
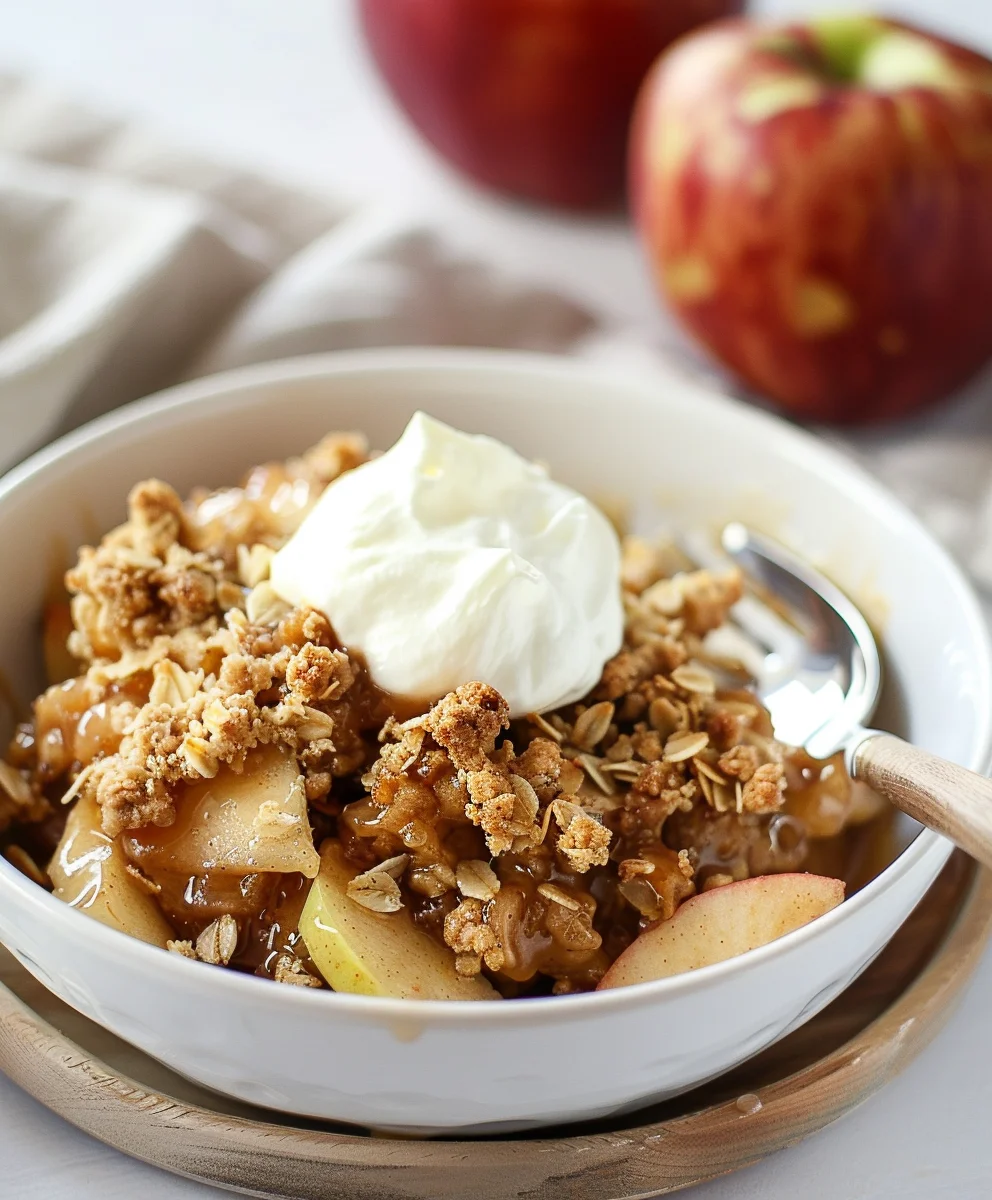
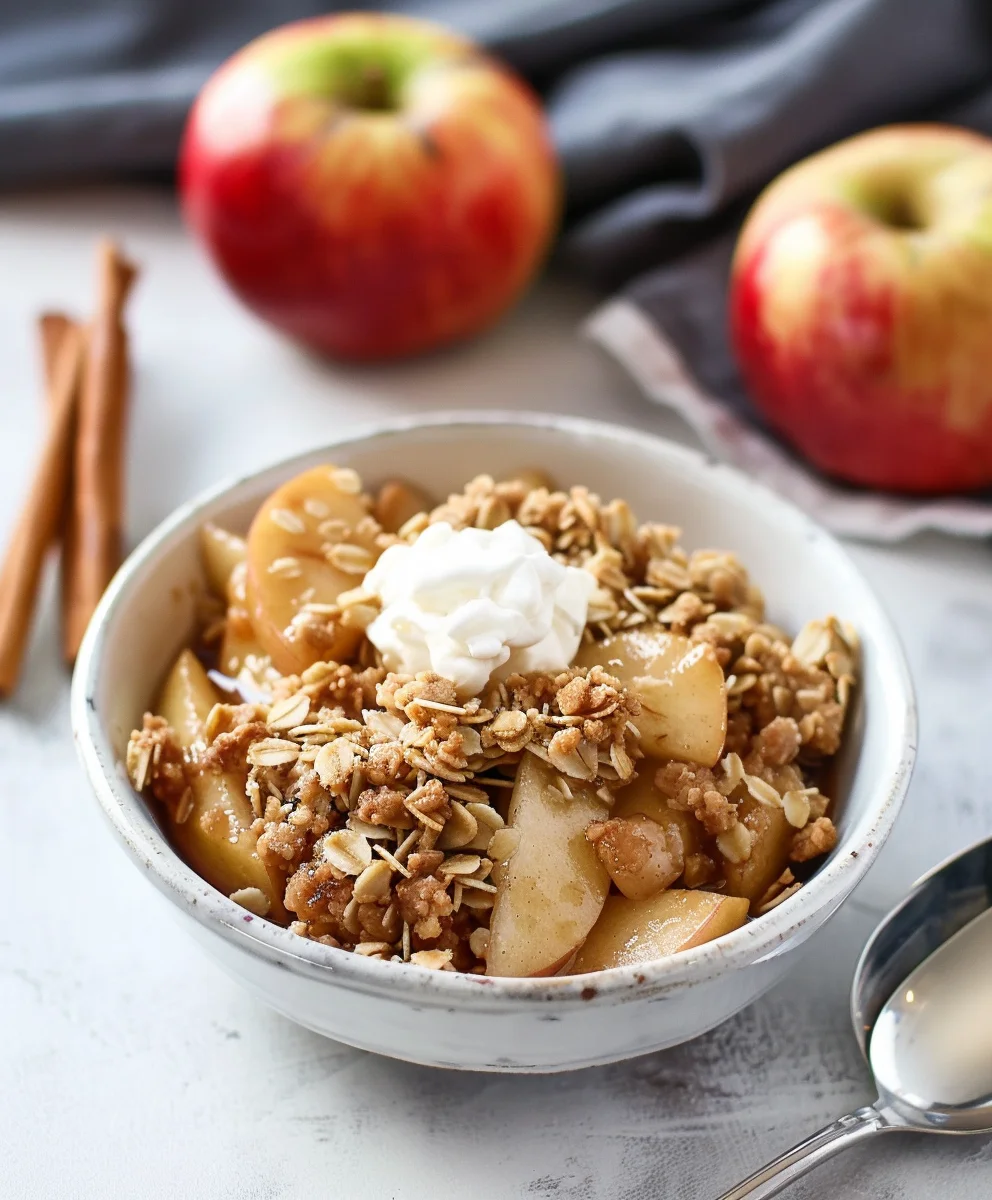
Apple Crisp is more than just a dessert; it’s a warm embrace, a sweet symphony of flavors that evokes pure comfort with every single bite. Imagine golden, tender apples, gently spiced with cinnamon and nutmeg, bubbling beneath a delectable, buttery oat topping that bakes to a perfect golden crunch. The mere aroma filling your kitchen is enough to transport you to a cozy autumn afternoon, regardless of the season.
This quintessential American dessert has graced countless tables, particularly during fall harvests and holiday gatherings. While its precise origins are a bit hazy, often linked to wartime rationing when pies were more elaborate, the simple elegance of an Apple Crisp quickly cemented its place as a beloved staple. I find that people adore this dish not only for its incredible taste—the perfect balance of tart fruit and sweet, crunchy streusel—but also for its inviting texture contrast and relative ease of preparation compared to its pastry-clad cousins. It’s a forgiving recipe, yielding consistently delightful results that are perfect on its own or elevated with a scoop of vanilla bean ice cream. There’s a heartwarming nostalgia woven into every serving, making it an enduring favorite across generations.
Ingredients:
- For the Apple Filling:
- 6-8 medium-sized apples (about 2.5 – 3 pounds), a mix of sweet and tart varieties like Honeycrisp, Granny Smith, Fuji, or Gala works beautifully for a balanced flavor in your Apple Crisp.
- 1/2 cup granulated sugar (adjust based on apple sweetness and personal preference).
- 1/4 cup packed light brown sugar, adding a lovely molasses note.
- 1 tablespoon all-purpose flour or cornstarch, to help thicken the juices and prevent a watery filling.
- 1 teaspoon ground cinnamon, for that classic warm spice.
- 1/4 teaspoon ground nutmeg, complementing the cinnamon perfectly.
- 1/8 teaspoon ground allspice (optional, but adds depth).
- 1 tablespoon fresh lemon juice, to brighten the flavors and prevent apples from browning.
- 2 tablespoons water (optional, if apples are not very juicy).
- For the Crisp Topping:
- 1 cup all-purpose flour, providing the structure for our delicious crumb.
- 1/2 cup old-fashioned rolled oats (do not use instant oats, as they will become mushy). These give our Apple Crisp its signature texture.
- 1/2 cup granulated sugar, for sweetness.
- 1/2 cup packed light brown sugar, for added depth and moisture.
- 1 teaspoon ground cinnamon, echoing the spice in the filling.
- 1/4 teaspoon salt, to balance the sweetness and enhance flavors.
- 1/2 cup (1 stick) unsalted butter, very cold and cut into small cubes. This is crucial for a perfectly crumbly topping.
- For Serving (Optional):
- Vanilla bean ice cream
- Whipped cream
- Caramel sauce
Preparing the Apple Filling
- Choose Your Apples Wisely: The foundation of an exceptional Apple Crisp lies in the apples themselves. I always recommend using a combination of apples to achieve a complex flavor profile – some tartness to cut through the sweetness, and some sweetness for overall balance. For example, Granny Smith offers a lovely tart bite and holds its shape well, while Honeycrisp or Fuji provide a wonderful sweetness and crisp texture. Gala and Golden Delicious are also fantastic choices. If you only have one type, that’s perfectly fine, but aiming for a mix truly elevates the experience. You’ll want approximately 2.5 to 3 pounds, which usually translates to 6-8 medium-sized apples.
- Peel, Core, and Slice: This is arguably the most time-consuming part, but it’s worth every moment. First, peel all your chosen apples using a sharp vegetable peeler. Then, core them – an apple corer makes this quick, but a paring knife works just as well. Once peeled and cored, slice the apples into uniform pieces, about 1/4 to 1/2 inch thick. I prefer slightly thinner slices because they cook down more evenly and become wonderfully tender without being mushy. If your slices are too thick, they might still be firm when the topping is perfectly golden.
- Combine with Flavorings: In a large mixing bowl, combine your sliced apples. Now, it’s time to infuse them with flavor. Sprinkle over the granulated sugar and light brown sugar. The brown sugar not only sweetens but also adds a rich, molasses-like depth that is essential to any great Apple Crisp. Next, add the all-purpose flour or cornstarch. This seemingly small addition is actually quite mighty; it helps to absorb excess moisture released by the apples during baking, creating a beautifully thick and luscious filling instead of a watery mess.
- Spice it Up: Add the ground cinnamon, ground nutmeg, and the optional pinch of ground allspice. These spices are the heart of a comforting apple dessert, creating that warm, inviting aroma and taste that we all associate with autumn baking. The cinnamon and nutmeg are non-negotiable for me!
- A Splash of Lemon: Drizzle the fresh lemon juice over the apples. Don’t skip this step! The lemon juice does a couple of important things: it prevents the apples from browning excessively (keeping them looking fresh and appealing), and more importantly, it brightens the flavors of the apples and spices, preventing the dish from becoming overly sweet or one-dimensional.
- Toss Gently but Thoroughly: Using a large spoon or your clean hands, gently toss all the ingredients together until the apples are evenly coated with the sugars, flour, and spices. Make sure every slice gets a little love! At this point, you might notice some moisture forming at the bottom of the bowl; this is perfectly normal and will contribute to the delicious filling. If your apples seem particularly dry, you can add 1-2 tablespoons of water, but usually, the apples release enough of their own juices. Set the apple filling aside while you prepare the topping.
Crafting the Irresistible Crisp Topping
- Gather Dry Ingredients: In a separate medium-sized mixing bowl, combine all the dry ingredients for the crisp topping. This includes the all-purpose flour, old-fashioned rolled oats, granulated sugar, packed light brown sugar, ground cinnamon, and a pinch of salt. The rolled oats are key here; they provide that wonderful chewy texture and rustic charm that defines an Apple Crisp. Avoid instant oats, as they will dissolve and become mushy.
- Whisk to Combine: Use a whisk or a fork to thoroughly mix these dry ingredients together. You want to ensure that the sugars, flour, and spices are evenly distributed, so you don’t end up with pockets of plain flour or overly sweet spots in your topping. This also helps to aerate the flour slightly.
- The Cold Butter Secret: Now for the most crucial step in achieving a truly “crisp” topping: adding the butter. Take your very cold, unsalted butter (1 stick or 1/2 cup), which you’ve already cut into small cubes. It’s paramount that the butter is as cold as possible. Cold butter prevents it from fully melting into the dry ingredients too quickly, which is what creates those delightful pockets of steam during baking, leading to a light, crumbly, and crispy texture. If the butter is soft or warm, it will blend too easily and result in a denser, less crisp topping.
-
Incorporate the Butter: There are a few excellent methods for incorporating the butter:
- Using a Pastry Blender: This is my preferred method. Use a pastry blender to cut the cold butter into the dry ingredients. Work quickly, pressing and twisting the blender through the mixture, until the butter pieces are about the size of small peas or coarse crumbs.
- Using Your Fingertips: If you don’t have a pastry blender, your fingertips are an excellent tool. Rub the butter into the flour mixture between your thumb and fingers. Work quickly to prevent the butter from warming up too much from the heat of your hands. Continue until the mixture resembles coarse crumbs, with some pieces of butter still visible.
- Using a Food Processor (with caution): For a very quick method, you can pulse the dry ingredients and cold butter in a food processor. Be very careful not to over-process, or you’ll end up with a paste rather than a crumbly topping. Use short pulses, just until coarse crumbs form.
- Achieving the Right Texture: The goal is to have a mixture that looks like coarse crumbs, with some pieces of butter still visible, ranging from the size of small peas down to fine sand. When you gently squeeze a handful, it should hold together slightly, but then easily crumble apart. This texture is what gives your Apple Crisp its signature crispness and prevents it from becoming uniformly hard or sandy. Set the topping aside.
Assembling and Baking Your Apple Crisp
- Preheat Your Oven: Preheat your oven to 375°F (190°C). This temperature is ideal for ensuring the apples cook through and soften while the topping gets beautifully golden and crisp. Make sure your oven rack is in the middle position for even baking.
- Prepare Your Baking Dish: Lightly grease a 9×13-inch baking dish (or an equivalent 2.5-3 quart dish) with butter or cooking spray. This prevents the baked-on sugars from sticking and makes cleanup much easier.
- Layer the Apple Filling: Pour your prepared apple filling into the greased baking dish. Spread the apples out evenly in a single layer. Don’t worry if the dish seems quite full; the apples will cook down considerably as they bake, releasing their juices and softening.
- Evenly Distribute the Crisp Topping: Generously sprinkle the prepared crisp topping evenly over the apple layer. Try to get a good, consistent layer across the entire surface. You want every bite of your Apple Crisp to have that perfect balance of tender apples and crumbly, sweet topping. If you have any larger clumps of topping, gently break them up with your fingers as you sprinkle.
-
Bake to Golden Perfection: Place the baking dish in the preheated oven. Bake for 45-60 minutes, or until the topping is a beautiful golden brown and the apple filling is bubbling vigorously around the edges.
Signs of Doneness:
The visual cues are important:
- Golden Brown Topping: The most obvious sign. You want a deep golden hue, not just pale yellow.
- Bubbling Filling: Look for the apple juices actively bubbling up through the topping, especially along the sides of the dish. This indicates that the apples are thoroughly cooked and the sugars are caramelized.
- Tender Apples: If you’re unsure, you can carefully insert a thin, sharp knife into the center of the crisp (through a gap in the topping) to test the tenderness of the apples. They should yield easily.
If the topping starts to brown too quickly before the apples are tender, you can loosely tent the dish with aluminum foil for the last 15-20 minutes of baking.
- Cool Before Serving: Once baked, carefully remove the Apple Crisp from the oven and place it on a wire rack to cool. This cooling step is crucial. While it’s tempting to dig right in, allowing it to cool for at least 15-20 minutes (or even longer) allows the filling to set and thicken properly. If you serve it immediately, the filling will be very hot and runny. The topping also becomes crispier as it cools slightly.
Serving Suggestions and Storage
-
The Perfect Serve: This homemade Apple Crisp is truly a delight on its own, warm and fragrant straight from the oven. However, to elevate the experience, I highly recommend serving it à la mode with a generous scoop of good quality vanilla bean ice cream. The cold, creamy ice cream melting into the warm, spiced apples and crisp topping is simply heavenly – a classic pairing for a reason! Other delicious additions include a dollop of freshly whipped cream, a drizzle of warm caramel sauce, or even a sprinkle of chopped toasted pecans for added crunch. The versatility of this dessert means you can tailor it to your personal preferences.
Tips for a Crowd:
If you’re serving a larger group, you can prepare individual portions by baking the crisp in ramekins or small oven-safe dishes. Adjust baking time accordingly, as smaller portions will cook faster.
-
Storage Instructions:
- Room Temperature: If you anticipate finishing the Apple Crisp within a day, you can store it loosely covered with foil or plastic wrap at room temperature. The topping might lose a little of its crispness, but the flavors will still be wonderful.
- Refrigeration: For longer storage, transfer any leftover Apple Crisp to an airtight container and refrigerate for up to 3-4 days. The topping will soften significantly in the fridge, but the flavors will meld beautifully.
- Freezing: You can also freeze baked Apple Crisp. Allow it to cool completely, then wrap the dish tightly with plastic wrap and then aluminum foil. It can be frozen for up to 3 months. Thaw overnight in the refrigerator before reheating.
-
Reheating for Freshness:
To bring your stored Apple Crisp back to its delicious best, especially if you want to restore some of that crispy topping, reheating is key.- Oven Reheat: My preferred method for reheating. Preheat your oven to 300°F (150°C). Place the crisp (uncovered, or covered loosely if you’re worried about too much browning) directly in the oven for about 15-25 minutes, or until warmed through and the topping has re-crisped to your liking. This is particularly effective for refrigerated leftovers.
- Microwave Reheat: If you’re in a hurry and not concerned about the crispness of the topping, individual portions can be reheated in the microwave for 30-60 seconds, or until warm. Just be aware that the topping will remain soft.
-
Troubleshooting Common Apple Crisp Issues:
Even seasoned bakers can run into snags, but most are easily remedied!- Soggy Bottom/Watery Filling: This often happens if the apples are very juicy or if not enough flour/cornstarch was used in the filling. To prevent this, ensure you use the specified amount of thickening agent. If it happens, you can try baking for a little longer, uncovered, to allow some of the moisture to evaporate. Next time, consider pre-cooking your apples slightly on the stovetop before adding them to the dish, especially if you know they’re very juicy.
- Topping Not Crispy Enough: This can be due to not using cold enough butter, overworking the butter into the flour (leading to a paste-like texture), or not baking long enough. Ensure your butter is ice-cold and aim for that coarse crumb texture. If your topping is still soft, try baking for an additional 10-15 minutes, or until deeply golden.
- Topping Burning Before Apples Are Done: If your topping is browning too quickly, simply tent the dish loosely with aluminum foil. This will shield the topping from direct heat while allowing the apples underneath to continue cooking to perfect tenderness.
With these tips, you’re well on your way to creating a truly spectacular homemade Apple Crisp that will be remembered and requested for years to come. Enjoy the process and the delicious results!
Conclusion:
This recipe isn’t just another dessert; it’s an experience. I’ve poured my heart into perfecting this version, ensuring that each bite delivers that nostalgic warmth you crave. The blend of tender, spiced apples beneath a crunchy, buttery oat topping creates a symphony of textures and flavors that truly defines comfort food. It’s surprisingly simple to put together, making it an ideal choice whether you’re a seasoned baker or just starting out in the kitchen. The aroma alone, wafting through your home as it bakes, is enough to gather everyone around, drawing them in with promises of deliciousness. This is the kind of dish that whispers tales of cozy evenings, family gatherings, and pure, unadulterated joy. I truly believe this particular recipe stands out because it strikes the perfect balance – not too sweet, not too tart, with a topping that offers an incredibly satisfying crunch without being dry or overly dense. It truly embodies what a perfect dessert should be: comforting, delicious, and memorable. You’re not just making a dish; you’re creating a moment. This is why I consider this to be my absolute go-to for a quintessential autumnal – or any-time-of-year, really! – treat. Prepare to fall in love with its irresistible charm.
Serving Suggestions and Creative Variations:
Now, let’s talk about taking your creation to the next level! While absolutely delightful on its own, a warm bowl of this straight from the oven truly sings when paired with a generous scoop of premium vanilla bean ice cream. The cold, creamy ice cream melting into the warm, fruit-filled goodness is a combination that simply cannot be beaten. If ice cream isn’t your preference, a dollop of freshly whipped cream, perhaps lightly sweetened with a touch of maple syrup or a dash of cinnamon, also makes for an exquisite accompaniment. For something a little different, consider serving it with a silky homemade custard or even a drizzle of rich caramel sauce for an extra layer of indulgence. Each option enhances the experience in its own unique way.
Beyond serving, don’t be afraid to experiment with the recipe itself! While I adore the classic apple combination, this recipe is incredibly forgiving and truly invites your personal touch. You could mix things up by using a blend of different apples – perhaps adding a few Granny Smiths for tartness alongside sweeter Honeycrisps or Fujis to create a more complex flavor profile. Feel free to introduce other fruits too; a handful of fresh cranberries can add a lovely tang and a burst of vibrant color, or some diced pears could lend a different subtle sweetness and melt-in-your-mouth texture. For those who love a nutty crunch, folding in some chopped pecans or walnuts into the topping mixture adds another dimension of texture and flavor that is truly delightful, complementing the oats perfectly. Spice it up further with a pinch of nutmeg, allspice, or even a touch of ground cloves if you’re feeling adventurous and want to lean into those warm, autumnal notes. And for dietary considerations, this recipe is surprisingly adaptable. You can easily make it gluten-free by swapping out the all-purpose flour for a cup-for-cup gluten-free flour blend and ensuring your oats are certified gluten-free. For a vegan version, simply substitute the butter with a high-quality plant-based butter alternative and ensure any serving suggestions (like ice cream or whipped cream) are also plant-based. The essence of the dish remains, just tweaked to fit various preferences. The beauty of this dessert lies in its versatility and its ability to be customized to your exact liking, making it a truly personal creation every time.
I genuinely hope that reading through this has inspired you to preheat your oven and dive into making this wonderful dessert. There’s a unique satisfaction that comes from baking something from scratch, especially when the end result is as comforting and universally loved as this. I truly believe that once you try my rendition of this classic, it will quickly become a cherished part of your own recipe repertoire. Don’t hesitate to gather your ingredients and set aside an afternoon; I promise the effort is minimal and the reward is immense. Imagine the smiles it will bring to your family and friends, or the pure contentment you’ll feel as you enjoy a quiet moment with a warm bowl. This isn’t just about following instructions; it’s about embracing the joy of creation and the pleasure of sharing good food. Once you’ve baked your own delicious batch, I would absolutely love to hear about your experience! Did you stick to the original recipe, or did you put your own spin on it with a creative variation? What apples did you use? How did you serve it? Please share your photos, your stories, and your thoughts. Your feedback and creations truly make my day and help build a wonderful community of food lovers. Tag me in your posts, or simply drop a comment below. I can’t wait to see your beautiful creations and hear how much you loved this particular Apple Crisp. Go on, give it a try. Your taste buds, and your loved ones, will thank you!
Delicious Apple Crisp Recipe: Easy & Comforting Dessert
Apple Crisp is more than just a dessert; it’s a warm embrace, a sweet symphony of flavors that evokes pure comfort with every single bite. Imagine golden, tender apples, gently spiced with cinnamon and nutmeg, bubbling beneath a delectable, buttery oat topping that bakes to a perfect golden crunch. The mere aroma filling your kitchen is enough to transport you to a cozy autumn afternoon, regardless of the season.
Ingredients
-
3 lbs apples (e.g., Granny Smith, Pink Lady), peeled, cored, and sliced
-
1/2 cup granulated sugar
-
1 tbsp fresh lemon juice
-
1 tbsp cornstarch
-
1 tbsp ground cinnamon, divided
-
1/2 cup unsalted butter, very cold and cubed (or melted coconut oil for vegan option)
-
1 cup old-fashioned rolled oats
-
1 cup all-purpose flour (or gluten-free 1:1 flour / almond flour for GF option)
-
1/3 cup packed brown sugar
-
1/4 tsp salt
Instructions
-
Step 1
Preheat oven to 375°F (190°C). Lightly grease a 9×13-inch baking dish. -
Step 2
Peel, core, and slice apples into 1/4 to 1/2-inch thick pieces. In a large bowl, combine sliced apples with granulated sugar, cornstarch, 1/2 tbsp ground cinnamon, and lemon juice. Toss until evenly coated. -
Step 3
In a separate medium bowl, whisk together all-purpose flour, rolled oats, brown sugar, the remaining 1/2 tbsp ground cinnamon, and salt. Cut in the very cold, cubed butter (or vegan substitute) using a pastry blender or fingertips until the mixture resembles coarse crumbs. -
Step 4
Pour the apple filling into the greased baking dish, spreading evenly. Generously sprinkle the prepared crisp topping over the apple layer. Bake for 45-60 minutes, or until the topping is golden brown and the apple filling is bubbling vigorously around the edges. If the topping browns too quickly, loosely tent the dish with aluminum foil. -
Step 5
Remove from oven and let cool on a wire rack for at least 15-20 minutes to allow the filling to set. Serve warm, optionally with vanilla bean ice cream, whipped cream, or caramel sauce.
Important Information
Nutrition Facts (Per Serving)
It is important to consider this information as approximate and not to use it as definitive health advice.
Allergy Information
Please check ingredients for potential allergens and consult a health professional if in doubt.


Leave a Comment