
Salted Caramel Cookie Recipe is not just a collection of ingredients; it’s my invitation to pure, unadulterated bliss. Imagine a cookie that perfectly balances the rich, buttery sweetness of caramel with a surprising whisper of sea salt, all encased in a soft, chewy texture that simply melts in your mouth. This isn’t merely a treat; it’s an experience, a symphony of flavors I’m thrilled to share, designed to captivate your taste buds from the very first bite.
The magic of salted caramel, a flavor combination that has captivated gourmands for decades, first gained widespread adoration from French “caramel au beurre salé” and has since evolved into a global phenomenon, particularly in the realm of desserts. People adore this exquisite blend because the touch of salt doesn’t just contrast the sweetness; it amplifies it, creating a depth of flavor that is both comforting and sophisticated. My meticulously crafted Salted Caramel Cookie Recipe captures this beloved essence, offering a delightful chewiness, pockets of gooey caramel, and that essential sprinkle of flaky sea salt that elevates every aspect. Get ready to bake a batch that will undoubtedly become a treasured favorite in your home.
Ingredients:
-
For the Salted Caramel Sauce:
- 1 cup (200g) granulated sugar
- 1/4 cup (60ml) water
- 6 tablespoons (85g) unsalted butter, cut into 6 pieces, at room temperature
- 1/2 cup (120ml) heavy cream, warmed slightly
- 1 teaspoon vanilla extract
- 1/2 teaspoon flaky sea salt, plus more for sprinkling
-
For the Cookies:
- 2 1/4 cups (270g) all-purpose flour
- 1 teaspoon baking soda
- 1/2 teaspoon fine sea salt
- 1 cup (226g) unsalted butter, softened to room temperature
- 3/4 cup (150g) granulated sugar
- 3/4 cup (150g) packed light brown sugar
- 2 large eggs, at room temperature
- 1 teaspoon vanilla extract
Preparing the Salted Caramel Sauce:
Making your own salted caramel for these cookies might seem like an extra step, but trust me, the depth of flavor and the gooey texture it provides is absolutely worth it. This homemade caramel truly elevates our Salted Caramel Cookie Recipe to another level.
- First things first, let’s get our ingredients ready. Measure out your sugar, water, butter, heavy cream, vanilla, and salt. Make sure your butter is at room temperature and cut into pieces, and your heavy cream is slightly warmed. You can achieve this by gently heating it in the microwave for 15-20 seconds or in a small saucepan over low heat. Having everything prepped will make the process much smoother, as caramel waits for no one!
- In a medium-sized, heavy-bottomed saucepan, combine the granulated sugar and water. Place the pan over medium heat. Stir just until the sugar is dissolved. Once the sugar has dissolved and the mixture begins to boil, stop stirring completely. Stirring at this point can cause the sugar to crystallize, which will ruin the smooth texture of your caramel.
- Allow the sugar mixture to boil undisturbed. Watch it carefully as it changes color. It will first become clear, then develop a light amber hue, gradually darkening to a rich, deep amber, almost the color of a penny. This typically takes about 8-12 minutes, but it can happen quickly towards the end. Do not let it get too dark, as it will taste burnt. If you have a candy thermometer, aim for about 340-350°F (170-175°C).
- Once the sugar reaches that beautiful deep amber color, immediately and carefully remove the pan from the heat. This is a crucial step for preventing it from burning.
- Now, swiftly but carefully add the room-temperature butter pieces to the hot sugar. The mixture will bubble up vigorously, and you might hear a hissing sound. This is completely normal. Whisk constantly until all the butter has melted and is fully incorporated into the sugar. The mixture will look a bit separated at first, but keep whisking, and it will come together beautifully.
- Next, very slowly and carefully pour the warmed heavy cream into the caramel while whisking continuously. Be extremely cautious, as the mixture will bubble up even more intensely and release a lot of steam. Continue to whisk until the cream is fully combined and the caramel is smooth. If you find any small lumps, don’t worry, they will usually dissolve as you whisk.
- Finally, stir in the vanilla extract and the 1/2 teaspoon of flaky sea salt. Give it a good whisk to ensure everything is evenly distributed.
- Pour the finished salted caramel sauce into a heatproof bowl or jar. Allow it to cool completely at room temperature, then cover it and refrigerate for at least 2-3 hours, or preferably overnight, until it is firm enough to handle and scoop. This chilling step is absolutely essential for creating that perfectly gooey, contained caramel center in our cookies. Without it, the caramel would melt out during baking.
Preparing the Cookie Dough:
Now that our magnificent salted caramel is chilling, let’s turn our attention to the heart of our Salted Caramel Cookie Recipe: the perfectly chewy, slightly crisp cookie dough. The secret to a fantastic cookie often lies in the quality of your ingredients and how they are handled.
- In a medium bowl, whisk together the all-purpose flour, baking soda, and fine sea salt. Whisking ensures these dry ingredients are thoroughly combined and evenly distributed, which is important for the cookie’s texture and rise. Set this aside for a moment.
- In a large bowl, using an electric mixer (either a stand mixer with the paddle attachment or a hand-held mixer), cream together the softened unsalted butter, granulated sugar, and light brown sugar. We want to beat this mixture on medium speed until it is light, fluffy, and pale in color, which usually takes about 3-5 minutes. This creaming process is vital because it incorporates air into the butter and sugar, creating pockets that will expand during baking, contributing to a lighter, softer cookie texture. Don’t rush this step! Scrape down the sides of the bowl as needed to ensure everything is evenly mixed.
- Add the large eggs, one at a time, beating well after each addition. After the first egg is fully incorporated, add the second. Then, beat in the vanilla extract. Continue to beat until the mixture is smooth and well combined, again scraping down the sides of the bowl to catch any unincorporated ingredients.
- Gradually add the dry ingredients mixture (flour, baking soda, and salt) to the wet ingredients. Do this in two or three additions, mixing on low speed until just combined. Be careful not to overmix the dough once the flour is added. Overmixing develops the gluten in the flour too much, which can result in tough cookies. Stop mixing as soon as you see no more streaks of flour. A few small flour streaks are perfectly fine; they’ll disappear during the next step.
- At this point, the cookie dough will be soft. Cover the bowl with plastic wrap and refrigerate the dough for at least 1 hour, or up to 24 hours. Chilling the cookie dough is incredibly important for several reasons. Firstly, it allows the flavors to meld and deepen, resulting in a more complex and delicious cookie. Secondly, it solidifies the butter, which helps prevent the cookies from spreading too much during baking, ensuring they retain their shape and a desirable thickness. Thirdly, it makes the dough much easier to handle when we’re ready to stuff them with caramel. This waiting period is tough, but it’s a non-negotiable step for truly outstanding results in our Salted Caramel Cookie Recipe.
Assembling and Baking the Salted Caramel Cookies:
The moment of truth is almost here! With our perfectly chilled caramel and rich cookie dough ready, we’re on the home stretch to creating the most incredible cookies you’ve ever tasted. This stage requires a bit of finesse, but I promise the effort is minimal compared to the delicious reward. You’re about to see why this Salted Caramel Cookie Recipe is a true showstopper.
- Preheat your oven to 375°F (190°C). Line two large baking sheets with parchment paper or silicone baking mats. This is essential for non-stick baking and easy cleanup.
- Take your chilled cookie dough and salted caramel sauce out of the refrigerator. The caramel should be quite firm at this point, almost like a soft candy.
- Using a 1.5-tablespoon cookie scoop (or just about 2 tablespoons of dough), scoop out a portion of the cookie dough. Flatten it slightly in the palm of your hand to form a disc, roughly 2-3 inches in diameter.
- Now, scoop about 1 teaspoon of the firm, chilled salted caramel and place it directly in the center of the flattened cookie dough disc. It’s important that the caramel is cold and firm; if it’s too soft, it will be messy and difficult to enclose.
- Carefully bring the edges of the cookie dough up and around the caramel, completely enclosing it. Pinch the seams together firmly to seal the caramel inside. Gently roll the dough in your hands to form a smooth, uniform ball. Ensuring the caramel is fully sealed is critical to prevent it from leaking out during baking. If there are any cracks, gently press them closed.
- Place the sealed cookie dough balls onto the prepared baking sheets, leaving about 2 inches between each cookie. They will spread a bit. Depending on the size of your baking sheets, you might fit 6-8 cookies per sheet.
- Bake one sheet at a time in the preheated oven for 10-12 minutes, or until the edges are golden brown and the centers are still slightly soft and puffy. The cookies will continue to set as they cool. If you bake them for too long, they might lose some of that wonderful chewiness. Remember, every oven is different, so keep an eye on them starting around the 9-minute mark.
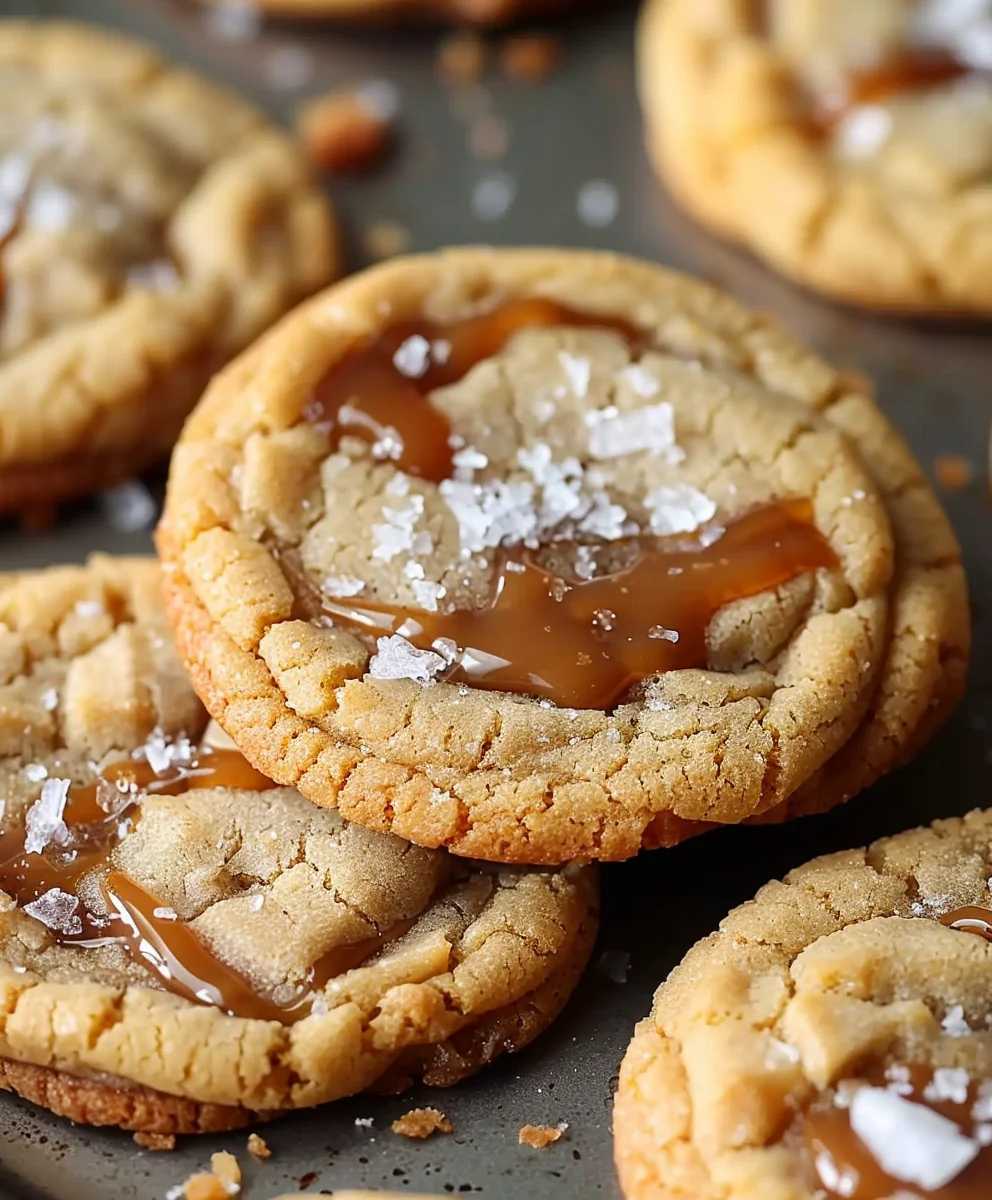
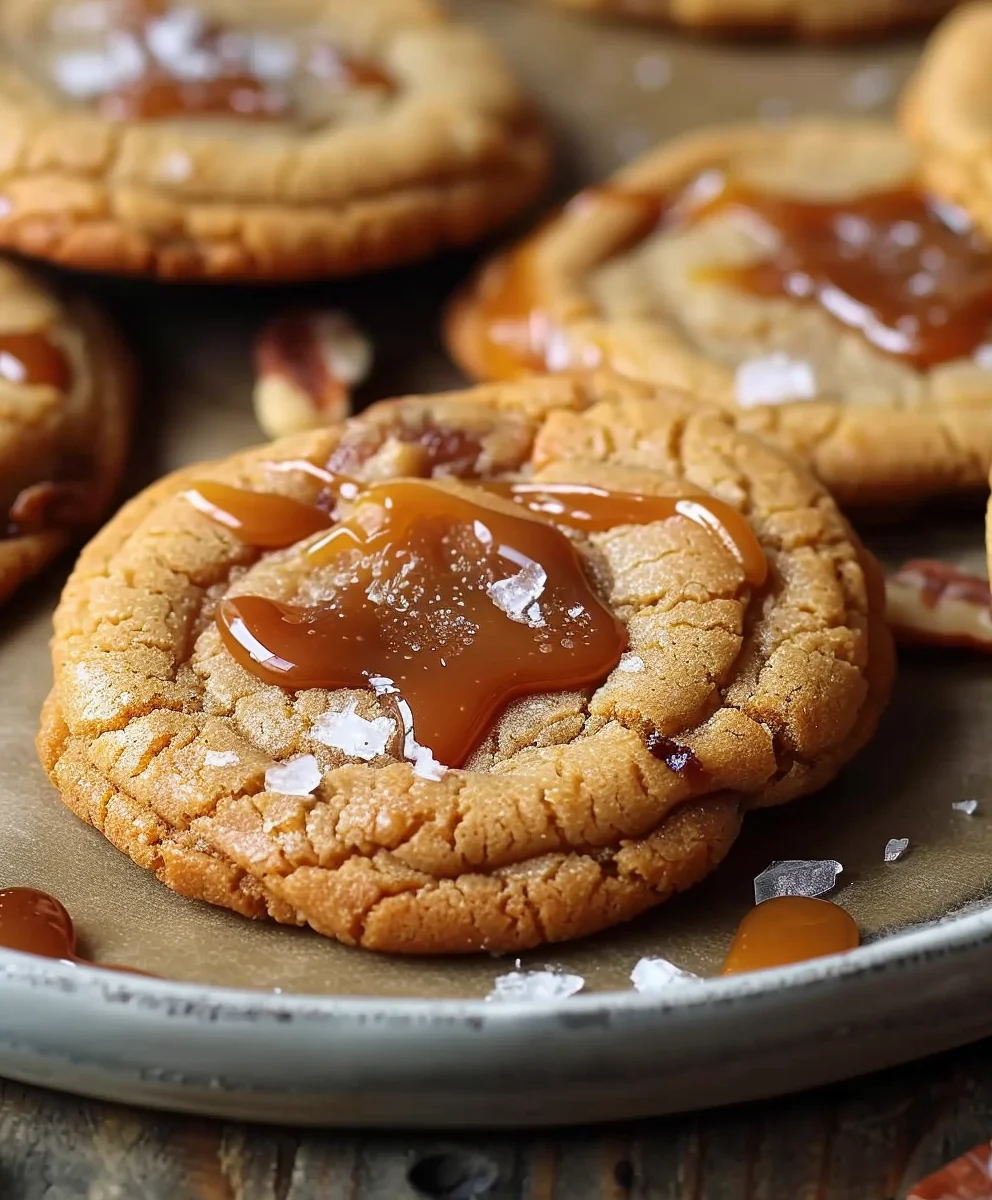
- As soon as you remove the cookies from the oven, and while they are still warm, immediately sprinkle a tiny pinch of flaky sea salt over the top of each cookie. This enhances the “salted” aspect of our Salted Caramel Cookie Recipe and adds a beautiful textural contrast. The warmth of the cookie helps the salt adhere.
- Let the cookies cool on the baking sheets for about 5 minutes before carefully transferring them to a wire rack to cool completely. Allowing them to cool on the baking sheet helps them set up without breaking. While it’s tempting to dive right in, letting them cool fully helps the caramel to firm up just enough to be gloriously gooey rather than scorching hot liquid.
Tips for the Perfect Salted Caramel Cookie:
Achieving the perfect Salted Caramel Cookie Recipe every time involves a few key considerations that can elevate your baking from good to absolutely phenomenal. These little insights can make all the difference, ensuring your cookies are a consistently delicious treat.
- Room Temperature Ingredients are Key: I cannot stress this enough for both the cookie dough and the caramel. Softened butter creams beautifully with sugar, creating those crucial air pockets. Room temperature eggs emulsify better into the mixture, creating a smoother dough. And for the caramel, room temperature butter helps it incorporate without seizing, while slightly warmed cream reduces the thermal shock, making for a smoother, less lumpy caramel. Plan ahead and take your ingredients out of the fridge at least an hour or two before you start.
- Don’t Rush the Caramel: Making caramel requires patience and attention. Watch the color carefully and don’t stir once the sugar starts boiling. If you’re nervous about making caramel from scratch, you can absolutely use a high-quality store-bought caramel for stuffing. Just make sure it’s a thick, firm caramel, not a thin sauce, and chill it thoroughly before attempting to scoop and enclose it. The firmer, the better for preventing leaks during baking.
- Chilling the Dough and Caramel is Non-Negotiable: This is arguably the most important tip for this specific Salted Caramel Cookie Recipe. Chilling the caramel until it’s firm allows it to be scooped and encapsulated without melting immediately. Chilling the cookie dough helps prevent excessive spreading in the oven, ensuring your cookies have that desirable chewiness and thickness, and keeps the butter from melting too quickly. It also allows the flavors to deepen. If you skip these steps, you’ll likely end up with flat cookies and molten caramel seeping everywhere.
- Precision in Measuring: Especially for the flour, I highly recommend using a kitchen scale. Too much flour can lead to dry, crumbly cookies, while too little can make them spread too much. One cup of all-purpose flour typically weighs around 120-125 grams. For liquid ingredients, use liquid measuring cups at eye level.
- Don’t Overbake: For soft and chewy cookies, it’s always better to slightly underbake than overbake. The cookies should look set around the edges but still appear a bit soft and puffy in the center. They will continue to cook and set on the hot baking sheet once removed from the oven. Overbaking is the quickest way to dry out your cookies and lose that delightful chewy texture.
- The Power of Flaky Sea Salt: That final sprinkle of flaky sea salt on top of the warm cookies isn’t just for aesthetics. It provides a crucial burst of contrasting flavor that balances the sweetness of the caramel and the cookie, truly living up to the “salted caramel” name. Don’t skip it!
- Storage: Once completely cooled, store your Salted Caramel Cookies in an airtight container at room temperature for up to 3-4 days. For longer storage, you can freeze them for up to 2 months. Thaw them at room temperature, or warm them slightly in the microwave for a few seconds for that fresh-baked, gooey caramel experience.
- Experiment with Sizes: While I’ve given a recommended scoop size, you can adjust it to your preference. Just remember that larger cookies will require a longer baking time, and smaller cookies will bake faster. Always adjust your baking time accordingly and watch for those golden edges.
Conclusion:
As we come to the end of our delightful journey, I truly hope you’re feeling as excited as I am about this incredible confection. This isn’t just another cookie; it’s an experience, a moment of pure bliss that elevates the simple pleasure of baking into something truly extraordinary. I’ve poured my heart into perfecting this particular creation, and I genuinely believe it’s a recipe that deserves a special place in your baking repertoire. The unparalleled combination of chewy centers, slightly crisp edges, and that luxurious, buttery caramel, all perfectly balanced with a delicate sprinkle of sea salt, creates a symphony of flavors and textures that is utterly irresistible. Trust me when I say, once you try this, you’ll understand why it quickly becomes a cherished favorite. It’s the kind of treat that elicits oohs and aahs, whether you’re serving it to discerning guests or simply indulging in a quiet moment of personal joy.
What makes this specific Salted Caramel Cookie Recipe so remarkable is its ability to deliver on every promise. It’s rich without being cloyingly sweet, complex yet comforting, and undeniably satisfying. I’ve found that these cookies are fantastic enjoyed warm, straight from the oven, when the caramel is still wonderfully gooey and stretches with each bite. Picture this: a cozy evening, a plate of these warm cookies, and a tall glass of cold milk, or perhaps a steaming mug of your favorite coffee or herbal tea. The contrast of the warm, sweet cookie with a cool, refreshing drink is simply heavenly. For a truly decadent dessert experience, try serving them à la mode, nestled alongside a scoop of premium vanilla bean ice cream. The melting ice cream mingling with the warm caramel and cookie crumbs is a match made in culinary heaven. You could also crumble them over ice cream sundaes or use them as a base for a unique cheesecake crust, adding an unexpected salty-sweet dimension to classic desserts.
But don’t stop there! This recipe, while perfect as is, also offers fantastic opportunities for playful variations. If you’re a chocolate lover, consider folding in a handful of dark chocolate chips or chunks into the dough before baking. The slight bitterness of the dark chocolate beautifully complements the sweet caramel. For an added textural crunch, a sprinkle of toasted pecans or walnuts can be incorporated, bringing an extra layer of nutty richness. Imagine swapping out the regular sea salt for a specialty flake salt like Maldon; its delicate crunch and pure flavor truly elevate the salted aspect. You could even get creative and make these into delightful cookie sandwiches by filling them with a luscious caramel cream cheese frosting or a simple ganache. Another fun idea is to turn them into cookie bars for an easier, slice-and-serve option, perfect for potlucks or larger gatherings. Simply press the dough into a rectangular baking dish, bake, cool, and slice into squares. The possibilities are genuinely endless, allowing you to tailor this sensational treat to your own tastes and preferences.
So, now it’s your turn! I genuinely encourage you to roll up your sleeves, gather your ingredients, and give this extraordinary recipe a try. Don’t be intimidated; the process is incredibly rewarding, and the results speak for themselves. There’s an undeniable satisfaction that comes from creating something so delicious from scratch, something that brings smiles to faces and joy to palates. Once you’ve baked your batch, I would absolutely love to hear about your experience. Did you make any fun variations? What did your family and friends think? Please don’t hesitate to share your thoughts, your successes, and perhaps even a photo or two with me. Your feedback and stories are what make this baking community so vibrant and inspiring. This isn’t just a recipe; it’s an invitation to create, to share, and to savor every single mouthwatering bite. Happy baking, my friends, and prepare to fall in love with your new favorite cookie!
Salted Caramel Cookie Recipe: Chewy, Sweet & Irresistible!
Salted Caramel Cookie Recipe is not just a collection of ingredients; it’s my invitation to pure, unadulterated bliss. Imagine a cookie that perfectly balances the rich, buttery sweetness of caramel with a surprising whisper of sea salt, all encased in a soft, chewy texture that simply melts in your mouth. This isn’t merely a treat; it’s an experience, a symphony of flavors I’m thrilled to share, designed to captivate your taste buds from the very first bite.
Ingredients
-
2 1/4 cups all-purpose flour
-
1 teaspoon baking soda
-
1 teaspoon salt
-
1 cup unsalted butter, softened
-
3/4 cup granulated sugar
-
3/4 cup packed light brown sugar
-
2 large eggs, room temperature
-
2 teaspoons vanilla extract
-
1 cup caramel chips
-
1/2 cup chocolate chips (optional)
-
1/2 teaspoon flaky sea salt, for sprinkling
Instructions
-
Step 1
In a medium bowl, whisk together the all-purpose flour, baking soda, and 1 teaspoon salt. Set aside. -
Step 2
In a large bowl, using an electric mixer, cream together the softened unsalted butter, granulated sugar, and light brown sugar on medium speed until light, fluffy, and pale (3-5 minutes). Scrape down the sides of the bowl. -
Step 3
Add the large eggs one at a time, beating well after each addition. Beat in the vanilla extract until smooth. -
Step 4
Gradually add the dry ingredients mixture to the wet, mixing on low speed until just combined. Be careful not to overmix. -
Step 5
Stir in the caramel chips and optional chocolate chips until evenly distributed. -
Step 6
Cover the bowl with plastic wrap and refrigerate the dough for at least 1 hour, or up to 24 hours. This chilling step is essential for flavor and texture. -
Step 7
Preheat your oven to 375°F (190°C). Line two large baking sheets with parchment paper or silicone baking mats. -
Step 8
Scoop about 1.5 tablespoons of chilled cookie dough per cookie. Place dough balls onto the prepared baking sheets, leaving about 2 inches between each. -
Step 9
Bake one sheet at a time for 10-12 minutes, or until the edges are golden brown and the centers are still slightly soft and puffy. -
Step 10
As soon as you remove the cookies from the oven, immediately sprinkle a tiny pinch of flaky sea salt over the top of each warm cookie. -
Step 11
Let the cookies cool on the baking sheets for about 5 minutes before transferring them to a wire rack to cool completely.
Important Information
Nutrition Facts (Per Serving)
It is important to consider this information as approximate and not to use it as definitive health advice.
Allergy Information
Please check ingredients for potential allergens and consult a health professional if in doubt.


Leave a Comment