
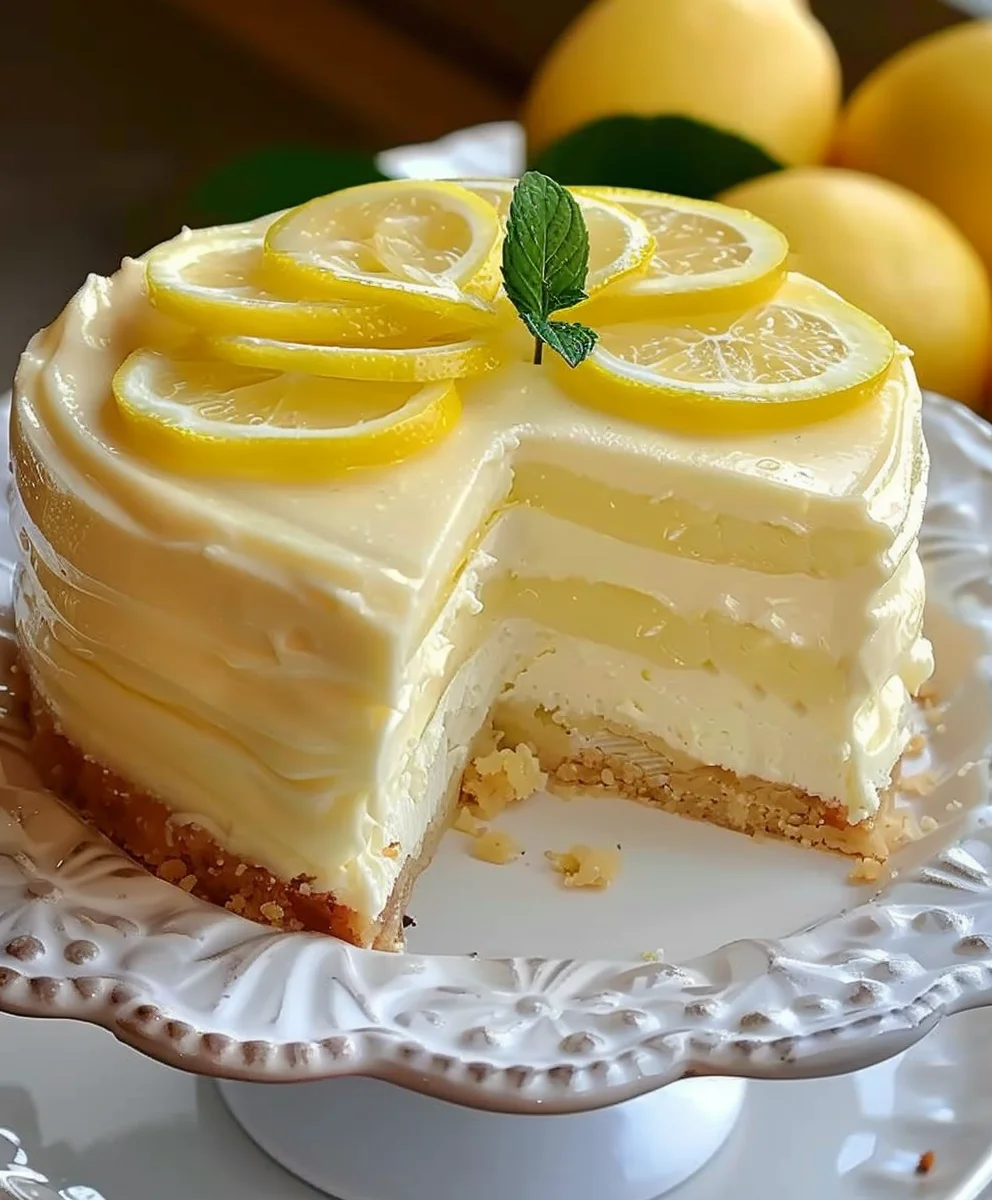
Lemon Cheesecake Delight Recipe Is A Must Try Dessert, and I am absolutely delighted to guide you through crafting this truly exquisite culinary masterpiece. Prepare yourself for a dessert experience that perfectly balances the rich indulgence of a classic cheesecake with the vibrant, sun-kissed zest of fresh lemons. This isn’t just any cheesecake; it’s a symphony of textures and flavors that will captivate your palate and leave a lasting impression on anyone fortunate enough to taste it.
While the humble cheesecake boasts a history stretching back to ancient Greece, evolving through Roman times and finding its modern fame in American kitchens, the addition of bright citrus has always been a celebrated enhancement. Our particular rendition celebrates this rich heritage, transforming a simple dessert into an elegant and refreshingly decadent creation. People adore this dish for its irresistible combination: a crisp, golden graham cracker crust, a luxuriously smooth and creamy filling, and that delightful tang from the lemon that cuts through the richness beautifully, making each bite utterly refreshing.
Why This Lemon Cheesecake Stands Out
It’s the ultimate crowd-pleaser, surprisingly easy to prepare yet undeniably impressive. Whether you’re hosting a sophisticated dinner party or simply craving a moment of pure bliss, this Lemon Cheesecake Delight Recipe Is A Must Try Dessert that promises to deliver an unforgettable taste sensation every single time.
Ingredients:
- For the Graham Cracker Crust:
- 1 ½ cups (about 15-18 full sheets) graham cracker crumbs (finely crushed)
- ¼ cup granulated sugar
- ½ teaspoon ground cinnamon (optional, but I love the warmth it adds!)
- 6 tablespoons (85g) unsalted butter, melted
- For the Lemon Cheesecake Filling:
- 3 (8-ounce) packages full-fat cream cheese, softened at room temperature (this is crucial for a smooth filling!)
- 1 cup granulated sugar
- ¼ cup sour cream, at room temperature (adds a lovely tang and moisture)
- 1 teaspoon pure vanilla extract
- 1 tablespoon fresh lemon zest (from about 2 medium lemons)
- ¼ cup fresh lemon juice (from about 2 medium lemons)
- 3 large eggs, at room temperature
- For the Homemade Lemon Curd Topping:
- 3 large eggs
- 3 large egg yolks
- ¾ cup granulated sugar
- ½ cup fresh lemon juice (from about 3-4 medium lemons)
- 2 tablespoons fresh lemon zest (from about 3-4 medium lemons)
- ¼ cup (56g) unsalted butter, cut into small pieces, chilled
- Pinch of salt
- For Garnish (Optional):
- Fresh lemon slices or twists
- Fresh raspberries or blueberries
- Whipped cream or meringue kisses
- A dusting of powdered sugar
- A few fresh mint leaves
Preparing the Crust
- First things first, let’s get that oven preheated. You’ll want your oven set to 350°F (175°C). While it’s heating up, grab a 9-inch springform pan. It’s helpful to lightly grease the bottom of the pan and, if you’re using a two-piece pan, you can even line the bottom with a circle of parchment paper to prevent sticking. This isn’t strictly necessary but can make removal a breeze, especially for a delicate dessert like our lemon cheesecake.
- Now, for the star of the crust: the graham crackers! You need about 1 ½ cups of finely crushed crumbs. You can achieve this a few ways. My go-to method is to place the graham crackers in a large zip-top bag and crush them with a rolling pin until they are very fine, almost like sand. Alternatively, a food processor makes quick work of this; just pulse until you have fine crumbs. The key here is uniformity – no big chunks, please! Fine crumbs ensure a cohesive and sturdy base for our delicious filling.
- In a medium-sized bowl, combine your finely crushed graham cracker crumbs with ¼ cup of granulated sugar and, if you’re feeling a bit adventurous like me, ½ teaspoon of ground cinnamon. The cinnamon adds a subtle warmth that beautifully complements the bright lemon, adding another layer of complexity to the flavor profile. Give these dry ingredients a good stir to ensure they are well mixed and evenly distributed.
- Next, melt your 6 tablespoons of unsalted butter. You can do this in a microwave-safe bowl in short bursts (checking and stirring every 15-20 seconds) or in a small saucepan over low heat. Once melted, pour the warm butter over the crumb mixture in the bowl. Use a fork or a spatula to mix everything together until the crumbs are uniformly moistened. It should resemble wet sand – if you squeeze a bit, it should hold together, but still be crumbly enough to press.
- Press this buttery crumb mixture firmly into the bottom of your prepared 9-inch springform pan. I find the back of a flat-bottomed measuring cup or a glass works wonderfully for this, ensuring an even and compact layer. Make sure it’s really packed down; this prevents the crust from crumbling when you slice into your cheesecake later and provides a stable foundation. You can also press some of the crumbs up the sides of the pan slightly, creating a small border, but a flat bottom crust is perfectly acceptable too.
- Bake the crust in your preheated 350°F (175°C) oven for 8-10 minutes. This pre-baking step helps to set the crust, toast the graham crackers slightly for enhanced flavor, and prevents it from getting soggy once the creamy filling is added. Keep a close eye on it to ensure it doesn’t burn, as ovens can vary. When it’s lightly golden and fragrant, it’s done.
- Once baked, remove the crust from the oven and set it aside on a wire rack to cool completely while you prepare the cheesecake filling. It’s important for it to be cool to the touch to prevent the filling from melting prematurely when poured in, which could affect the final texture.
Preparing the Lemon Cheesecake Filling
- This is where the magic happens for the creamy texture! For the absolute best results, ensure all your dairy ingredients – the cream cheese, sour cream, and eggs – are at room temperature. I can’t stress this enough! Cold cream cheese will result in a lumpy batter, no matter how much you try to beat it, and cold eggs can cause the mixture to curdle slightly, leading to an uneven texture. Plan ahead and take them out of the fridge at least 1-2 hours before you start your baking adventure.
- In the bowl of a stand mixer fitted with the paddle attachment (or using a large bowl with a hand mixer), place the softened cream cheese. Beat the cream cheese on medium speed for about 2-3 minutes, scraping down the sides of the bowl frequently with a rubber spatula, until it is completely smooth and free of any lumps. You want it light, airy, and fluffy, almost like a cloud, before you add any other ingredients. This initial creaming is vital.
- Gradually add the 1 cup of granulated sugar to the cream cheese, beating on low to medium speed until just combined. Continue to beat for another 1-2 minutes, scraping the bowl down again, until the mixture is uniform and creamy. The sugar helps to aerate the cream cheese further and completely dissolve, preventing a grainy texture in your final cheesecake.
- Next, mix in the ¼ cup of room temperature sour cream and 1 teaspoon of pure vanilla extract. Beat on low speed just until they are incorporated into the batter. The sour cream adds a wonderful richness and a subtle tang that balances the sweetness beautifully, while also providing crucial moisture that contributes to that signature smooth and melt-in-your-mouth cheesecake texture we all crave.
- Now for the star flavor! Add the 1 tablespoon of fresh lemon zest and ¼ cup of fresh lemon juice. I always recommend using freshly squeezed lemon juice – it makes a world of difference compared to bottled versions, offering a brighter, more authentic citrus punch. Beat gently on low speed, just until the lemon flavor is evenly distributed throughout the luscious batter.
- Finally, add the 3 large eggs, one at a time. After each egg, beat on low speed just until it is incorporated into the batter. This step is crucial: do not overmix! Overmixing introduces too much air into the batter, which can cause your cheesecake to puff up dramatically in the oven and then, sadly, crack and sink as it cools. We’re aiming for a dense, incredibly creamy, and smooth texture, not a light, airy one. Once the last egg is just combined, stop mixing immediately. Give the bowl a final scrape with a spatula to ensure everything is perfectly blended without overworking the batter.
- Before pouring the filling into the crust, let’s prepare a water bath. This step is essential for preventing cracks and ensuring an incredibly smooth, evenly baked cheesecake. Wrap the outside of your springform pan with two layers of heavy-duty aluminum foil. Make sure the foil extends all the way up the sides of the pan and covers the base completely. This creates an impenetrable barrier against water seeping in, which would ruin your crust.
- Carefully pour the creamy lemon cheesecake batter over the cooled graham cracker crust in the prepared springform pan. Gently tap the pan a few times on your counter to release any large air bubbles that might be trapped within the batter. This small action helps ensure a perfectly smooth surface on your baked cheesecake.
Baking the Cheesecake
- Place the foil-wrapped springform pan into a larger roasting pan. Then, very carefully, pour hot water (I usually boil a kettle) into the roasting pan until it comes about halfway up the sides of the springform pan. Be gentle to avoid splashing water into your cheesecake! The water bath creates a moist, steamy environment in the oven, which helps the cheesecake bake slowly and evenly, preventing it from drying out, cracking, or developing a rubbery texture. It’s absolutely a game-changer for cheesecake perfection and guarantees that rich, velvety consistency.
- Carefully transfer the roasting pan with your cheesecake setup into your preheated 350°F (175°C) oven. Be mindful of the hot water and try to keep the pan level to avoid spills.
- Bake for 60-75 minutes. Every oven is a little different, so keep a close eye on it. You’ll know your cheesecake is done when the edges are set and slightly puffed, but the very center (about a 2-3 inch circle in the middle) still jiggles slightly when you gently shake the pan. It shouldn’t be liquidy, but a slight wobble is exactly what you’re looking for. This ensures it’s cooked through but not overbaked, and it will continue to cook and set as it cools.
- Once baked, turn off the oven, but do not remove the cheesecake immediately! Leave the cheesecake in the turned-off oven with the door ajar (you can prop it open with a wooden spoon or a heat-safe oven mitt) for one hour. This gradual cooling process is another critical step in preventing those dreaded cracks and helps the cheesecake slowly adjust to the change in temperature, resulting in a beautifully smooth top.
- After one hour in the oven, carefully remove the cheesecake from the water bath and the roasting pan. Gently remove the aluminum foil from around the springform pan. Place the cheesecake on a wire rack to cool completely at room temperature for another 1-2 hours. This ensures it cools down gradually before hitting the fridge.
- Once the cheesecake has reached room temperature, cover it loosely with plastic wrap, taking care not to let the plastic touch the surface of the cheesecake, and transfer it to the refrigerator to chill for at least 6 hours, but ideally overnight. This long chill time is non-negotiable for cheesecake. It allows the flavors to meld, the texture to firm up, and ensures clean, beautiful slices. This Lemon Cheesecake Delight Recipe Is A Must Try Dessert, and proper chilling is key to its success and its incredible, dense texture.
Preparing the Homemade Lemon Curd Topping
- While your cheesecake is chilling (or even the day before), you can prepare this vibrant lemon curd. In a medium-sized, heatproof bowl, whisk together the 3 large eggs, 3 large egg yolks, ¾ cup of granulated sugar, 2 tablespoons of fresh lemon zest, and a pinch of salt until well combined and slightly frothy. This combination of whole eggs and extra yolks gives the curd a rich, creamy texture and a more intense yellow color.
- In a small saucepan, gently warm the ½ cup of fresh lemon juice over medium-low heat until it’s just simmering. You don’t want it boiling fiercely; just small bubbles forming around the edges is perfect.
- Now comes the tempering step, which prevents your eggs from scrambling. While whisking constantly, slowly drizzle about half of the warm lemon juice into the egg mixture. This gradually raises the temperature of the eggs without cooking them too quickly, gently easing them into the heat.
- Pour the warmed egg mixture back into the saucepan with the remaining lemon juice. Place the saucepan over medium-low heat and cook, stirring constantly with a whisk or a rubber spatula, until the curd thickens. This usually takes about 8-12 minutes. You’ll know it’s ready when it coats the back of a spoon and you can draw a clean line through it with your finger, or when it reaches a temperature of about 170-175°F (77-79°C) on an instant-read thermometer. Be patient and keep stirring to prevent it from sticking or scorching the bottom of the pan – consistency is key here.
- Once thickened, immediately remove the saucepan from the heat. Add the ¼ cup of chilled unsalted butter, cut into small pieces. Stir until the butter is completely melted and incorporated, which will give the curd a beautiful glossy finish, an extra layer of richness, and a silky smooth mouthfeel.
- For an ultra-smooth and silky lemon curd, press it through a fine-mesh sieve into a clean bowl. This step removes any tiny bits of cooked egg or zest that might have become too prominent, resulting in a perfectly smooth, professional-looking topping. I highly recommend doing this for that truly refined finish.
- Cover the surface of the lemon curd directly with plastic wrap to prevent a skin from forming as it cools. This is important as it cools. Let it cool at room temperature for about 30 minutes, then transfer it to the refrigerator to chill completely for at least 2-3 hours, or until firm enough to spread. It will thicken considerably as it cools, developing that beautiful gel-like consistency.
Assembling and Chilling
- Once your cheesecake has thoroughly chilled overnight and your lemon curd is beautifully set, it’s time for the grand finale – assembly! This is where all your hard work comes together.
- Carefully run a thin, sharp knife (dipped in hot water and wiped clean, if you want extra precision) around the edge of the cheesecake before releasing the springform pan collar. This helps ensure a clean release and prevents any sticking or tearing of the delicate cheesecake edge. Gently open and remove the collar. You can leave the cheesecake on the base of the springform pan for serving, or carefully slide it onto a serving plate.
- Now, pour or spoon the chilled lemon curd evenly over the top of the firm cheesecake. Use an offset spatula or the back of a spoon to spread it all the way to the edges, creating a vibrant, glossy layer that will immediately catch the eye. You can make it as thick or thin as you like, but I usually aim for about a ¼ to ½ inch layer for a perfect balance of flavors and a stunning visual contrast.
- Return the cheesecake, now crowned with its luscious lemon curd, to the refrigerator for at least another 1-2 hours. This allows the curd to set firmly on top of the cheesecake, making it easier to slice and ensuring everything is perfectly chilled for serving. This final chill ensures that every element of your Lemon Cheesecake Delight Recipe Is A Must Try Dessert is at its peak of flavor and texture, ready to impress.
Garnish and Serving
- When you’re ready to serve this magnificent Lemon Cheesecake Delight, you can transfer it from the springform pan base to a beautiful serving plate, if desired, using a large, flat spatula. However, it’s perfectly fine to serve it directly from the base as well; just ensure it’s on a stable surface.
-
This is where you can let your creativity shine! The presentation truly elevates this already spectacular dessert.
Garnishing Ideas for Your Lemon Cheesecake Delight:
- Fresh Fruit: A sprinkle of fresh raspberries or blueberries around the edge, or even arranged artfully in the center, provides a beautiful contrast in color, a burst of complementary freshness, and a delightful textural counterpoint to the smooth cheesecake.
- Lemon Accents: Thinly sliced lemon rounds, elegant half-moons, or intricate lemon twists can really highlight the star flavor and add a sophisticated touch. You could even try candying a few lemon slices for an extra special, edible flourish.
- Whipped Cream: A generous dollop of freshly whipped cream on each slice, perhaps with a touch of vanilla or a hint of lemon zest mixed in, adds a luxurious, cloud-like finish that pairs wonderfully with the tangy curd.
- Meringue Kisses: For a more sophisticated and whimsical look, small baked meringue kisses or shards can be placed around the base or delicately positioned on top of individual slices. Their crisp texture and delicate sweetness pair wonderfully with the rich cheesecake.
- Powdered Sugar: A light dusting of powdered sugar over the entire cheesecake (especially if not using other toppings) can give it a lovely, ethereal finished look that’s simple yet elegant.
- Mint Leaves: A few fresh mint leaves, strategically placed, can add a pop of vibrant green color and an aromatic, refreshing hint.
No matter how you choose to adorn it, remember that this Lemon Cheesecake Delight Recipe Is A Must Try Dessert that truly speaks for itself, even served simply. Its bright flavors and creamy texture are enough to wow anyone!
- To get the cleanest, most professional-looking slices, warm your knife under hot water and wipe it clean with a paper towel between each cut. This will give you those picture-perfect slices you see in magazines, gliding through the cheesecake and curd with ease. Serve cold, and prepare for rave reviews from everyone lucky enough to try a piece. Enjoy every bright, creamy, tangy, and utterly satisfying bite of this incredible dessert!
Conclusion:
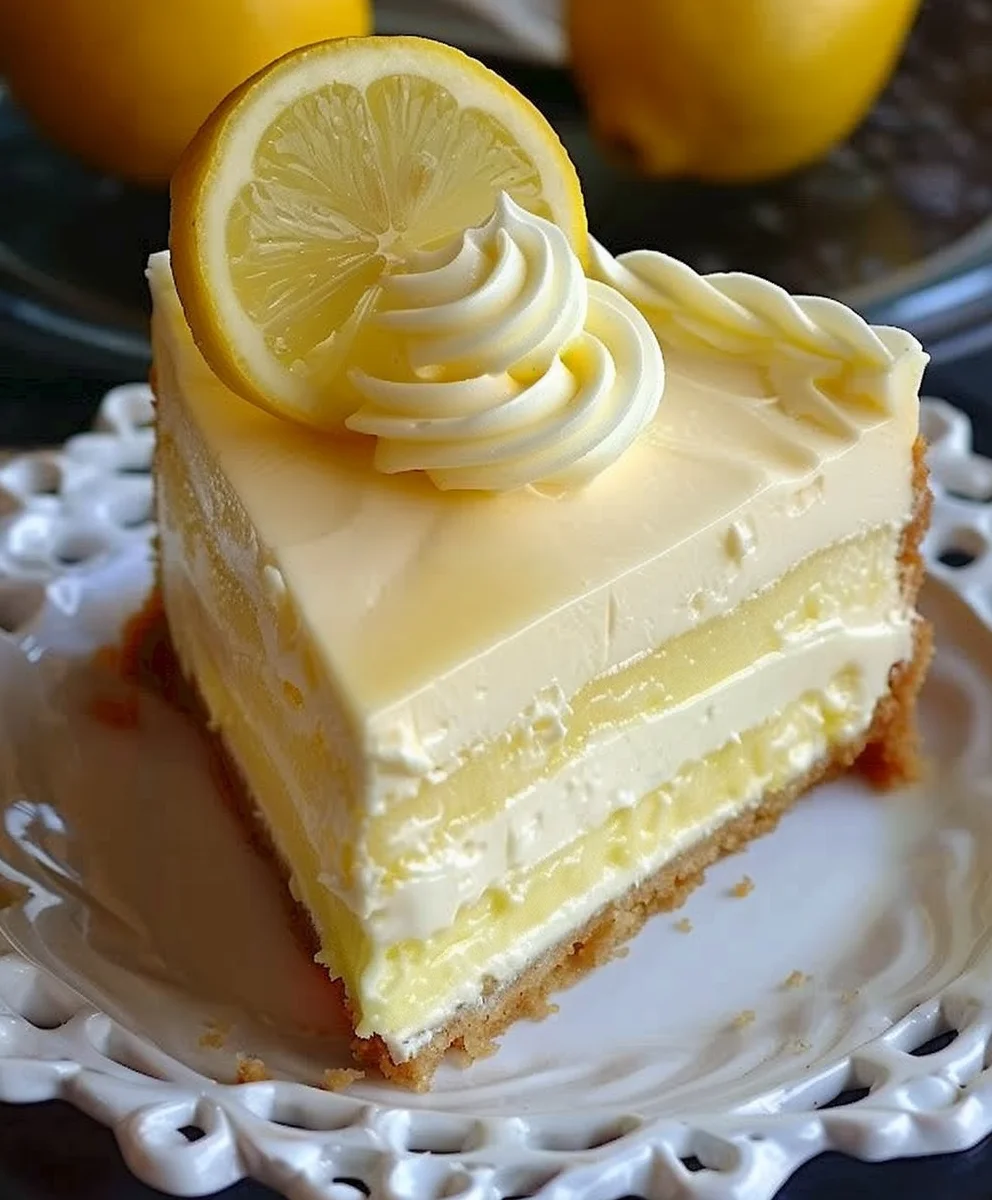
As we reach the sweet conclusion of our journey through this incredible recipe, I truly hope you’re feeling as excited and inspired as I am about what you’ve learned. This isn’t just any dessert; it’s an experience waiting to unfold in your kitchen. We’ve meticulously walked through each step, ensuring that even if you’re a novice baker, you’ll feel confident in creating something truly spectacular. The undeniable truth is that the Lemon Cheesecake Delight Recipe Is A Must Try Dessert for anyone who appreciates the perfect harmony of flavors and textures.
What makes this particular cheesecake so extraordinary? It’s the impeccable balance of the bright, zesty tang of fresh lemon cutting through the rich, velvety creaminess of the filling. That beautiful contrast is what elevates it from a good cheesecake to an unforgettable one. Coupled with the buttery, crumbly crust, each bite is a symphony of culinary delight. I’ve personally witnessed the smiles this dessert brings to faces, the “oohs” and “aahs” it elicits around the table, and the satisfaction of knowing you’ve created something so utterly perfect from scratch. It’s light enough to be refreshing after a hearty meal, yet decadent enough to feel like a true treat. This versatility makes it ideal for virtually any occasion, from a casual family dinner to a sophisticated dinner party, or even a delightful afternoon tea.
Beyond its inherent deliciousness, one of the joys of baking this lemon cheesecake is how adaptable it is to your personal taste and the occasion. While it stands gloriously on its own, there are countless ways to elevate and present it. For a simple yet elegant finish, a light dusting of powdered sugar or a few delicate curls of lemon zest are always a winner, adding both visual appeal and a burst of concentrated citrus aroma. But don’t stop there! Think about fresh berries – plump, ruby-red strawberries, juicy blueberries, or vibrant raspberries – mounded artfully on top. Their natural sweetness and slight tartness provide a beautiful counterpoint to the cheesecake’s creamy texture, making for a truly stunning presentation and an even more complex flavor profile. You could even create a quick berry compote by simmering fresh or frozen berries with a touch of sugar and a squeeze of lemon juice until thickened; spooned warm or cold over a slice, it’s divine.
For those who love a bit more indulgence, a delicate raspberry coulis drizzled across the plate adds a professional touch and another layer of fruity brightness. A dollop of freshly whipped cream, perhaps infused with a hint of vanilla or even more lemon zest, is always welcome, adding an extra cloud of richness. If you’re feeling adventurous, consider a very thin layer of torched meringue on top, transforming it into a lemon meringue cheesecake hybrid – the crisp, sweet meringue contrasting wonderfully with the cool, creamy filling. And don’t forget the crust variations! While the classic graham cracker crust is always a crowd-pleaser, try experimenting with crushed digestive biscuits, shortbread cookies, or even gingersnaps for a spiced, autumnal twist that pairs surprisingly well with the lemon. For a fun, portable option, bake the cheesecake in individual ramekins or muffin tins lined with paper cups to create adorable mini lemon cheesecakes, perfect for parties or lunchboxes.
Your Culinary Adventure Awaits!
I genuinely encourage you to roll up your sleeves, gather your ingredients, and embark on this delightful baking adventure. Don’t be intimidated; the process is incredibly rewarding, and the result, I promise, is worth every moment. Imagine the first slice, the smooth texture, the burst of lemon, and the satisfying crunch of the crust – it’s a moment of pure culinary bliss that you created yourself. Baking should be a joyful, creative process, and this recipe offers plenty of opportunities for both.
Once you’ve experienced the magic of this lemon cheesecake, I would absolutely love to hear about it! Your experiences, your triumphs, and even your funny kitchen anecdotes are what make our shared love for food so vibrant. Did you try a unique serving suggestion? Did you make a memorable variation that became your new favorite? Please, share your journey, your photos, and your invaluable feedback. There’s nothing more inspiring than seeing how a recipe comes to life in different kitchens, bringing joy to different tables. So go ahead, make this Lemon Cheesecake Delight your own, and prepare to impress everyone, most importantly yourself!
Lemon Cheesecake Delight: Your Must-Try Dessert Recipe
This Lemon Cheesecake Delight recipe delivers a perfect balance of rich, creamy indulgence and vibrant lemon zest. Featuring a crisp graham cracker crust and a luxuriously smooth lemon-infused filling, it’s a refreshing dessert that’s surprisingly easy to prepare and guaranteed to impress.
Ingredients
-
1 ½ cups graham cracker crumbs
-
½ cup unsalted butter, melted
-
2 tablespoons granulated sugar
-
1 (8-ounce) package cream cheese, softened
-
½ cup granulated sugar
-
1 teaspoon vanilla extract
-
2 large eggs
-
1 cup sour cream
-
¼ cup fresh lemon juice
-
Zest of 1 lemon
-
1 teaspoon baking powder
-
Fresh berries (strawberries, blueberries, raspberries), for garnish
-
Whipped cream, for garnish
-
Lemon slices or zest, for garnish
-
Powdered sugar for dusting, for garnish
Instructions
-
Step 1
Preheat oven to 350°F (175°C). Lightly grease a 9-inch springform pan. In a bowl, combine 1 ½ cups graham cracker crumbs, 2 tbsp granulated sugar, and ½ cup melted unsalted butter. Press firmly into the bottom of the prepared pan. Bake for 8-10 minutes until lightly golden. Let cool. -
Step 2
Ensure cream cheese, sour cream, and eggs are at room temperature. In a mixer, beat 1 (8 oz) package softened cream cheese until smooth and fluffy (2-3 min). -
Step 3
Gradually beat in ½ cup granulated sugar until combined. Mix in 1 cup sour cream, 1 tsp vanilla extract, ¼ cup fresh lemon juice, zest of 1 lemon, and 1 tsp baking powder until just incorporated. -
Step 4
Add 2 large eggs, one at a time, beating on low speed just until combined. Do not overmix. -
Step 5
Wrap the outside of the springform pan with two layers of heavy-duty aluminum foil. Pour filling over the cooled crust. Place the foil-wrapped pan into a larger roasting pan. Pour hot water into the roasting pan, coming halfway up the sides of the springform pan. -
Step 6
Bake at 350°F (175°C) for 40-50 minutes. The edges should be set, but the center should still jiggle slightly. -
Step 7
Turn off the oven, leave cheesecake inside with the door ajar for 1 hour. Remove from water bath, unwrap foil. Cool at room temperature for 1-2 hours. Cover loosely and refrigerate for at least 6 hours, or ideally overnight, for best texture and flavor. -
Step 8
Once thoroughly chilled, remove the springform collar. Garnish with fresh berries (strawberries, blueberries, raspberries), whipped cream, lemon slices or zest, or a dusting of powdered sugar. For clean slices, warm your knife under hot water and wipe clean between cuts. Serve cold.
Important Information
Nutrition Facts (Per Serving)
It is important to consider this information as approximate and not to use it as definitive health advice.
Allergy Information
Please check ingredients for potential allergens and consult a health professional if in doubt.
Leave a Comment