
Banana Pudding Cookie Butter Cheesecake Cake Recipe is here to redefine your dessert expectations! Prepare to embark on an extraordinary culinary journey that merges three beloved classics into one undeniably spectacular creation. I am absolutely thrilled to share this recipe with you because I truly believe it represents the pinnacle of decadent fusion desserts. This isn’t just a cake; it’s a celebration of textures and flavors, a testament to what happens when Southern comfort meets European sophistication and modern indulgence.
The inspiration for this incredible treat draws from a rich tapestry of culinary traditions. Banana pudding, a quintessential Southern comfort food, evokes warmth and nostalgia. Cheesecake, with its ancient origins and countless delicious variations, brings a creamy, tangy elegance. And then there’s cookie butter, a relatively new, yet incredibly addictive, spread that originated in Belgium, adding a unique, spiced caramelized depth that is simply irresistible. Why do people fall head over heels for this dish? It’s the perfect harmony of creamy, crunchy, sweet, and tangy, offering a truly unique experience with every single bite. The layers are a symphony: moist cake, luscious banana pudding, a rich cheesecake swirl, and the unmistakable taste of cookie butter weaving its magic throughout. Get ready to impress everyone with this show-stopping Banana Pudding Cookie Butter Cheesecake Cake Recipe!
Ingredients:
For the Cookie Butter Cake Layers:
- 3 cups (360g) all-purpose flour, spooned and leveled
- 1 teaspoon baking soda
- 1/2 teaspoon baking powder
- 1/2 teaspoon salt
- 1 cup (226g) unsalted butter, softened to room temperature
- 1 3/4 cups (350g) granulated sugar
- 4 large eggs, room temperature
- 1 teaspoon pure vanilla extract
- 1 cup (240ml) buttermilk, room temperature
- 1/2 cup (120g) smooth cookie butter (like Biscoff or Lotus Speculoos spread), melted and slightly cooled
For the Cookie Butter Cheesecake Layer:
- 16 ounces (450g) full-fat cream cheese, softened to room temperature
- 1/2 cup (100g) granulated sugar
- 2 large eggs, room temperature
- 1/2 cup (120g) smooth cookie butter, melted and slightly cooled
- 1 teaspoon pure vanilla extract
- Pinch of salt
For the Banana Pudding Filling:
- 1 1/2 cups (360ml) whole milk
- 1/2 cup (120ml) heavy cream
- 1/2 cup (100g) granulated sugar
- 1/4 cup (30g) cornstarch
- 1/4 teaspoon salt
- 2 large egg yolks
- 2 tablespoons unsalted butter, cold and cut into cubes
- 1 teaspoon pure vanilla extract
- 3-4 ripe but firm bananas, sliced
- 1 1/2 cups (about 120g) vanilla wafer cookies, broken into pieces
For the Stabilized Whipped Cream Frosting:
- 3 cups (720ml) heavy cream, very cold
- 1/2 cup (60g) powdered sugar, sifted
- 1 teaspoon pure vanilla extract
- 1 teaspoon unflavored gelatin powder
- 2 tablespoons cold water
For Assembly and Garnish:
- Additional vanilla wafer cookies, whole or crushed
- A few extra banana slices (tossed in a little lemon juice to prevent browning, optional)
- 2-3 tablespoons melted cookie butter, for drizzling
Let’s Get Baking! Your Banana Pudding Cookie Butter Cheesecake Cake Awaits!
Oh, prepare yourself for an absolutely epic baking adventure! This Banana Pudding Cookie Butter Cheesecake Cake Recipe is a true showstopper, combining three incredible desserts into one magnificent creation. It’s rich, creamy, fluffy, and full of those nostalgic banana pudding flavors with a sophisticated twist of cookie butter. Trust me, every single step is worth it for the incredible final result. Let’s dive in!
Phase 1: Crafting the Delicious Cookie Butter Cake Layers
We’re starting with the foundation: two tender, flavorful cookie butter cake layers. These will be incredibly moist and fragrant, setting the stage perfectly for the rest of our decadent cake.
- Preheat and Prep: Begin by preheating your oven to 350°F (175°C). Grease and flour two 8-inch round cake pans. For extra assurance against sticking, I always recommend lining the bottoms of the pans with parchment paper circles. This small step can save a lot of heartache later!
- Whisk Dry Ingredients: In a medium bowl, whisk together the all-purpose flour, baking soda, baking powder, and salt. Make sure these are thoroughly combined. Set this aside for a moment.
- Cream Butter and Sugar: In a large mixing bowl, using an electric mixer (either a stand mixer with the paddle attachment or a hand mixer), cream together the softened unsalted butter and granulated sugar on medium speed until the mixture is light, fluffy, and pale in color. This usually takes about 3-5 minutes. Don’t rush this step, as it incorporates air, which is crucial for a tender cake.
- Add Eggs Gradually: Add the eggs, one at a time, beating well after each addition. Scrape down the sides of the bowl as needed to ensure everything is incorporated. After the last egg, beat for another minute until the mixture is truly smooth and emulsified.
- Incorporate Flavor: Stir in the pure vanilla extract. Then, drizzle in the melted and slightly cooled cookie butter. Beat on low speed until just combined. You don’t want to overmix here.
- Alternate Wet and Dry: With the mixer on low speed, gradually add the dry ingredients to the wet ingredients in three additions, alternating with two additions of the buttermilk. Begin and end with the dry ingredients. For example: 1/3 dry, mix; 1/2 buttermilk, mix; 1/3 dry, mix; 1/2 buttermilk, mix; 1/3 dry, mix. Stop mixing as soon as the last streaks of flour disappear. Overmixing can lead to a tough cake, and we want ours to be beautifully tender. Scrape down the bowl once more to catch any unmixed batter at the bottom.
- Divide and Bake: Divide the batter evenly between your two prepared cake pans. You can use a kitchen scale for precision if you want perfectly even layers, otherwise, eyeball it. Bake for 28-32 minutes, or until a wooden skewer or toothpick inserted into the center of the cakes comes out clean.
- Cool Completely: Let the cakes cool in their pans on a wire rack for about 10-15 minutes before inverting them onto the rack to cool completely. This is critical! Attempting to frost or stack warm cakes will result in a messy disaster. Patience is a virtue in baking!
Phase 2: Preparing the Creamy Cookie Butter Cheesecake Layer
This rich and creamy cheesecake layer is the heart of our “Banana Pudding Cookie Butter Cheesecake Cake Recipe.” It adds an incredible depth of flavor and a wonderfully contrasting texture to the cake layers.
- Preheat Oven and Prep Pan: Reduce your oven temperature to 325°F (160°C). Grease and flour an 8-inch round cake pan (you can use one of the ones you just used for the cake layers, after cleaning it). Line the bottom with parchment paper.
- Beat Cream Cheese: In a large mixing bowl, beat the softened cream cheese on medium speed until it’s perfectly smooth and creamy, with no lumps. This is important for a silky-smooth cheesecake.
- Add Sugar: Gradually add the granulated sugar to the cream cheese, beating until just combined and smooth. Again, avoid overmixing.
- Incorporate Eggs: Add the eggs one at a time, beating on low speed until just incorporated. Scrape down the bowl after each egg. Do not overbeat the eggs, as this can introduce too much air, which can cause cracks in your cheesecake.
- Flavor Boost: Stir in the melted and slightly cooled cookie butter, pure vanilla extract, and a pinch of salt until just combined.
- Bake the Cheesecake: Pour the cheesecake batter into your prepared 8-inch pan. Place the pan in a larger roasting pan. Carefully pour hot water into the larger roasting pan, creating a water bath, until the water comes about halfway up the sides of the cheesecake pan. This water bath helps the cheesecake bake evenly and prevents cracking.
- Bake and Cool: Bake for 45-55 minutes, or until the edges are set but the center still has a slight jiggle. Turn off the oven, crack the door open, and leave the cheesecake in the oven for another hour to cool down gradually. This also helps prevent cracks.
- Chill Completely: Remove the cheesecake from the water bath and allow it to cool completely on a wire rack at room temperature. Once cooled, cover it with plastic wrap and refrigerate for at least 4 hours, or preferably overnight. A well-chilled cheesecake is essential for clean slicing and stability when assembling the cake.
Phase 3: Whipping Up the Irresistible Banana Pudding Filling
Now for the classic component that truly makes this a Banana Pudding Cookie Butter Cheesecake Cake Recipe – our homemade banana pudding! This will be rich, creamy, and utterly delightful.
- Combine Wet Ingredients: In a medium saucepan, whisk together the whole milk and heavy cream.
- Whisk Dry Ingredients: In a separate small bowl, whisk together the granulated sugar, cornstarch, and salt. This prevents lumps when adding to the milk.
- Create Slurry: Add the egg yolks to the dry sugar mixture and whisk until smooth and pale. This creates a thick, yellow slurry.
- Heat Milk Mixture: Place the saucepan with the milk and cream over medium heat. Bring it to a gentle simmer, just until small bubbles appear around the edges. Do not let it boil vigorously.
- Temper Egg Yolks: While whisking the egg yolk mixture constantly, slowly pour about half of the hot milk mixture into the egg yolks. This process, called tempering, prevents the eggs from scrambling.
- Return to Pan: Pour the tempered egg yolk mixture back into the saucepan with the remaining hot milk mixture. Return the saucepan to medium heat.
- Thicken Pudding: Cook, whisking constantly, until the pudding thickens considerably and comes to a gentle boil. Continue to boil gently for 1-2 minutes, whisking all the while, to ensure the cornstarch is fully cooked out and the pudding is very thick. It should be thick enough to coat the back of a spoon.
- Add Butter and Vanilla: Remove the saucepan from the heat. Stir in the cold butter, one piece at a time, until fully melted and incorporated. Then stir in the pure vanilla extract. The butter adds richness and a beautiful gloss.
- Cool the Pudding: Transfer the pudding to a clean bowl. Press a piece of plastic wrap directly onto the surface of the pudding to prevent a skin from forming. Refrigerate for at least 3-4 hours, or until thoroughly chilled and firm.
- Prepare Bananas and Wafers: Once the pudding is chilled, gently fold in the sliced ripe bananas and broken vanilla wafer cookies. Be careful not to mash the bananas too much. This is your luscious banana pudding filling!
Phase 4: Creating the Light and Fluffy Stabilized Whipped Cream Frosting
Our stabilized whipped cream frosting will be the dreamy topping and a crucial element for holding our cake together. The gelatin ensures it stays perfectly stable and doesn’t weep or collapse, even for a grand cake like this Banana Pudding Cookie Butter Cheesecake Cake Recipe.
- Bloom Gelatin: In a small, microwave-safe bowl, sprinkle the gelatin powder over the cold water. Let it sit for 5 minutes to “bloom” or soften.
- Melt Gelatin: Microwave the bloomed gelatin for 10-15 seconds, or until it is completely melted and clear. Stir well to ensure there are no granules. Let it cool slightly, but don’t let it set.
- Whip Cream: In a large, very cold mixing bowl (you can chill the bowl and whisk attachment in the freezer for 15 minutes beforehand for best results), pour the very cold heavy cream. Begin whipping on medium-high speed.
- Add Sugar and Vanilla: Once the cream starts to thicken and form soft peaks, gradually add the sifted powdered sugar and pure vanilla extract. Continue whipping.
- Incorporate Gelatin: With the mixer still running on medium speed, slowly drizzle in the cooled, melted gelatin in a steady stream. Increase speed to high and continue whipping until stiff peaks form. Be careful not to overbeat, or it will become grainy. The whipped cream should be light, fluffy, and hold its shape beautifully.
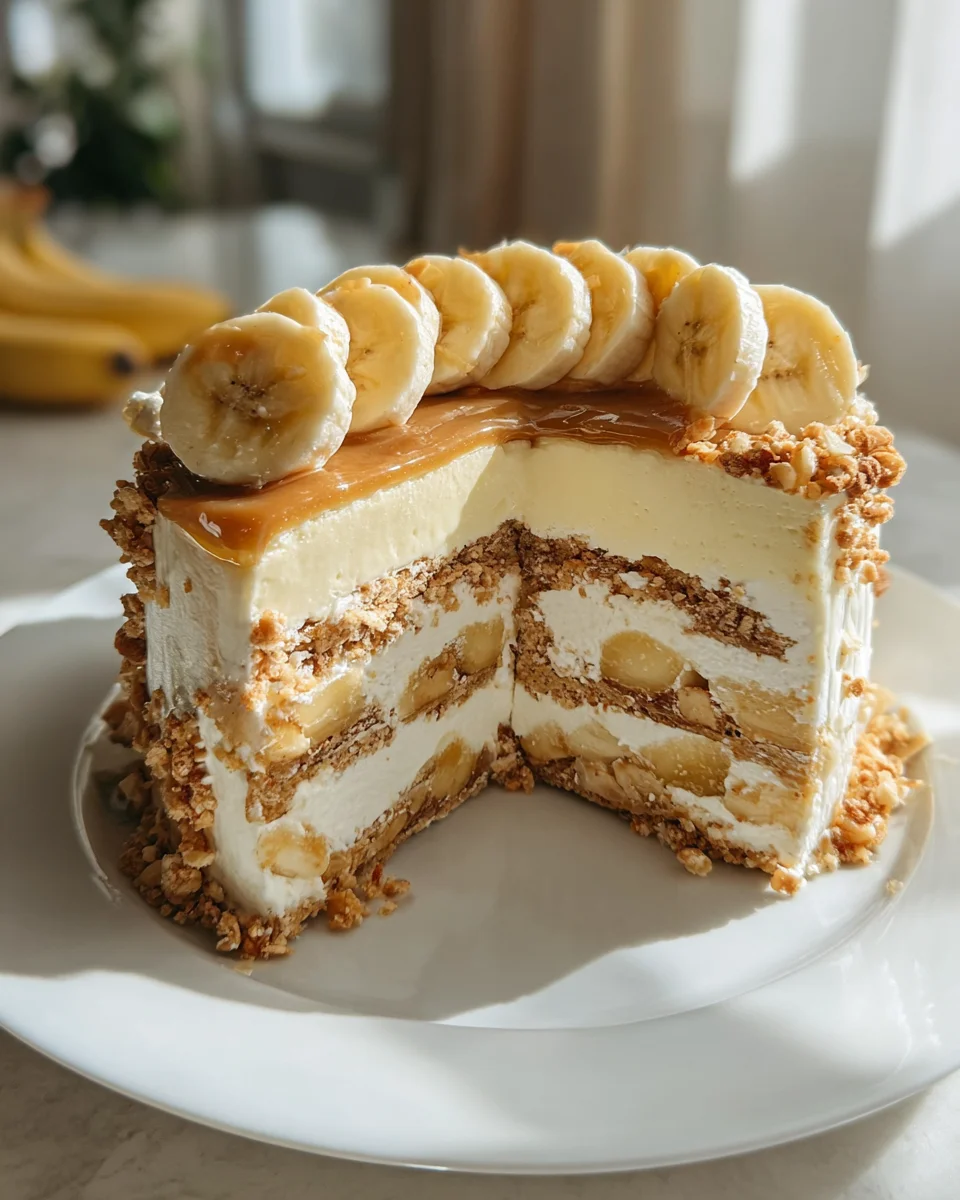
Phase 5: Assembling Your Masterpiece: The Banana Pudding Cookie Butter Cheesecake Cake
This is where all our hard work comes together to create the stunning Banana Pudding Cookie Butter Cheesecake Cake Recipe! Take your time, enjoy the process, and get ready for some serious edible art.
- Prepare Your Workspace: Have a cake stand or serving plate ready. You may want to place four strips of parchment paper around the edges of your cake stand, slightly under where the cake will sit. This helps keep the stand clean during frosting and can be easily pulled out at the end.
- First Cake Layer: Place one of your cooled cookie butter cake layers onto your chosen cake stand.
- First Frosting Layer: Spread a thin, even layer of the stabilized whipped cream frosting on top of the first cake layer. This acts as a ‘dam’ for our filling and helps prevent it from oozing out.
- Add Cheesecake Layer: Carefully lift and place your chilled cookie butter cheesecake layer directly on top of the whipped cream frosting. The cheesecake should be firm enough to handle.
- Banana Pudding Filling: Spread all of your banana pudding filling evenly over the cheesecake layer. Make sure it’s distributed right to the edges.
- Second Cake Layer: Gently place the second cookie butter cake layer on top of the banana pudding filling. Press down very lightly to ensure it’s secure.
- Crumb Coat: Apply a thin layer of whipped cream frosting all over the top and sides of the entire cake. This is called a crumb coat, and its purpose is to trap any loose crumbs, creating a smooth surface for your final frosting layer. Don’t worry about perfection here.
- Chill the Crumb Coat: Refrigerate the cake for at least 20-30 minutes, or until the crumb coat is firm. This step is crucial for achieving a neat final frosting layer.
- Final Frosting: Once the crumb coat is chilled, apply the remaining stabilized whipped cream frosting to the top and sides of the cake. Use an offset spatula or bench scraper to smooth it out to your desired finish. You can create swoops, swirls, or a perfectly smooth finish – whatever your heart desires!
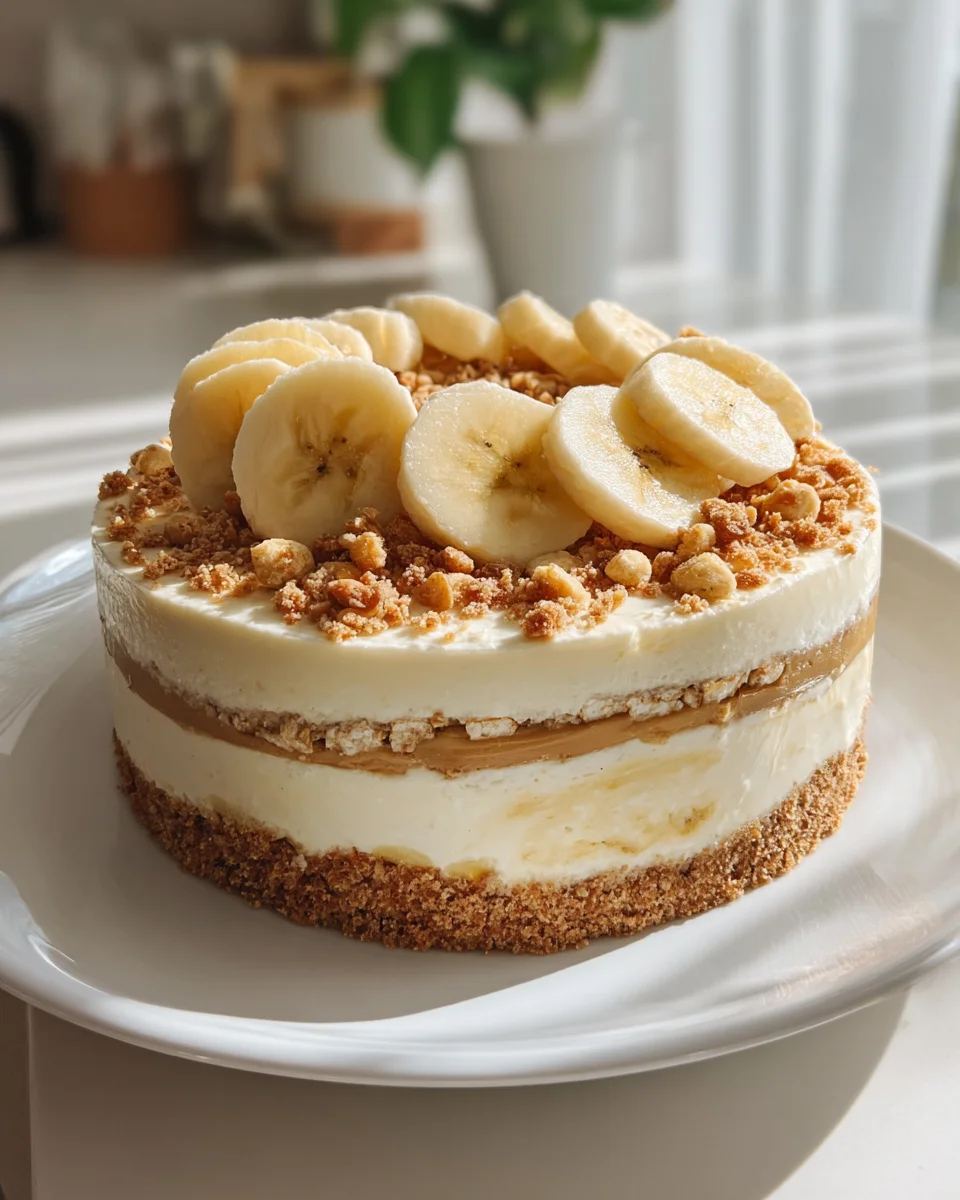
- Decorate and Garnish: Now for the fun part! Arrange additional vanilla wafer cookies (whole or crushed) around the base of the cake or on top. If using, place a few fresh banana slices on top (remember to toss them in lemon juice if you want them to stay fresh-looking for longer). For an extra touch, drizzle a little melted cookie butter over the top of the cake.
- Final Chill: Refrigerate your magnificent Banana Pudding Cookie Butter Cheesecake Cake Recipe for at least 1-2 hours before slicing and serving. This allows all the layers to set properly, making for much cleaner slices and allowing the flavors to meld beautifully.
- Serve and Enjoy! When ready to serve, remove the cake from the refrigerator a few minutes beforehand to allow the frosting to soften slightly. Slice with a sharp, warm knife for the cleanest cuts. Get ready for applause, because this cake is truly a showstopper!
Conclusion:
So, there you have it – the complete journey through creating what I truly believe is one of the most exciting, indulgent, and utterly unforgettable desserts you’ll ever bake. This isn’t just a cake; it’s an experience, a symphony of layers and flavors that dance on your palate with every single bite. We’ve combined the nostalgic comfort of classic banana pudding, the creamy dreaminess of cheesecake, the comforting texture of a moist cake, and the surprising, spiced warmth of cookie butter into one magnificent creation. It’s a dessert that defies categorization, yet somehow manages to feel perfectly harmonious and familiar all at once.
I promise you, the effort, though rewarding, is more than justified when you witness the delighted reactions of those who get to taste this masterpiece. Each layer contributes its unique charm: the crunchy, buttery crust provides a fantastic base, the rich and tangy cheesecake layer offers that signature luxurious creaminess, the cake itself is light yet substantial, and the banana pudding layer brings a touch of fruitiness and nostalgic sweetness. But it’s the cookie butter element that truly elevates it, adding a unique, irresistible depth that will have everyone asking for the recipe. This isn’t just a dessert; it’s a showstopper, a conversation starter, and quite simply, a dessert that will be remembered long after the last crumb is gone. It truly embodies everything I love about baking: creativity, generosity, and pure, unadulterated deliciousness.
Once your magnificent creation is perfectly chilled and ready, how best to enjoy it? I always recommend serving slices chilled, allowing the different layers to hold their structure beautifully while still being incredibly tender. For an elegant accompaniment, a dollop of freshly whipped cream, perhaps lightly sweetened with vanilla, is always a welcome addition. For an extra touch of indulgence and textural contrast, a sprinkle of toasted pecans or crushed Biscoff cookies on top works wonders. Thinly sliced fresh bananas, arranged artfully on the plate or directly on the slice, also enhance the banana pudding element both visually and tastefully, reminding everyone of the delightful flavors within.
Thinking about variations? While the original recipe is pure perfection in my eyes, don’t hesitate to make it your own! For the crust, consider using graham crackers for a more traditional cheesecake base, or even ginger snaps for a spicier kick that would complement the cookie butter beautifully. If you’re feeling adventurous, a delicate drizzle of warm caramel sauce over each slice just before serving can elevate it even further, adding another layer of sweet complexity. For a fun, portable option, you could even adapt this recipe into individual trifles, layering the components in small glasses for a stunning presentation at a party or picnic. Imagine serving these at a summer BBQ, a festive holiday gathering, or even just a cozy family dinner – they fit every occasion with their irresistible charm and impressive appearance.
Now, it’s your turn! I genuinely hope this guide has inspired you to step into your kitchen and embark on the joyous journey of baking this incredible dessert. Don’t be intimidated by the layers; each step is straightforward, and the final result is so immensely rewarding. Take the plunge and create your very own show-stopping dessert. This Banana Pudding Cookie Butter Cheesecake Cake Recipe is more than just a recipe; it’s an invitation to create memories, share joy, and indulge in something truly extraordinary. I absolutely cannot wait to hear about your experiences! Please do share your triumphs, your photos, and your feedback in the comments section below. There’s nothing I love more than seeing your culinary creations and knowing I’ve helped you bring a little extra sweetness into your life and the lives of those you cherish. Happy baking, my friends!
Decadent Banana Pudding Cookie Butter Cheesecake Cake
An extraordinary culinary journey merging three beloved classics: Southern comfort banana pudding, elegant cheesecake, and modern indulgence of spiced cookie butter into one spectacular creation. This show-stopping cake features moist cake layers, a rich cheesecake swirl, creamy banana pudding, and a light stabilized whipped cream frosting, promising a perfect harmony of creamy, crunchy, sweet, and tangy flavors in every bite.
Ingredients
Instructions
Important Information
Nutrition Facts (Per Serving)
It is important to consider this information as approximate and not to use it as definitive health advice.
Allergy Information
Please check ingredients for potential allergens and consult a health professional if in doubt.
Leave a Comment