
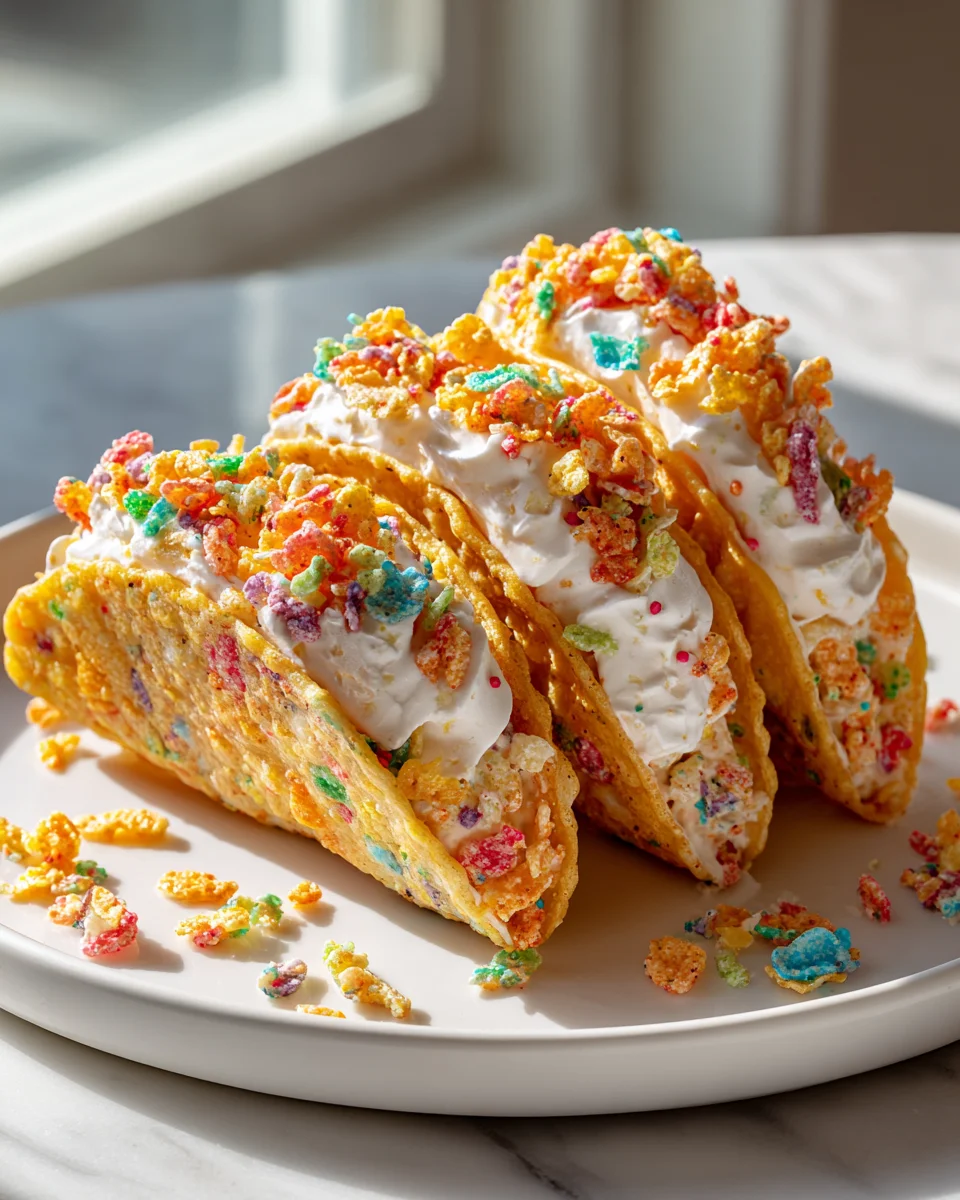
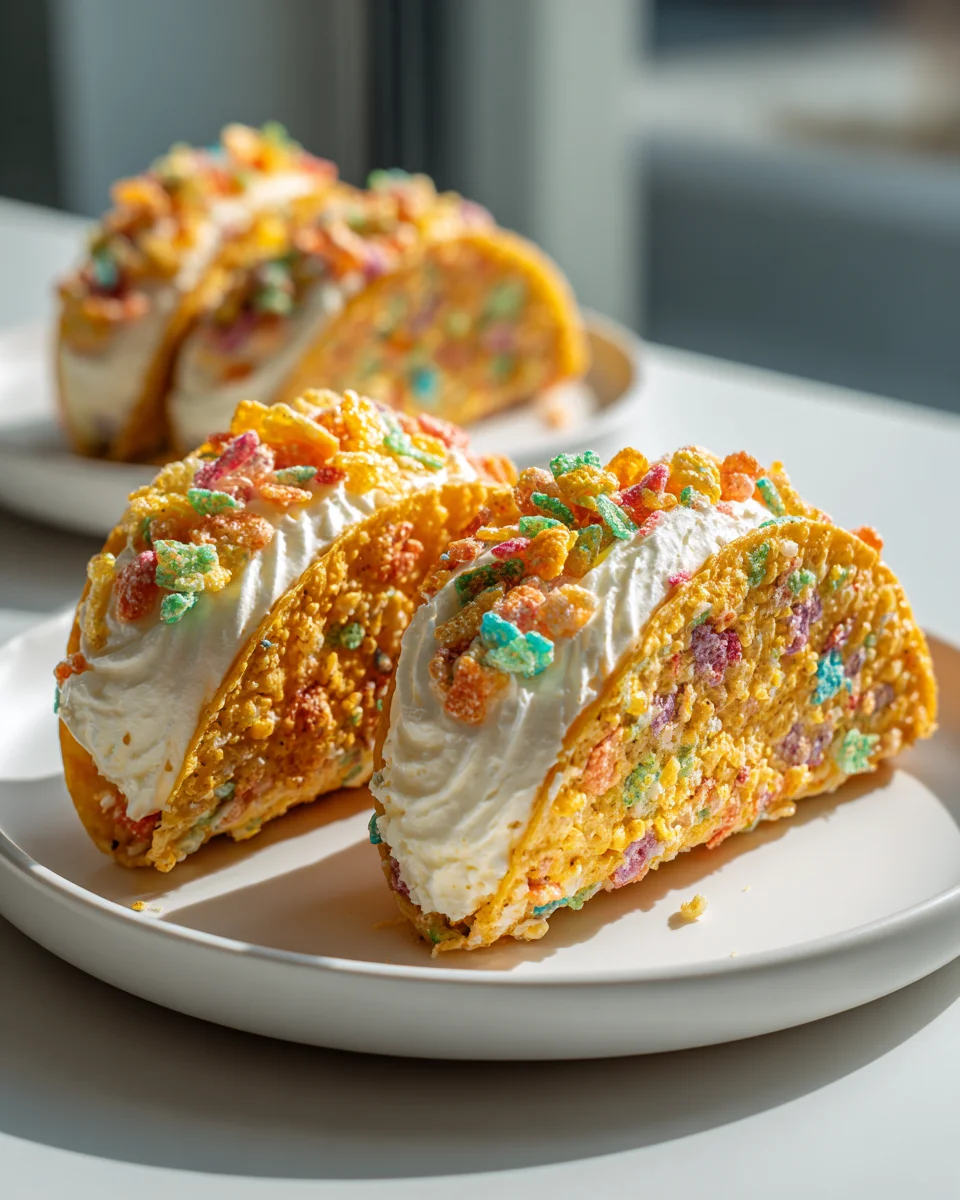
Fruity Pebbles Cheesecake Tacos
Oh my goodness, get ready for a dessert that’s about to blow your mind! When I first dreamed up Fruity Pebbles Cheesecake Tacos, I knew it was going to be something special, and I promise you, it delivers on every front. What makes this recipe so incredibly unique is how it fearlessly blends two beloved comfort foods – the vibrant, nostalgic crunch of Fruity Pebbles cereal and the rich, creamy decadence of cheesecake – and wraps them up in the most fun, unexpected package: a taco!
You, my friend, are going to absolutely adore these because they’re not just a dessert; they’re an experience. Imagine the pure delight when you serve up these colorful, handheld treats at your next gathering, or simply treat yourself to a whimsical bite of pure joy. They’re visually stunning, ridiculously tasty, and just plain fun to eat. Each bite delivers a delightful crunch from the cereal-coated ‘taco’ shell, giving way to a luscious, tangy cheesecake filling that perfectly balances the sweetness. It’s a dessert that promises a burst of flavor and a trip down memory lane all at once, making every mouthful an unforgettable adventure!
Ingredient Notes
Creating these Fruity Pebbles Cheesecake Tacos is an absolute blast, and the ingredients are pretty straightforward! Here’s a little insight into what we’ll need and why, along with a few substitution ideas just in case.
- Small Flour Tortillas: We’re transforming humble flour tortillas into crispy, sweet taco shells! I recommend using 6-inch or smaller tortillas for a perfect dessert-sized taco. Corn tortillas could work in a pinch, but flour tortillas tend to fry up a bit softer and are easier to shape.
- Vegetable Oil: For frying our tortilla shells. A neutral-flavored oil like canola, sunflower, or grapeseed oil is ideal as it won’t impart any unwanted flavors to our sweet shells.
- Cinnamon Sugar: This simple mixture is going to coat our freshly fried shells, adding an irresistible sweet and spiced crunch. You can easily make your own by mixing about 1/4 cup granulated sugar with 1 teaspoon ground cinnamon. If you prefer, a simple dusting of powdered sugar after frying would also be delicious!
- Full-Fat Cream Cheese: This is the heart of our no-bake cheesecake filling. Make sure it’s softened to room temperature for a smooth, lump-free mixture. Using full-fat cream cheese provides the best richness and stability for our filling. Low-fat cream cheese can be used but might result in a slightly less firm and creamy texture.
- Powdered Sugar (Confectioners’ Sugar): This fine sugar sweetens our cheesecake filling beautifully and dissolves without any grittiness. Don’t substitute with granulated sugar, as it won’t give you the same smooth texture.
- Heavy Cream (or Whipping Cream): Whipped into stiff peaks, this lightens our cheesecake filling, making it airy and delightful. Ensure your cream is very cold before whipping for the best results. You cannot substitute this with milk or half-and-half; it needs to be heavy cream for its fat content and ability to whip.
- Vanilla Extract: A touch of vanilla enhances all the sweet flavors in our cheesecake filling. I always use a good quality pure vanilla extract.
- Fruity Pebbles Cereal: The star of the show! We’ll be folding some into the cheesecake filling and using even more as a vibrant, crunchy topping. I love the texture and burst of color it adds. Feel free to crush some of the cereal for the filling if you want a more integrated flavor, or leave them whole for bigger pops of crunch.
- Optional Toppings: A dollop of whipped cream, a few extra whole Fruity Pebbles, or a drizzle of melted white chocolate can take these tacos over the top!
Step-by-Step Instructions
Let’s get cooking! Making these Fruity Pebbles Cheesecake Tacos is a super fun process, and I’ll walk you through each step to ensure you create the most delightful dessert experience.
Step 1: Prepare Your Crispy “Taco” Shells
- First things first, let’s get those tortillas ready. In a large, heavy-bottomed skillet or a shallow pot, pour enough vegetable oil to create about a 1/2-inch depth. Heat the oil over medium heat until it reaches about 350-375°F (175-190°C). If you don’t have a thermometer, a small piece of tortilla should sizzle immediately when dropped in.
- While the oil heats, prepare your cinnamon sugar. In a shallow dish, mix together your granulated sugar and ground cinnamon. Set aside.
- Carefully place one tortilla into the hot oil. Fry for about 15-30 seconds on one side until it just starts to puff up and turn golden.
- Using tongs, carefully flip the tortilla. As soon as you flip it, gently fold it in half or drape it over the handle of a wooden spoon or a metal spatula to create that classic taco shell shape. Hold it in place for another 15-30 seconds until it’s golden brown and crispy, keeping that taco shape.
- Carefully remove the crispy shell from the oil and immediately transfer it to the dish with cinnamon sugar. Toss gently to coat both sides.
- Place the coated shell on a wire rack set over a baking sheet to drain any excess oil and cool completely. Repeat this process with the remaining tortillas, being careful not to overcrowd the pan. If needed, adjust your oil temperature between batches. Cooling completely is crucial for them to hold their crispness.
Step 2: Make the No-Bake Cheesecake Filling
- In a large mixing bowl, using an electric mixer, beat the softened full-fat cream cheese until it’s smooth and creamy, with no lumps. This should take about 1-2 minutes.
- Add the powdered sugar to the cream cheese and continue beating on medium speed until well combined and fluffy. Scrape down the sides of the bowl as needed.
- In a separate, chilled mixing bowl, pour the very cold heavy cream and vanilla extract. Beat with clean beaters on high speed until stiff peaks form. Be careful not to overbeat, or it will turn into butter!
- Gently fold the whipped cream into the cream cheese mixture using a spatula. Do this in two additions, being careful not to deflate the cream. You want to keep the filling light and airy.
- Finally, gently fold in about 1 cup of Fruity Pebbles cereal. I like to leave some whole for texture and vibrant color.
Step 3: Assemble and Chill Your Fruity Pebbles Cheesecake Tacos
- Once your taco shells are completely cool and crisp, it’s time for the fun part! You can either spoon the cheesecake filling into each shell or, for a neater look, transfer the filling to a piping bag with a large star tip (or just snip off the corner of a Ziploc bag) and pipe it into the shells.
- Arrange the filled tacos on a serving platter or a baking sheet.
- For the best texture and for the filling to set properly, place the assembled tacos in the refrigerator for at least 30 minutes to 1 hour. This helps the cheesecake filling firm up beautifully.
Step 4: Garnish and Serve
- Right before serving, add your final touches! Sprinkle more whole Fruity Pebbles over the top of each taco for extra crunch and a burst of color.
- If desired, add a dollop of whipped cream or a drizzle of melted white chocolate for an extra special treat.
- Serve immediately and enjoy the delightful combination of crispy, sweet shells and creamy, fruity cheesecake!
Tips & Suggestions
To make sure your Fruity Pebbles Cheesecake Tacos are absolutely perfect, here are a few friendly tips and suggestions from my kitchen:
- Perfecting Your Taco Shells:
- Oil Temperature is Key: Don’t let your oil get too hot or too cool. Too hot and your shells will burn before they crisp; too cool and they’ll become greasy. Aim for 350-375°F (175-190°C).
- Shape Immediately: Once you pull the tortilla out of the oil, it starts to cool and stiffen very quickly. Make sure to shape it into a taco shell right away. I find draping it over a wooden spoon handle or using tongs to hold it in shape works best.
- Cool Completely: Don’t rush this step! Warm shells will soften your cheesecake filling. Let them cool fully on a wire rack to ensure maximum crispness.
- Cinnamon Sugar Adhesion: Toss the shells in cinnamon sugar while they are still warm and just out of the oil. This helps the sugar stick better.
- Cheesecake Filling Perfection:
- Room Temperature Cream Cheese: I can’t stress this enough! Softened cream cheese ensures a super smooth, lump-free filling. If it’s too cold, you’ll end up with lumps, no matter how much you beat it.
- Don’t Overmix the Whipped Cream: Whip the heavy cream until just stiff peaks form. Over-whipping can lead to a grainy texture or, worse, butter!
- Gentle Folding: When combining the whipped cream with the cream cheese mixture, fold gently. This maintains the airiness of the whipped cream, giving you a light and fluffy filling.
- Fruity Pebbles Integration: For a slightly different texture, you can crush about half of the Fruity Pebbles you plan to fold into the filling before adding them. This gives a more integrated “fruity” flavor throughout, while the whole pieces provide distinct crunch.
- Make-Ahead Magic:
- Shells Ahead of Time: You can absolutely fry and coat your taco shells a day or two in advance. Store them in an airtight container at room temperature to keep them crisp.
- Filling Prep: The cheesecake filling can also be made a day ahead and stored in an airtight container in the refrigerator. Just give it a quick, gentle stir before filling the shells.
- Assemble Just Before Serving: For the absolute best experience (crispy shell, fresh filling), I recommend assembling the tacos no more than an hour or two before serving, as the moisture from the filling can eventually soften the shells.
- Customization Fun: Feel free to experiment with other cereals (like Cinnamon Toast Crunch for a different flavor profile), add a drizzle of chocolate or caramel sauce, or even sprinkle on some zest for a brighter note. A few fresh berries on top would also be lovely!
Storage
While these Fruity Pebbles Cheesecake Tacos are truly best enjoyed fresh, you can certainly store them if you have any delicious leftovers or want to prepare them slightly ahead of time. Here’s how I recommend storing each component:
- Assembled Fruity Pebbles Cheesecake Tacos:
Once assembled, the shells will slowly start to absorb moisture from the cheesecake filling, becoming softer over time. For the best crispness, I suggest assembling them no more than an hour or two before you plan to serve. If you do have leftovers, store them in a single layer in an airtight container in the refrigerator for up to 1-2 days. You might find the shells have softened a bit, but they’ll still be absolutely delicious!
- Unfilled Crispy Taco Shells:
Your fried and cinnamon-sugar-coated shells will stay beautifully crisp for a few days if stored properly. Once they are completely cooled, place them in an airtight container at room temperature. Avoid refrigerating them, as the humidity in the fridge can make them lose their crunch. They can typically last for 2-3 days.
- No-Bake Cheesecake Filling:
The cheesecake filling is quite stable on its own. You can prepare it a day or two in advance. Store the filling in an airtight container in the refrigerator. It will keep well for up to 3-4 days. Just give it a gentle stir before you’re ready to fill your shells.
Remember, the fresher, the better for that delightful contrast between the crispy shell and the creamy filling!
Final Thoughts
And there you have it! I truly believe these Fruity Pebbles Cheesecake Tacos are more than just a dessert; they’re an experience waiting to happen. What makes this recipe an absolute must-try is its brilliant marriage of textures and flavors – the delightful crunch of the ‘taco’ shell, the smooth, tangy creaminess of the cheesecake filling, and that unforgettable burst of sweet, fruity nostalgia from the Fruity Pebbles cereal. It’s a playful, vibrant, and utterly irresistible combination.
I can confidently say that creating and sharing these Fruity Pebbles Cheesecake Tacos will bring a smile to anyone’s face. They’re perfect for celebrations, a unique weeknight treat, or simply whenever you need a little extra joy and color in your life. Don’t just make dessert; create a memory. I promise, once you take that first bite, you’ll understand why I’m so excited about these fantastic treats!
Fruity Pebbles Cheesecake Tacos: Fun & Flavorful!

Get ready for a dessert that combines the vibrant crunch of Fruity Pebbles cereal with the creamy decadence of cheesecake, all wrapped in a crispy taco shell. These Fruity Pebbles Cheesecake Tacos are visually stunning, ridiculously tasty, and a delightful experience for any gathering!
- Prep Time: 30 mins
- Cook Time: 15 mins
- Total Time: 45 minutes
- Yield: 12 tacos
- Category: Dessert
- Method: Frying and No-Bake
- Cuisine: American
Ingredients
- Small Flour Tortillas
- Vegetable Oil
- Cinnamon Sugar (1/4 cup granulated sugar with 1 teaspoon ground cinnamon)
- Full-Fat Cream Cheese
- Powdered Sugar (Confectioners' Sugar)
- Heavy Cream (or Whipping Cream)
- Vanilla Extract
- Fruity Pebbles Cereal
- Optional Toppings (whipped cream, whole Fruity Pebbles, melted white chocolate)
Instructions
- Prepare Your Crispy 'Taco' Shells: Pour enough vegetable oil into a large, heavy-bottomed skillet to create about a 1/2-inch depth and heat over medium heat until it reaches about 350-375°F (175-190°C).
- Mix together granulated sugar and ground cinnamon in a shallow dish to prepare your cinnamon sugar.
- Carefully place one tortilla into the hot oil and fry for about 15-30 seconds until it starts to puff up and turn golden.
- Flip the tortilla and gently fold it in half or drape it over the handle of a wooden spoon to create a taco shell shape, holding it in place for another 15-30 seconds until golden brown and crispy.
- Remove the crispy shell from the oil and transfer it to the dish with cinnamon sugar, tossing gently to coat both sides.
- Place the coated shell on a wire rack set over a baking sheet to drain excess oil and cool completely. Repeat with remaining tortillas.
- Make the No-Bake Cheesecake Filling: In a large mixing bowl, beat the softened full-fat cream cheese until smooth and creamy, about 1-2 minutes.
- Add powdered sugar to the cream cheese and beat on medium speed until well combined and fluffy.
- In a separate chilled mixing bowl, pour the very cold heavy cream and vanilla extract, then beat on high speed until stiff peaks form.
- Gently fold the whipped cream into the cream cheese mixture in two additions, being careful not to deflate the cream.
- Fold in about 1 cup of Fruity Pebbles cereal, leaving some whole for texture.
- Assemble and Chill Your Fruity Pebbles Cheesecake Tacos: Once taco shells are completely cool, spoon or pipe the cheesecake filling into each shell.
- Arrange the filled tacos on a serving platter or baking sheet.
- Refrigerate the assembled tacos for at least 30 minutes to 1 hour to help the filling firm up.
- Garnish and Serve: Sprinkle more whole Fruity Pebbles over the top of each taco and add a dollop of whipped cream or a drizzle of melted white chocolate if desired.
- Serve immediately and enjoy!
Nutrition
- Serving Size: 1 taco
- Calories: 250
- Sugar: 15 g
- Sodium: 150 mg
- Fat: 12 g
- Saturated Fat: 7 g
- Unsaturated Fat: 3 g
- Trans Fat: 0 g
- Carbohydrates: 30 g
- Fiber: 1 g
- Protein: 3 g
- Cholesterol: 30 mg
Keywords: Ensure the cream cheese is at room temperature for a smooth filling. Don't overmix the whipped cream to avoid a grainy texture. Assemble the tacos no more than an hour or two before serving for the best texture.
Leave a Comment