
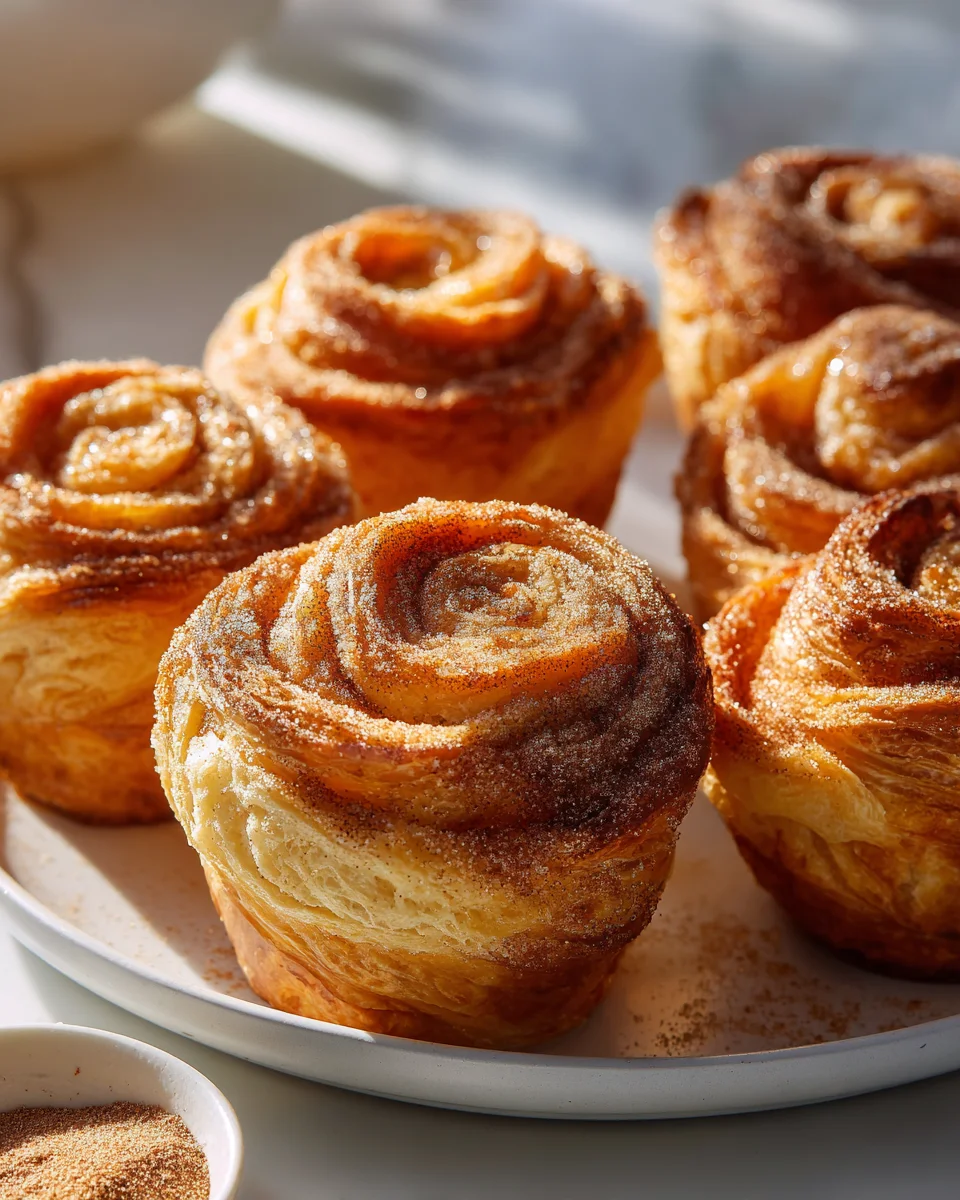
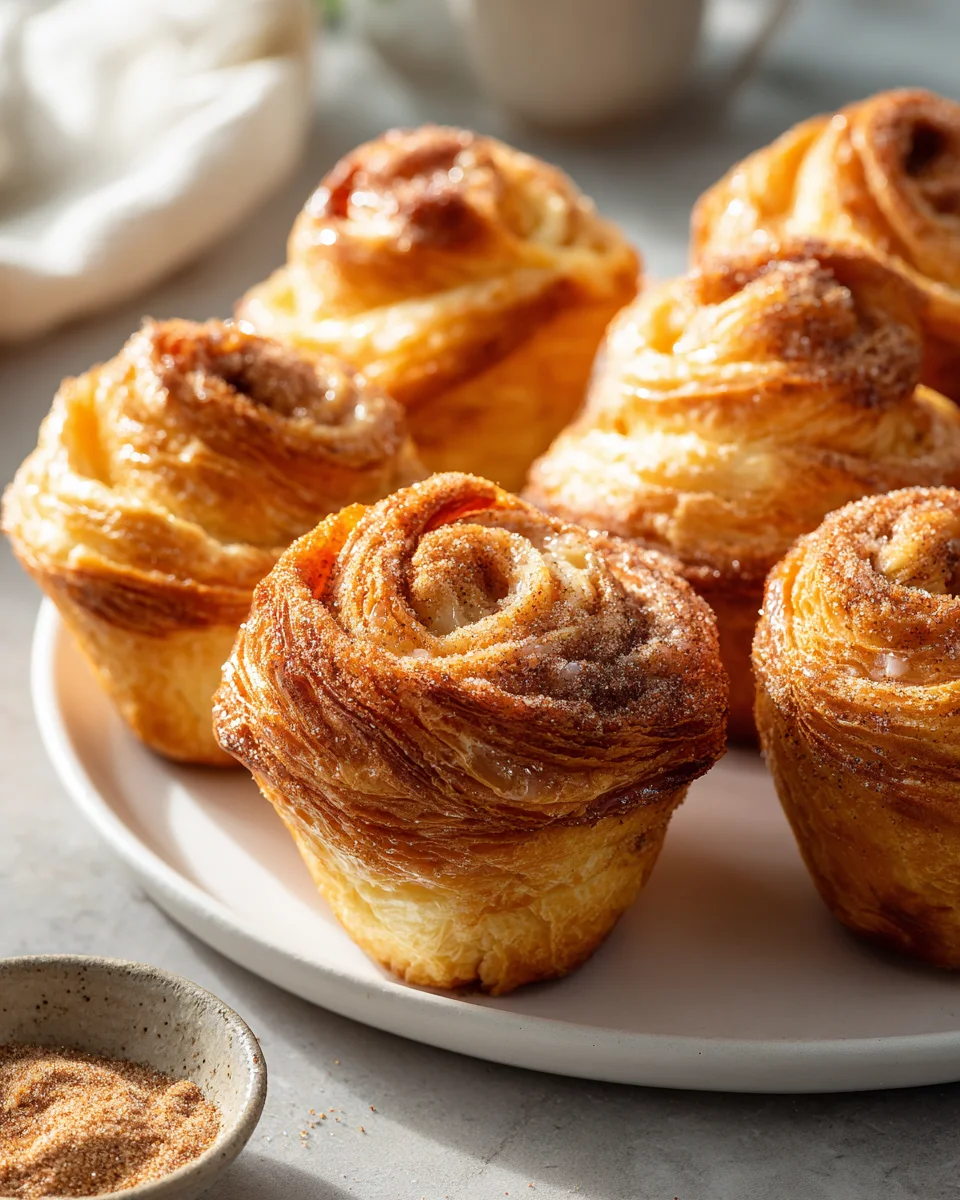
Delicious Cruffins
Oh, prepare yourselves, because you’re about to fall head over heels for my recipe for Delicious Cruffins! If you, like me, find yourself torn between the delightful flakiness of a perfect croissant and the comforting grab-and-go nature of a muffin, then this recipe is truly special. My version isn’t just a croissant stuffed into a muffin tin; it’s crafted to deliver an extra layer of buttery richness and that incredibly satisfying shattering crust, making each bite an absolute dream.
I promise you, once you try these, you’ll understand why everyone raves about them. Readers will adore how these beautiful pastries look like they’re straight out of a high-end bakery, yet they’re surprisingly achievable in your own kitchen. They’re perfect for impressing brunch guests, treating your family to a weekend indulgence, or simply enjoying a moment of pure bliss with your morning coffee. The combination of textures and flavors is just irresistible!
So, what exactly are we diving into? A Cruffin is a glorious hybrid pastry, merging the delicate, laminated layers of a croissant with the charming, convenient shape of a muffin. We’ll be creating those iconic flaky layers, rolling them up, and baking them in a muffin tin to achieve that distinct shape and an even bake. Often dusted with sugar or filled with something divine, these ‘Delicious Cruffins’ are a truly exceptional treat that bridges the gap between two beloved classics. Let’s get baking!
Ingredient Notes
Making truly delicious Cruffins is an incredibly rewarding experience, and it all starts with understanding your ingredients. While the process might seem intricate, using the right components is key to achieving that perfect flaky, tender, and buttery pastry. Here’s a breakdown of what I recommend for my ‘Delicious Cruffins’:
Flour
- Strong Bread Flour: This is non-negotiable for cruffins. I always reach for a high-protein bread flour (around 12-14% protein). The higher protein content develops stronger gluten, which is essential for creating those beautiful, distinct layers and giving the cruffins their characteristic chewiness and structure. All-purpose flour simply won’t give you the same results.
- Substitution: While not ideal, if you absolutely must, you could try a blend of bread flour and a small amount of all-purpose flour, but expect a slightly less structured result.
Butter
- High-Quality Unsalted Butter: This is arguably the star of the show for any laminated dough, and cruffins are no exception. I always use butter with a high butterfat content (at least 82%). European-style butters are fantastic for this purpose. The butter needs to be firm but pliable – too cold and it will crack, too warm and it will melt into the dough, ruining your layers. Consistency is everything when laminating.
- Substitution: Do not substitute with margarine or low-fat butter; the water content is too high, and you won’t get the desired flakiness or flavor. There’s no real good substitute for good butter here.
Yeast
- Instant Dry Yeast: I prefer instant yeast as it doesn’t require proofing beforehand and can be mixed directly with the dry ingredients. It’s reliable and gives a consistent rise, which is important for light, airy cruffins.
- Substitution: If using active dry yeast, remember to activate it first by dissolving it in a small portion of the warm milk (from the recipe total) with a pinch of sugar for about 5-10 minutes, until frothy, before adding to your dough.
Sugar
- Granulated Sugar: A modest amount of sugar in the dough helps activate the yeast, tenderizes the crumb, and contributes to the beautiful browning during baking. It’s not just for sweetness; it plays a structural role too.
- Substitution: You can adjust the amount slightly to your preference, but don’t omit it entirely as it impacts the yeast activity and texture.
Milk
- Whole Milk: I always opt for whole milk because the fat content enriches the dough, making it more tender and adding to the flavor. It also provides the necessary liquid for gluten development.
- Substitution: You can use 2% milk, but I wouldn’t go lower. For a non-dairy option, unsweetened almond milk or oat milk can work, though they might slightly alter the richness and crumb structure.
Salt
- Fine Sea Salt: A little salt is crucial. It balances the sweetness, enhances all the other flavors, and importantly, controls yeast activity. Don’t skip it!
- Substitution: Any fine salt will do, but I find sea salt provides the best flavor.
Step-by-Step Instructions
Alright, let’s dive into making these incredible ‘Delicious Cruffins’! This process requires patience and attention to detail, but I promise the results are well worth it. Read through all the steps before you begin.
Step 1: Prepare the Dough (The Night Before or Early Morning)
- In a large bowl, whisk together 400g strong bread flour, 50g granulated sugar, 7g instant dry yeast, and 5g fine sea salt.
- In a separate bowl or measuring jug, combine 200ml whole milk (lukewarm, around 95-105°F / 35-40°C) with 1 large egg and 25g melted unsalted butter.
- Pour the wet ingredients into the dry ingredients. Mix with a spatula until a shaggy dough forms, then turn it out onto a lightly floured surface.
- Knead for 8-10 minutes until the dough is smooth, elastic, and passes the windowpane test (you can stretch a small piece thin enough to see light through it without tearing). This is crucial for strong gluten development.
- Place the dough in a lightly oiled bowl, cover it with plastic wrap, and refrigerate overnight (at least 8 hours, up to 18 hours). This slow, cold fermentation develops flavor and makes the dough easier to work with.
Step 2: Prepare the Butter Block
- The next day, take 200g cold unsalted butter (high-fat content is best) and place it between two sheets of parchment paper.
- Using a rolling pin, pound and roll the butter into an approximately 6×8-inch (15x20cm) rectangle. Try to get it as even in thickness as possible. Place this butter block back in the refrigerator while you prepare the dough.
Step 3: First Turn (Lamination)
- Remove the chilled dough from the refrigerator. On a lightly floured surface, roll it out into a rectangle approximately 12×16 inches (30x40cm). It should be about twice the size of your butter block.
- Place the cold butter block squarely in the center of the dough, ensuring it covers exactly two-thirds of the dough’s width.
- Fold the uncovered third of the dough over the butter block, then fold the remaining third of the dough (with the butter) over that. You’ll now have a three-layered packet of dough and butter.
- Rotate the dough 90 degrees so the open seam is to your right. Gently press the edges to seal.
- Roll the dough out again to approximately 8×24 inches (20x60cm). Keep the thickness as even as possible.
- Perform another tri-fold: fold one-third of the dough over the center, then the remaining third over that. You should now have a neat rectangular packet.
- Wrap the dough tightly in plastic wrap and refrigerate for 30 minutes. This is your first “turn.”
Step 4: Second Turn
- After 30 minutes, remove the dough from the fridge. Place it on your lightly floured surface with the seam to your right again (this is important to maintain consistent layers).
- Roll the dough out again to approximately 8×24 inches (20x60cm), trying to maintain even thickness.
- Perform another tri-fold, just as before.
- Wrap the dough tightly in plastic wrap and refrigerate for another 30-45 minutes. This is your second “turn.”
Step 5: Third Turn and Final Roll
- Repeat the process for a third turn: remove the dough, orient it with the seam to your right, roll it out to 8×24 inches (20x60cm), and perform a final tri-fold.
- Wrap the dough and refrigerate for at least 1-2 hours, or up to 4 hours. This final chill is crucial for the butter to firm up and the gluten to relax before shaping.
- After the final chill, remove the dough. On a lightly floured surface, roll the dough out into a large, very thin rectangle, approximately 16×20 inches (40x50cm) and about 1/8 inch (3mm) thick. The thinner you can get it, the more layers your cruffins will have!
Step 6: Shaping the Cruffins
- Once the dough is rolled out, trim the edges to create a neat rectangle.
- Using a sharp knife or pizza cutter, cut the dough lengthwise into strips about 1 inch (2.5cm) wide. You should get 8-10 strips.
- Take one strip, hold it at both ends, and gently twist it into a spiral.
- Then, coil the twisted strip into a tight snail-like shape, tucking the end underneath.
- Carefully place each coiled cruffin into a well-greased standard muffin tin. Repeat with the remaining dough strips.
Step 7: Proofing
- Cover the muffin tins loosely with plastic wrap or a clean kitchen towel.
- Let the cruffins proof in a warm, draft-free place for 1.5 to 2.5 hours, or until they have nearly doubled in size and look puffy. This can take longer or shorter depending on your room temperature. Don’t rush this step!
- Preheat your oven to 375°F (190°C) during the last 30 minutes of proofing.
Step 8: Bake and Finish
- Bake the cruffins for 20-25 minutes, or until they are deeply golden brown and puffed up. If they are browning too quickly, you can loosely tent them with foil for the last 5-10 minutes.
- Once baked, remove the cruffins from the oven. Let them cool in the muffin tin for 5 minutes, then carefully transfer them to a wire rack to cool completely.
- While still warm, I love to toss them in granulated sugar or cinnamon sugar for a classic finish. You can also pipe in a filling (like pastry cream or jam) once cooled, using a piping bag with a small round tip.
Tips & Suggestions
Mastering ‘Delicious Cruffins’ is a journey, and I’ve learned a few tricks along the way that I want to share to help you achieve absolute perfection every time. These tips are specific to working with laminated dough and ensuring your cruffins live up to their name.
- Temperature Control is King: This is the most crucial tip for laminated doughs. Keep everything cold! Your dough, your butter, and even your kitchen if possible. If the butter gets too warm, it will melt into the dough, and you’ll lose your distinct layers. If your dough feels sticky or butter starts to seep, pop it back in the fridge immediately for 10-15 minutes to firm up. A cold dough is easier to handle and prevents butter leakage.
- Don’t Rush the Chilling: The chilling times between each turn are not suggestions; they’re vital. They allow the butter to re-solidify and, perhaps more importantly, let the gluten in the dough relax. If the gluten isn’t relaxed, the dough will snap back excessively when you try to roll it out, making the process frustrating and potentially tearing your precious layers.
- Flour Lightly: When rolling, use just enough flour to prevent sticking. Too much flour will dry out your dough, making it tough, and can also get incorporated into the layers, making them cloudy instead of distinct. Dust off any excess flour with a pastry brush before folding.
- Gentle Rolling: Be firm but gentle with your rolling pin. Apply even pressure across the dough to ensure consistent thickness and prevent butter pockets from forming or tearing the dough. Don’t press down too hard, especially at the beginning of each roll.
- Perfect Proofing: The final proofing stage is critical. Over-proofed cruffins will collapse in the oven, and under-proofed cruffins will be dense and lack the signature open crumb. Look for the dough to be visibly puffy and almost doubled, but still have some spring back when gently poked. I often place them in a slightly warm, turned-off oven (with a bowl of hot water for humidity) to create an ideal environment.
- Don’t Overbake: While you want a beautiful golden-brown color, overbaking can dry out your cruffins and make them tough. Keep an eye on them, and remember ovens vary. If they’re browning too fast, a loose foil tent can help.
- Flavor Variations are Endless: My ‘Delicious Cruffins’ recipe is a fantastic base for creativity!
- Sweet Fillings: Once completely cooled, you can inject them with pastry cream, hazelnut spread, fruit curd, or jam.
- Coatings: Besides the classic cinnamon sugar, try a simple glaze (powdered sugar and milk/lemon juice), or a sprinkle of coarse sugar before baking for extra crunch.
- Zests & Spices: Add lemon or orange zest to the dough for a fragrant twist, or a pinch of cardamom or nutmeg.
- Use a Sharp Knife: When cutting the dough strips, a very sharp knife or pizza cutter will give you clean cuts, which helps maintain the integrity of your layers as you twist and coil.
Storage
Once you’ve gone to all the effort of creating these ‘Delicious Cruffins’, you’ll want to ensure they stay as fresh and wonderful as possible. Here’s my advice for storing them properly.
At Room Temperature
- Best within 24 Hours: Cruffins, like most laminated pastries, are truly at their absolute best on the day they are baked. The layers are flakiest, and the butter flavor is most prominent.
- Airtight Container: If you have any leftovers (a rare occurrence in my house!), store them in an airtight container at room temperature. They will remain good for up to 2 days, though they will lose some of their crispness and become a bit softer.
- Reheating: To revive them, I love to pop them in a preheated oven at 300°F (150°C) for about 5-8 minutes. This brings back some of the warmth and flakiness, almost like they were freshly baked. A toaster oven works wonders for this too.
Freezing Cruffins
- Baked Cruffins: Once completely cooled, cruffins freeze beautifully. Wrap each cruffin individually in plastic wrap, then place them in a freezer-safe bag or airtight container. They can be frozen for up to 1 month.
- Thawing and Reheating Frozen Cruffins: When you’re ready to enjoy one, simply remove it from the freezer. You can thaw it at room temperature for an hour or two, then warm it in a preheated oven at 350°F (175°C) for 10-15 minutes until heated through and crisp again. You can also reheat directly from frozen in a slightly cooler oven (around 300°F / 150°C) for a bit longer, about 15-20 minutes, or until warm and flaky.
- Unbaked Cruffins (Dough): While you can freeze the raw dough after the final turn and before shaping, I generally don’t recommend it for cruffins. The delicate layers and yeast activity can be compromised by freezing raw, laminated dough, potentially leading to less rise and flakiness. If you must, freeze the dough well-wrapped, and thaw overnight in the refrigerator before shaping and proofing, but expect slightly variable results. It’s usually better to bake them first then freeze.
Enjoy your delightful cruffins!
Final Thoughts
There’s truly nothing quite like the experience of baking and then savoring your very own batch of Delicious Cruffins. I’m confident that once you try this recipe, you’ll understand why it has become such a beloved treat. The way the buttery, flaky layers of a croissant marry perfectly with the soft, tender texture of a muffin creates a symphony of taste and feel in every bite. It’s a pastry that feels both familiar and wonderfully novel at the same time.
I genuinely believe this recipe for Delicious Cruffins is an absolute must-try for any baking enthusiast. It offers a rewarding journey from start to finish, culminating in a spectacular creation that will impress and delight. So, go ahead, gather your ingredients, and prepare to fill your home with the irresistible aroma and incredible taste of these fantastic cruffins. Happy baking!
Delicious Cruffins: The Best Flaky Croissant-Muffin Recipe

Experience the perfect blend of flaky croissant and convenient muffin with these Delicious Cruffins! This recipe delivers buttery richness and a satisfying shattering crust in every bite.
- Prep Time: 8 hours (overnight)
- Cook Time: 25 minutes
- Total Time: 8 hours 25 minutes
- Yield: 8-10 servings 1x
- Category: Dessert
- Method: Baking
- Cuisine: French
Ingredients
- 400g strong bread flour
- 50g granulated sugar
- 7g instant dry yeast
- 5g fine sea salt
- 200ml whole milk (lukewarm, around 95-105°F / 35-40°C)
- 1 large egg
- 25g melted unsalted butter
- 200g cold unsalted butter (high-fat content)
Instructions
- In a large bowl, whisk together 400g strong bread flour, 50g granulated sugar, 7g instant dry yeast, and 5g fine sea salt.
- In a separate bowl or measuring jug, combine 200ml whole milk (lukewarm, around 95-105°F / 35-40°C) with 1 large egg and 25g melted unsalted butter.
- Pour the wet ingredients into the dry ingredients. Mix with a spatula until a shaggy dough forms, then turn it out onto a lightly floured surface.
- Knead for 8-10 minutes until the dough is smooth, elastic, and passes the windowpane test.
- Place the dough in a lightly oiled bowl, cover it with plastic wrap, and refrigerate overnight (at least 8 hours, up to 18 hours).
- The next day, take 200g cold unsalted butter and place it between two sheets of parchment paper.
- Using a rolling pin, pound and roll the butter into an approximately 6×8-inch (15x20cm) rectangle. Place this butter block back in the refrigerator.
- Remove the chilled dough from the refrigerator. On a lightly floured surface, roll it out into a rectangle approximately 12×16 inches (30x40cm).
- Place the cold butter block squarely in the center of the dough, ensuring it covers exactly two-thirds of the dough's width.
- Fold the uncovered third of the dough over the butter block, then fold the remaining third of the dough (with the butter) over that.
- Rotate the dough 90 degrees so the open seam is to your right. Gently press the edges to seal.
- Roll the dough out again to approximately 8×24 inches (20x60cm).
- Perform another tri-fold: fold one-third of the dough over the center, then the remaining third over that.
- Wrap the dough tightly in plastic wrap and refrigerate for 30 minutes.
- After 30 minutes, remove the dough from the fridge. Place it on your lightly floured surface with the seam to your right again.
- Roll the dough out again to approximately 8×24 inches (20x60cm).
- Perform another tri-fold, just as before.
- Wrap the dough tightly in plastic wrap and refrigerate for another 30-45 minutes.
- Repeat the process for a third turn: remove the dough, orient it with the seam to your right, roll it out to 8×24 inches (20x60cm), and perform a final tri-fold.
- Wrap the dough and refrigerate for at least 1-2 hours, or up to 4 hours.
- After the final chill, remove the dough. On a lightly floured surface, roll the dough out into a large, very thin rectangle, approximately 16×20 inches (40x50cm) and about 1/8 inch (3mm) thick.
- Once the dough is rolled out, trim the edges to create a neat rectangle.
- Using a sharp knife or pizza cutter, cut the dough lengthwise into strips about 1 inch (2.5cm) wide.
- Take one strip, hold it at both ends, and gently twist it into a spiral.
- Then, coil the twisted strip into a tight snail-like shape, tucking the end underneath.
- Carefully place each coiled cruffin into a well-greased standard muffin tin.
- Cover the muffin tins loosely with plastic wrap or a clean kitchen towel.
- Let the cruffins proof in a warm, draft-free place for 1.5 to 2.5 hours, or until they have nearly doubled in size.
- Preheat your oven to 375°F (190°C) during the last 30 minutes of proofing.
- Bake the cruffins for 20-25 minutes, or until they are deeply golden brown and puffed up.
- Once baked, remove the cruffins from the oven. Let them cool in the muffin tin for 5 minutes, then carefully transfer them to a wire rack to cool completely.
- While still warm, toss them in granulated sugar or cinnamon sugar for a classic finish.
Nutrition
- Serving Size: 1 cruffin
- Calories: 250
- Sugar: 10 g
- Sodium: 150 mg
- Fat: 15 g
- Saturated Fat: 10 g
- Unsaturated Fat: 5 g
- Trans Fat: 0 g
- Carbohydrates: 25 g
- Fiber: 1 g
- Protein: 4 g
- Cholesterol: 30 mg
Keywords: Keep everything cold to maintain distinct layers. Don't rush the chilling times; they are vital for the dough's structure. Use a sharp knife for clean cuts when shaping the cruffins.
Leave a Comment