
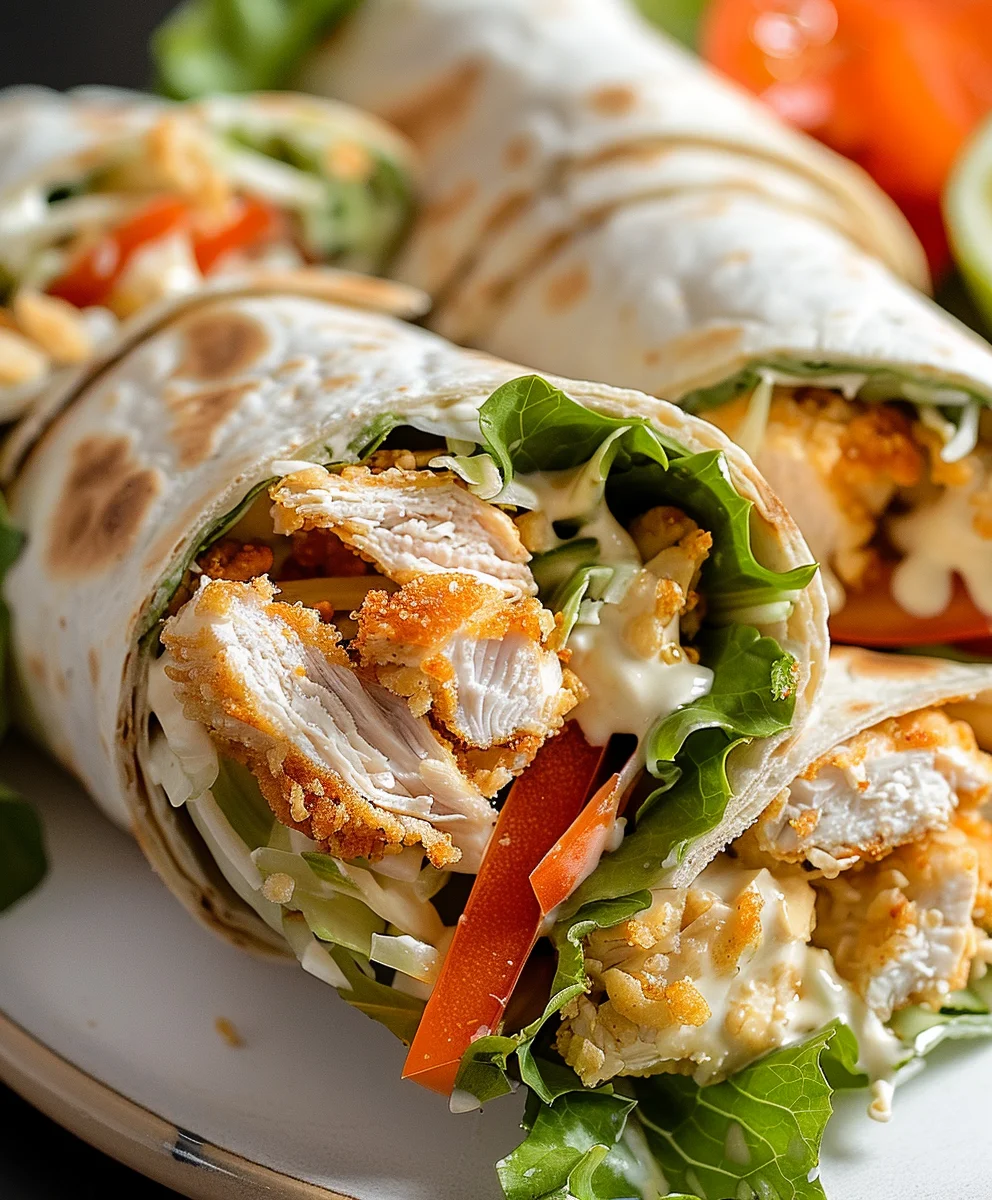
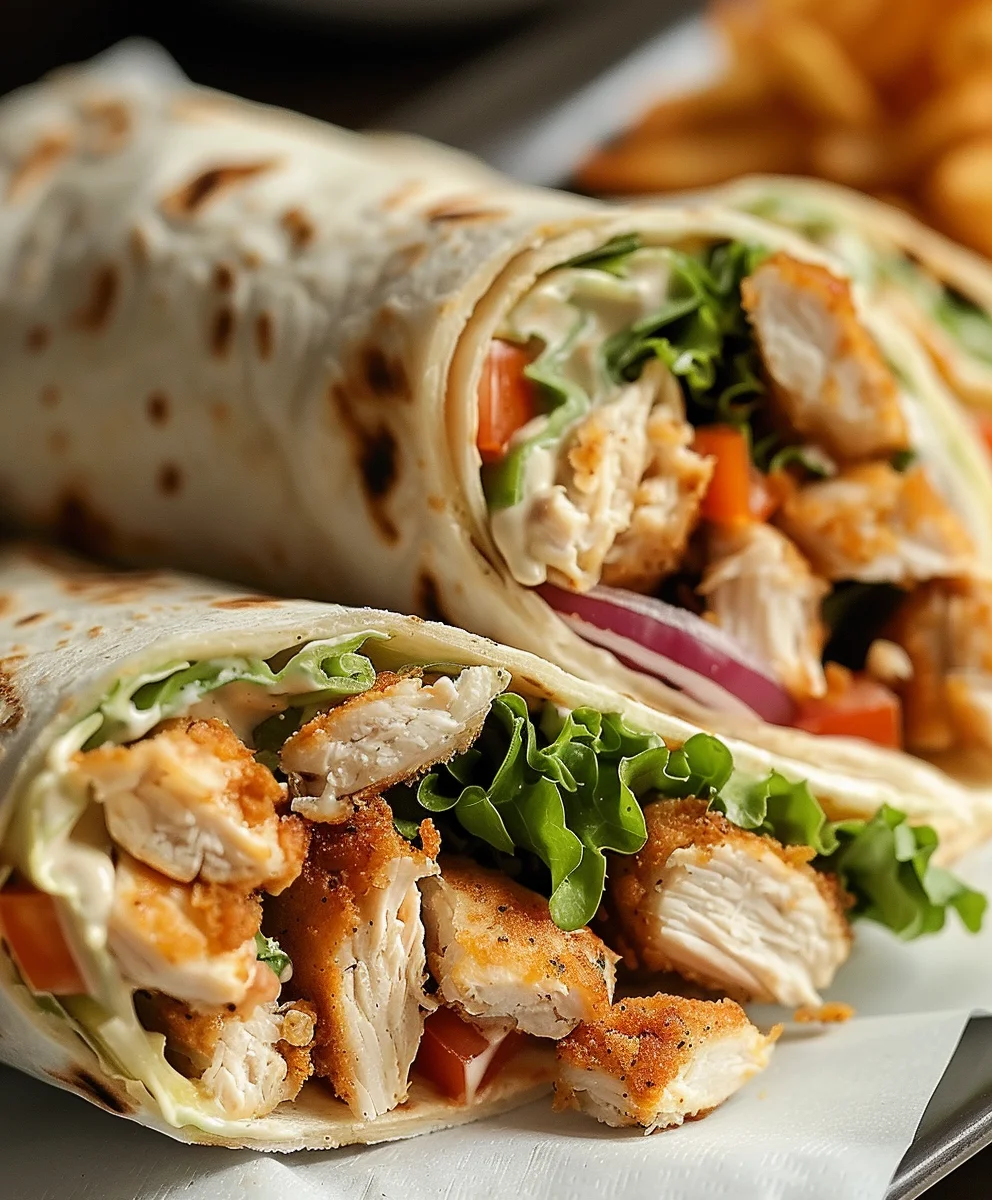
Knuspriger Chicken Ranch Snack Wrap – there’s a certain magic to a dish that perfectly combines convenience with irresistible flavor and texture, transforming a simple meal into an experience. Imagine sinking your teeth into a delightful creation where every bite offers a harmonious symphony: the satisfying crunch of golden, seasoned chicken, the cool, refreshing crispness of fresh greens, and the creamy, tangy embrace of classic ranch dressing, all elegantly nestled within a soft, pliable tortilla. It’s more than just a quick bite; it’s a moment of pure, unadulterated culinary pleasure that truly elevates the everyday.
While the precise genesis of the “snack wrap” as a distinct item may be rooted in contemporary fast-casual trends, the fundamental idea of wrapping diverse ingredients into a portable, fulfilling meal is a tradition that spans centuries and cultures worldwide. This particular iteration, however, masterfully fuses deeply cherished American flavors—the iconic zest of ranch dressing and the comforting appeal of crispy chicken—into an accessible and utterly enjoyable format.
Why This Dish Captures Hearts (and Taste Buds)
People universally adore this dish for its incredible textural interplay and its unparalleled convenience. The delightful contrast between the crunchy chicken, the vibrant lettuce, and the smooth, rich ranch is simply captivating. It’s remarkably satisfying, incredibly quick to assemble, making it the quintessential choice for a speedy lunch, a delectable appetizer, or even a light, flavorful dinner. I find its adaptability truly makes the Knuspriger Chicken Ranch Snack Wrap a firm favorite for countless individuals seeking a burst of deliciousness without the fuss.
Ingredients:
- For the Crispy Chicken:
- 1 ½ pounds boneless, skinless chicken breast or tenderloins, sliced into ½-inch thick strips or small nuggets (this ensures quicker, even cooking and a perfect fit for a wrap).
- 1 cup all-purpose flour, for dredging (I always use unbleached for a cleaner taste).
- 2 teaspoons smoked paprika (adds a lovely depth and color to our crispy coating).
- 1 teaspoon garlic powder (essential for that savory base).
- ½ teaspoon onion powder.
- ½ teaspoon black pepper, freshly ground (because fresh is always best!).
- 1 teaspoon fine sea salt (or to taste, you can adjust this later).
- 2 large eggs, whisked vigorously with 1 tablespoon of water or milk (this creates our essential liquid binder).
- 2 cups Panko breadcrumbs (my secret for ultimate crispiness! Panko truly makes a difference compared to regular breadcrumbs).
- 4-6 cups vegetable oil, canola oil, or peanut oil, for frying (choose one with a high smoke point). Alternatively, olive oil spray for air frying/baking.
- For the Wraps & Assembly:
- 8-10 small soft flour tortillas (about 6-8 inches in diameter, perfect “snack wrap” size).
- ½ cup ranch dressing (your favorite brand, or homemade if you’re feeling ambitious!).
- 2 cups shredded iceberg lettuce or romaine lettuce (iceberg gives that classic crunch).
- 1 cup shredded Colby Jack or cheddar cheese (a mild, melty cheese works wonders here).
- Optional garnishes: diced tomatoes, thinly sliced red onion, a sprinkle of fresh chives.
Preparing the Crispy Chicken: The Heart of Your Knuspriger Chicken Ranch Snack Wrap
This is where we lay the foundation for our incredible Knuspriger Chicken Ranch Snack Wrap. The crispy chicken is the star, so let’s make it perfect!
- Prepare the Chicken: First things first, take your chicken breast or tenderloins and pat them thoroughly dry with paper towels. This step is crucial because excess moisture can prevent the breading from adhering properly, leading to a less-than-crispy result. Once dry, if you’re using larger chicken breasts, slice them against the grain into ½-inch thick strips or bite-sized nuggets. Uniform pieces cook more evenly, ensuring every bite of your wrap is perfectly tender and cooked through.
- Set Up Your Breading Station: To streamline the process and minimize mess, I always set up a three-station assembly line.
- Station 1 (Flour Mixture): In a shallow dish or plate, combine the all-purpose flour, smoked paprika, garlic powder, onion powder, black pepper, and salt. Whisk these dry ingredients together until they are well combined. The spices in the flour don’t just season the chicken; they also create a flavorful crust.
- Station 2 (Egg Wash): In a second shallow dish, crack your two large eggs and add the tablespoon of water or milk. Whisk thoroughly until the yolks and whites are fully incorporated and slightly frothy. This egg wash acts as the glue for our Panko.
- Station 3 (Panko Breadcrumbs): Pour the Panko breadcrumbs into a third shallow dish. Make sure it’s wide enough to easily coat the chicken pieces.
- Breading the Chicken: Now for the fun part! Working with one piece of chicken at a time, follow this sequence:
- First, dredge the chicken piece in the flour mixture, ensuring it’s completely coated. Gently shake off any excess flour. A thin, even layer is what we’re after.
- Next, dip the floured chicken into the egg wash, making sure all surfaces are moistened. Let any excess egg drip off briefly.
- Finally, transfer the chicken to the Panko breadcrumbs. Press the chicken firmly into the Panko, then flip it over and press again to ensure a thick, even coating of breadcrumbs on all sides. Don’t be shy; a good layer of Panko is key to that “knuspriger” (crispy) texture.
- Place the breaded chicken pieces on a clean plate or baking sheet lined with parchment paper. Repeat this process until all your chicken pieces are beautifully coated. For best results, I sometimes let the breaded chicken rest for about 10-15 minutes in the refrigerator. This brief chill helps the breading adhere even better during cooking.
- Cooking the Crispy Chicken (Choose Your Method):
Option A: Deep Frying (My personal favorite for maximum crispiness for this Knuspriger Chicken Ranch Snack Wrap!)
- Pour your chosen oil (vegetable, canola, or peanut) into a large, heavy-bottomed pot or Dutch oven, ensuring it’s at least 2-3 inches deep.
- Heat the oil over medium-high heat until it reaches a temperature of 350-375°F (175-190°C). If you don’t have a thermometer, you can test it by dropping a tiny pinch of Panko into the oil; it should sizzle vigorously and turn golden brown within a few seconds.
- Carefully lower each breaded chicken piece into the preheated oil, being mindful not to overcrowd the pan. Cooking in batches ensures the oil temperature doesn’t drop too drastically, which could lead to greasy rather than crispy chicken.
- Fry for about 4-6 minutes, or until the chicken is golden brown and cooked through, reaching an internal temperature of 165°F (74°C). Flip them halfway through to ensure even browning.
- Using tongs or a slotted spoon, transfer the cooked chicken to a wire rack set over a baking sheet lined with paper towels. This allows any excess oil to drain off, keeping our chicken perfectly crisp. Lightly season with a pinch more salt immediately after frying, if desired.
Option B: Air Frying (A fantastic lighter alternative!)
- Preheat your air fryer to 375°F (190°C).
- Lightly spray the breaded chicken pieces with olive oil spray on all sides. This helps with browning and crisping.
- Place the chicken in a single layer in the air fryer basket, making sure not to overcrowd it. You’ll likely need to work in batches.
- Air fry for 10-15 minutes, flipping halfway through, until the chicken is golden brown and cooked through (internal temperature of 165°F / 74°C). The exact time can vary depending on your air fryer model and chicken thickness, so keep an eye on it.
Option C: Baking (Another good option for less oil)
- Preheat your oven to 400°F (200°C).
- Place the breaded chicken pieces on a baking sheet lined with parchment paper or a wire rack set over a baking sheet. Lightly spray the chicken with olive oil spray.
- Bake for 18-25 minutes, flipping halfway through, until golden brown and cooked through to 165°F (74°C).
- Keep Warm: As you finish cooking the batches, you can keep the cooked crispy chicken warm in a low oven (around 200°F / 95°C) while you prepare the remaining components of your wrap.
Assembling Your Knuspriger Chicken Ranch Snack Wrap: The Grand Finale!
Now that our chicken is gloriously crispy, it’s time to bring all the elements together to create your delicious Knuspriger Chicken Ranch Snack Wrap.
- Prepare Other Components:
- Wash and shred your iceberg or romaine lettuce. I find that a fine shred works best for wraps, preventing large pieces from pulling out when you take a bite.
- Have your shredded cheese ready.
- Warm your tortillas. This step is important because warm tortillas are more pliable and less likely to crack when folded, making for a much better wrapping experience. You can warm them briefly in a dry skillet over medium heat for about 15-20 seconds per side, microwave them for 15-30 seconds wrapped in a damp paper towel, or stack them and wrap them in foil in a warm oven for a few minutes.
- Layering for Success: Lay one warm tortilla flat on a clean work surface. I always recommend placing your ingredients strategically to maximize flavor in every bite and ensure structural integrity.
H5: The Ranch Base:
Spoon about 1 tablespoon of ranch dressing down the center of the tortilla. Don’t go all the way to the edges, as this will make folding difficult and messy. Spread it evenly to create a flavorful base.
H5: The Freshness Factor:
Next, sprinkle a generous amount of shredded lettuce over the ranch dressing. This adds that crucial crisp texture and fresh counterpoint to the rich chicken and dressing. Follow this with a sprinkle of shredded cheese.
H5: The Star Attraction:
Place 2-3 pieces of your freshly cooked, warm crispy chicken directly on top of the cheese and lettuce. The warmth of the chicken will slightly soften the cheese and dressing, enhancing the melt-in-your-mouth experience.
H5: Optional Extras for Your Knuspriger Chicken Ranch Snack Wrap:
If you’re adding optional garnishes like diced tomatoes or red onion, this is the time to sprinkle them over the chicken. Remember not to overfill, as this makes folding very challenging.
- The Art of Folding Your Knuspriger Chicken Ranch Snack Wrap: This is arguably the most crucial step to prevent a messy eating experience!
- Fold in the Sides: Take the left and right sides of the tortilla and fold them inward, overlapping slightly over the filling. You’re aiming to create a straight edge on both sides, effectively creating a “pocket” for the filling. These side folds act as barriers, keeping the fillings securely inside.
- Roll Up from the Bottom: Now, grasp the bottom edge of the tortilla (the edge closest to you). Tightly pull it up and over the filling, tucking it under the ingredients. As you pull and tuck, apply gentle but firm pressure to keep everything compact.
- Continue Rolling: Continue to roll the tortilla upwards, away from you, maintaining that firm tension. You want a snug roll that holds its shape. The goal is to create a tight, cylinder-like wrap. If done correctly, your wrap should be sealed on the bottom and sides, with only the very top slightly open or neatly tucked in.
- Serve Immediately: For the best experience, serve your Knuspriger Chicken Ranch Snack Wrap immediately while the chicken is still warm and crispy. The contrast of the warm chicken with the cool ranch and crisp lettuce is simply divine!
Tips for the Perfect Knuspriger Chicken Ranch Snack Wrap & Beyond!
Making a great Knuspriger Chicken Ranch Snack Wrap is an art, and a little extra knowledge goes a long way. Here are some tips to elevate your wrap game!
- Customization is Key: Don’t be afraid to experiment with your fillings.
- Cheese Varieties: Try pepper jack for a little kick, mozzarella for more melt, or a Mexican blend.
- Veggie Boost: Add finely diced bell peppers, a spoonful of corn, black beans, or even some thinly sliced avocado for extra creaminess. Just be mindful not to overfill!
- Spice It Up: A dash of hot sauce (like sriracha or buffalo sauce) mixed into your ranch dressing can add a fantastic zing.
- Bacon Love: Crumbled cooked bacon bits are an absolute game-changer in a chicken ranch wrap, adding a smoky, salty crunch that complements the crispy chicken perfectly.
- Achieving Maximum Crispiness:
- Double Breading: For an even thicker, crunchier coating, after the first Panko layer, dip the chicken back into the egg wash and then into the Panko again. This creates a super-crispy crust that truly lives up to “Knuspriger.”
- Don’t Overcrowd: This applies whether you’re frying, air frying, or baking. Giving the chicken enough space allows for even cooking and proper browning, which is crucial for crispiness.
- Resting Post-Frying: Always let your fried chicken rest on a wire rack, not directly on paper towels. The rack allows air circulation, preventing the bottom from becoming soggy.
- Preventing Soggy Wraps:
One common complaint about wraps is that they can get soggy, especially if made ahead. Here are my tricks:
- Barrier Layer: The ranch dressing and cheese actually act as a slight barrier, but you can go a step further. Spread a very thin layer of mayonnaise or cream cheese directly onto the tortilla before adding other wet ingredients. This creates an extra waterproof layer.
- Dry Ingredients First: Layer your drier ingredients (like cheese) closer to the tortilla, and your wetter ingredients (like tomatoes, if using) in the middle.
- Assemble Just Before Serving: The best way to ensure your Knuspriger Chicken Ranch Snack Wrap remains crispy and fresh is to assemble it right before you plan to eat it. The crispy chicken loses its crunch quickly when exposed to moisture from the dressing and lettuce for too long.
- Make-Ahead & Meal Prep Considerations:
While I recommend fresh assembly, you can prep components ahead of time:
- Chicken: Breaded chicken can be prepared and frozen raw on a baking sheet, then transferred to a freezer bag once solid. Cook from frozen, adjusting cooking times as needed. Cooked crispy chicken can be stored in an airtight container in the fridge for 2-3 days and reheated in an air fryer or oven for a refresh of crispiness.
- Veggies: Wash and shred lettuce, grate cheese, and chop any other veggies. Store them separately in airtight containers in the refrigerator.
- Dressing: Have your ranch dressing ready to go.
- This way, you can quickly assemble your Knuspriger Chicken Ranch Snack Wrap in minutes when hunger strikes!
- Serving Suggestions: These wraps are fantastic on their own as a light meal or substantial snack. For a fuller meal, consider serving them alongside:
- A simple green salad with a light vinaigrette.
- Sweet potato fries or regular French fries.
- A cup of homemade soup.
- Fresh fruit for a refreshing contrast.
- Troubleshooting Common Issues:
- Chicken isn’t crispy: Ensure your oil was hot enough (if frying) or your air fryer/oven was preheated. Don’t overcrowd the pan/basket, and make sure the breading was thick and adhered well.
- Wrap is falling apart: You might be overfilling it, or your tortilla wasn’t warm enough to be pliable. Practice the folding technique; it really does make a difference!
- Chicken is dry: Ensure you’re not overcooking the chicken. Use a meat thermometer to check for 165°F (74°C) internal temperature, and remove it from the heat as soon as it reaches it.
- The “Knuspriger” Factor: Remember, the term “Knuspriger” means crispy in German, and it’s the defining characteristic of this dish. Pay special attention to your breading and cooking methods to truly achieve that satisfying crunch that makes this Knuspriger Chicken Ranch Snack Wrap so utterly delightful. Enjoy every single bite!
Conclusion:
As we wrap up our culinary journey today, I truly hope you’re feeling inspired and ready to dive into your kitchen to create what I believe will become a new staple in your recipe rotation. This isn’t just another meal; it’s a testament to how simple ingredients, when brought together with a little care and a touch of ingenuity, can transform into something truly extraordinary. What makes this recipe an absolute must-try, in my humble opinion, is its unparalleled blend of textures and flavors. Imagine that irresistible crunch from the perfectly cooked chicken, encased in a soft, yielding tortilla, all brought to life by the cool, tangy creaminess of ranch dressing, and punctuated by crisp lettuce and fresh tomato. It’s a symphony for your taste buds, a delightful contrast that keeps you coming back for more.
I can confidently say that the Knuspriger Chicken Ranch Snack Wrap offers a remarkable balance of comfort and excitement. It’s hearty enough to satisfy a significant craving, yet light enough not to leave you feeling overly full. The beauty of it lies in its deceptive simplicity. You don’t need to be a gourmet chef to achieve fantastic results; the steps are straightforward, and the ingredients are accessible. This recipe truly shines as a fantastic option for a quick weeknight dinner when you’re pressed for time, but it’s equally brilliant as a leisurely weekend lunch or even an impressive, crowd-pleasing appetizer for your next gathering. Forget those greasy, store-bought alternatives that often disappoint; making your own not only guarantees freshness but also allows you complete control over the quality of ingredients, making it a healthier and undeniably more delicious choice.
But the magic of this wrap doesn’t stop at its core deliciousness; its versatility is another major selling point. While the classic preparation is undeniably superb, I encourage you to think of this recipe as a canvas for your culinary creativity. For serving suggestions, consider pairing your wraps with a vibrant side salad dressed with a light vinaigrette – perhaps a mix of mixed greens, cucumber, and bell peppers – to add an extra layer of freshness and color. They also make an excellent addition to a picnic basket, perfect for outdoor dining, or as a sophisticated finger food for a casual dinner party. For those busy weekday lunches, prepare the chicken and components ahead of time, and simply assemble when you’re ready to eat for a quick, satisfying meal.
When it comes to variations, the possibilities are truly endless, allowing you to tailor this snack wrap to your personal preferences or whatever ingredients you have on hand. Don’t have chicken? No problem! Grilled steak, crispy fish fillets, pan-fried tofu, or even seasoned black beans can all serve as fantastic protein alternatives, each offering a unique flavor profile. For an extra kick, try drizzling a bit of hot sauce or Sriracha into your ranch dressing, or for a smoky twist, a touch of BBQ sauce can work wonders. Boost the nutritional content by incorporating extra veggies like shredded carrots, thinly sliced red onion, or even a sprinkle of corn or black olives. Experiment with different types of cheese too; pepper jack will add a subtle heat, while a sharp cheddar could provide a bolder flavor. If you’re looking for a lighter option, consider using whole wheat or spinach tortillas, or even turning the concept into a “snack bowl” by serving the crispy chicken and other ingredients over a bed of mixed greens without the tortilla.
For my vegetarian friends, you could easily substitute the chicken with crispy cauliflower bites, seasoned chickpeas, or a hearty mushroom and onion sauté. The key is to maintain that delightful textural contrast that makes the original so appealing. And for those with dietary restrictions, gluten-free tortillas are readily available, and many brands now offer dairy-free ranch dressings, ensuring that everyone can enjoy this fantastic creation. Don’t be afraid to experiment! That’s where the real fun of cooking lies – in making a recipe your own, adapting it to your tastes, and discovering new favorite combinations.
Ultimately, I am so excited for you to experience the joy of making and tasting this incredible Knuspriger Chicken Ranch Snack Wrap. It’s more than just food; it’s an opportunity to create something delicious, share it with loved ones, and perhaps even impress yourself with your culinary skills. So, please, gather your ingredients, follow the steps, and let the enticing aroma fill your kitchen. Once you’ve taken that first glorious bite, I would absolutely love to hear about your experience. Did you make any exciting variations? What did your family and friends think? Did it become your new go-to snack? Your feedback and shared culinary adventures truly inspire me, and I can’t wait to see your creations. Happy cooking, my friends!
Seriously, give this recipe a try! I promise you won’t regret it. And don’t forget to share your photos and stories with me. Your cooking triumphs are my greatest reward!
Delicious Crispy Chicken Ranch Snack Wraps
A delightful snack wrap combining crispy golden chicken, fresh greens, tangy ranch dressing, and cheese, all wrapped in a soft tortilla. Perfect for a quick, satisfying meal with irresistible flavor and texture.
Ingredients
-
2 boneless, skinless chicken breasts
-
1/2 cup all-purpose flour
-
1 tsp paprika powder
-
1/2 tsp garlic powder
-
Salt and pepper, to taste
-
2 large eggs, lightly beaten
-
1 cup Panko breadcrumbs
-
Approx. 4-6 cups vegetable oil, for frying (or olive oil spray for air frying/baking)
-
4 large flour tortillas
-
1/2 cup Ranch dressing
-
1 cup shredded romaine lettuce
-
1/2 cup diced tomatoes
-
1/4 cup finely diced red onion
-
1 cup shredded Cheddar cheese
-
Optional: A squeeze of lemon juice
Instructions
-
Step 1
Pat chicken breasts dry; slice into ½-inch thick strips or nuggets. -
Step 2
Prepare three shallow dishes: 1) flour, paprika, garlic powder, salt, pepper; 2) whisked eggs; 3) Panko breadcrumbs. -
Step 3
Dredge each chicken piece first in the flour mixture (shake off excess), then dip in egg wash, and finally press firmly into Panko breadcrumbs to coat thoroughly. Place on a plate. -
Step 4
{‘@type’: ‘HowToStep’, ‘name’: ‘Cook Crispy Chicken (Choose Method)’, ‘itemListElement’: [{‘@type’: ‘HowToStep’, ‘name’: ‘Deep Frying’, ‘text’: ‘Heat oil to 350-375°F (175-190°C). Fry chicken in batches for 4-6 minutes until golden brown and cooked through (165°F/74°C internal temp). Drain on a wire rack.’}, {‘@type’: ‘HowToStep’, ‘name’: ‘Air Frying’, ‘text’: ‘Preheat air fryer to 375°F (190°C). Lightly spray chicken with olive oil spray. Air fry for 10-15 minutes, flipping halfway, until golden and cooked through (165°F/74°C).’}, {‘@type’: ‘HowToStep’, ‘name’: ‘Baking’, ‘text’: ‘Preheat oven to 400°F (200°C). Place chicken on a baking sheet, spray with olive oil. Bake for 18-25 minutes, flipping halfway, until golden and cooked through (165°F/74°C).’}]} -
Step 5
Wash and shred lettuce. Have cheese, diced tomatoes, and red onion ready. Warm tortillas briefly until pliable. -
Step 6
Lay a warm tortilla flat. Spread ranch dressing down the center. Layer with shredded lettuce, shredded cheese, 2-3 pieces of crispy chicken, diced tomatoes, and red onion. Add a squeeze of lemon juice if desired. -
Step 7
Fold in the left and right sides of the tortilla, then tightly roll from the bottom upwards to create a snug, cylinder-like wrap. Serve immediately while chicken is warm and crispy.
Important Information
Nutrition Facts (Per Serving)
It is important to consider this information as approximate and not to use it as definitive health advice.
Allergy Information
Please check ingredients for potential allergens and consult a health professional if in doubt.
Leave a Comment