
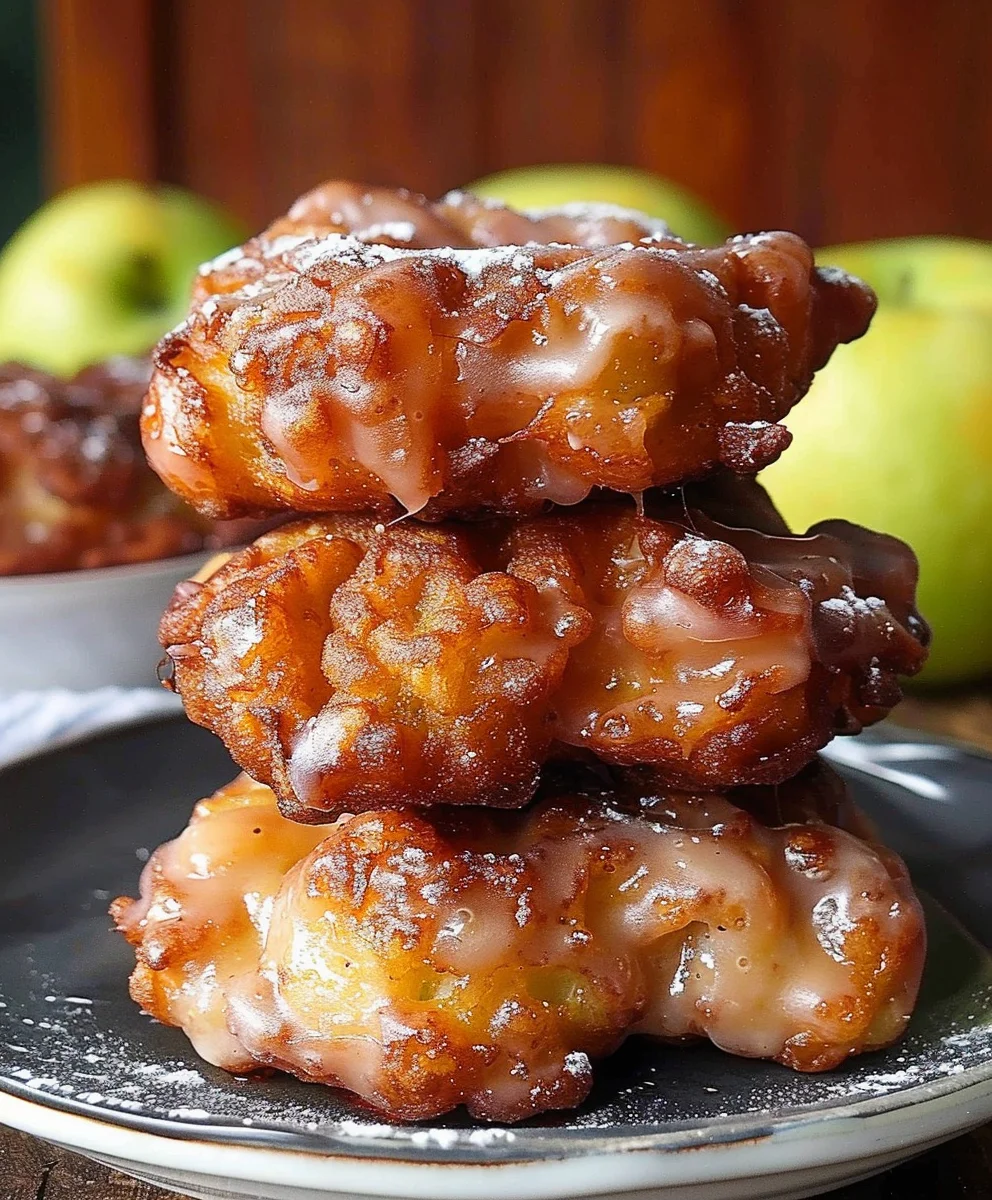
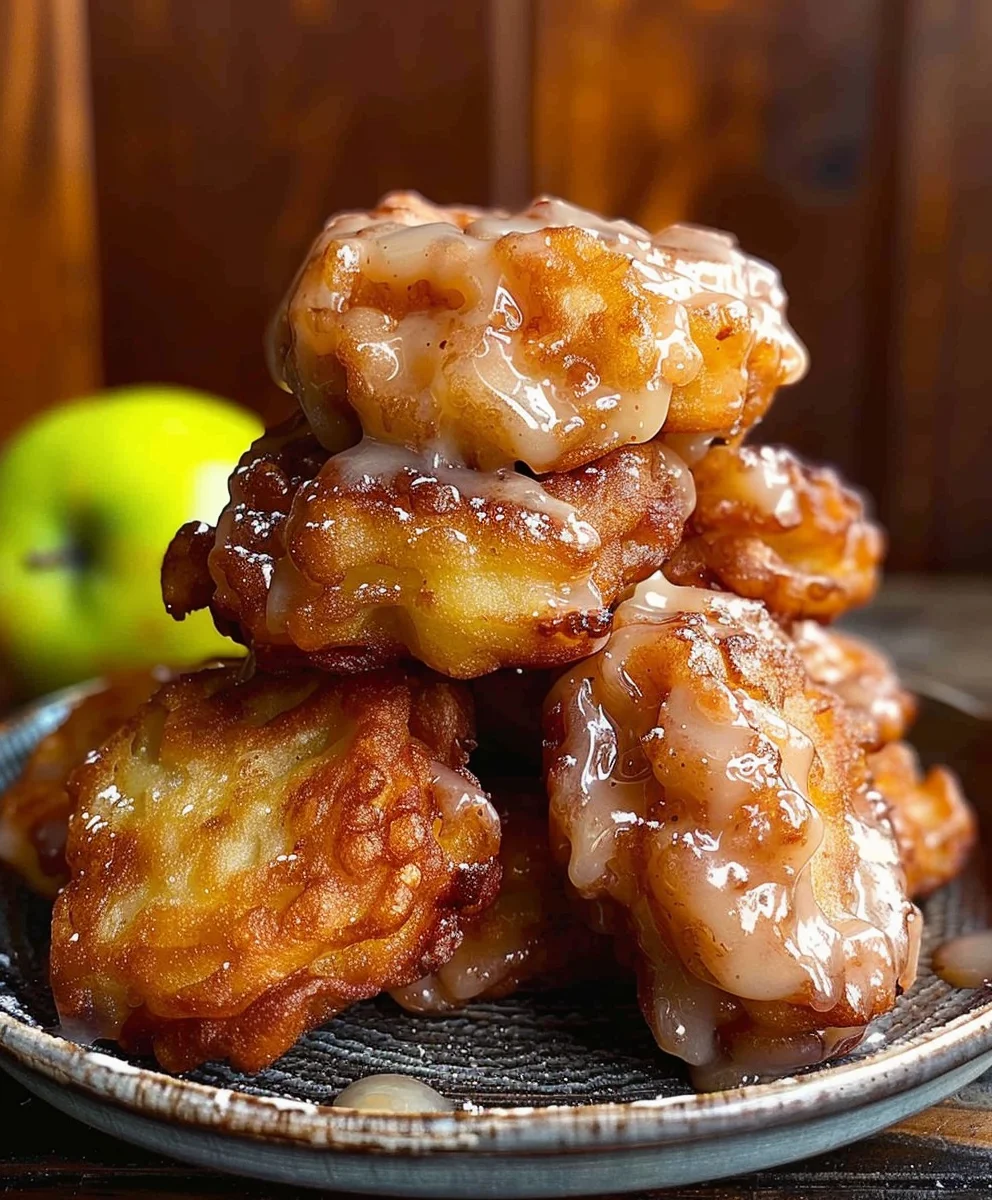
Best Recipe For Baked Apple Fritters – imagine biting into a golden-brown, perfectly spiced pastry, its warm, tender apple pieces bursting with sweet cinnamon flavor, all without the guilt of deep-frying. For generations, apple fritters have graced tables as a beloved comfort food, often heralding the bounty of autumn harvests and offering a delightful way to enjoy crisp, fresh apples. While traditionally fried to achieve that irresistible crunch, I’ve meticulously crafted a version that captures every bit of that beloved texture and taste in a healthier, baked form. This isn’t just about reducing oil; it’s about perfecting the art of a lighter, equally delicious fritter.
People utterly adore these treats for their incredible balance of soft, melt-in-your-mouth interior and a delicately crisp exterior, enveloped in a fragrant cinnamon-sugar embrace. They are the quintessential breakfast delight, a perfect brunch addition, or a comforting dessert, pairing wonderfully with a morning coffee or an afternoon tea. The convenience of baking also means less mess and a lighter indulgence, making them accessible any day of the week. I’m confident that after just one bite, you’ll agree this truly is the Best Recipe For Baked Apple Fritters, offering all the joy of the classic without the fuss. Prepare to fall in love with your new go-to apple treat!
Ingredients:
- For the Baked Apple Fritters:
- 3 medium-sized baking apples (about 3 cups diced), such as Granny Smith, Honeycrisp, or Fuji – I love a mix of tart and sweet!
- 2 cups (240g) all-purpose flour
- ½ cup (100g) granulated sugar
- 2 teaspoons baking powder
- 1 ½ teaspoons ground cinnamon – this is key for that cozy flavor!
- ½ teaspoon ground nutmeg – just a hint adds so much depth
- ½ teaspoon salt
- 2 large eggs, at room temperature
- ½ cup (120ml) milk, any kind will do, at room temperature
- ¼ cup (60g) unsalted butter, melted and slightly cooled
- 1 teaspoon pure vanilla extract
- For the Vanilla Glaze:
- 1 ½ cups (180g) powdered sugar (confectioners’ sugar), sifted
- 2-3 tablespoons milk or heavy cream – start with less and add more if needed
- ½ teaspoon pure vanilla extract
Preparing the Apples
- Choose Your Apples Wisely: First things first, let’s get those apples ready. I always recommend using firm, crisp baking apples for the Best Recipe For Baked Apple Fritters because they hold their shape beautifully and provide that delightful bite. My go-to choices are Granny Smith for a lovely tart counterpoint, or Honeycrisp and Fuji for a sweeter, juicier element. You’ll need about three medium-sized apples, which should give you roughly 3 cups once they’re prepped.
- Peel, Core, and Dice: Carefully peel each apple using a vegetable peeler. Then, core them thoroughly to remove all seeds and the fibrous core. The next crucial step is dicing them into small, approximately 1/4-inch pieces. This small dice is incredibly important! It ensures that the apples cook through evenly during baking and are distributed perfectly throughout each fritter, meaning you’ll get a burst of tender, flavorful apple in every single bite. Avoid large chunks, as they might not soften properly and can make the fritters dense. Place your diced apples in a medium bowl and set them aside while we prepare the batter. There’s no need to worry about them browning too much; they’ll be mixed into the batter very soon.
Making the Fritter Batter
- Combine Dry Ingredients: In a large mixing bowl, whisk together the all-purpose flour, granulated sugar, baking powder, ground cinnamon, ground nutmeg, and salt. Whisking these dry ingredients thoroughly ensures that the leavening agents and spices are evenly distributed throughout the flour. This is a small but mighty step that guarantees a consistent rise and flavor in every single fritter. A well-mixed dry base sets the stage for a truly delightful fritter.
- Prepare Wet Ingredients: In a separate medium bowl, lightly whisk the two large eggs. Make sure your eggs are at room temperature; this helps them emulsify better with the other liquids and creates a smoother batter. To the eggs, add the milk (also at room temperature, if possible, for the same reason), the melted and slightly cooled unsalted butter, and the pure vanilla extract. Whisk these wet ingredients together until they are well combined. It’s important that your melted butter isn’t hot, as hot butter could start to cook the eggs. Slightly cooled means it’s still liquid but won’t affect the temperature of the other ingredients.
- Gently Combine Wet and Dry: Now, pour the wet ingredients mixture into the bowl with the dry ingredients. Using a rubber spatula or a wooden spoon, mix until just combined. This is a critical moment: do not overmix! Overmixing develops the gluten in the flour, which will result in tough, dense fritters, rather than the light and tender texture we’re aiming for. A few lumps in the batter are perfectly fine, even desirable; they indicate you haven’t overmixed.
- Fold in the Apples: Once the batter is mostly combined, gently fold in your diced apples. Continue to mix just until the apples are evenly distributed throughout the batter. Again, be mindful not to overmix. The goal here is to incorporate the apples without excessively working the gluten in the batter.
- Let the Batter Rest (Optional but Recommended): For even better results, especially if you have a few extra minutes, let your batter rest for about 10-15 minutes at room temperature. This resting period allows the flour to fully hydrate, resulting in a more tender crumb for your baked apple fritters. It’s a little secret for an even more amazing texture!
Baking the Apple Fritters
- Preheat Oven and Prepare Baking Sheet: While the batter rests, preheat your oven to 375°F (190°C). Line a large baking sheet with parchment paper. This prevents sticking and makes cleanup a breeze. If you don’t have parchment paper, you can lightly grease the baking sheet, but I find parchment paper gives the best non-stick surface for these delicate treats.
- Portion the Fritters: Using two spoons or a large cookie scoop (about 1/4 cup capacity), drop mounds of the apple fritter batter onto the prepared baking sheet. Leave about 2 inches of space between each fritter to allow for even baking and spreading. Don’t worry too much about perfect shapes; the rustic, uneven edges are part of the charm of a fritter! You should get about 12-15 fritters, depending on their size.
- Bake to Golden Perfection: Place the baking sheet into your preheated oven and bake for 18-25 minutes. Baking time can vary based on your oven and the size of your fritters. Look for a beautiful golden-brown color on the outside. To check for doneness, you can gently press on a fritter; it should feel firm to the touch. Alternatively, insert a toothpick into the center of one of the larger fritters; it should come out clean, indicating that the batter is cooked through. If you notice some fritters browning faster than others, you can rotate the baking sheet halfway through the baking time for more even results.
- Cooling the Fritters: Once baked, immediately transfer the hot fritters from the baking sheet to a wire cooling rack. This is a crucial step! Allowing them to cool on a rack ensures air circulates around all sides, preventing the bottoms from becoming soggy. While they need to cool for a bit, don’t let them get completely cold. We want them to be slightly warm when we glaze them for the best flavor and texture absorption.
Preparing the Glaze
- Sift the Powdered Sugar: While the fritters are cooling, let’s whip up that heavenly vanilla glaze. In a medium bowl, sift the powdered sugar. Sifting is important here to remove any lumps and ensure a super smooth, glossy glaze.
- Create the Perfect Consistency: To the sifted powdered sugar, add the vanilla extract and start by adding just 2 tablespoons of milk or heavy cream. Whisk vigorously until smooth. The consistency is key here: you’re aiming for a glaze that is thick enough to coat the back of a spoon but still thin enough to drip slowly. If it’s too thick, add a tiny bit more milk or cream, a teaspoon at a time, until you reach the desired consistency. If it accidentally becomes too thin, you can whisk in a little more sifted powdered sugar. This glaze will truly elevate your baked apple fritters, giving them that classic finish!
Glazing and Serving
- Glaze the Warm Fritters: Once the fritters have cooled down for about 10-15 minutes and are still slightly warm to the touch, it’s time to glaze them. You have a couple of options:
- Dipping Method: My personal favorite for full coverage! Dip the top of each warm fritter into the glaze, letting any excess drip off back into the bowl. Then, place the glazed fritter back onto the wire cooling rack, which you can set over a sheet of parchment paper or aluminum foil to catch any drips.
- Drizzling Method: If you prefer a lighter coating or a more artistic look, you can use a spoon to drizzle the glaze generously over each fritter while they rest on the wire rack.
The warmth of the fritters will help the glaze set beautifully and absorb a little, creating an irresistible sticky-sweet outer layer.
- Allow the Glaze to Set: Let the glazed fritters sit on the wire rack for another 10-15 minutes, or until the glaze has fully set. This will prevent any sticky messes and ensure that beautiful, slightly crackly glaze texture that we all adore.
- Serve and Enjoy: These glorious Best Recipe For Baked Apple Fritters are absolutely at their peak when served warm, shortly after the glaze has set. The combination of the soft, apple-studded interior with the sweet, vanilla-scented glaze is pure bliss. They make an unforgettable breakfast, brunch treat, or even a delightful dessert. Leftovers, if you’re lucky enough to have any, can be stored in an airtight container at room temperature for up to 2 days, though they are truly best enjoyed fresh. Get ready to impress everyone with this fantastic baked treat!
Conclusion:
So, there you have it – my absolute go-to for a truly unforgettable treat. We’ve journeyed through the simple steps that transform humble apples and pantry staples into something truly magical. What makes this recipe an absolute triumph, a definite keeper in your culinary collection, is its perfect harmony of flavors and textures. Imagine a tender, moist interior bursting with sweet, spiced apple chunks, encased in a beautifully crisp, golden-brown crust, all without the fuss and grease of traditional frying. It’s a healthier twist on a classic, delivering all the indulgence without the guilt, making it an ideal choice for any time of day. The aroma alone, as these bake, is enough to fill your home with warmth and anticipation, promising a treat that lives up to every delightful expectation.
Trust me when I say, once you experience the warmth, the incredible taste, and the ease of preparation of these homemade delights, you’ll understand exactly why I call it the Best Recipe For Baked Apple Fritters. This isn’t just a claim; it’s a promise backed by countless delighted smiles and satisfied cravings. Whether you’re a seasoned baker or just starting out, the clear, concise instructions ensure success every single time, making it an accessible joy for everyone. The result is a dessert or breakfast item that feels gourmet, yet is surprisingly approachable. The way the cinnamon and nutmeg meld with the natural sweetness and slight tartness of the apples creates a symphony of flavors that will dance on your palate, leaving you longing for just one more bite. It’s truly a recipe designed to impress and comfort, perfect for sharing with loved ones or indulging in a quiet moment of pure bliss.
Serving Suggestions:
Now, for the fun part – how to enjoy these glorious creations! While they are undeniably delicious straight out of the oven, perhaps dusted with a simple snowfall of powdered sugar, their versatility allows for endless delightful serving options. For a truly decadent experience, I love to drizzle them with a warm caramel sauce and a scoop of vanilla bean ice cream; the contrast of warm fritter and cold, melting ice cream is heavenly. They also pair wonderfully with a dollop of fresh whipped cream and a sprinkle of extra cinnamon for an elegant dessert that feels incredibly special. For breakfast or brunch, consider serving them alongside a steaming cup of coffee or a glass of cold milk, perhaps with a side of crispy bacon or a fresh fruit salad to round out the meal. Even a simple maple syrup glaze or a bright lemon zest icing can elevate them further, adding another layer of sweetness and a delightful tang. Don’t be afraid to experiment and find your own perfect pairing, as these fritters are a fantastic canvas for your culinary imagination.
Variations to Explore:
And speaking of experimentation, this recipe is incredibly adaptable, inviting you to put your own spin on it. While apples are the undeniable star, feel free to explore other fruit possibilities. Pears, peaches, or even mixed berries could offer exciting new flavor profiles, though you might need to adjust the cooking time slightly based on the fruit’s water content and moisture level. For an extra textural crunch, try folding in a handful of chopped walnuts or pecans into the batter, which adds a wonderful nutty dimension. Spice lovers could introduce a pinch of ground cardamom, a touch of vibrant ground ginger, or even a hint of allspice to complement the apples beautifully. You could also play with different extracts – a splash of rich vanilla bean paste instead of extract, or even a tiny bit of almond extract for a subtle, sophisticated nutty note. For those with dietary restrictions, while I haven’t specifically detailed modifications here, the base often adapts well to gluten-free flour blends and dairy-free milk alternatives, allowing even more people to savor this incredible treat with a few thoughtful substitutions. The possibilities are truly endless!
So, my friends, I sincerely hope you feel inspired and excited to roll up your sleeves and give this wonderful recipe a try. There’s a special kind of satisfaction that comes from creating something so delicious from scratch, and I promise you, the effort is minimal compared to the incredible reward that awaits. Don’t just read about how good these baked apple fritters are – experience the pure joy of baking them yourself and savoring every warm, spiced bite. And when you do, please, please share your experience with me! I absolutely adore hearing about your kitchen adventures. Did you try a new variation? What was your favorite way to serve them? Drop a comment below or share a photo of your golden-brown masterpieces. Your feedback, tips, and creativity truly enrich our cooking community and inspire others. Happy baking, and get ready to fall in love with your new favorite fall (or any season!) treat!
Best Baked Apple Fritters Recipe
Imagine biting into a golden-brown, perfectly spiced pastry, its warm, tender apple pieces bursting with sweet cinnamon flavor, all without the guilt of deep-frying. This meticulously crafted recipe captures every bit of that beloved texture and taste in a healthier, baked form, offering a lighter, equally delicious fritter.
Ingredients
-
2 cups all-purpose flour
-
1/2 cup granulated sugar
-
2 tsp baking powder
-
1 tsp ground cinnamon
-
1/4 tsp salt
-
2 large eggs, at room temperature
-
1/2 cup milk, at room temperature
-
2 tbsp unsalted butter, melted and slightly cooled
-
2 medium apples, peeled, cored, and diced into 1/4-inch pieces
-
For the Vanilla Glaze:
-
1/2 cup powdered sugar, sifted
-
1-2 tbsp milk or heavy cream
Instructions
-
Step 1
Peel, core, and dice 2 medium baking apples (e.g., Granny Smith, Honeycrisp) into small, 1/4-inch pieces. Set aside. -
Step 2
In a large mixing bowl, whisk together the all-purpose flour, granulated sugar, baking powder, ground cinnamon, and salt until well combined. -
Step 3
In a separate medium bowl, lightly whisk the 2 large room-temperature eggs. Add the room-temperature milk and the melted, slightly cooled unsalted butter. Whisk until well combined. -
Step 4
Pour the wet ingredients into the dry. Mix with a spatula until just combined; do not overmix (a few lumps are perfectly fine). Gently fold in the diced apples until evenly distributed throughout the batter. -
Step 5
For a more tender crumb, let the batter rest at room temperature for 10-15 minutes. -
Step 6
Preheat your oven to 375°F (190°C). Line a large baking sheet with parchment paper to prevent sticking. -
Step 7
Using two spoons or a 1/4 cup cookie scoop, drop mounds of batter onto the prepared baking sheet, leaving about 2 inches between each. Bake for 18-25 minutes, or until golden brown and firm to the touch. Rotate the baking sheet halfway through if needed for even baking. -
Step 8
Immediately transfer the baked fritters to a wire cooling rack. Allow them to cool for 10-15 minutes until they are still slightly warm. -
Step 9
While the fritters cool, sift 1/2 cup powdered sugar into a medium bowl. Add 1-2 tablespoons of milk (or heavy cream) and whisk vigorously until the glaze is smooth and has a thick, pourable consistency. Adjust milk quantity as needed. -
Step 10
Dip the top of each warm fritter into the glaze, letting any excess drip off, or drizzle the glaze generously over them. Place the glazed fritters back onto the wire rack to set for another 10-15 minutes. Serve warm for the best experience. Leftovers can be stored in an airtight container at room temperature for up to 2 days.
Important Information
Nutrition Facts (Per Serving)
It is important to consider this information as approximate and not to use it as definitive health advice.
Allergy Information
Please check ingredients for potential allergens and consult a health professional if in doubt.
Leave a Comment