
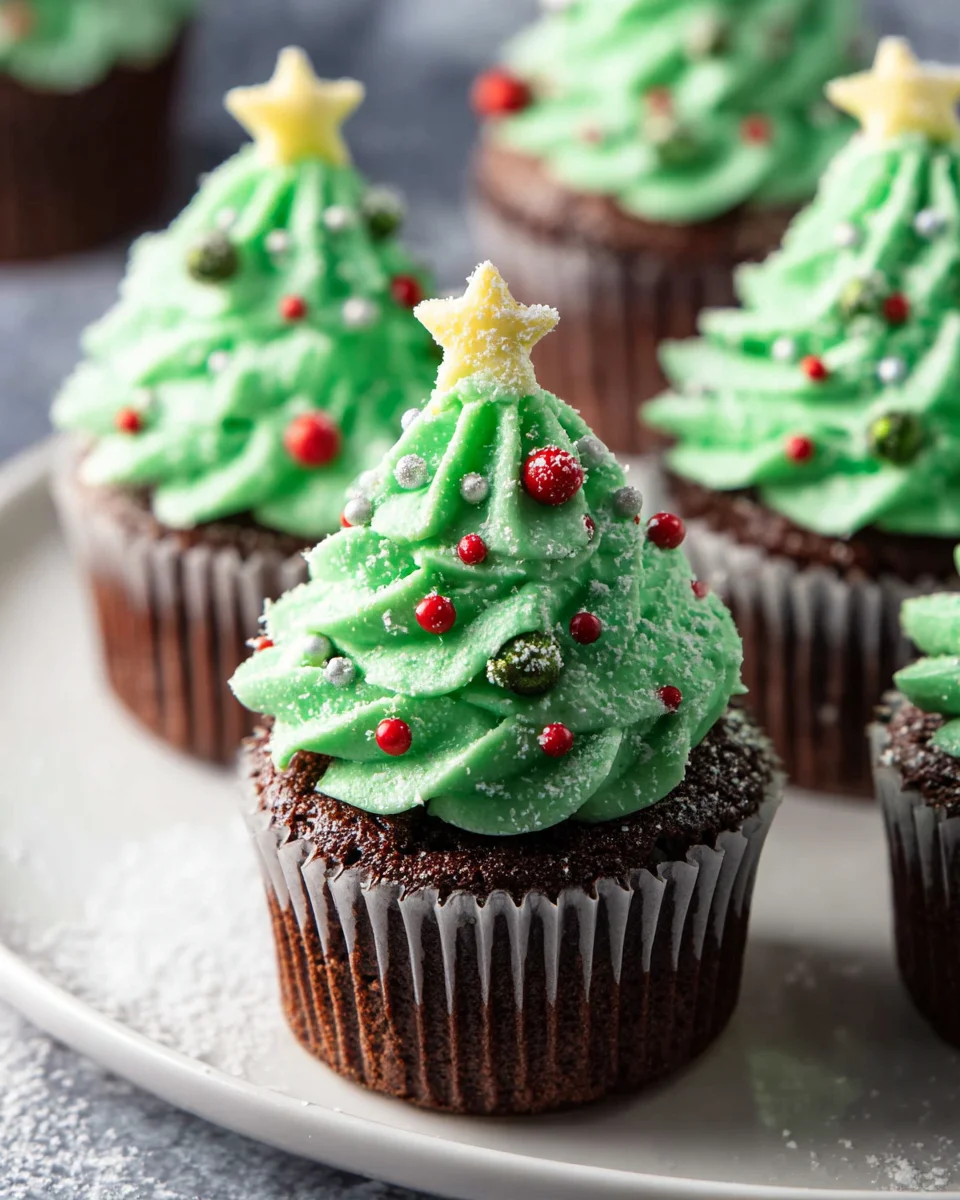
Christmas Tree Cupcakes
are more than just a dessert; they are miniature edible celebrations that bring immense joy to any holiday table. As the festive season approaches, I find myself drawn to recipes that not only taste incredible but also capture the enchanting spirit of Christmas visually. Imagine the delight on your loved ones’ faces when they discover these charming, festive treats at your next gathering! The tradition of holiday baking and decorating has long been a cherished part of Christmas celebrations, allowing us to transform simple ingredients into whimsical creations that embody the season’s magic.
There’s something uniquely special about these delightful treats. They combine the comforting familiarity of a perfectly baked cupcake with the captivating charm of a decorated evergreen. People absolutely adore this dish because it offers the irresistible trio of a moist, tender cake, sumptuously creamy frosting, and sparkling edible decorations that evoke pure holiday cheer. They are surprisingly simple to assemble, making them an ideal project for families wanting to create lasting holiday memories together.
Today, I am incredibly excited to guide you through creating your very own batch of these show-stopping Christmas Tree Cupcakes, perfect for gifting, sharing, or simply indulging in the festive spirit.
Ingredients:
- For the Fluffy Vanilla Cupcakes:
- 1 ½ cups (190g) All-Purpose Flour: I always recommend using a good quality all-purpose flour. Sifting it once before measuring, and again with the other dry ingredients, can truly make a difference in the lightness of your cupcakes. It ensures there are no lumps and that the dry ingredients are evenly distributed, leading to a tender crumb.
- 1 ½ teaspoons Baking Powder: This is our primary leavening agent, responsible for those lovely domed tops on our cupcakes. Make sure it’s fresh for optimal lift!
- ½ teaspoon Salt: A crucial ingredient that doesn’t just add flavor, but also balances the sweetness and enhances all the other flavors in the cupcake. Don’t skip it!
- ¾ cup (170g) Unsalted Butter, softened: Room temperature butter is absolutely non-negotiable for the creaming method. It should be soft enough to make an indent with your finger without melting. If it’s too cold, it won’t cream properly with the sugar; if it’s too warm or melted, it will result in dense cupcakes.
- 1 ½ cups (300g) Granulated Sugar: This provides sweetness and also contributes to the tender texture and moistness of the cupcakes.
- 2 Large Eggs, room temperature: Like the butter, room temperature eggs emulsify much better with the other ingredients, creating a smoother, more uniform batter. Give them about 30 minutes on the counter if they’re coming straight from the fridge.
- 1 teaspoon Pure Vanilla Extract: Use the best quality vanilla you can find. It makes a significant impact on the overall flavor of your vanilla cupcakes, giving them that classic comforting aroma and taste that perfectly complements our Christmas Tree Cupcakes.
- ¾ cup (180ml) Whole Milk, room temperature: Whole milk adds richness and moisture. Again, room temperature is key for a smooth batter, preventing it from seizing or curdling when combined with the other ingredients.
- For the Vibrant Green Vanilla Buttercream Frosting:
- 1 cup (226g) Unsalted Butter, softened: Just like for the cupcakes, room temperature butter is essential for creamy, lump-free buttercream. It should be pliable but not greasy.
- 4 cups (480g) Powdered Sugar (confectioners’ sugar), sifted: Sifting is incredibly important here to avoid any pesky lumps in your frosting. This fine sugar dissolves easily and creates a smooth texture.
- 2-4 tablespoons Heavy Cream or Whole Milk: Start with 2 tablespoons and add more as needed until you reach your desired piping consistency. This helps achieve a smooth, spreadable, and pipeable buttercream.
- 1 ½ teaspoons Pure Vanilla Extract: For that lovely vanilla flavor that pairs so well with the sweetness of the sugar and richness of the butter.
- Green Gel Food Coloring: Gel food coloring is preferred over liquid as it provides a more intense color without adding too much moisture to the frosting. You’ll want a vibrant, festive green for your Christmas Tree Cupcakes!
- For Decoration (Making Your Christmas Tree Cupcakes Sparkle!):
- 12 Pretzel Sticks: These will serve as the sturdy, edible trunks for our Christmas trees.
- Yellow or Gold Star Sprinkles: The iconic star for the top of each tree!
- Assorted Colorful Sprinkles (nonpareils, jimmies, round sprinkles): These will be our “ornaments,” adding a festive burst of color to your Christmas Tree Cupcakes.
- Edible Glitter (optional): For a magical, snowy, or shimmery effect on your trees.
- Small Candies (e.g., M&M’s minis, miniature candy canes, red hots): These can be used for additional unique “ornaments” or festive accents.
Baking the Fluffy Vanilla Cupcakes for Your Christmas Tree Cupcakes
- Prepare Your Workspace and Oven: First things first, let’s get organized! Preheat your oven to 350°F (175°C). Line a 12-cup standard muffin tin with paper cupcake liners. I always find that having everything ready before I start mixing makes the baking process so much smoother and more enjoyable.
- Combine Dry Ingredients: In a medium bowl, whisk together the 1 ½ cups of all-purpose flour, 1 ½ teaspoons of baking powder, and ½ teaspoon of salt. Make sure these are thoroughly combined – this ensures that the leavening agent is evenly distributed throughout the batter, giving all your cupcakes a consistent rise. Set this bowl aside for a moment.
- Cream Butter and Sugar: In a large bowl, using an electric mixer (either a stand mixer with the paddle attachment or a handheld mixer), beat the ¾ cup (170g) of softened unsalted butter on medium speed for about 1-2 minutes until it’s light and creamy. Then, gradually add the 1 ½ cups (300g) of granulated sugar, beating on medium-high speed for another 3-5 minutes. This step is crucial; you want the mixture to become pale yellow, light, and fluffy, almost like whipped cream. This process incorporates air into the butter and sugar, which contributes significantly to the cupcakes’ light and airy texture. Scrape down the sides of the bowl periodically to ensure everything is well combined.
- Incorporate Eggs: Add the 2 large room temperature eggs, one at a time, beating well after each addition. Make sure each egg is fully incorporated before adding the next. This helps create a stable emulsion with the butter and sugar. After both eggs are in, continue to beat for another minute until the mixture is cohesive and slightly increased in volume.
- Add Vanilla: Stir in the 1 teaspoon of pure vanilla extract. The aroma alone is enough to get you excited for these Christmas Tree Cupcakes!
- Alternate Dry and Wet Ingredients: Now, we’re going to gradually add the dry ingredients and the whole milk to our wet mixture. With the mixer on low speed, add about one-third of the flour mixture to the butter mixture, mixing just until combined. Then, pour in half of the ¾ cup of whole milk, mixing until just incorporated. Repeat this process: add another third of the flour, then the remaining milk, and finally the last third of the flour. The key here is to mix just until the ingredients are combined after each addition. Overmixing at this stage can develop the gluten in the flour too much, leading to tough, chewy cupcakes rather than the soft, tender ones we’re aiming for. A few small lumps are perfectly fine.
- Fill Cupcake Liners: Divide the batter evenly among the 12 prepared cupcake liners. I find an ice cream scoop works wonderfully for this, ensuring consistent sizes. Fill each liner about two-thirds full; this leaves enough room for the cupcakes to rise without overflowing.
- Bake to Perfection: Transfer the muffin tin to your preheated oven and bake for 18-22 minutes. Baking times can vary depending on your oven, so keep an eye on them. You’ll know they’re done when a wooden skewer or toothpick inserted into the center of a cupcake comes out clean, or with just a few moist crumbs attached. The tops should be lightly golden and spring back when gently touched.
- Cool Completely: Remove the muffin tin from the oven and let the cupcakes cool in the tin for about 5 minutes. After this initial cooling, carefully transfer the cupcakes to a wire rack to cool completely. This step is absolutely critical! Attempting to frost warm cupcakes will result in melted, messy frosting, which we definitely don’t want for our beautifully designed Christmas Tree Cupcakes. Patience is a virtue here!
Crafting the Perfect Green Buttercream Frosting for Your Christmas Tree Cupcakes
- Prepare the Butter: In a large bowl, using an electric mixer, beat the 1 cup (226g) of softened unsalted butter on medium speed for about 2-3 minutes. You want it to become very light, creamy, and pale in color. This initial whipping of the butter helps create an incredibly airy and smooth buttercream.
- Gradually Add Powdered Sugar: With the mixer on low speed, gradually add the 4 cups (480g) of sifted powdered sugar, one cup at a time. Start slowly to avoid a “sugar cloud” explosion in your kitchen! Once all the sugar is added, increase the speed to medium-high and beat for another 2-3 minutes until the mixture is light and fluffy. Scrape down the sides of the bowl as needed.
- Add Liquids and Flavor: Pour in the 1 ½ teaspoons of pure vanilla extract and 2 tablespoons of heavy cream or whole milk. Beat on medium-high speed until the frosting is smooth and creamy.
- Adjust Consistency: If the frosting seems too thick to pipe easily, add the remaining heavy cream or milk, ½ tablespoon at a time, beating after each addition, until you reach your desired consistency. For piping detailed Christmas trees, you’ll want a frosting that holds its shape well but is still smooth and easy to pipe. If, by chance, your frosting becomes too thin, you can always beat in a little more sifted powdered sugar until it stiffens up. Conversely, if it’s too stiff, a tiny splash more cream will loosen it.
- Color Your Frosting Green: This is where our Christmas trees come to life! Add a few drops of green gel food coloring to the buttercream. Start with a small amount, mix it thoroughly, and then add more drops incrementally until you achieve the vibrant, festive green color you desire for your Christmas Tree Cupcakes. Gel food coloring is fantastic because it’s very concentrated and won’t thin out your frosting like liquid colors can. Beat on medium speed until the color is uniform throughout the frosting.
Assembling and Decorating Your Festive Christmas Tree Cupcakes
This is the fun part where we transform our vanilla cupcakes into adorable Christmas Tree Cupcakes! Make sure your cupcakes are completely cool before starting this stage.
- Prepare Your Piping Bag: Fit a large piping bag with a star tip (Wilton 1M or 21 works beautifully for creating textured Christmas trees). To fill the bag cleanly, fold the top edges over to create a cuff, then use a spatula to spoon the green buttercream frosting into the bag. Push the frosting down towards the tip, ensuring there are no large air bubbles. Twist the top of the bag to seal.
- Pipe the Base Layer: Start by piping a thin, flat layer of green frosting on top of each cupcake. This acts as a stable foundation for building your tree and ensures the entire cupcake top is covered in beautiful green.
- Build the Christmas Tree Shape:
- Hold the piping bag vertically over the center of the cupcake, just above the base layer of frosting.
- Starting at the outer edge of the cupcake, pipe a continuous spiral or a ring of frosting, working your way inwards to create the first layer of your tree. Apply steady pressure.
- Release pressure, lift the bag slightly, and then pipe a slightly smaller spiral or ring directly on top of the first layer. This creates a tiered effect.
- Continue piping smaller and smaller rings, stacking them upwards and gradually decreasing the diameter with each layer, to form a cone or Christmas tree shape.
- Finish by piping a small peak right at the very top, mimicking the tip of a real Christmas tree. Don’t worry if your first few aren’t perfect; practice makes progress, and they’ll all be charming!
- Add the Tree Trunk: Carefully insert one pretzel stick vertically into the center base of each piped Christmas tree cupcake. Make sure it goes deep enough into the cupcake to be stable, but not so deep that it pokes out the bottom. This adds a lovely rustic touch and a satisfying salty crunch to complement the sweet cupcake.
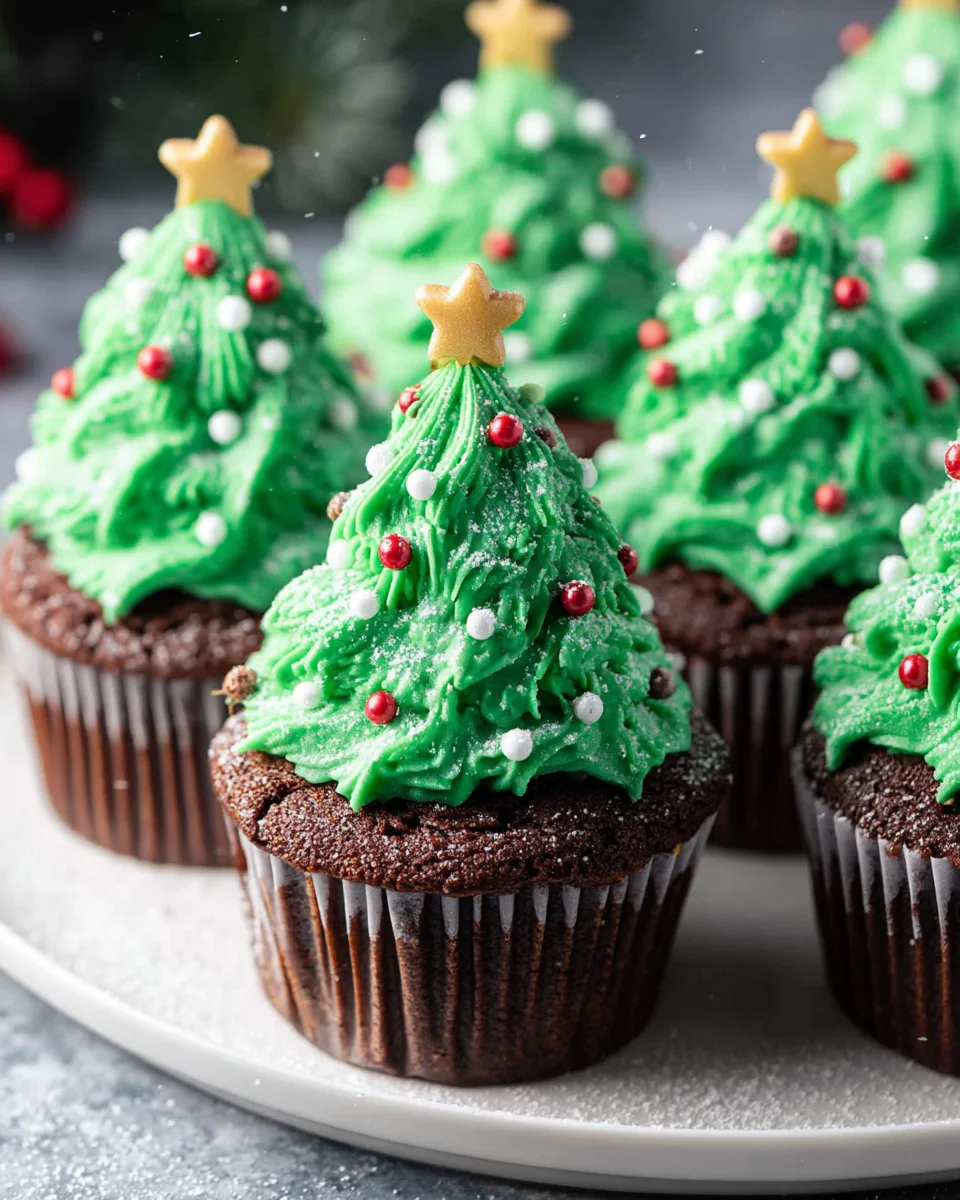
- Decorate Your Christmas Tree Cupcakes with “Ornaments” and “Star Toppers”:
- Star Topper: Gently place a yellow or gold star sprinkle right on top of the frosting peak of each Christmas tree. This is the crowning glory!
- Colorful Ornaments: Scatter assorted colorful sprinkles (nonpareils, jimmies, tiny round sprinkles) randomly over the green frosting. Press them gently if needed to ensure they adhere to the buttercream. These become your festive “ornaments.”
- Extra Bling (Optional Edible Glitter): For a truly magical touch, lightly dust or sprinkle edible glitter over your finished Christmas Tree Cupcakes. It will catch the light beautifully and add a touch of sparkle, reminiscent of freshly fallen snow or fairy lights.
- Mini Candies (Optional): For larger “ornaments,” you can carefully place small candies like M&M’s minis or even tiny pieces of miniature candy canes onto the tree frosting. Be creative!
- Final Flourish: Once all your Christmas Tree Cupcakes are decorated, take a moment to admire your festive creations! Arrange them on a platter for a truly show-stopping holiday treat.
Tips for Storing Your Beautiful Christmas Tree Cupcakes
- Room Temperature Storage: If you’re planning to serve your Christmas Tree Cupcakes within 1-2 days and your home is at a comfortable, cool room temperature (below 70°F or 21°C), they can be stored in an airtight container on the counter. This keeps the cupcakes moist and prevents the frosting from drying out or absorbing any ambient odors.
- Refrigeration for Longer Storage or Warm Climates: If your kitchen is warm, or if you need to store them for up to 3-4 days, it’s best to place the Christmas Tree Cupcakes in an airtight container in the refrigerator. Before serving, allow them to come to room temperature for at least 30-60 minutes. This will ensure the cake is soft and the buttercream is creamy and enjoyable.
- Airtight is Key: Regardless of whether you store them on the counter or in the fridge, always use an airtight container. Exposure to air is the enemy of fresh cupcakes, making them dry and stale quickly.
- Freezing Undecorated Cupcakes: If you want to get ahead, you can bake and cool the plain vanilla cupcakes, then freeze them undecorated in an airtight container for up to 2-3 months. Thaw them at room temperature before frosting and decorating them as Christmas Tree Cupcakes closer to your event. Freezing frosted cupcakes is generally not recommended as the decorations might get damaged, and the sprinkles might bleed when thawing.
Conclusion:
Well, we’ve reached the delightful end of our journey, and I genuinely hope you’re feeling as inspired as I am to whip up a batch of these extraordinary treats! This recipe isn’t just about baking; it’s about crafting pure joy, creating edible artistry, and bringing a touch of festive magic into your home. I truly believe these aren’t just any ordinary cupcakes; they are little parcels of happiness, promising to be the star of any gathering or a wonderfully sweet escape on a quiet evening in. The beauty of this particular creation lies in its perfect blend of simplicity and stunning visual impact. You don’t need to be a professional baker to achieve breathtaking results, and that’s precisely what makes them so special. Imagine the smiles when you present these; they’re truly showststoppers!
What makes these Christmas Tree Cupcakes an absolute must-try? It’s the delightful combination of a moist, tender cake base, a rich and creamy frosting, and the whimsical touch of festive decoration that transforms a simple dessert into a memorable experience. Every bite is a comforting embrace of familiar flavors, elevated by the joy of the holiday season. They embody everything wonderful about festive baking – the inviting aromas that fill your kitchen, the satisfaction of creating something beautiful with your own hands, and the shared pleasure of indulging in something truly special with loved ones. They are surprisingly straightforward to assemble, making them an ideal project for bakers of all skill levels, even those just dipping their toes into the wonderful world of holiday confections. Trust me, the effort, minimal as it is, is overwhelmingly rewarded by the sheer delight they bring.
Serving Suggestions and Delightful Variations
When it comes to serving these beauties, the possibilities are as endless as your imagination. For a truly enchanting presentation, arrange your finished cupcakes on a tiered dessert stand amidst some twinkling fairy lights or a scattering of fresh cranberries and pine sprigs – it instantly elevates them into a festive centerpiece. They are absolutely perfect alongside a warm mug of homemade hot chocolate, perhaps topped with a dollop of whipped cream and a sprinkle of cinnamon, making for a cozy winter afternoon treat. Alternatively, pair them with a sparkling glass of prosecco or a festive non-alcoholic cranberry punch for a more sophisticated holiday party dessert. Don’t forget, these also make incredibly thoughtful homemade gifts! Package a few in a decorative box with a pretty ribbon, and you’ve got a personalized present that’s sure to warm hearts.
Feeling adventurous? The beauty of this recipe also lies in its adaptability. While the classic vanilla base is always a winner, consider experimenting with different cake flavors. A rich chocolate cupcake base would offer a delightful contrast to the green frosting, or for a truly festive twist, try a spiced gingerbread or red velvet cupcake for that extra holiday cheer. You could also play with the frosting flavor itself – a hint of peppermint extract would add a refreshing zing, or a touch of almond extract could offer a subtle, sophisticated note. Beyond the classic green, imagine pink or blue frosting “trees” for a magical, fantastical forest theme! For decorations, swap out the star sprinkles for tiny edible pearls, miniature candy canes, or even carefully placed sugared cranberries. If you’re catering to dietary needs, remember that many gluten-free or dairy-free cake mixes and frosting alternatives can be easily substituted, ensuring everyone can enjoy these delightful treats. The goal is to make them uniquely yours, reflecting your personal taste and creative flair.
Your Turn to Create and Share!
Now that you have all the tips, tricks, and inspiration, it’s truly time to roll up your sleeves and get baking! I promise you, the process is incredibly rewarding, and the final result will bring so much joy. Whether you’re baking for a big holiday gathering, a quiet family evening, or simply to treat yourself, these cupcakes are guaranteed to make any occasion feel a little more special. I am so excited for you to experience the magic of creating these festive delights. Please, please, don’t keep your masterpieces a secret! I would absolutely adore seeing your magnificent creations. Share your photos, your delightful variations, and your baking experiences with me and our community. Let’s spread the festive cheer, one delicious cupcake at a time. Happy baking, everyone!
Christmas Tree Cupcakes
Transform simple cupcakes into charming, festive Christmas Tree Cupcakes! These delightful treats combine a moist chocolate cake base with vibrant green vanilla buttercream and sparkling edible decorations, perfect for holiday gatherings or a fun family baking project. They’re surprisingly simple to assemble and bring immense joy to any holiday table.
Ingredients
Instructions
Important Information
Nutrition Facts (Per Serving)
It is important to consider this information as approximate and not to use it as definitive health advice.
Allergy Information
Please check ingredients for potential allergens and consult a health professional if in doubt.
Leave a Comment