
Rice Krispie Christmas Puddings are here to revolutionize your holiday dessert table this year! Imagine the festive charm of a classic Christmas pudding, but without the hours of steaming and baking, all while delivering an irresistible crunch and a delightful chocolatey richness. That’s exactly what these delightful no-bake treats offer. While traditional Christmas puddings have graced holiday tables for centuries, symbolizing warmth and shared joy, our modern twist takes all the beloved visual cues and transforms them into an incredibly easy, family-friendly confection. I find that this recipe perfectly captures the spirit of the season with minimal fuss.
Children and adults alike adore the playful simplicity and festive appearance of these delightful creations. With their rich chocolate base, a satisfyingly crisp texture from the Rice Krispies, and a charming white topping mimicking brandy butter, these Rice Krispie Christmas Puddings are not only delicious but also incredibly fun to make and decorate. They are the ideal solution for busy holiday schedules, offering a delightful homemade touch without the stress. I’m confident you’ll agree they bring an extra sparkle to any festive gathering.

Ingredients:
-
For the Classic Rice Krispie Base:
- Unsalted Butter: 4 tablespoons (approximately 1/4 cup or 56 grams). Using unsalted butter allows us to control the saltiness in the recipe, which is particularly useful for a sweet treat. You can use salted butter if that’s all you have, but be mindful that it might impart a slight salty note.
- Mini Marshmallows: 1 (10-ounce) bag, approximately 40 large marshmallows or 4 cups of mini marshmallows. Mini marshmallows melt more quickly and evenly, ensuring a smooth, cohesive mixture for our Rice Krispie Christmas Puddings. If you only have large marshmallows, simply cut them into smaller pieces to aid in melting.
- Vanilla Extract: 1 teaspoon. A good quality vanilla extract really elevates the flavor profile, adding a warm, comforting aroma to our Rice Krispie base. This is an optional but highly recommended ingredient.
- Rice Krispies Cereal: 6 cups. This is the star of our “Rice Krispie Christmas Puddings”! Ensure your cereal is fresh for maximum crispness. Stale cereal will result in a chewy, less appealing texture.
-
For the Festive Decorations:
- White Chocolate Chips or Melts: 1 cup (approximately 170 grams). High-quality white chocolate will provide the best flavor and a smooth, glossy finish for our “sauce” topping. White chocolate melts are often easier to work with for a smooth consistency.
- Coconut Oil or Shortening: 1 teaspoon (optional, for thinning chocolate). Adding a tiny bit of coconut oil helps achieve a smoother, more pourable consistency for the melted white chocolate, making it easier to drizzle and spread evenly over the Rice Krispie Christmas Puddings.
- Green Candies: For the “holly” leaves. Examples include green M&M’s (cut in half or left whole), green sour strips (cut into leaf shapes), green spearmint leaves, or even green colored white chocolate piped into leaf shapes. I personally love using green gummy leaves or cutting up sour green apple straps for a realistic look and a little chewiness.
- Red Candies: For the “berries.” Examples include red M&M’s, red sprinkles, red cinnamon candies (like Red Hots), small red gumdrops, or even dried cranberries for a slightly healthier, more sophisticated touch.
- Red Icing Gel or Food Coloring: (Optional) If you want to paint on intricate berry details or create your own red elements.
- Powdered Sugar: 1 tablespoon (optional, for dusting). A light dusting can give a lovely “snowy” effect, making your Rice Krispie Christmas Puddings even more festive!
-
Essential Equipment:
- Large, heavy-bottomed saucepan
- Large mixing bowl
- Rubber spatula or wooden spoon
- Baking sheet lined with parchment paper or wax paper
- Small microwave-safe bowl or double boiler for melting chocolate
- Measuring cups and spoons
- Small pastry brush (optional, for applying chocolate)
- Gloves (optional, for shaping to prevent stickiness)
Preparing the Rice Krispie Base for your Christmas Puddings
- Prepare Your Workspace and Equipment: Before you even think about melting butter, it’s crucial to have everything ready. This recipe moves quickly once the marshmallows start melting, and you don’t want to be scrambling for ingredients or tools. First, lay out a large sheet of parchment paper or wax paper on a baking sheet. This will be where your finished Rice Krispie Christmas Puddings will cool and set. Lightly grease your large mixing bowl and your rubber spatula or wooden spoon with a little butter or non-stick cooking spray. This preparation step is key to preventing the incredibly sticky marshmallow mixture from clinging stubbornly to everything it touches. Believe me, a little grease goes a long way in saving you from a sticky mess and making the process much more enjoyable!
- Melt the Butter: Place your large, heavy-bottomed saucepan over low to medium-low heat. Add the 4 tablespoons of unsalted butter to the pan. Allow the butter to melt slowly and completely. You want the butter to be fully liquid but not browning or scorching. The gentle heat ensures even melting and prevents the butter from burning, which could impart an undesirable bitter flavor to your finished Rice Krispie Christmas Puddings. Keep a watchful eye on it; butter can go from perfectly melted to burnt very quickly.
- Introduce the Marshmallows: Once the butter is completely melted and shimmering, add the entire bag of mini marshmallows to the saucepan. Stir them continuously with your prepared spatula. The key here is patience and consistent stirring. Maintain a low to medium-low heat. If the heat is too high, the marshmallows will seize up, become grainy, or even burn on the bottom of the pan, leading to a lumpy and unpleasant texture. Stir until the marshmallows are about 90-95% melted and you see just a few small lumps remaining. These last few lumps will melt into the residual heat once you remove the pan from the stove. The mixture should be smooth, glossy, and incredibly sticky.
- Add the Vanilla Extract: As soon as the marshmallows are almost fully melted, remove the saucepan from the heat. This is important to prevent overcooking the marshmallows. Stir in the 1 teaspoon of vanilla extract. The warmth of the mixture will help the vanilla incorporate beautifully, releasing its aromatic qualities. Give it a good stir to ensure the vanilla is evenly distributed throughout the sweet, gooey marshmallow base. This little touch of vanilla truly enhances the overall flavor profile of your “Rice Krispie Christmas Puddings.”
- Combine with Rice Krispies: Now for the star of the show! Pour the entire 6 cups of Rice Krispies cereal into the large, greased mixing bowl that you prepared earlier. Immediately pour the warm, melted marshmallow mixture over the cereal. Working quickly but gently, use your greased rubber spatula or wooden spoon to fold the cereal into the marshmallow mixture. The goal is to coat every single flake of Rice Krispies without crushing them too much. You want to maintain that delightful crispness! Continue folding until the cereal is evenly coated and no dry patches remain. This process should take just a minute or two. Don’t overmix, as that can lead to a dense Rice Krispie treat rather than a light and airy one.
Shaping Your Festive Rice Krispie Christmas Puddings
- Cool Slightly for Easier Handling: The mixture will be very hot and incredibly sticky right off the stove. It’s best to let it cool down for about 3-5 minutes in the mixing bowl. This brief cooling period makes it much more manageable to handle with your hands and reduces the risk of burns. While it’s cooling, you can lightly grease your hands (or wear food-safe gloves) with a little butter or non-stick cooking spray. This is your secret weapon against stickiness when shaping!
- Shape the Pudding Bases: Once the mixture is cool enough to handle comfortably, take about 2-3 tablespoons of the Rice Krispie mixture and gently roll it between your greased palms to form a compact ball. Then, slightly flatten the bottom of the ball to create a stable base, and gently taper the top to give it that classic rounded pudding shape. Think of a mini dome or a hemisphere. The size is up to you, but aiming for roughly golf-ball to tangerine size will yield charming individual “Rice Krispie Christmas Puddings.” Place each shaped pudding onto your prepared parchment-lined baking sheet. Repeat this process with the remaining Rice Krispie mixture until all of it has been transformed into delightful little puddings. You should get approximately 12-18 puddings, depending on their size.
-
Achieving the Perfect Shape and Texture:
Tips for Shaping Rice Krispie Christmas Puddings:
- Grease Regularly: Re-grease your hands or gloves periodically as you work. The mixture will try its best to stick, so don’t let it win!
- Even Pressure: Use gentle but firm pressure when shaping. You want the puddings to be compact enough to hold their shape but not so dense that they lose their signature crisp-chewiness.
- Uniformity: Try to make them relatively uniform in size for consistent presentation. A cookie scoop can help portion out the mixture if you want to be extra precise before shaping.
- Troubleshooting Stickiness: If the mixture is too sticky to handle, allow it to cool for a few more minutes. If it starts to harden too much, you can microwave it for 10-15 seconds to soften it slightly, but be very careful not to overheat it.
Decorating Your Delicious Rice Krispie Christmas Puddings
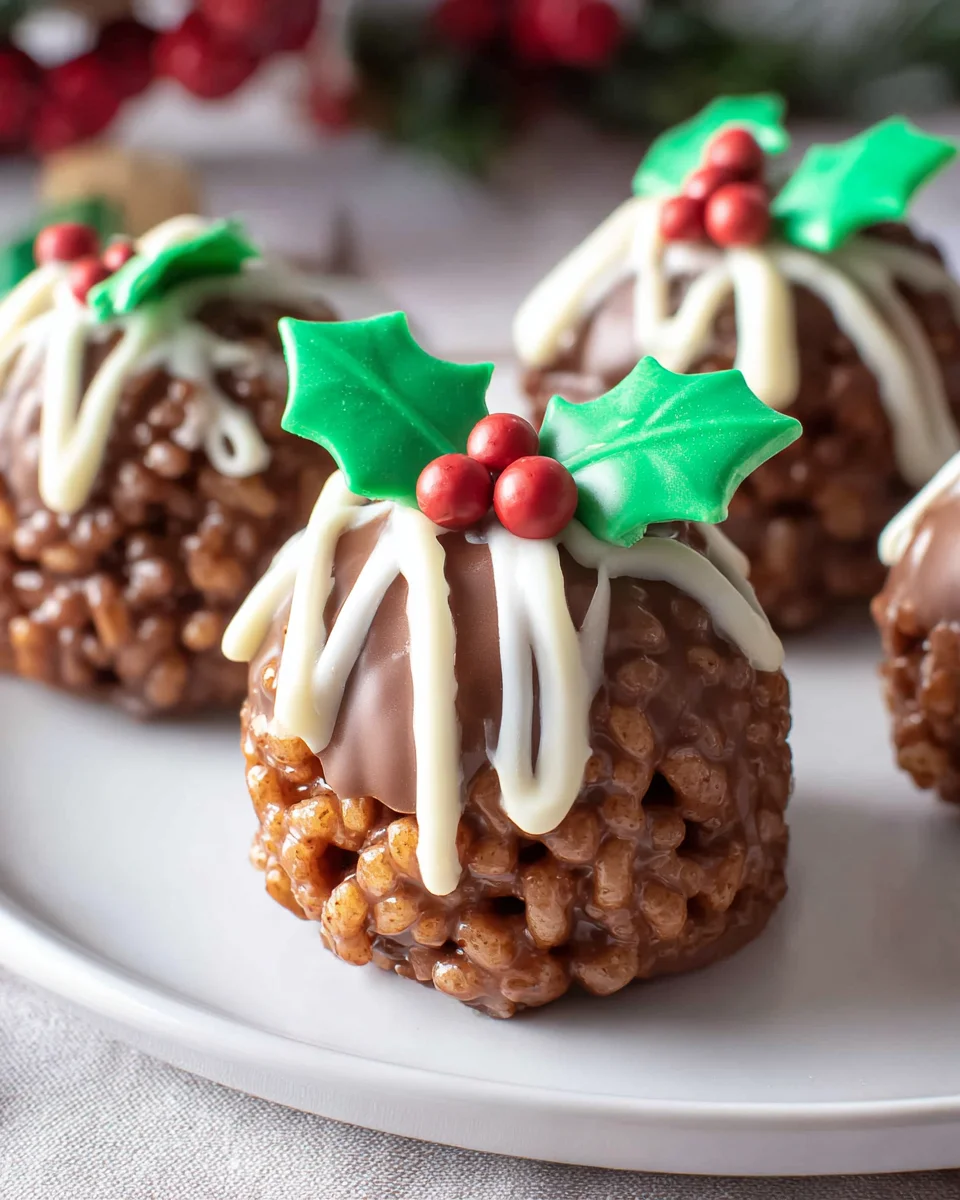
- Prepare the White Chocolate “Sauce”: Now for the beautiful “brandy sauce” topping! Place your white chocolate chips or melts into a small microwave-safe bowl. Microwave on 50% power in 30-second intervals, stirring thoroughly after each interval. White chocolate can seize up easily if overheated, so low and slow is the way to go. Continue until the chocolate is smooth and completely melted. Alternatively, you can use a double boiler method for a more controlled melt. If the chocolate seems too thick, stir in 1 teaspoon of coconut oil or shortening to thin it out to a pourable consistency. This helps create that lovely drip effect on your “Rice Krispie Christmas Puddings.”
- Top with White Chocolate: Once your white chocolate is perfectly melted and smooth, spoon a small amount (about 1-2 teaspoons) onto the top of each Rice Krispie pudding. Gently let the chocolate drizzle down the sides, mimicking the look of brandy sauce cascading over a traditional Christmas pudding. You can use the back of the spoon or a small pastry brush to help guide the chocolate around the top and sides for a more artistic look. Don’t worry if it’s not perfect; the rustic charm is part of the appeal of homemade “Rice Krispie Christmas Puddings”!
-
Add the Festive Holly and Berries: Immediately after applying the white chocolate (before it sets!), arrange your chosen green candies to represent holly leaves and red candies for the berries on top of the white chocolate. The wet chocolate will act as an edible glue, holding the decorations in place. You can be creative here:
Creative Holly and Berry Ideas:
- For holly, you might place two small green candies side-by-side, or use cut pieces of green gummy candy shaped like leaves.
- For berries, cluster 2-3 small red candies together. Red sprinkles can also be sprinkled on top of the white chocolate for a burst of color.
- If using red icing gel, you can pipe small dots to create realistic berries once the white chocolate has slightly set, but is still tacky.
The immediacy of this step is crucial, as white chocolate sets relatively quickly, especially in a cool environment.
Setting and Storing Your Rice Krispie Christmas Puddings
- Allow Your Puddings to Set: Once all your “Rice Krispie Christmas Puddings” are shaped and decorated, leave them undisturbed on the parchment-lined baking sheet. Allow them to set at room temperature for at least 30-60 minutes, or until the white chocolate topping is completely firm to the touch. If you’re in a hurry, or if your kitchen is particularly warm, you can transfer the baking sheet to the refrigerator for about 15-20 minutes to speed up the setting process. Just be sure not to leave them in the fridge for too long, as Rice Krispie treats can become a bit hard when thoroughly chilled. The goal is for the chocolate to be firm enough that it won’t smudge when handled.
- Optional Finishing Touches: For an extra festive touch, and to truly mimic a snow-dusted Christmas morning, you can lightly dust your set Rice Krispie Christmas Puddings with a very fine sifting of powdered sugar just before serving. This adds a beautiful “snow” effect that makes them even more charming and appealing. Simply use a fine-mesh sieve and tap it gently over the puddings.
- Storage Guidelines: These delightful “Rice Krispie Christmas Puddings” are best enjoyed within 2-3 days of preparation to ensure optimal freshness and crispness. Store them in an airtight container at room temperature. Layer them between sheets of parchment paper if you need to stack them, to prevent any sticking or smudging of the delicate white chocolate topping and decorations. Avoid storing them in the refrigerator for extended periods, as the cold can make the Rice Krispie base a bit hard and less enjoyable to eat. If they do get a little firm, simply let them come to room temperature for a while before serving. These make wonderful edible gifts or a fun, festive treat for any holiday gathering! I often find myself making a double batch because they disappear so quickly from the dessert table!
Conclusion:
As we wrap up our journey through this wonderfully simple and utterly delightful recipe, I truly hope you’re feeling as excited as I am about the prospect of bringing these festive treats to life in your own kitchen. There’s something uniquely special about creating a dessert that not only tastes incredible but also carries so much visual charm and nostalgic appeal. This isn’t just another sweet treat; it’s an invitation to embrace joy, simplicity, and a touch of homemade magic during the bustling holiday season.
Why are these a must-try, you ask? Well, for starters, the sheer ease of preparation is unparalleled. Forget preheating ovens, complicated techniques, or long ingredient lists. This recipe is the ultimate no-bake wonder, making it perfect for novice bakers, busy parents, or anyone looking for a stress-free yet impressive dessert. The satisfying crunch of the cereal, perfectly bound by that sweet, gooey marshmallow mixture, creates a textural sensation that’s utterly addictive. Then there’s the aesthetic: these miniature puddings are undeniably cute, guaranteed to elicit smiles and compliments. They are a brilliant way to add a personalized touch to your holiday spread without adding any extra stress to your plate. They truly embody the spirit of festive fun and effortless elegance.
When it comes to serving, the possibilities are as endless as your imagination. These charming individual treats are absolutely perfect for holiday dessert platters, nestled amongst mince pies and shortbread. Arrange them artfully on a tiered stand at your next Christmas party, or even use them as edible place settings, personalized with a guest’s initial on top. They also make incredibly thoughtful, homemade gifts; simply wrap them individually in cellophane bags tied with a festive ribbon, and you have a sweet token of affection ready to share with friends, teachers, or neighbors. For a cozy evening, pair them with a steaming mug of hot cocoa or a festive spiced tea. You can even consider serving them alongside a scoop of vanilla bean ice cream for a delightful contrast in temperature and texture.
And let’s talk variations! While the classic design is beautiful, feel free to let your creativity shine. Instead of traditional green and red holly details, try using silver and blue sprinkles for a winter wonderland theme, or go all out with edible glitter for extra sparkle. For a touch of extra flavor, a hint of peppermint extract stirred into the marshmallow mixture can transform them into a minty marvel, or a dash of orange zest could add a bright, citrusy note. If you’re feeling adventurous, gently fold in some mini chocolate chips or finely chopped candied ginger before shaping. For those seeking gluten-free options, simply ensure your Rice Krispies and marshmallows are certified gluten-free. The beauty of this recipe lies in its adaptability; it’s a wonderful canvas for your own festive flair. Don’t be afraid to experiment and make these little puddings uniquely yours.
So, I sincerely encourage you to gather your ingredients, perhaps even invite the kids to help, and dive into making these delightful treats. The joy of creating something so charming and delicious with minimal effort is incredibly rewarding. Once you’ve made your batch, I’d absolutely love to hear about your experience! Did you stick to the classic design, or did you unleash your inner artist with unique variations? What serving suggestions did you come up with? Please share your creations and stories with me. I can’t wait for you to discover the magic of these adorable Rice Krispie Christmas Puddings and make them a cherished part of your holiday traditions for years to come. Happy baking (or rather, no-baking)!
Delightful Rice Krispie Christmas Puddings – Simple & Sweet
Revolutionize your holiday dessert table with these delightful no-bake Rice Krispie Christmas Puddings. Enjoy the festive charm of a classic Christmas pudding, but with an irresistible crunch and a rich chocolatey base. These easy, family-friendly treats feature a crisp Rice Krispie texture, a charming white chocolate topping, and festive holly decorations, perfect for busy holiday schedules.
Ingredients
Instructions
Important Information
Nutrition Facts (Per Serving)
It is important to consider this information as approximate and not to use it as definitive health advice.
Allergy Information
Please check ingredients for potential allergens and consult a health professional if in doubt.
Leave a Comment