
Strawberry Crunch Cheesecake Tacos are more than just a dessert; they’re a celebration of flavor and fun, perfectly blending two beloved treats into one unforgettable experience. Have you ever dreamed of a dessert that captures the creamy decadence of cheesecake, the nostalgic crunch of strawberry shortcake, and presents it in an exciting, handheld format? Well, prepare to have your dessert dreams come true! While the concept of a “dessert taco” might be a modern, playful twist on culinary traditions, drawing inspiration from global street food culture, its genius lies in transforming familiar comforts into something fresh, innovative, and utterly delightful.
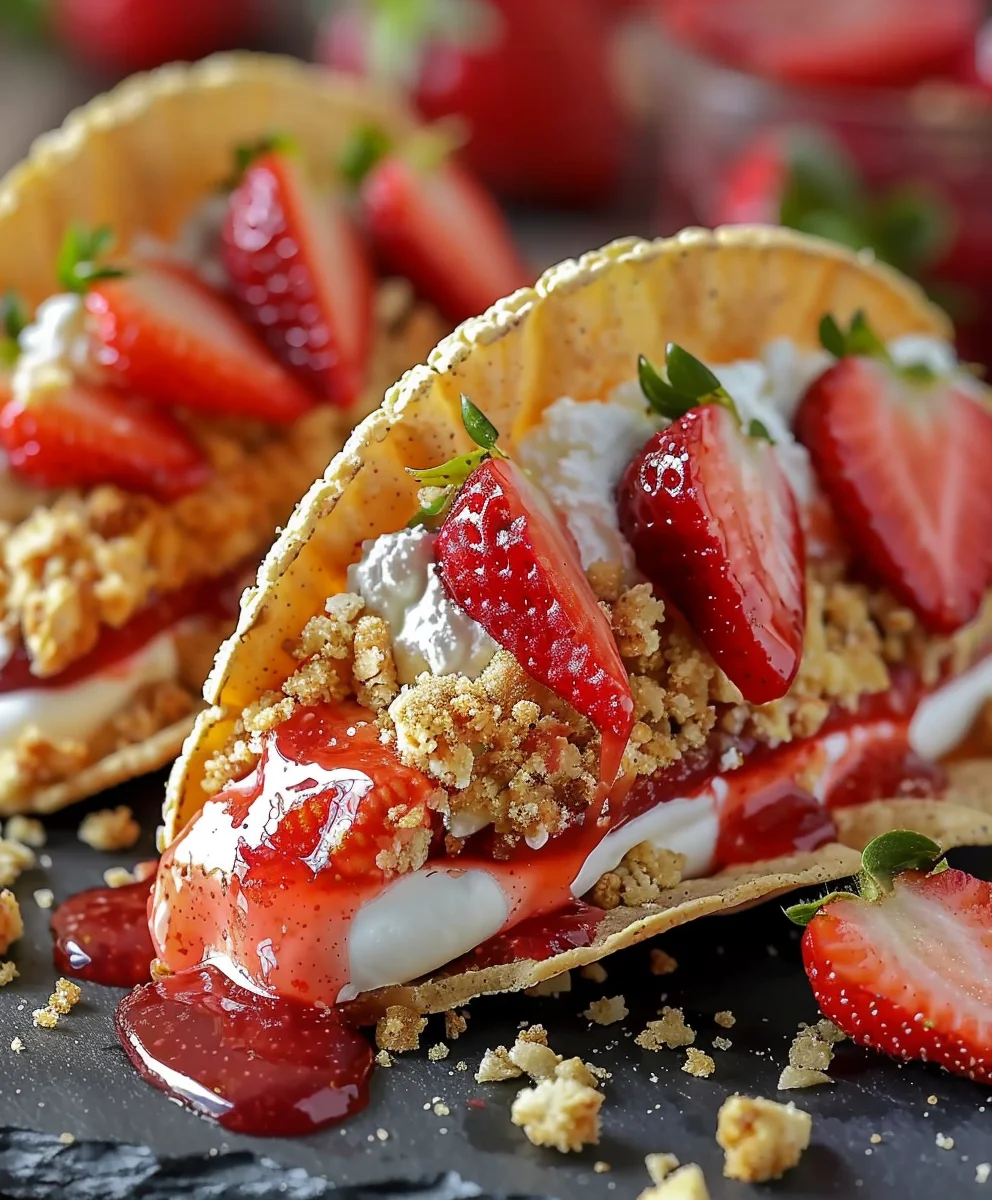
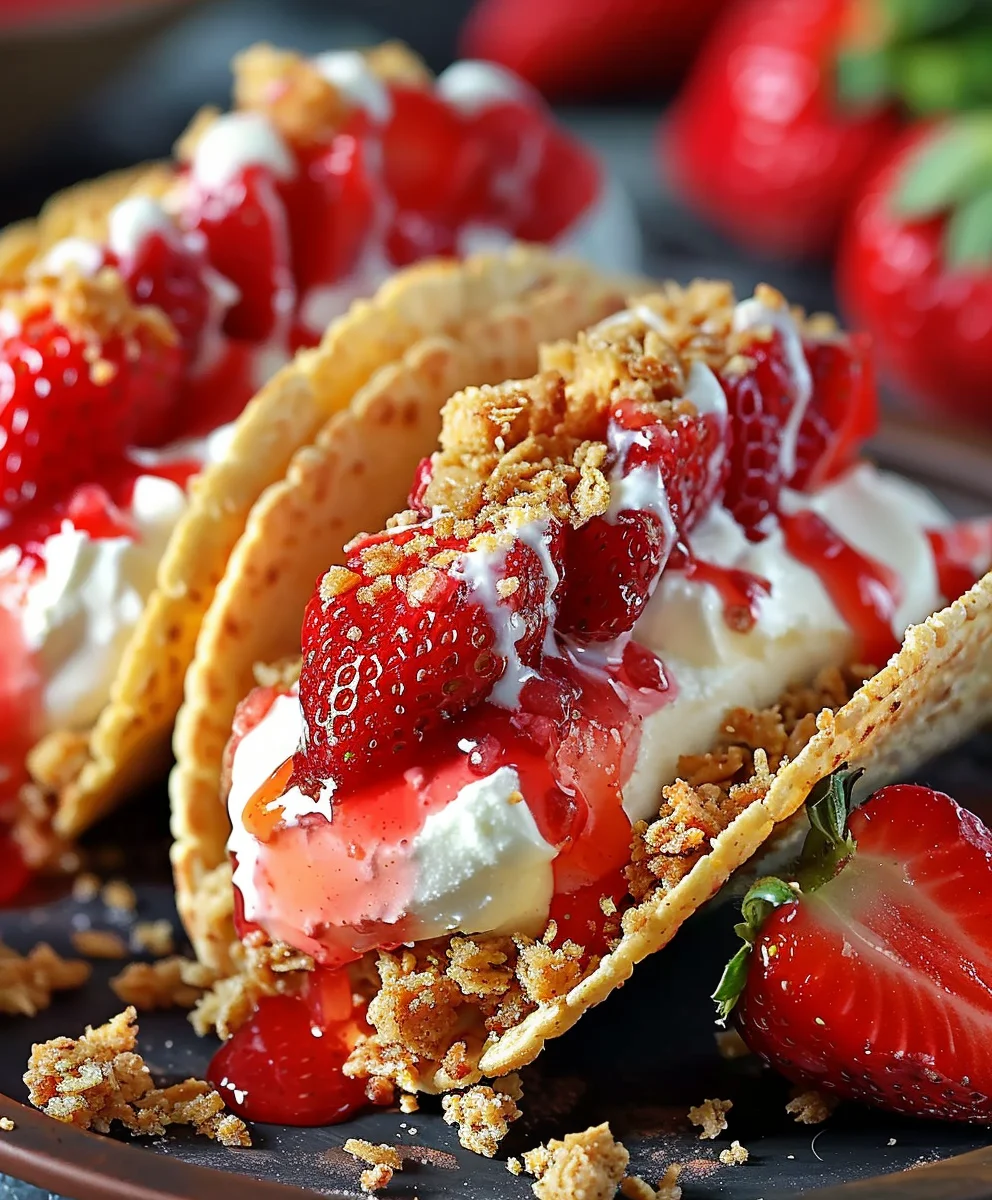
I find that this dish resonates deeply because it taps into a universal love for both rich, tangy cheesecake and the sweet, crumbly magic of strawberry crunch. It’s a whimsical nod to classic ice cream truck favorites, but elevated with a sophisticated, creamy cheesecake filling. The beauty of these tacos lies in their incredible textural contrast: the crispy, often golden-fried ‘taco’ shell provides a delightful snap, giving way to an incredibly smooth, sweet, and tangy cheesecake filling. This is then generously crowned with that irresistible, vibrant pink strawberry crunch topping, offering a burst of fruity flavor and satisfying crumble in every single bite.
What truly makes these Strawberry Crunch Cheesecake Tacos a showstopper is their ability to bring pure joy. They’re visually stunning, surprisingly easy to customize, and remarkably convenient to eat, making them perfect for parties, picnics, or simply as a special treat at home. Get ready to embark on a culinary adventure that promises to delight your taste buds and impress your guests with its innovative charm and deliciousness.
Ingredients:
- For the Strawberry Crunch Topping:
- 1 ½ cups Golden Oreo crumbs (about 18-20 cookies, crushed)
- ½ cup freeze-dried strawberries, crushed into a fine powder (you can use a food processor or a Ziploc bag and rolling pin)
- ¼ cup unsalted butter, melted
- 2 tablespoons granulated sugar (optional, for extra sweetness)
- For the No-Bake Cheesecake Filling:
- 16 ounces cream cheese, full-fat, softened to room temperature
- 1 cup powdered sugar, sifted, plus more to taste
- 1 teaspoon pure vanilla extract
- ¼ teaspoon salt
- 2 cups heavy cream, very cold
- For the “Taco” Shells:
- 12 small (6-inch) flour tortillas (street taco size works best)
- 2-3 tablespoons neutral oil (like vegetable or canola oil), for brushing/frying
- ¼ cup granulated sugar
- 1 teaspoon ground cinnamon
- For Garnish (Optional):
- Fresh strawberries, sliced or halved
- White chocolate, melted, for drizzling
Preparing the Strawberry Crunch Topping
Oh, this topping is what truly makes our Strawberry Crunch Cheesecake Tacos sing! It’s crunchy, sweet, and bursting with strawberry flavor. Let’s get started on creating this irresistible component.
-
Crushing the Golden Oreos:
First things first, we need to transform those lovely Golden Oreos into crumbs. You have a couple of options here. You can place the cookies in a sturdy Ziploc bag, seal it, and use a rolling pin to crush them into fine crumbs. This method is wonderfully therapeutic! Alternatively, a food processor will do the job quickly and efficiently. Just pulse until you have a consistent crumb texture, ensuring there are no large chunks remaining. We’re aiming for a texture similar to graham cracker crumbs.
-
Powdering the Freeze-Dried Strawberries:
Next, let’s tackle the freeze-dried strawberries. These little gems are packed with intense strawberry flavor and a beautiful vibrant color, making them essential for our Strawberry Crunch Cheesecake Tacos. For the best results, I highly recommend using a food processor or even a spice grinder to turn them into a fine powder. If you don’t have one, you can also place them in a Ziploc bag and crush them with a rolling pin, though it might take a bit more effort to get them truly powdery. The finer the powder, the better it will blend and distribute its flavor and color throughout our crunch.
-
Combining the Crunch Ingredients:
In a medium bowl, combine your Golden Oreo crumbs and the freeze-dried strawberry powder. Give them a good stir with a spoon or whisk to ensure they are thoroughly mixed. At this point, you’ll start to see that beautiful pinkish-orange hue develop, and you’ll catch a delightful whiff of strawberry! Now, pour in the melted unsalted butter. Mix everything together until the crumbs are evenly moistened and resemble wet sand. If you’re using the optional granulated sugar for an extra touch of sweetness, add it now and mix well.
-
Toasting for Extra Flavor (Optional, but Recommended):
For an even deeper flavor and a delightful crispness, I love to lightly toast the strawberry crunch. Spread the mixture evenly on a baking sheet lined with parchment paper. Bake in a preheated oven at 300°F (150°C) for about 8-10 minutes, stirring halfway through. Keep a close eye on it, as it can burn quickly due to the sugar content. We’re looking for a slightly golden color and a wonderfully aromatic quality. Once toasted, remove from the oven and let it cool completely on the baking sheet. As it cools, it will become even crunchier. This step truly elevates the texture and taste of the strawberry crunch topping for your Strawberry Crunch Cheesecake Tacos.
Crafting the No-Bake Cheesecake Filling
This cheesecake filling is luxuriously creamy, perfectly sweet, and incredibly easy to make since it’s no-bake. It’s the heart of our Strawberry Crunch Cheesecake Tacos!
-
Creaming the Cream Cheese:
In a large mixing bowl, using an electric mixer (either a stand mixer with a whisk attachment or a hand mixer), beat the softened cream cheese on medium speed for about 2-3 minutes. It’s crucial that your cream cheese is at absolute room temperature. If it’s too cold, you’ll end up with lumps, and nobody wants lumpy cheesecake! Beat until it’s super smooth and fluffy, scraping down the sides of the bowl frequently to ensure everything is incorporated.
-
Adding Sweetness and Flavor:
Once the cream cheese is silky smooth, gradually add the sifted powdered sugar. Sifting is important here to prevent clumps in your final filling. Beat on low speed until combined, then increase to medium-high and beat for another 1-2 minutes until light and airy. Stir in the vanilla extract and salt. The salt really helps to balance the sweetness and enhance the other flavors. Mix until just combined.
-
Whipping the Heavy Cream:
In a separate, very cold bowl (I often chill my bowl and whisk attachment in the freezer for 10-15 minutes beforehand), pour in the very cold heavy cream. Using your electric mixer, whip the heavy cream on medium-high speed until stiff peaks form. This means when you lift the whisk, the peaks of cream stand up firmly and don’t droop. Be careful not to over-whip, or it will turn grainy or even start to separate into butter.
-
Folding it All Together:
Now for the magical part: combining the two mixtures! Gently, in two or three additions, fold the whipped heavy cream into the cream cheese mixture using a rubber spatula. The key word here is “fold” – we want to preserve all that lovely air we just whipped into the cream. Don’t stir vigorously, as this will deflate the cream and result in a dense filling. Continue folding until no streaks of white cream remain, and the mixture is uniformly smooth and creamy. You’ll have a light, airy, and luscious no-bake cheesecake filling perfect for your Strawberry Crunch Cheesecake Tacos.
-
Chilling Time:
Transfer the cheesecake filling to a piping bag fitted with a large star tip (or just a large round tip), or cover the bowl tightly with plastic wrap. Refrigerate for at least 30 minutes, or even better, an hour. This chilling time is crucial as it allows the filling to firm up and become more stable, making it much easier to pipe into our taco shells and ensuring it holds its shape beautifully.
Preparing the Crispy “Taco” Shells
These aren’t your typical savory tacos! We’re making sweet, crispy shells that perfectly cradle our cheesecake filling. This step is a fun and essential part of creating our unique Strawberry Crunch Cheesecake Tacos.
-
Making the Cinnamon Sugar Mixture:
In a small, shallow bowl, combine the ¼ cup granulated sugar and 1 teaspoon of ground cinnamon. Stir well to ensure the cinnamon is evenly distributed. This mixture will give our taco shells a delightful sweet and spicy aroma and flavor, making them truly dessert-worthy.
-
Preparing the Tortillas:
Lay out your small flour tortillas. If you only have larger ones, you can use a round cookie cutter or a glass rim to cut them into smaller, more manageable circles, roughly 4-5 inches in diameter. Smaller tortillas work best for a dessert taco that’s easy to handle and eat. Brush both sides of each tortilla very lightly with neutral oil. You don’t want them soaking wet; just a thin, even coating will suffice to help them crisp up and brown beautifully.
-
Shaping and Baking (or Frying) the Shells:
This is where we turn flat tortillas into taco shells! You have a few options:
- Baking Method (Recommended for Ease and Less Mess): Preheat your oven to 375°F (190°C). Drape the oiled tortillas over two bars of your oven rack, creating an inverted V shape. Space them out so they aren’t touching. Bake for 8-12 minutes, or until golden brown and crispy. The cooking time will vary depending on your oven and the thickness of your tortillas. Keep a close eye on them to prevent burning. They should be firm and hold their taco shape when cooled.
- Frying Method: Heat about ½ inch of neutral oil in a large skillet or shallow pot over medium-high heat. Once hot (a tiny piece of tortilla should sizzle when dropped in), carefully place one tortilla into the hot oil. Using tongs, gently fold the tortilla in half to create a taco shape. Fry for about 1-2 minutes per side, or until golden brown and crispy. Remove with tongs and place on a wire rack lined with paper towels to drain excess oil. Be very careful with hot oil!
- Air Fryer Method: Lightly brush the tortillas with oil. Drape them over the edges of a heat-safe bowl or use an air fryer taco stand. Air fry at 350°F (175°C) for 5-8 minutes, checking frequently, until crispy and golden.
-
Coating with Cinnamon Sugar:
As soon as the crispy shells come out of the oven or fryer (while they are still warm but cool enough to handle), immediately sprinkle them generously with the cinnamon sugar mixture, both inside and out. The warmth will help the sugar adhere beautifully. Place the finished shells on a wire rack to cool completely. They must be completely cooled before filling, otherwise, the heat will melt your delicious cheesecake filling.
Assembling Your Strawberry Crunch Cheesecake Tacos
Now for the grand finale! Bringing all these wonderful components together to create the showstopping Strawberry Crunch Cheesecake Tacos. This is where the magic truly happens, and your kitchen will smell absolutely divine.
-
Prepping for Filling:
Retrieve your chilled cheesecake filling from the refrigerator. If you used a piping bag, ensure the tip is secure. If you don’t have a piping bag, a sturdy Ziploc bag with a corner snipped off will work just fine, or you can simply use two spoons to fill the shells, though piping creates a neater presentation.
-
Filling the Taco Shells:
Hold one of your cooled, crispy cinnamon sugar taco shells in one hand. Carefully pipe or spoon the cheesecake filling into the taco shell. Don’t be shy – fill it generously, but leave a little space at the top for our incredible strawberry crunch topping. Aim for an even distribution of filling across the length of the shell. Repeat this process with all the remaining taco shells, creating a delicious lineup of future Strawberry Crunch Cheesecake Tacos.
-
Adding the Strawberry Crunch:
Once all the shells are filled with the creamy cheesecake, it’s time for the star of the show: the strawberry crunch! Take your cooled strawberry crunch topping and sprinkle it generously over the exposed cheesecake filling in each taco shell. You can also gently press some onto the sides of the filling if you like. The more crunch, the better, in my opinion! The contrast of the smooth, creamy filling and the crispy, fruity crunch is absolutely divine.
-
Garnishing and Serving:
For an extra touch of elegance and freshness, garnish your Strawberry Crunch Cheesecake Tacos with fresh strawberry slices or halves. The vibrant red of the fresh berries really pops against the pink crunch and white filling. If you’re feeling extra fancy, drizzle some melted white chocolate over the tops of the tacos for a beautiful finish and an added layer of sweetness. These tacos are best served fresh, but you can also refrigerate them for about 15-20 minutes before serving to ensure the filling is perfectly firm. Store any leftovers in an airtight container in the refrigerator for up to 2-3 days, though the shells may soften slightly over time.
-
Enjoying Your Creation:
And there you have it! Your very own delightful and utterly irresistible Strawberry Crunch Cheesecake Tacos. These are truly a dessert sensation – perfect for parties, a special treat, or just because you deserve something wonderfully delicious. Take a bite and savor the incredible combination of crispy cinnamon sugar shell, creamy no-bake cheesecake, and that unforgettable strawberry crunch. Enjoy!
Conclusion:
Well, my friends, we’ve reached the sweet end of our journey through this truly unforgettable dessert. If there’s one recipe I urge you to try this season, it’s this one. What makes it an absolute showstopper, you ask? It’s the perfect marriage of textures and flavors that simply dance on your palate. Imagine the velvety smoothness of a classic cheesecake filling, rich and tangy, perfectly cradled within a crispy, golden taco shell. Then, picture that incredible, vibrant strawberry crunch topping – a delightful explosion of sweet, fruity notes with a satisfying textural contrast that elevates every single bite. It’s not just a dessert; it’s an experience, a joyous celebration of flavor that manages to be both nostalgic and excitingly new all at once. I honestly believe that once you take that first bite of these incredible treats, you’ll understand exactly why I’m so enthusiastic. They embody everything a great dessert should be: indulgent, innovative, and utterly irresistible. The vibrant colors alone make them a feast for the eyes, perfect for impressing guests or simply treating yourself to something truly special.
Serving Suggestions & Creative Variations to Elevate Your Experience
Now that you’re convinced these are a must-make, let’s talk about how to make them truly shine on your table, or how to personalize them even further. For serving, I love arranging a platter of these beautiful tacos, perhaps with a scattering of fresh mint leaves or a few extra strawberry slices for a pop of color. They’re fantastic on their own, but if you want to take them over the top, a small dollop of homemade whipped cream or a light dusting of powdered sugar adds an elegant touch without overwhelming the existing flavors. For those who love a bit of extra indulgence, a delicate drizzle of white chocolate or dark chocolate sauce can be absolutely divine, creating an artistic flourish and an additional layer of sweetness. Think about how stunning they would look as the centerpiece of a brunch spread or as the grand finale to a dinner party! These aren’t just single-serve treats; they’re conversation starters.
But the fun doesn’t stop there! One of the joys of cooking is experimentation, and this recipe lends itself beautifully to creative twists. While the classic strawberry crunch is phenomenal, consider swapping out the freeze-dried strawberries for other fruits. Imagine a “Blueberry Lemon Crunch” version, using lemon-flavored cookies and freeze-dried blueberries, or a tropical “Mango Coconut Crunch” for an exotic escape. You could even experiment with the cookie base for the crunch; vanilla wafers or shortbread cookies could offer a different subtle flavor profile. For those with dietary considerations, this recipe is surprisingly adaptable. You can easily opt for gluten-free taco shells and cookies to make a celiac-friendly version, ensuring everyone can enjoy these delights. Dairy-free cream cheese alternatives are also widely available now, making a vegan-friendly rendition totally possible without sacrificing that creamy texture. The possibilities for making these Strawberry Crunch Cheesecake Tacos uniquely your own are truly endless!
Your Turn to Create Sweet Magic!
My biggest hope is that you’re feeling inspired right now to roll up your sleeves and give this recipe a try. There’s an immense satisfaction that comes from creating something so delicious and beautiful with your own hands. Don’t be intimidated; the process is incredibly rewarding, and the payoff is simply extraordinary. I promise you, the smiles and appreciative murmurs you’ll receive when you serve these will be worth every single step. Imagine the delight on your family’s faces, or the surprise of your friends when they discover this inventive dessert. Whether you follow the recipe to the letter or put your own unique spin on it, the journey of making and tasting these is an adventure in itself. I truly believe that these Strawberry Crunch Cheesecake Tacos will become a staple in your dessert repertoire. So, gather your ingredients, put on your favorite music, and prepare to make some sweet memories!
Once you’ve embarked on this delicious adventure, I would absolutely love to hear about your experience. Did you make any variations? What was your favorite part? Share your photos, your tweaks, and your triumphs! Your feedback and creativity inspire me and our entire community of dessert lovers. Let’s celebrate the joy of baking together. Happy cooking, and even happier eating!
Strawberry Crunch Cheesecake Tacos
A delightful dessert blending creamy no-bake cheesecake with a sweet strawberry and graham cracker crunch, offering a unique and irresistible treat.
Ingredients
-
8 oz (226g) cream cheese, softened
-
1/2 cup (100g) granulated sugar
-
1 tsp vanilla extract
-
1/4 cup (60ml) heavy cream
-
1 cup (150g) fresh strawberries, finely chopped
-
1 1/2 cups (180g) graham cracker crumbs
-
1/4 cup (50g) unsalted butter, melted
-
1/4 cup (35g) chopped toasted pecans (optional)
-
Additional chopped strawberries, for garnish (optional)
Instructions
-
Step 1
In a medium bowl, combine graham cracker crumbs, melted unsalted butter, and optional chopped toasted pecans. Mix well until the crumbs are evenly moistened and resemble wet sand. -
Step 2
In a large mixing bowl, beat softened cream cheese with an electric mixer until smooth and fluffy. Gradually add granulated sugar, beating until fully combined. Stir in vanilla extract, then add the cold heavy cream and beat on medium-high speed until the mixture is light, airy, and fluffy. Do not overmix. -
Step 3
Spoon or pipe the cheesecake filling into individual serving dishes, glasses, or small bowls. Layer generously with the finely chopped fresh strawberries and then top with the prepared graham cracker crunch mixture. Repeat layers if desired for a parfait style. -
Step 4
Garnish with additional fresh strawberry slices. For best results and a firmer filling, refrigerate the assembled desserts for at least 30 minutes before serving. Enjoy this delightful dessert!
Important Information
Nutrition Facts (Per Serving)
It is important to consider this information as approximate and not to use it as definitive health advice.
Allergy Information
Please check ingredients for potential allergens and consult a health professional if in doubt.


Leave a Comment