
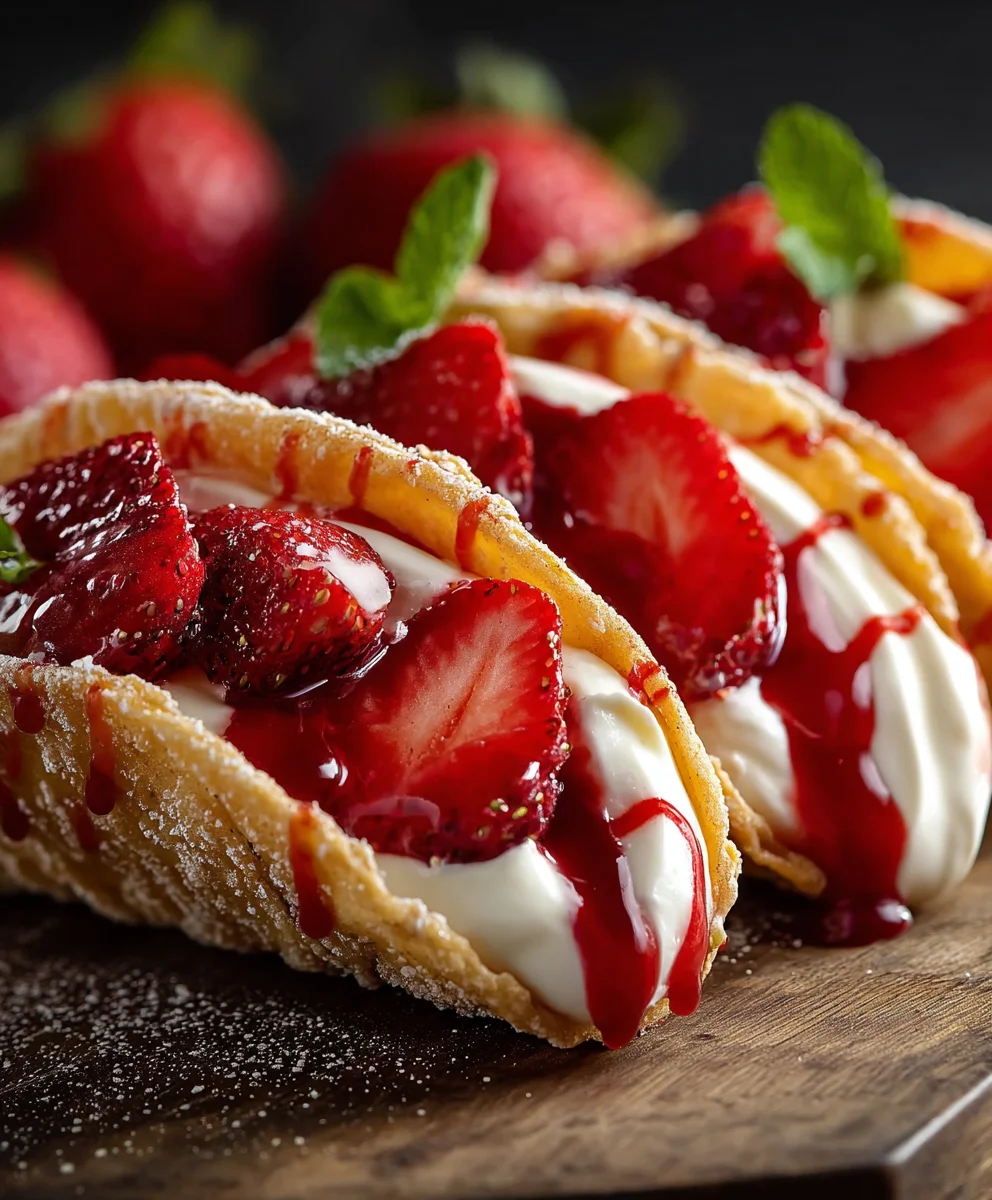
Strawberry Cheesecake Dessert Tacos – prepare to have your dessert expectations deliciously redefined! I am absolutely thrilled to share with you a recipe that perfectly encapsulates the joy of unexpected culinary fusion, transforming two beloved classics into one irresistible, handheld treat. This ingenious creation takes the rich, creamy decadence of a traditional cheesecake and marries it with the playful, convenient form of a taco, all brought to life with the vibrant freshness of strawberries.
While not steeped in centuries of history like its savory counterpart, the dessert taco trend represents a delightful modern evolution in sweet treats, reflecting a global palate that embraces innovation and fun. It’s a testament to how culinary boundaries can be deliciously blurred, creating something entirely new yet wonderfully familiar. People adore this dish for countless reasons: the delightful textural contrast of a crisp, slightly sweet shell embracing a smooth, tangy cheesecake filling, punctuated by juicy bursts of fresh strawberries. It’s not just a dessert; it’s an experience – convenient to serve, visually stunning, and undeniably delicious. These Strawberry Cheesecake Dessert Tacos are simply perfect for parties, family gatherings, or whenever you crave a uniquely satisfying sweet indulgence that’s sure to impress and delight everyone.
Ingredients:
-
For the Crispy Cinnamon Sugar Taco Shells:
- 8-10 small (6-inch) flour tortillas – I find these are the perfect size for individual dessert tacos.
- 1/2 cup granulated sugar – For that essential sweet coating.
- 2 teaspoons ground cinnamon – The warm spice that elevates the flavor.
- 1/2 cup (about 1 stick) unsalted butter, melted – For brushing, helping the cinnamon sugar adhere beautifully.
- Vegetable oil or canola oil for frying – About 3-4 cups, depending on the size of your pot.
-
For the Dreamy Strawberry Cheesecake Filling:
- 2 (8-ounce) packages full-fat cream cheese, softened to room temperature – This is crucial for a smooth, lump-free filling.
- 1/2 cup granulated sugar – To provide just the right amount of sweetness.
- 1/4 cup powdered sugar (confectioners’ sugar) – Adds extra sweetness and helps with the silky texture.
- 1 teaspoon pure vanilla extract – A classic flavor enhancer.
- 1/4 teaspoon lemon zest (optional, but highly recommended) – Brightens the entire filling.
- 1 cup heavy cream, chilled – For that light, airy, and rich cheesecake texture.
- Pinch of salt – To balance the sweetness and enhance other flavors.
-
For the Luscious Strawberry Topping:
- 2 pounds fresh strawberries, hulled and sliced or quartered – Choose ripe, vibrant red strawberries for the best flavor and appearance.
- 1/4 cup granulated sugar (or more, to taste, depending on the sweetness of your berries) – Helps to draw out the natural juices and create a light syrup.
- 1 tablespoon fresh lemon juice – Brightens the berries and prevents them from tasting flat.
- 1 teaspoon cornstarch dissolved in 1 tablespoon cold water (optional, for a slightly thicker sauce) – If you prefer a less watery topping.
-
Optional Garnishes:
- Whipped cream – A dollop on top is always a welcome addition.
- Fresh mint leaves – For a touch of color and freshness.
- Chocolate shavings or a drizzle of chocolate sauce – For the chocolate lovers out there.
Preparing the Crispy Cinnamon Sugar Taco Shells
This is where the magic begins for our “Strawberry Cheesecake Dessert Tacos”! Creating these sweet, crunchy shells is a game-changer and surprisingly simple. You’ll love the aroma that fills your kitchen as these fry up.
- Step 1: Get those tortillas ready. First things first, grab your small flour tortillas. If they seem a little stiff, you can warm them gently in the microwave for about 10-15 seconds or in a dry skillet for a few moments on each side. This makes them more pliable and less likely to crack when you fold them. I always make sure to have a couple of extra tortillas on hand, just in case one doesn’t cooperate during frying. Remember, practice makes perfect, and even the “imperfect” ones still taste delicious!
- Step 2: Time to infuse them with flavor. In a shallow dish or a wide bowl, combine the granulated sugar and ground cinnamon. Stir it really well until the cinnamon is evenly distributed throughout the sugar. This is going to be the wonderful coating for our dessert taco shells. In a separate small bowl, melt your unsalted butter. You can do this in the microwave in 20-second bursts or in a small saucepan over low heat. We’ll be using this to brush the tortillas, helping that sweet cinnamon sugar stick like a dream.
- Step 3: Heating the oil, getting it just right. Pour about 3-4 cups of vegetable or canola oil into a heavy-bottomed pot or a deep skillet. You want enough oil so that the tortillas can be at least partially submerged. Heat the oil over medium-high heat until it reaches about 350-375°F (175-190°C). This temperature is crucial for crispy, non-greasy shells. If you don’t have a thermometer, you can test it by dropping a tiny piece of tortilla into the oil; it should sizzle immediately and float to the surface within a second or two. Be patient; getting the oil to the right temperature will make all the difference in the texture of your dessert tacos.
- Step 4: Frying and shaping our shells. Once the oil is hot, carefully place one tortilla into the oil. Fry it for about 10-15 seconds until it starts to puff up and turn slightly golden. Using tongs, gently fold the tortilla in half to create a taco shape. Hold it in place with the tongs for another 15-20 seconds, allowing it to crisp up in that folded position. You want it to be golden brown and firm, but not burnt. Don’t overcrowd the pot; fry one or two at a time, depending on your pot’s size, to maintain oil temperature. Overcrowding will lower the oil temperature and result in greasy shells. This step requires a bit of attention, but it’s quite fun to watch them transform!
- Step 5: Draining and coating for that irresistible crunch. As soon as a tortilla is golden and crispy, remove it from the oil and immediately place it on a plate lined with paper towels to drain any excess oil. While it’s still warm and slightly oily, lightly brush both sides with the melted butter. Then, immediately dredge it through your cinnamon sugar mixture, ensuring both sides are completely coated. The warmth and butter will help the sugar adhere perfectly. Transfer the coated shell to a wire rack set over a baking sheet to cool completely. Repeat this process with the remaining tortillas. Work quickly after frying each one, as the cinnamon sugar sticks best when the shell is still warm.
- Step 6: Cooling for perfection. Allow all the cinnamon sugar taco shells to cool completely on the wire rack. They will become even crispier as they cool. Patience here is key! You want them fully cooled before filling, otherwise, the heat can cause your delicious cheesecake filling to melt and slide. These crispy shells are not just containers for our Strawberry Cheesecake Dessert Tacos; they are a delightful part of the whole experience, offering a satisfying crunch and a burst of warm spice.
Crafting the Velvety Cheesecake Filling
Now that our crunchy shells are cooling, let’s turn our attention to the star of the show: a lusciously smooth, perfectly sweet, and slightly tangy cheesecake filling. This is what makes these “Strawberry Cheesecake Dessert Tacos” truly decadent.
- Step 1: Softening the stars of our filling. The absolute most important step for a silky-smooth cheesecake filling is to ensure your full-fat cream cheese is truly at room temperature. I can’t stress this enough! If it’s cold, you’ll end up with lumps, no matter how much you beat it. Take it out of the fridge at least an hour or two before you plan to start, or if you’re in a hurry, you can unwrap it and microwave it on low power for 10-15 second intervals until just slightly softened, being careful not to melt it.
- Step 2: Whipping up the base. In a large mixing bowl, using an electric mixer (either a stand mixer with the paddle attachment or a hand mixer), beat the softened cream cheese on medium speed for about 2-3 minutes. You want to whip it until it’s incredibly smooth, fluffy, and completely free of any lumps. This aeration process also helps create a lighter texture, which is perfect for our dessert tacos. Scrape down the sides of the bowl often to ensure everything gets incorporated.
- Step 3: Sweetening the deal. Gradually add the granulated sugar and powdered sugar to the whipped cream cheese, beating on low speed until fully incorporated, then increase to medium-high and beat for another 2 minutes. The powdered sugar really contributes to that wonderfully smooth, almost velvety texture that we’re aiming for. Now, stir in the pure vanilla extract and that optional, but highly recommended, pinch of lemon zest. The lemon zest adds a beautiful, subtle brightness that cuts through the richness of the cream cheese and complements the strawberries later on. Don’t forget that tiny pinch of salt; it truly balances and enhances all the sweet flavors.
- Step 4: Adding the creamy elements. In a separate, chilled bowl (I like to chill my bowl and whisk attachment in the freezer for 10-15 minutes beforehand), pour your cold heavy cream. Whip the heavy cream on medium-high speed until it forms stiff peaks. You’re looking for that moment when you lift the whisk, and the cream holds its shape firmly. Be careful not to over-whip it into butter! This step creates a light and airy component, making our cheesecake filling delightful and not too dense for our dessert tacos.
- Step 5: A final, gentle mix. Now, gently fold the whipped heavy cream into the cream cheese mixture. Use a rubber spatula and a delicate hand, incorporating it in two additions. The goal here is to maintain as much of that lovely airiness as possible. Fold until just combined; overmixing at this stage can deflate the cream and make your filling less light. You’ll notice the filling takes on a gorgeous, cloud-like consistency.
- Step 6: Chilling for optimal texture. Transfer the finished cheesecake filling to an airtight container or cover the bowl tightly with plastic wrap. Place it in the refrigerator for at least 1 hour, or even better, for 2-3 hours. This chilling time is essential! It allows the filling to firm up properly, making it much easier to pipe or spoon into our crispy taco shells, and it lets the flavors meld beautifully. A well-chilled filling will hold its shape much better within your Strawberry Cheesecake Dessert Tacos.
Creating the Luscious Strawberry Topping
No “Strawberry Cheesecake Dessert Tacos” would be complete without a vibrant, fresh, and utterly delicious strawberry topping. This component brings a burst of fruity brightness and a lovely contrast to the creamy filling and crispy shell.
- Step 1: Prepping our beautiful strawberries. Start by thoroughly washing your fresh strawberries under cool running water. Then, hull them by removing the green leafy tops and the small white core. You can do this with a small paring knife or a handy strawberry huller. Once hulled, slice about half of your strawberries into thin, even pieces, and quarter the other half. I like this mix of sizes because it gives both visual appeal and varying textures in every bite of our dessert tacos. The smaller pieces will break down slightly to create a sauce, while the larger ones will retain their shape and provide juicy chunks.
- Step 2: Macerating for maximum flavor. Place all your prepared strawberries in a medium-sized bowl. Sprinkle the granulated sugar over the strawberries. The amount of sugar can be adjusted based on the natural sweetness of your berries and your personal preference. Now, add the fresh lemon juice. The lemon juice is a secret weapon here; it not only brightens the flavor of the strawberries but also helps to draw out their natural juices, creating a beautiful, light syrup. Gently toss everything together until the strawberries are evenly coated. Let them sit at room temperature for about 20-30 minutes. During this time, the sugar will dissolve, and the strawberries will release their sweet, flavorful liquid. This process, called maceration, intensifies their flavor and makes them even more delicious.
- Step 3: A quick simmer for half the berries. After the maceration period, carefully scoop out about half of the strawberry mixture (both berries and their syrup) into a small saucepan. If you prefer a slightly thicker topping, now is the time to add your cornstarch slurry (1 teaspoon cornstarch dissolved in 1 tablespoon cold water). Bring the mixture in the saucepan to a gentle simmer over medium-low heat, stirring occasionally, for about 5-7 minutes. You want the strawberries to soften slightly and the sauce to thicken just a bit if you added cornstarch. This partial cooking creates a wonderful syrupy component that adheres well to the cheesecake filling, while the uncooked berries maintain their fresh, vibrant bite.
- Step 4: Combining and cooling. Remove the saucepan from the heat and let it cool down slightly. Once it’s no longer piping hot, combine the cooked strawberry mixture with the remaining fresh, macerated strawberries in a single bowl. Stir gently to mix everything together. Allow the strawberry topping to cool completely to room temperature, or even better, chill it in the refrigerator for at least 30 minutes. A chilled topping provides a delightful temperature contrast against the creamy cheesecake filling and ensures your Strawberry Cheesecake Dessert Tacos stay delightfully cool. This combination of fresh and slightly sauced berries is what makes this topping truly special for our dessert tacos.
Assembling Your Delectable Strawberry Cheesecake Dessert Tacos
The moment has arrived! All our components for the “Strawberry Cheesecake Dessert Tacos” are ready: the crispy cinnamon sugar shells, the velvety cheesecake filling, and the luscious strawberry topping. Now, let’s bring it all together into an irresistible treat.
- Step 1: Gathering your components. Before you start assembling, make sure all your prepared ingredients are cooled and ready. Your cinnamon sugar taco shells should be completely crisp and at room temperature. The cheesecake filling should be nicely chilled and firm, and your strawberry topping should also be cool. Having everything at the right temperature is key to a perfectly structured and enjoyable dessert taco. You might want to get a piping bag fitted with a large star tip for the cheesecake filling, as it makes for a beautiful presentation, or simply use a spoon.
- Step 2: Filling the shells with cheesecake magic. Carefully pick up one of your cooled, crispy taco shells. If you’re using a piping bag, pipe a generous amount of the chilled cheesecake filling along the inside curve of the taco shell. Start from one end and work your way to the other, creating a lovely, swirled pattern. If you’re using a spoon, gently spoon a good two to three tablespoons of the filling into the shell, spreading it evenly across the bottom. Be careful not to overfill at this stage, as you still need room for our gorgeous strawberries. The rich, creamy texture of the cheesecake filling will be the perfect foundation for our “Strawberry Cheesecake Dessert Tacos.”
- Step 3: Loading up the strawberry topping. Once you have a nice layer of cheesecake filling in the shell, it’s time for the star fruit! Spoon a generous amount of the chilled strawberry topping over the cheesecake filling. Try to get a good mix of the fresh strawberry chunks and the delightful, slightly syrupy sauce onto each taco. You want enough strawberries so that you get that fresh, fruity burst in every bite. The vibrant red of the strawberries against the creamy white of the cheesecake filling will look absolutely stunning, making your Strawberry Cheesecake Dessert Tacos visually appealing as well as delicious.
- Step 4: The grand finale of garnishes. Now for those optional, but highly recommended, finishing touches! If you’re feeling fancy, add a dollop of fresh whipped cream right on top of the strawberries. The light, airy cream adds another layer of texture and richness. For a pop of color and a hint of fresh aroma, tuck a small fresh mint leaf or two next to the whipped cream or directly on the strawberries. If you’re a chocolate fan, a delicate sprinkle of chocolate shavings or a quick drizzle of chocolate sauce over the entire creation can take your “Strawberry Cheesecake Dessert Tacos” to an even higher level of indulgence.
- Step 5: Serving and savoring. These Strawberry Cheesecake Dessert Tacos are best enjoyed immediately after assembly to fully appreciate the contrast between the crispy shell, the creamy filling, and the fresh strawberries. The crunch of the shell will be at its peak! If you need to prepare them slightly in advance, you can assemble them up to 30 minutes before serving and keep them chilled in the refrigerator, but be aware that the shells may lose some of their crispness over time. For the ultimate experience, serve them fresh and watch them disappear! Enjoy the incredible combination of flavors and textures in every single bite of these truly unique and delicious dessert tacos. They’re perfect for parties, family gatherings, or just a special treat for yourself.
Conclusion:
And there you have it, my friends! We’ve journeyed through the simple yet utterly brilliant steps to create a dessert that will undoubtedly become a staple in your recipe repertoire. If you’ve been searching for that perfect sweet treat that combines familiar comfort with an exciting, innovative twist, then look no further. This recipe isn’t just about making dessert; it’s about crafting an experience. These are not just any dessert tacos; these are the Strawberry Cheesecake Dessert Tacos that will redefine your perception of easy, impressive sweets. I truly believe this recipe is a must-try for anyone who loves the creamy, tangy delight of cheesecake paired with the juicy sweetness of fresh strawberries, all wrapped up in a wonderfully crisp, slightly sweet shell. It’s the kind of dessert that elicits gasps of delight and immediate requests for the recipe, all while being surprisingly straightforward to assemble.
What makes these Strawberry Cheesecake Dessert Tacos truly special is their incredible balance. You get the rich, velvety texture of the cheesecake filling, lightened by the vibrant burst of fresh strawberries. The crisp, warm tortilla shell provides the perfect contrast, offering a delightful crunch and a hint of cinnamon that ties all the flavors together beautifully. It’s a symphony of textures and tastes – cool and creamy, warm and crisp, sweet and slightly tart. They are perfect for a casual family dessert, an impressive potluck contribution, or even a fun and unique party centerpiece. Trust me, once you taste them, you’ll understand why I’m so enthusiastic. They’re a delicious escape, a moment of pure culinary joy that you can easily bring to life in your own kitchen.
Serving Suggestions & Creative Variations to Elevate Your Tacos:
Now, while these tacos are absolutely divine as they are, I always encourage a little creative flair in the kitchen. Here are some of my favorite ways to serve and vary your magnificent creation:
Garnish for Grandeur:
- A Dusting of Delight: A simple sprinkle of powdered sugar or a light dusting of cinnamon can add an elegant finish and extra visual appeal.
- Fresh Berries Galore: Beyond the strawberries inside, consider topping your tacos with a mix of fresh raspberries, blueberries, or even a few thinly sliced kiwi pieces for an extra burst of color and tangy freshness.
- Saucy Swirls: A drizzle of high-quality chocolate sauce, a swirl of caramel, or even a tangy raspberry coulis can take these tacos to a new level of indulgence.
- Whipped Cream Cloud: A dollop of freshly whipped cream, perhaps infused with a hint of vanilla bean or almond extract, makes for a luxurious topping.
- Minty Freshness: A small sprig of fresh mint placed artfully on top can add a touch of sophistication and a hint of aromatic brightness.
Unleash Your Inner Chef – Exciting Variations:
- Fruit Fantasia: Don’t limit yourself to strawberries! Try sliced peaches, blueberries, bananas, or even a tropical blend of mango and pineapple for a different flavor profile. Just make sure your fruit isn’t too watery, or pat it dry before adding.
- Cheesecake Remix: Infuse your cheesecake filling with different flavors. A little lemon zest or orange zest can add a bright, citrusy note. A teaspoon of almond extract, vanilla bean paste, or even a touch of coffee liqueur could create a whole new experience.
- The Shell Game: While cinnamon sugar tortillas are fantastic, consider brushing your tortillas with melted butter and then sprinkling them with a mix of cocoa powder and sugar for a chocolatey shell. Or, for a crunchier texture, bake your tortillas until slightly crispy before filling.
- Nutty Nibblers: A sprinkle of finely chopped toasted pecans, walnuts, or almonds over the filling can add a lovely texture and nutty flavor.
- Miniature Marvels: Use smaller tortillas to create adorable mini Strawberry Cheesecake Dessert Tacos, perfect for parties or as a bite-sized treat.
So, what are you waiting for? I wholeheartedly encourage you to roll up your sleeves, gather your ingredients, and dive into the delightful world of homemade dessert tacos. This recipe is more than just instructions; it’s an invitation to create something truly delicious and memorable. You absolutely have to try these Strawberry Cheesecake Dessert Tacos! I promise, your taste buds will thank you, and you’ll find immense satisfaction in crafting such a joyous treat. When you do make them, please come back and share your experience! What variations did you try? Did your family love them? Did they disappear in minutes? Your stories and photos inspire me and our entire community of food lovers. Let’s make some sweet memories together!
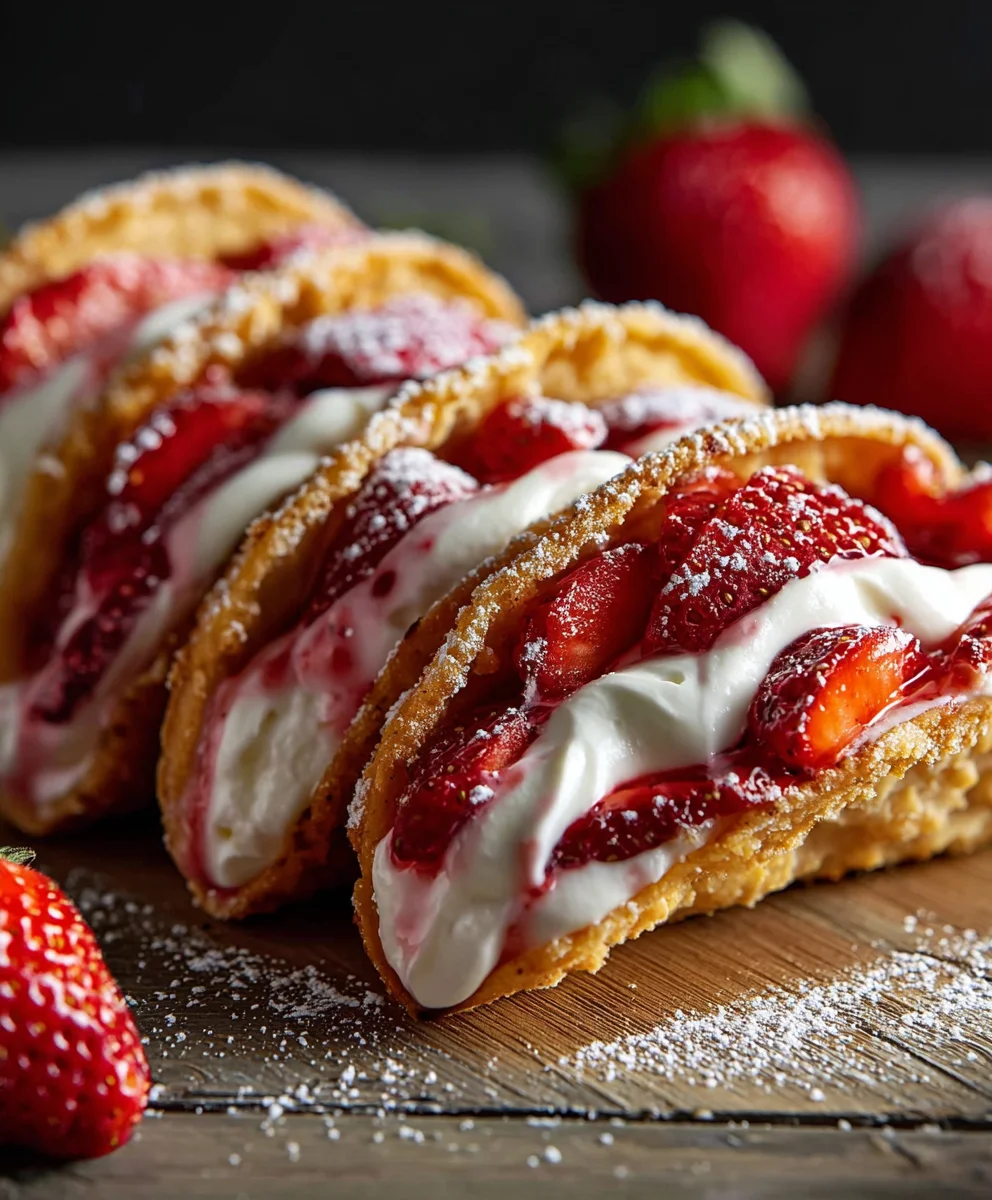
Strawberry Cheesecake Dessert Tacos
Delicious Strawberry Cheesecake Dessert Tacos featuring crispy cinnamon sugar shells, a velvety cheesecake filling, and a luscious fresh strawberry topping. Perfect for parties, gatherings, or a uniquely satisfying sweet indulgence.
Ingredients
-
8-10 small (6-inch) flour tortillas
-
1/2 cup granulated sugar
-
2 teaspoons ground cinnamon
-
1/2 cup (1 stick) unsalted butter, melted
-
3-4 cups vegetable oil or canola oil, for frying
-
2 (8-ounce) packages full-fat cream cheese, softened
-
1/2 cup granulated sugar
-
1/4 cup powdered sugar (confectioners’ sugar)
-
1 teaspoon pure vanilla extract
-
1/4 teaspoon lemon zest (optional)
-
1 cup heavy cream, chilled
-
Pinch of salt
-
2 pounds fresh strawberries, hulled and sliced or quartered
-
1/4 cup granulated sugar (or more, to taste)
-
1 tablespoon fresh lemon juice
-
1 teaspoon cornstarch dissolved in 1 tablespoon cold water (optional)
-
Whipped cream (optional, for garnish)
-
Fresh mint leaves (optional, for garnish)
-
Chocolate shavings or a drizzle of chocolate sauce (optional, for garnish)
Instructions
-
Step 1
Gently warm tortillas until pliable. In a shallow dish, combine 1/2 cup granulated sugar and 2 tsp ground cinnamon. Melt 1/2 cup butter. Heat 3-4 cups vegetable oil in a pot to 350-375°F (175-190°C). -
Step 2
Fry one tortilla at a time for 10-15 seconds. Using tongs, fold in half to create a taco shape and hold for 15-20 seconds until crispy and golden brown. Immediately remove, drain briefly, brush with melted butter, then dredge in cinnamon sugar. Transfer to a wire rack to cool completely until crisp. -
Step 3
Ensure 2 (8-ounce) packages full-fat cream cheese are at room temperature. In a large bowl, beat softened cream cheese until smooth and fluffy (2-3 minutes). Gradually add 1/2 cup granulated sugar and 1/4 cup powdered sugar; beat for 2 minutes. Stir in 1 tsp vanilla extract, 1/4 tsp lemon zest (optional), and a pinch of salt. -
Step 4
In a separate chilled bowl, whip 1 cup cold heavy cream to stiff peaks. Gently fold whipped cream into the cream cheese mixture until just combined. Cover and refrigerate for at least 1-3 hours to firm up. -
Step 5
Wash, hull, and slice/quarter 2 pounds fresh strawberries. In a bowl, combine strawberries with 1/4 cup granulated sugar (or more) and 1 tbsp fresh lemon juice. Toss and let sit for 20-30 minutes to macerate. -
Step 6
Scoop half the strawberry mixture into a small saucepan. Optionally, stir in 1 tsp cornstarch dissolved in 1 tbsp cold water. Simmer over medium-low heat for 5-7 minutes until strawberries soften and sauce thickens slightly. Remove from heat, let cool, then combine with remaining fresh strawberries. Chill for at least 30 minutes. -
Step 7
Ensure all components are thoroughly cooled. Pipe or spoon a generous amount of chilled cheesecake filling into each crispy taco shell. Spoon a generous amount of chilled strawberry topping over the filling. -
Step 8
Optionally garnish with whipped cream, fresh mint leaves, or chocolate shavings/drizzle. Serve immediately for best crispness. If preparing slightly in advance, keep chilled for up to 30 minutes before serving.
Important Information
Nutrition Facts (Per Serving)
It is important to consider this information as approximate and not to use it as definitive health advice.
Allergy Information
Please check ingredients for potential allergens and consult a health professional if in doubt.
Leave a Comment