
Pumpkin Pie Filling: the very essence of autumn, captured in a creamy, spiced delight! Have you ever dreamt of a Thanksgiving dessert so perfect, so intensely flavorful, that it transports you straight to a cozy fireside chat? Well, dream no more! This recipe unlocks the secret to achieving that very experience.
Pumpkin pie, with its roots tracing back to early American colonial times, has evolved from a simple, resourceful dish to a beloved symbol of harvest and togetherness. Early versions often featured pumpkin baked inside a hollowed-out gourd, a far cry from the smooth, velvety texture we crave today. But the spirit remains the same: celebrating the bounty of the season.
What makes a truly exceptional pumpkin pie? It all starts with the pumpkin pie filling. People adore this dessert for its harmonious blend of sweet and spicy notes, the comforting warmth of cinnamon, ginger, and nutmeg dancing on the palate. The smooth, almost custard-like texture is incredibly satisfying, and the aroma alone is enough to evoke feelings of nostalgia and happiness. Plus, with this easy-to-follow recipe, creating the perfect pumpkin pie filling is surprisingly simple, making it a convenient choice for both seasoned bakers and kitchen novices alike. Get ready to impress your family and friends with a pie that’s bursting with autumnal flavor!
Ingredients:
- 1 (15 ounce) can pumpkin puree (not pumpkin pie filling)
- 1 (12 fluid ounce) can evaporated milk
- ¾ cup granulated sugar
- ½ teaspoon salt
- 1 teaspoon ground cinnamon
- ½ teaspoon ground ginger
- ¼ teaspoon ground cloves
- ¼ teaspoon ground nutmeg
- 2 large eggs
Preparing the Pumpkin Pie Filling:
Okay, let’s get started! Making pumpkin pie filling from scratch is surprisingly easy, and the flavor is so much better than store-bought. Trust me, once you try this, you’ll never go back. We’re going to take it step-by-step to make sure it’s perfect.
- Combine the Pumpkin Puree and Evaporated Milk: In a large mixing bowl, add the entire can of pumpkin puree. Make sure it’s puree and not pumpkin pie filling, which already has spices and sugar added. Next, pour in the entire can of evaporated milk. I like to use a whisk to start combining these two ingredients. Whisk until they are well blended and smooth. This is the foundation of our delicious filling, so make sure there are no lumps!
- Add the Sugar and Salt: Now, add the ¾ cup of granulated sugar to the bowl. Also, add the ½ teaspoon of salt. The salt might seem like a small thing, but it really enhances the sweetness and brings out all the other flavors. Whisk these ingredients into the pumpkin and milk mixture until the sugar is completely dissolved. You shouldn’t feel any gritty sugar at the bottom of the bowl.
- Incorporate the Spices: This is where the magic happens! Add the 1 teaspoon of ground cinnamon, ½ teaspoon of ground ginger, ¼ teaspoon of ground cloves, and ¼ teaspoon of ground nutmeg. These spices are what give pumpkin pie its signature warm and comforting flavor. I sometimes like to add a tiny pinch of allspice too, if I’m feeling adventurous. Whisk the spices into the mixture until they are evenly distributed. Make sure there are no clumps of spices. You want that flavor in every single bite!
- Beat in the Eggs: Crack the two large eggs into the bowl. It’s always a good idea to crack them into a separate small bowl first, just in case you get any shell fragments in there. Nobody wants crunchy pie! Gently whisk the eggs into the pumpkin mixture until everything is completely combined and smooth. Be careful not to over-whisk at this stage, as you don’t want to incorporate too much air into the filling. Over-whisking can lead to cracks in your pie after baking.
- Taste and Adjust (Optional): Now, here’s a pro tip: taste the filling! Use a clean spoon, of course. This is your chance to adjust the spices to your liking. If you want a stronger cinnamon flavor, add a little more. If you prefer a more intense ginger flavor, add a pinch more of that. Remember, you can always add more, but you can’t take it away! This is your pie, so make it exactly how you like it.
Preparing the Pie Crust (If Using Homemade):
If you’re using a store-bought pie crust, you can skip this section. But if you’re feeling ambitious and want to make your own, here’s a basic recipe and instructions. A homemade crust really elevates the pie to the next level!
Ingredients for Pie Crust:
- 1 ¼ cups all-purpose flour
- ½ teaspoon salt
- ½ cup (1 stick) cold unsalted butter, cut into cubes
- ¼ cup cold vegetable shortening, cut into cubes
- ¼ – ½ cup ice water
- Combine Dry Ingredients: In a large bowl, whisk together the flour and salt.
- Cut in the Fat: Add the cold butter and shortening to the flour mixture. Use a pastry blender or your fingertips to cut the fat into the flour until the mixture resembles coarse crumbs. The key here is to keep the fat cold, so work quickly. If the butter starts to get too soft, put the bowl in the freezer for a few minutes.
- Add Ice Water: Gradually add the ice water, one tablespoon at a time, mixing gently after each addition. Stop adding water when the dough just comes together. You don’t want it to be too wet or sticky.
- Form the Dough: Gently form the dough into a disc. Wrap it in plastic wrap and refrigerate for at least 30 minutes. This allows the gluten to relax, which will make the crust more tender.
- Roll Out the Dough: On a lightly floured surface, roll out the dough into a 12-inch circle. Carefully transfer the dough to a 9-inch pie plate. Trim the edges and crimp them decoratively. You can use a fork to crimp the edges, or you can use your fingers to create a more elaborate design.
- Pre-Bake (Blind Bake) the Crust (Optional): For a crispier crust, you can pre-bake it before adding the filling. To do this, line the crust with parchment paper and fill it with pie weights or dried beans. Bake at 375°F (190°C) for 15-20 minutes, or until the edges are lightly golden brown. Remove the parchment paper and weights and bake for another 5-10 minutes, or until the bottom of the crust is set. Let the crust cool slightly before adding the filling.
Baking the Pumpkin Pie:
Now for the grand finale: baking the pie! This is where all your hard work comes together. The baking time is crucial for a perfectly set pie, so pay close attention.
- Pour the Filling into the Crust: Carefully pour the pumpkin pie filling into the prepared pie crust. Make sure the filling is evenly distributed. If you pre-baked the crust, be extra careful not to crack it.
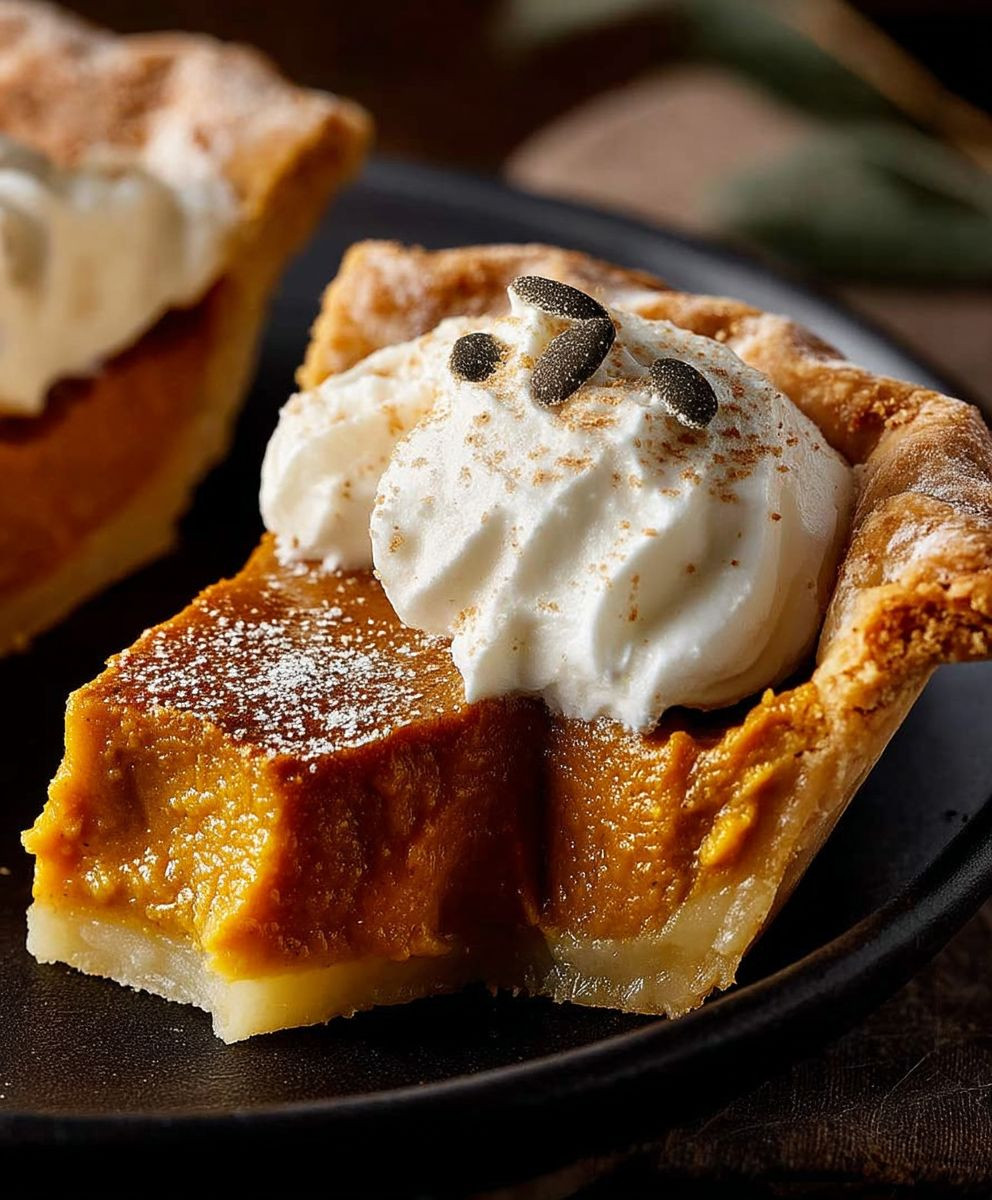
- Bake the Pie: Place the pie in a preheated oven at 375°F (190°C). Bake for 50-60 minutes, or until the filling is set but still has a slight jiggle in the center. The edges of the crust should be golden brown.
- Check for Doneness: To check if the pie is done, gently shake it. The filling should be mostly set, with just a slight wobble in the center. If the crust is browning too quickly, you can cover the edges with aluminum foil.
- Cool Completely: Remove the pie from the oven and let it cool completely on a wire rack. This is important because the filling will continue to set as it cools. Don’t be tempted to cut into it while it’s still warm, or it will be too runny.
- Refrigerate: Once the pie has cooled completely, cover it loosely with plastic wrap and refrigerate for at least 4 hours, or preferably overnight. This will allow the flavors to meld together and the filling to set completely.
Serving and Storing:
Finally, the best part: serving and enjoying your homemade pumpkin pie! Here are a few tips for serving and storing your masterpiece.
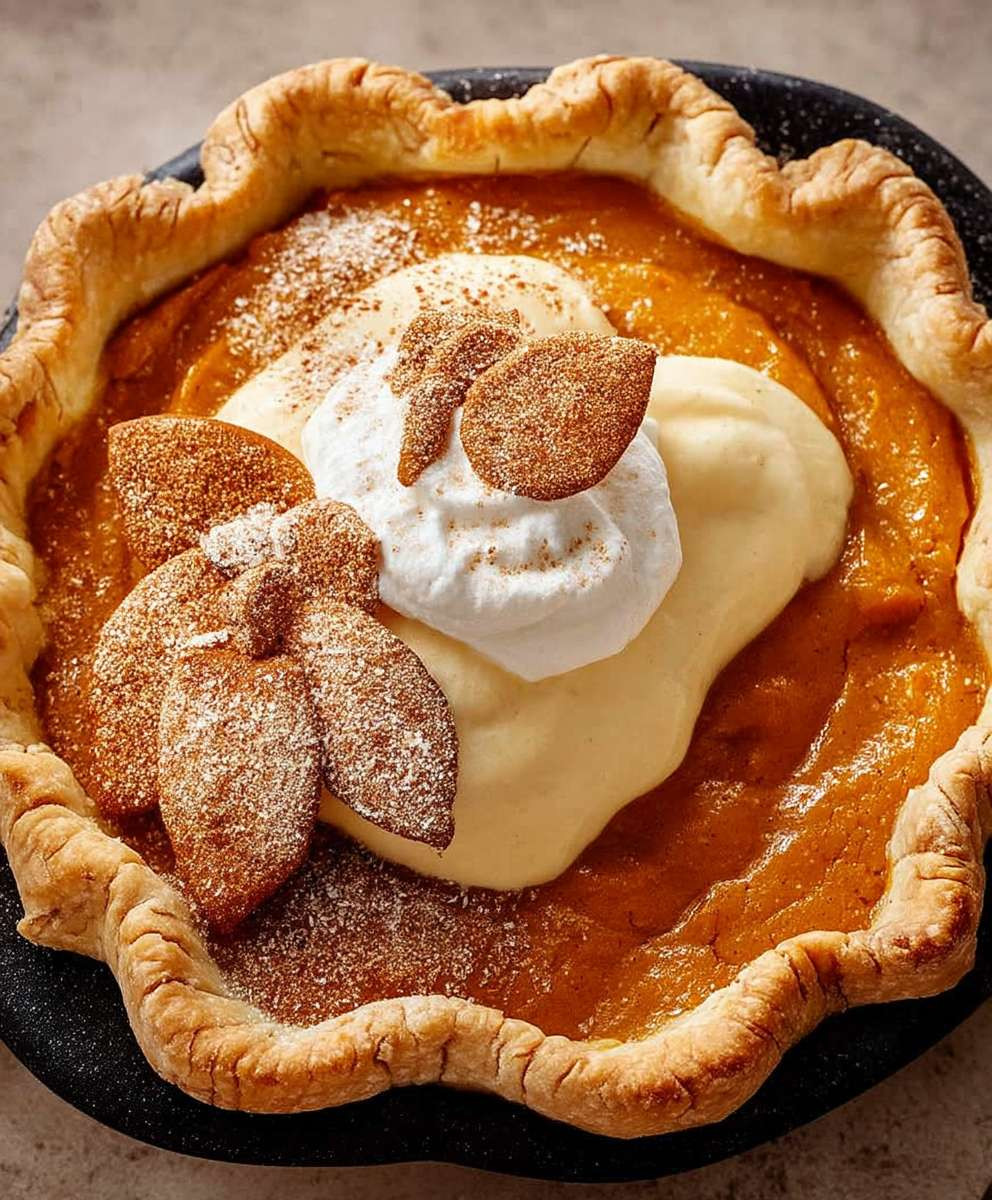
- Serving Suggestions: Serve the pumpkin pie chilled or at room temperature. A dollop of whipped cream or a scoop of vanilla ice cream is the perfect accompaniment. You can also sprinkle a little cinnamon or nutmeg on top for extra flavor.
- Storing Leftovers: Store any leftover pumpkin pie in the refrigerator, covered tightly with plastic wrap or in an airtight container. It will keep for up to 3-4 days.
- Freezing (Optional): You can also freeze pumpkin pie for longer storage. Wrap the pie tightly in plastic wrap and then in aluminum foil. Freeze for up to 2-3 months. Thaw the pie in the refrigerator overnight before serving.
Tips for Success:
- Use Good Quality Ingredients: The better the ingredients, the better the pie will taste. Use fresh spices and good quality pumpkin puree.
- Don’t Overbake: Overbaking will result in a dry, cracked pie. Bake until the filling is just set, with a slight jiggle in the center.
- Cool Completely: Cooling the pie completely is essential for the filling to set properly.
- Adjust Spices to Your Liking: Don’t be afraid to experiment with the spices to create your perfect pumpkin pie.
And there you have it! A delicious, homemade pumpkin pie that is sure to impress your family and friends. Enjoy!
Conclusion:
So there you have it! This Pumpkin Pie Filling recipe is truly a game-changer, and I genuinely believe it’s a must-try for anyone who loves the warm, comforting flavors of fall. Forget the canned stuff – once you taste the difference that fresh, homemade filling makes, you’ll never go back. The depth of flavor, the smooth texture, and the pure pumpkin essence are simply unparalleled. It’s the kind of recipe that will have your family and friends begging for seconds (and the recipe, of course!).
But why is it a must-try? Well, beyond the incredible taste, it’s also surprisingly easy to make. We’ve broken down the process into simple, manageable steps, so even if you’re a novice baker, you can confidently whip up a batch of this deliciousness. Plus, you have complete control over the ingredients, allowing you to adjust the sweetness, spice levels, and even the type of pumpkin you use to perfectly suit your preferences.
And the possibilities don’t stop there! While this recipe is specifically designed for pumpkin pie, don’t feel limited to just that. Think outside the pie crust! This filling is fantastic in pumpkin parfaits layered with whipped cream and gingersnap crumbles. You could also use it as a base for pumpkin bread pudding, or even swirl it into your morning oatmeal for a cozy and flavorful start to the day.
Here are a few serving suggestions and variations to get your creative juices flowing:
* Classic Pumpkin Pie: Of course, the most obvious choice! Pour the filling into your favorite pie crust (homemade or store-bought, no judgment!), bake until set, and let cool completely before slicing and serving. A dollop of whipped cream or a scoop of vanilla ice cream is the perfect finishing touch.
* Pumpkin Pie Bars: For a more casual and portable treat, spread the filling over a shortbread crust and bake until set. Cut into squares and enjoy!
* Pumpkin Spice Latte: Add a spoonful of this filling to your morning coffee for an instant pumpkin spice latte. Top with whipped cream and a sprinkle of cinnamon for extra indulgence.
* Pumpkin Cheesecake Swirl: Swirl a generous amount of this filling into your favorite cheesecake batter before baking for a decadent and festive dessert.
* Spiced Pumpkin Muffins: Fold some of this filling into your favorite muffin batter for moist and flavorful pumpkin muffins.
Don’t be afraid to experiment and get creative! The beauty of this recipe is its versatility. You can easily adapt it to suit your own tastes and preferences. For example, if you prefer a spicier filling, add a pinch more cinnamon, ginger, or cloves. If you like a sweeter filling, add a tablespoon or two of maple syrup or brown sugar. And if you want a richer filling, use heavy cream instead of milk.
I’m so excited for you to try this recipe and experience the magic of homemade Pumpkin Pie Filling for yourself. I truly believe it will become a staple in your fall baking repertoire.
So, what are you waiting for? Gather your ingredients, preheat your oven, and get ready to create something truly special. And most importantly, don’t forget to share your experience with me! I’d love to hear how your pie turned out, what variations you tried, and any tips or tricks you discovered along the way. Leave a comment below, tag me on social media, or send me an email – I can’t wait to see what you create! Happy baking!
Pumpkin Pie Filling: The Ultimate Guide to Perfect Pie
Classic homemade pumpkin pie with a smooth, spiced filling and a flaky crust. Perfect for holidays or any time you crave a comforting dessert.
Ingredients
Instructions
Recipe Notes
- Use pumpkin puree, not pumpkin pie filling.
- Don’t overbake the pie to avoid cracks and dryness.
- Cooling completely is essential for the filling to set properly.
- Adjust spices to your liking for a personalized flavor.
- Serve chilled or at room temperature with whipped cream or vanilla ice cream.
- Store leftovers in the refrigerator for up to 3-4 days.
- Pie can be frozen for 2-3 months. Thaw in the refrigerator overnight before serving.

Leave a Comment