
Philadelphia Cheesecake Bars: Prepare to be captivated by a dessert that perfectly balances creamy indulgence with effortless simplicity! These aren’t just any cheesecake bars; they’re a delightful twist on a classic, offering all the rich flavor of a traditional cheesecake in a convenient, portable, and utterly irresistible form. I’m so excited to share this recipe with you!
While the exact origins of cheesecake are debated, its roots can be traced back to ancient Greece. The modern cheesecake, however, owes much to American ingenuity, with Philadelphia Cream Cheese playing a pivotal role in its creamy texture and widespread popularity. These Philadelphia Cheesecake Bars take that legacy and make it even more accessible for the home baker.
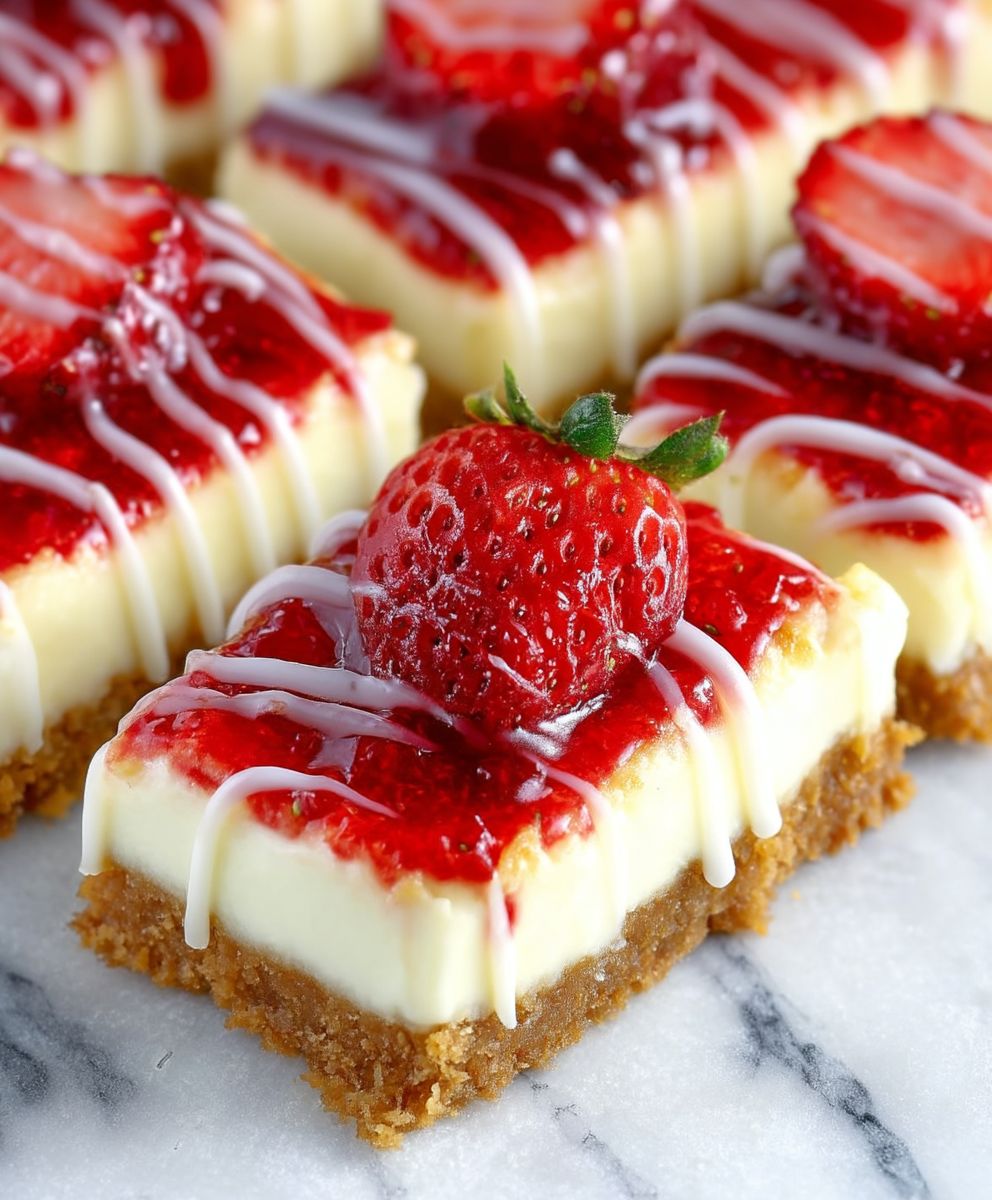
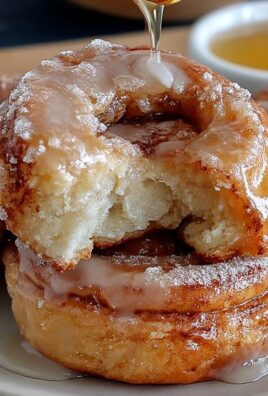
What makes these bars so beloved? It’s the harmonious blend of textures – the buttery, crumbly crust, the smooth, velvety filling, and the optional (but highly recommended!) topping of your choice. They’re incredibly easy to make, requiring minimal ingredients and baking time, making them perfect for potlucks, parties, or simply satisfying a sweet craving. The tangy sweetness of the cheesecake filling, combined with the buttery crust, creates a symphony of flavors that will leave you wanting more. Plus, their individual portion size makes them ideal for controlling portions (though you might find that difficult!). Get ready to experience cheesecake bliss in every bite!
Ingredients:
- For the Crust:
- 1 ½ cups graham cracker crumbs
- 5 tablespoons unsalted butter, melted
- ¼ cup granulated sugar
- For the Cheesecake Filling:
- 2 (8 ounce) packages cream cheese, softened
- ¾ cup granulated sugar
- 2 large eggs
- 1 teaspoon vanilla extract
- ¼ cup sour cream
- Optional Toppings:
- Fresh berries (strawberries, blueberries, raspberries)
- Chocolate sauce
- Caramel sauce
- Whipped cream
Preparing the Crust:
- Preheat your oven to 350°F (175°C). This is crucial for even baking!
- In a medium bowl, combine the graham cracker crumbs, melted butter, and granulated sugar. Make sure everything is well mixed. I like to use a fork to ensure the butter is evenly distributed.
- Press the mixture firmly into the bottom of an ungreased 9×13 inch baking pan. You can use the bottom of a measuring cup or a flat-bottomed glass to get a nice, even crust. This will prevent it from being too crumbly later.
- Bake the crust for 8-10 minutes, or until lightly golden brown. Keep a close eye on it, as it can burn easily. Once baked, remove from the oven and let it cool completely before adding the filling. This step is important because a warm crust can melt the cheesecake filling.
Making the Cheesecake Filling:
- In a large bowl, beat the softened cream cheese and granulated sugar together with an electric mixer until smooth and creamy. This usually takes about 3-5 minutes. Make sure your cream cheese is truly softened! Otherwise, you’ll end up with lumps in your cheesecake.
- Add the eggs one at a time, beating well after each addition. Be careful not to overbeat the mixture at this stage. Overbeating can incorporate too much air, which can cause the cheesecake to crack during baking.
- Stir in the vanilla extract and sour cream. Mix until just combined. Again, avoid overmixing. The sour cream adds a lovely tang and helps to keep the cheesecake moist.
Baking the Cheesecake Bars:
- Pour the cheesecake filling over the cooled crust, spreading it evenly. I like to use a spatula to make sure it’s perfectly smooth.
- Bake in the preheated oven for 25-30 minutes, or until the edges are set and the center is just slightly jiggly. The cheesecake will continue to set as it cools.
- Turn off the oven and let the cheesecake bars cool in the oven with the door slightly ajar for about 1 hour. This helps to prevent cracking by allowing the cheesecake to cool gradually.
- Remove the cheesecake bars from the oven and let them cool completely at room temperature. This usually takes another hour or two.
- Cover the cheesecake bars with plastic wrap and refrigerate for at least 4 hours, or preferably overnight. This is essential for the cheesecake to fully set and develop its flavor. I know it’s hard to wait, but trust me, it’s worth it!
Cutting and Serving:
- Once the cheesecake bars are thoroughly chilled, you can cut them into squares or rectangles. I find it helpful to use a sharp knife dipped in warm water to get clean cuts. Wipe the knife clean between each cut.
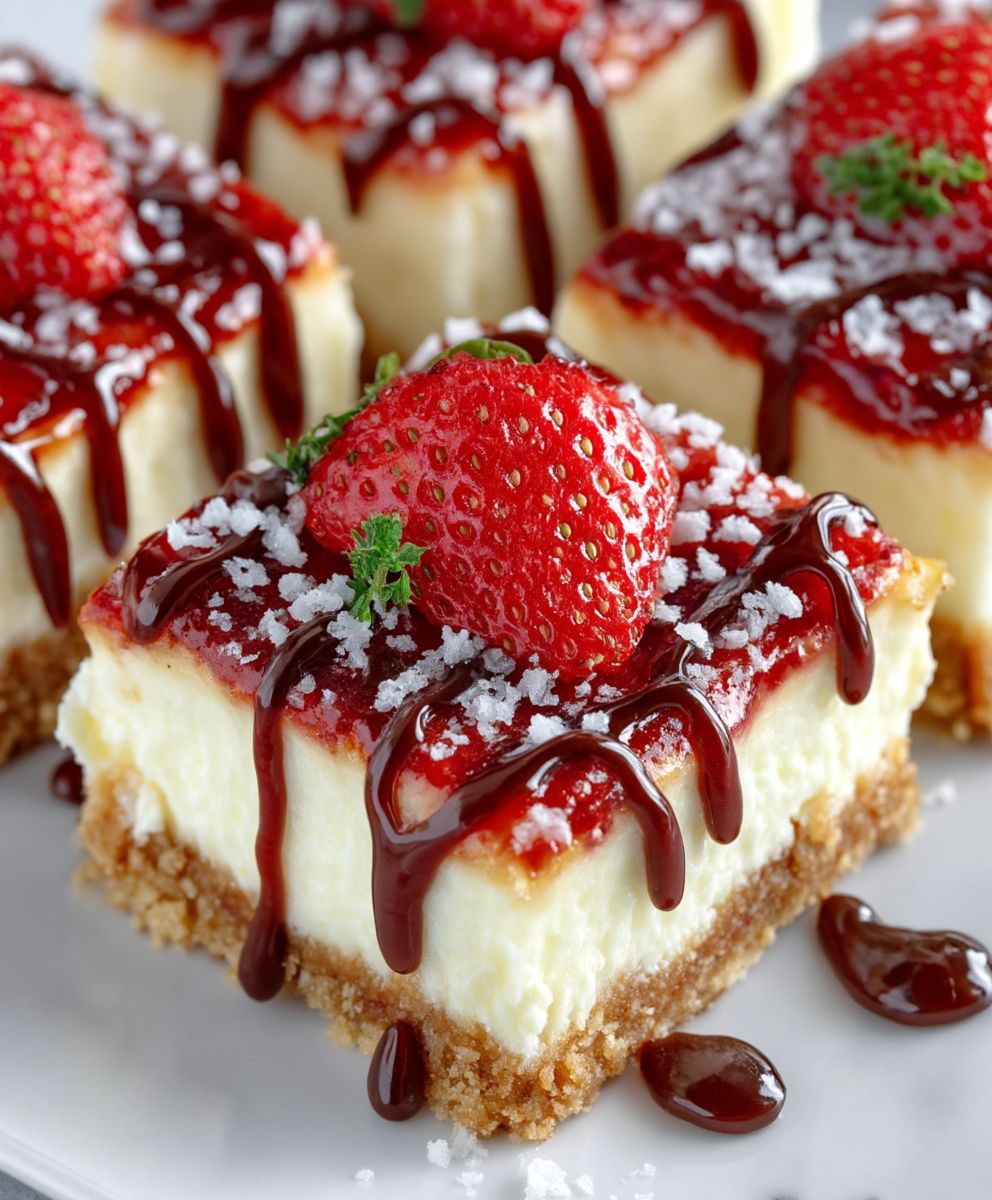
- Serve the cheesecake bars plain, or top with your favorite toppings. Fresh berries, chocolate sauce, caramel sauce, and whipped cream are all delicious options. Get creative and have fun with it!
Tips for Success:
- Use softened cream cheese: This is the most important tip for a smooth and creamy cheesecake. Take the cream cheese out of the refrigerator at least an hour before you start baking.
- Don’t overmix the batter: Overmixing can incorporate too much air, which can cause the cheesecake to crack. Mix until just combined.
- Bake at a low temperature: Baking at a lower temperature helps to prevent cracking.
- Cool the cheesecake slowly: Cooling the cheesecake slowly in the oven helps to prevent cracking.
- Chill the cheesecake thoroughly: Chilling the cheesecake for at least 4 hours, or preferably overnight, is essential for it to fully set and develop its flavor.
- For a richer flavor: Use full-fat cream cheese and sour cream.
- To prevent sticking: Line the baking pan with parchment paper, leaving an overhang on the sides. This will make it easy to lift the cheesecake bars out of the pan.
- Variations: You can add different flavors to the cheesecake filling, such as lemon zest, chocolate chips, or peanut butter.
- Storage: Store leftover cheesecake bars in the refrigerator for up to 5 days.
Troubleshooting:
- Cracked Cheesecake: If your cheesecake cracks, don’t worry! It will still taste delicious. You can cover the cracks with toppings or whipped cream. To prevent cracking in the future, try cooling the cheesecake more slowly in the oven.
- Lumpy Cheesecake: If your cheesecake is lumpy, it’s likely because the cream cheese wasn’t softened enough. Make sure to soften the cream cheese completely before you start baking.
- Soggy Crust: If your crust is soggy, it’s likely because it wasn’t baked long enough. Make sure to bake the crust until it’s lightly golden brown.
Make Ahead Tips:
- The cheesecake bars can be made up to 2 days in advance. Store them in the refrigerator, tightly covered.
- You can also freeze the cheesecake bars for up to 2 months. Wrap them tightly in plastic wrap and then in aluminum foil. Thaw them in the refrigerator overnight before serving.
Serving Suggestions:
- Serve the cheesecake bars as a dessert for parties, potlucks, or holidays.
- They’re also a great treat to enjoy with a cup of coffee or tea.
- For a special occasion, you can decorate the cheesecake bars with fresh fruit, chocolate shavings, or edible flowers.
Nutritional Information (approximate, per serving):
- Calories: 250-300
- Fat: 15-20g
- Saturated Fat: 10-12g
- Cholesterol: 80-100mg
- Sodium: 150-200mg
- Carbohydrates: 20-25g
- Sugar: 15-20g
- Protein: 4-5g
Enjoy your delicious Philadelphia Cheesecake Bars!
Conclusion:
And there you have it! These Philadelphia Cheesecake Bars are truly a must-try for anyone who loves a creamy, decadent dessert that’s surprisingly easy to make. Forget spending hours slaving over a complicated cheesecake recipe; these bars deliver all the rich flavor and satisfying texture you crave, but in a fraction of the time and with minimal fuss. The buttery graham cracker crust provides the perfect foundation for the smooth, tangy cheesecake filling, creating a harmonious balance of flavors and textures that will leave you wanting more.
What makes these bars so special is their versatility. They’re perfect for any occasion, from a casual weeknight treat to a more formal gathering. Imagine serving these at your next potluck or bringing them as a hostess gift – you’re guaranteed to be the star of the show! And because they’re so easy to transport, they’re ideal for picnics, barbecues, or any outdoor event.
But the fun doesn’t stop there! Feel free to get creative with your toppings and variations. For a classic touch, a simple dusting of powdered sugar or a dollop of whipped cream is always a winner. Or, if you’re feeling adventurous, try adding a layer of fresh berries, such as strawberries, raspberries, or blueberries, for a burst of fruity flavor. A drizzle of chocolate sauce or caramel sauce can also elevate these bars to a whole new level of indulgence.
Serving Suggestions and Variations:
* Berry Bliss: Top with a mix of fresh berries and a light dusting of powdered sugar.
* Chocolate Decadence: Drizzle with melted chocolate and sprinkle with chocolate shavings.
* Caramel Swirl: Swirl caramel sauce into the cheesecake filling before baking for a rich, gooey treat.
* Lemon Zest: Add lemon zest to the cheesecake filling for a bright, citrusy flavor.
* Oreo Overload: Crush Oreo cookies and sprinkle them on top of the bars before baking.
* Peanut Butter Perfection: Swirl peanut butter into the cheesecake filling for a nutty, creamy delight.
* Espresso Infusion: Add a teaspoon of instant espresso powder to the cheesecake filling for a coffee-flavored kick.
These are just a few ideas to get you started, but the possibilities are endless! Don’t be afraid to experiment and create your own signature Philadelphia Cheesecake Bars.
I truly believe that this recipe is a winner, and I’m confident that you’ll love it as much as I do. The simplicity of the recipe combined with the incredible flavor makes it a go-to dessert for any occasion. So, what are you waiting for? Gather your ingredients, preheat your oven, and get ready to bake up a batch of these irresistible cheesecake bars.
I’m so excited for you to try this recipe! Once you’ve made them, I’d love to hear about your experience. Did you try any variations? What toppings did you use? Share your photos and comments in the comments section below. Let’s create a community of cheesecake bar enthusiasts and inspire each other with our delicious creations! Happy baking, and enjoy every single bite of these heavenly Philadelphia Cheesecake Bars! I can’t wait to see what you come up with!
Philadelphia Cheesecake Bars: The Ultimate Guide to Baking Perfection
Easy, delicious Philadelphia Cheesecake Bars with a graham cracker crust and creamy filling. Perfect for parties or a simple dessert!
Ingredients
- 1 ½ cups graham cracker crumbs
- 5 tablespoons unsalted butter, melted
- ¼ cup granulated sugar
- 2 (8 ounce) packages cream cheese, softened
- ¾ cup granulated sugar
- 2 large eggs
- 1 teaspoon vanilla extract
- ¼ cup sour cream
- Fresh berries (strawberries, blueberries, raspberries)
- Chocolate sauce
- Caramel sauce
- Whipped cream
Instructions
- Preheat oven to 350°F (175°C).
- In a medium bowl, combine graham cracker crumbs, melted butter, and sugar. Mix well.
- Press the mixture firmly into the bottom of an ungreased 9×13 inch baking pan.
- Bake for 8-10 minutes, or until lightly golden brown. Let cool completely.
- In a large bowl, beat softened cream cheese and sugar until smooth and creamy.
- Add eggs one at a time, beating well after each addition.
- Stir in vanilla extract and sour cream. Mix until just combined.
- Pour the cheesecake filling over the cooled crust, spreading it evenly.
- Bake for 25-30 minutes, or until the edges are set and the center is just slightly jiggly.
- Turn off the oven and let the cheesecake bars cool in the oven with the door slightly ajar for about 1 hour.
- Remove the cheesecake bars from the oven and let them cool completely at room temperature.
- Cover and refrigerate for at least 4 hours, or preferably overnight.
- Cut into squares or rectangles. Serve plain or with your favorite toppings.
Notes
- Use softened cream cheese: This is the most important tip for a smooth and creamy cheesecake. Take the cream cheese out of the refrigerator at least an hour before you start baking.
- Don’t overmix the batter: Overmixing can incorporate too much air, which can cause the cheesecake to crack. Mix until just combined.
- Bake at a low temperature: Baking at a lower temperature helps to prevent cracking.
- Cool the cheesecake slowly: Cooling the cheesecake slowly in the oven helps to prevent cracking.
- Chill the cheesecake thoroughly: Chilling the cheesecake for at least 4 hours, or preferably overnight, is essential for it to fully set and develop its flavor.
- For a richer flavor: Use full-fat cream cheese and sour cream.
- To prevent sticking: Line the baking pan with parchment paper, leaving an overhang on the sides. This will make it easy to lift the cheesecake bars out of the pan.
- Variations: You can add different flavors to the cheesecake filling, such as lemon zest, chocolate chips, or peanut butter.
- Storage: Store leftover cheesecake bars in the refrigerator for up to 5 days.
Leave a Comment