
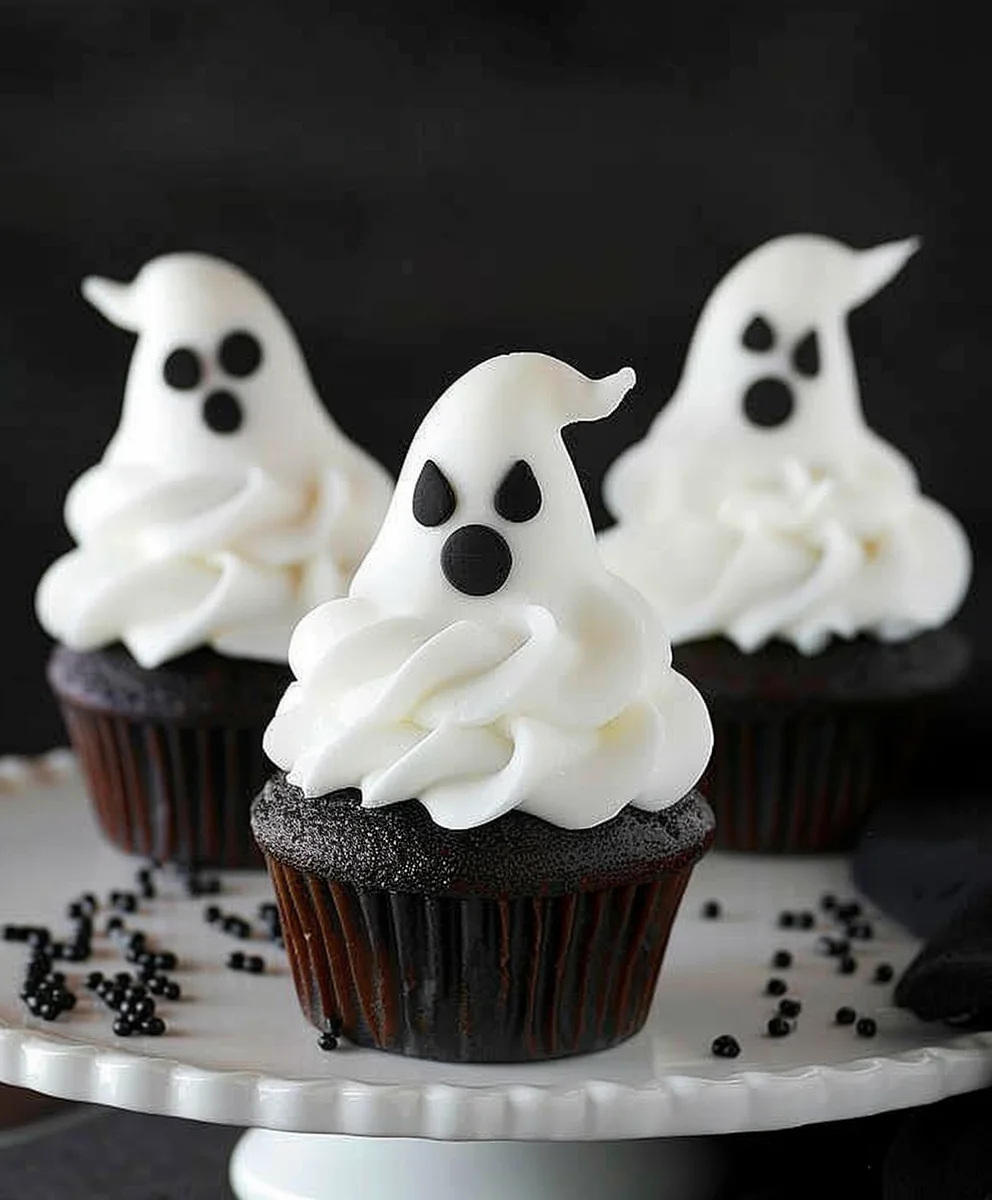
Halloween Ghost Cupcakes are more than just a sweet treat; they are a delightful embodiment of autumn’s most enchanting holiday. As the vibrant colors of fall paint our landscapes and a gentle crispness enters the air, our minds naturally drift towards the playful frights and sugary delights of Halloween. What could possibly capture the whimsical spirit of this ancient festival better than a batch of these adorably spooky confections?
I find that these charming cupcakes hold a truly special place in our hearts, marrying irresistible flavor with an undeniable visual appeal. Halloween, a celebration rooted in age-old traditions like Samhain, is a time for embracing the mysterious, the magical, and, most importantly, the deliciously fun. These Halloween Ghost Cupcakes perfectly encapsulate that festive energy, transforming a simple dessert into a miniature work of art.
People absolutely adore this dish not only for its moist, tender cake and creamy, sweet frosting but also for the sheer joy and creativity it inspires. They are the ultimate party showstopper, guaranteed to elicit smiles and awe from guests of all ages. Preparing them is a wonderfully engaging activity, bringing a touch of playful ghoulishness right into your kitchen. Each bite promises a harmonious blend of sweetness and a whisper of seasonal magic, making them a festive favorite that disappears almost as quickly as a real phantom!
Ingredients:
-
For the Spooky Vanilla Cupcakes:
- 1 ½ cups (190g) all-purpose flour, sifted
- 1 ½ teaspoons baking powder
- ¼ teaspoon salt
- ½ cup (113g) unsalted butter, softened to room temperature
- 1 cup (200g) granulated sugar
- 2 large eggs, at room temperature
- 1 teaspoon pure vanilla extract
- ½ cup (120ml) whole milk, at room temperature
- 12 cupcake liners
-
For the Silky Vanilla Buttercream Frosting:
- 1 cup (226g) unsalted butter, softened to room temperature
- 3-4 cups (360-480g) powdered sugar (confectioners’ sugar), sifted
- 1 teaspoon pure vanilla extract
- 2-4 tablespoons whole milk or heavy cream, as needed for consistency
- Pinch of salt (optional, helps balance sweetness)
-
For the Adorable Ghost Decorations:
- 12 large marshmallows (one per cupcake)
- Mini chocolate chips or edible food marker (black) for eyes and mouths
- Optional: A tiny bit of melted chocolate or corn syrup to help marshmallows stick
For the Spooky Vanilla Cupcakes:
- Prepare Your Baking Station: First things first, my baking friends! I always begin by preheating my oven to 350°F (175°C). Then, I line a standard 12-cup muffin pan with those festive cupcake liners. Trust me, having everything ready before you start mixing makes the whole process so much smoother and more enjoyable. It’s like setting the stage for a delicious performance!
- Combine the Dry Ingredients: In a medium-sized bowl, I gently whisk together the sifted all-purpose flour, baking powder, and salt. Sifting the flour is a step I never skip because it helps prevent lumps and ensures a lighter, more tender crumb in your final cupcakes. This initial blend ensures these dry ingredients are evenly distributed, which is crucial for uniform leavening. Set this bowl aside for a moment.
- Cream the Butter and Sugar: Now for the magical part! In a large bowl, using an electric mixer (either a stand mixer with the paddle attachment or a hand mixer), I beat the softened unsalted butter on medium speed for about 1-2 minutes until it becomes light and creamy. Then, I gradually add the granulated sugar, beating on medium-high speed for another 3-5 minutes. This creaming process is absolutely vital; you want the mixture to look pale yellow and fluffy. It’s where you incorporate air into the butter and sugar, which contributes significantly to the cupcakes’ light and airy texture. Scrape down the sides of the bowl often to ensure everything is well combined.
- Incorporate the Eggs and Vanilla: With the mixer still on medium speed, I add the large eggs one at a time, beating well after each addition. It’s important to give each egg a good minute of mixing to fully incorporate it into the butter mixture before adding the next. This prevents the mixture from separating. After both eggs are fully incorporated, I stir in the pure vanilla extract. That lovely vanilla aroma is already starting to fill my kitchen, a sign of good things to come!
- Alternate Dry and Wet Ingredients: This step requires a bit of patience and a gentle touch. With the mixer on low speed, I gradually add the dry ingredient mixture to the wet mixture, alternating with the whole milk. I usually start and end with the dry ingredients. So, add about one-third of the flour mixture, mix until just combined, then half of the milk, mix, another third of the flour, mix, the remaining milk, mix, and finally the last third of the flour. The key here is to not overmix! Overmixing develops the gluten in the flour too much, which can lead to tough, dense cupcakes. As soon as the last streaks of flour disappear, I stop the mixer. A few lumps are okay, but visible dry flour means you need another quick stir.
- Fill the Cupcake Liners: Using a spoon or, my personal favorite, an ice cream scoop (it helps ensure even portions!), I divide the cupcake batter evenly among the 12 prepared liners. I aim to fill each liner about two-thirds full. This leaves enough room for the cupcakes to rise beautifully without overflowing, creating that perfect domed top that’s ideal for frosting.
- Bake to Perfection: Gently place the muffin pan into your preheated oven. Bake for 18-22 minutes, or until a wooden skewer or toothpick inserted into the center of a cupcake comes out clean. The tops should be lightly golden and spring back when gently pressed. Every oven is a little different, so I always keep a close eye on them after the 18-minute mark.
- Cool Completely: Once baked, I take the cupcakes out of the oven and let them cool in the muffin pan for about 5-10 minutes. This allows them to set up a bit before moving them. After this initial cooling, I carefully transfer the cupcakes to a wire rack to cool completely. This is a critical step for your Halloween Ghost Cupcakes! Attempting to frost warm cupcakes will result in melted, messy frosting, and nobody wants a sad, melting ghost! They need to be absolutely cool to the touch.
Preparing the Silky Vanilla Buttercream Frosting:
- Cream the Butter: In a large bowl, using an electric mixer, beat the softened unsalted butter on medium speed for 2-3 minutes. You want it to be wonderfully light and fluffy, almost white in color. This process whips air into the butter, creating the foundation for a truly magnificent, airy buttercream that’s perfect for piping. It’s the secret to a professional-looking frosting texture.
- Gradually Add Powdered Sugar: With the mixer on low speed, I gradually add the sifted powdered sugar, about 1 cup at a time. I usually start with 3 cups and add more if needed. It’s important to start on low speed to avoid a cloud of sugar dusting your kitchen! Once each addition is incorporated, I increase the speed to medium and beat for about 30 seconds before adding the next cup. Scrape down the sides of the bowl frequently to ensure all the sugar is mixed in.
- Incorporate Vanilla and Liquid: Once all the powdered sugar is incorporated, I add the pure vanilla extract and a pinch of salt (if using). Then, I slowly add 2 tablespoons of milk or heavy cream.
- Achieve Perfect Consistency: At this point, I assess the consistency. If the frosting seems too stiff for piping, I add more milk or cream, ½ teaspoon at a time, beating well after each addition, until it reaches my desired consistency. For piping beautiful ghosts, you want a frosting that is soft and smooth, but holds its shape well. It should be thick enough to stand up, but not so stiff that it’s hard to pipe. If it accidentally becomes too thin, you can add a little more sifted powdered sugar to thicken it up.
- Whip for Airiness: Once the consistency is just right, I turn the mixer up to medium-high speed and beat the buttercream for another 2-3 minutes. This final whip makes the frosting extra light, fluffy, and incredibly smooth, perfect for creating those billowy ghost shapes on our Halloween Ghost Cupcakes. This is where the magic happens and your frosting transforms into a dream to work with!
Assembling and Decorating Your Spooktacular Halloween Ghost Cupcakes:
- Ensure Cupcakes are Completely Cool: Before you even think about frosting, double-check that your cupcakes are absolutely, 100% cool. I cannot stress this enough! Even slightly warm cupcakes will cause your beautiful buttercream to melt and slide right off, creating a sad, un-ghostly mess. Patience is a virtue, especially when it comes to frosting.
- Pipe the Frosting Base: Transfer your silky vanilla buttercream to a piping bag fitted with a large round tip (like an Ateco 808 or Wilton 1A) or a star tip (like a Wilton 1M for a swirled effect). You don’t necessarily need a fancy tip if you don’t have one; you can also just snip off a good-sized corner of the piping bag for a simple opening. The goal here is to create a generous mound of frosting on top of each cupcake. I like to pipe a tall swirl or a simple dome, building it up slightly in the center. This gives our marshmallow ghosts a nice, elevated base to sit on, making them look more dimensional and spooky!
- Create the Marshmallow Ghosts: Take one large marshmallow and gently place it on top of the piped frosting mound on each cupcake. You can give it a very gentle press to help it adhere slightly. If you find your marshmallows aren’t sticking well, you can dab a tiny bit of melted chocolate or even corn syrup on the bottom of the marshmallow before placing it. The goal is for the marshmallow to sit proudly on its frosting pedestal, ready to become a spooky specter.
- Add the Ghostly Features: Now for the fun part – giving our ghosts some personality! Take your mini chocolate chips. For eyes, I usually press two mini chocolate chips into the marshmallow, pointed side down, about halfway up the marshmallow. You can position them close together for a shy ghost, or further apart for a more bewildered look. If you’re using an edible food marker, simply draw two dots for eyes. For an extra touch of spooky cuteness, you can even draw a little “ooh” mouth or a wavy line for a different expression. This is where your creativity shines for your Halloween Ghost Cupcakes! Each ghost can have its own unique, adorable expression.
- Final Touches and Presentation: If you’re feeling extra festive, you could sprinkle some Halloween-themed sprinkles around the base of the cupcake, or even dye a small portion of your buttercream green and pipe little “grass” around the ghost for a haunted graveyard effect. Arrange your finished Halloween Ghost Cupcakes on a festive platter. They are ready to bring a delightful and spooky charm to any Halloween gathering!
- Storage Tips: These Halloween Ghost Cupcakes are best enjoyed within 1-2 days. Store them in an airtight container at room temperature. If your kitchen is particularly warm, or if you’ve used a very fresh dairy product in your frosting, you might consider refrigerating them. Just be sure to bring them back to room temperature for about 15-30 minutes before serving for the best flavor and texture of the cupcake and frosting.
Conclusion:
And there you have it, my friends! We’ve journeyed through the simple magic of creating these absolutely enchanting Halloween Ghost Cupcakes, and I truly hope you’re feeling as inspired as I am to get baking. This isn’t just a recipe; it’s a gateway to creating joyful, memorable moments, especially during the spookiest time of the year. From the first pour of the batter to the final, adorable ghost eyes, every step is designed to be straightforward, rewarding, and utterly delightful. Trust me when I say, these are far more than just pretty faces; they are an explosion of moist, tender cake topped with a cloud of creamy, dreamy frosting that will have everyone reaching for another.
Why are these Halloween Ghost Cupcakes an absolute must-try? Let me count the ways! Firstly, they are surprisingly easy to master, making them perfect for seasoned bakers looking for a festive project or even beginners wanting to impress without stress. You don’t need any fancy equipment or advanced techniques – just a little enthusiasm and a love for all things delicious. Secondly, the visual appeal is simply unparalleled. Imagine a platter of these charming, spectral treats gracing your Halloween party table; they’re instant showstoppers, sparking conversation and bringing smiles to every face. Kids adore them, and adults find their whimsical charm utterly irresistible. Thirdly, and perhaps most importantly, they taste absolutely divine. The rich, comforting flavor of the cupcake itself provides the perfect canvas for the sweet, smooth buttercream, creating a harmonious bite that’s both fun and incredibly satisfying. They embody everything wonderful about homemade treats: love, care, and an undeniable deliciousness that store-bought simply cannot replicate.
Elevate Your Spooky Delights: Serving Suggestions & Creative Variations
Now, while these Halloween Ghost Cupcakes are perfect just as they are, I love thinking about how we can make them even more special or tailor them to different occasions. For serving, picture them alongside a warm mug of spiced apple cider or a rich, dark hot chocolate – the ultimate autumnal comfort pairing. They also make fantastic additions to a Halloween potluck, a school bake sale, or simply as a special treat for your family after a night of trick-or-treating. You could arrange them on a multi-tiered stand for a dramatic party centerpiece, or individually wrap them in clear bags with festive ribbons as party favors.
But let’s talk variations! The beauty of this recipe lies in its adaptability. Feeling adventurous with the cupcake base? You could easily incorporate pumpkin puree and a touch of pumpkin spice for a seasonal twist, or swap out some of the flour for cocoa powder to create decadent chocolate ghost cupcakes. For the frosting, consider adding a hint of almond extract for a delicate nuance, or even a drop of black food coloring for a spooky grey ghost effect before piping. Don’t be afraid to play with the ghost expressions either! Mini chocolate chips are great for eyes, but edible markers can create tiny, expressive mouths or even mischievous eyebrows. You could also use different sizes of round piping tips to create ghosts of varying shapes and sizes, or even drizzle a little chocolate “slime” over the top for an extra ghoulish touch. For an adult-friendly version, a tiny splash of a liqueur like Irish cream or Kahlua in the frosting could add an unexpected depth of flavor that your guests will adore. The possibilities are truly endless, allowing you to personalize your treats and unleash your inner culinary artist.
Your Turn: Bake, Share, and Inspire!
So, what are you waiting for? I wholeheartedly encourage you to roll up your sleeves, preheat your oven, and embark on this delightful baking adventure. You’re not just making cupcakes; you’re crafting edible smiles and spreading Halloween joy. Imagine the aroma filling your kitchen, the satisfaction of seeing your adorable little ghosts come to life, and the pure delight on the faces of those who get to enjoy them. It’s an experience from start to finish that truly embodies the spirit of the season.
Once you’ve whipped up your own batch of these fantastic Halloween Ghost Cupcakes, I would absolutely love to hear about your experience! Did you stick to the recipe, or did you try some fun variations? What was your favorite part of the process, and most importantly, how did your friends and family react? Please share your stories, your tips, and especially your photos! Seeing your creations truly makes my day and inspires others to get baking too. Let’s make this Halloween the most deliciously spooky one yet, one adorable ghost cupcake at a time. Happy baking!
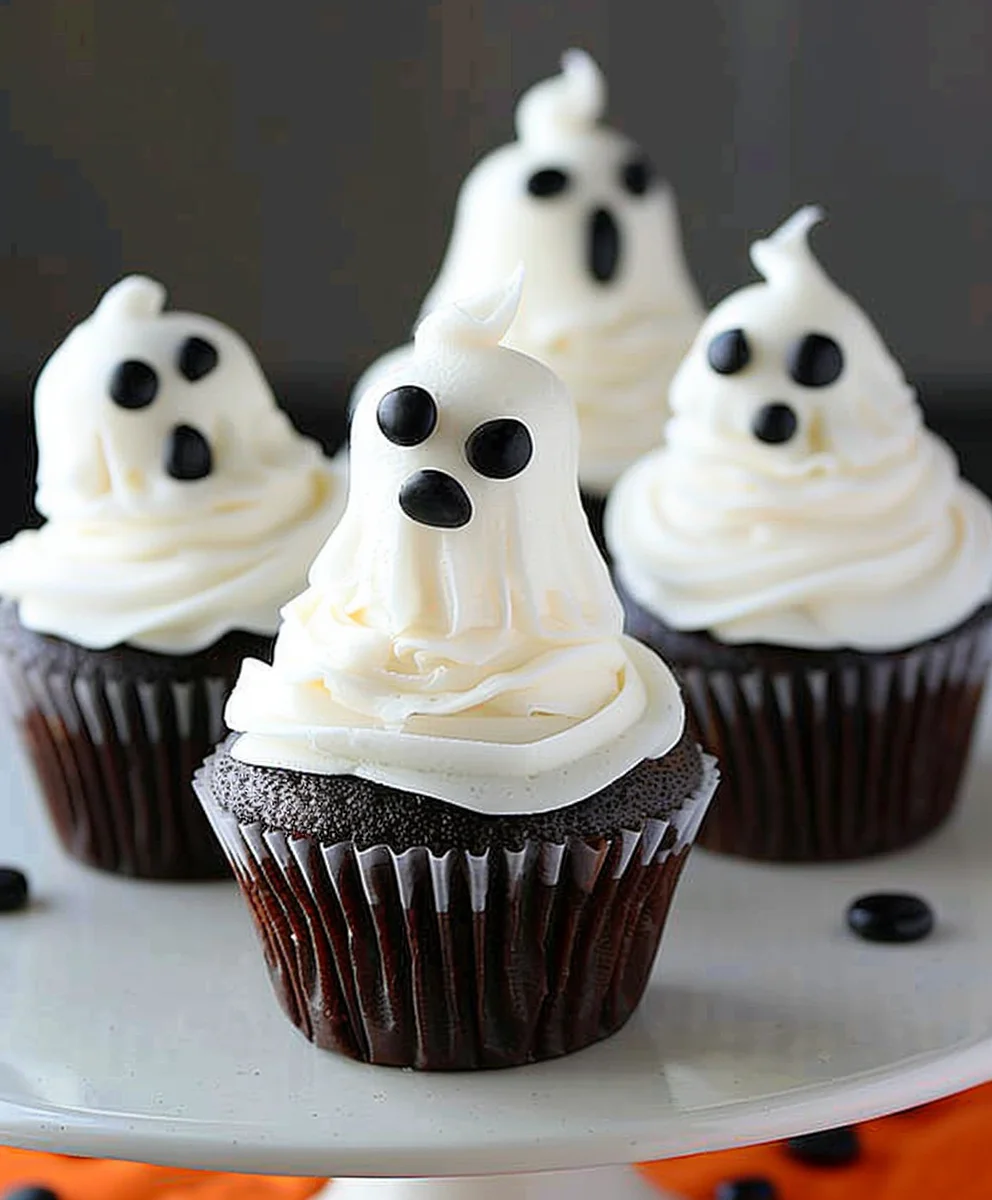
Easy Spooky Halloween Chocolate Ghost Cupcakes
Whip up these adorable and delicious Halloween Chocolate Ghost Cupcakes for your next party! Made with a convenient cake mix base, rich chocolate flavor, and topped with silky vanilla buttercream and cute marshmallow ghosts, they’re a fun and easy treat everyone will love.
Ingredients
-
1 (15.25 oz) box chocolate or devil’s food cake mix
-
1 (4 oz) box chocolate pudding mix
-
1 cup sour cream
-
1/2 cup water
-
1/2 cup vegetable oil
-
4 large eggs
-
2 tsp espresso powder (optional)
-
For the Silky Vanilla Buttercream Frosting:
-
1 cup (226g) unsalted butter, softened
-
3-4 cups (360-480g) powdered sugar, sifted
-
1 teaspoon pure vanilla extract
-
2-4 tablespoons whole milk or heavy cream
-
Pinch of salt (optional)
-
For the Adorable Ghost Decorations:
-
12 large marshmallows
-
Mini chocolate chips or black frosting for eyes and mouths
Instructions
-
Step 1
Preheat oven to 350°F (175°C). Line a 12-cup muffin pan with cupcake liners. In a large bowl, combine chocolate cake mix, chocolate pudding mix, sour cream, water, vegetable oil, eggs, and optional espresso powder. Beat with an electric mixer until well combined, about 2 minutes. -
Step 2
Fill cupcake liners about two-thirds full with batter. Bake for 18-22 minutes, or until a wooden skewer inserted into the center comes out clean. Let cool in the pan for 5-10 minutes, then transfer to a wire rack to cool completely. -
Step 3
In a large bowl, beat 1 cup softened unsalted butter with an electric mixer for 2-3 minutes until light and fluffy. Gradually add 3-4 cups sifted powdered sugar, 1 tsp pure vanilla extract, and a pinch of salt. Add 2-4 tablespoons milk or cream, ½ teaspoon at a time, beating until smooth and desired piping consistency is reached. Whip on medium-high speed for 2-3 minutes for extra airiness. -
Step 4
Ensure cupcakes are completely cool. Transfer buttercream to a piping bag fitted with a large round or star tip. Pipe a generous mound of frosting on top of each cupcake. Place one large marshmallow on each frosting mound. Use mini chocolate chips or black frosting to create eyes and mouths on the marshmallows, giving each ghost a unique expression. -
Step 5
Arrange your finished Halloween Ghost Cupcakes on a festive platter and serve. Store any leftover cupcakes in an airtight container at room temperature for 1-2 days. If refrigerated, bring to room temperature for 15-30 minutes before serving for best texture.
Important Information
Nutrition Facts (Per Serving)
It is important to consider this information as approximate and not to use it as definitive health advice.
Allergy Information
Please check ingredients for potential allergens and consult a health professional if in doubt.

Leave a Comment