
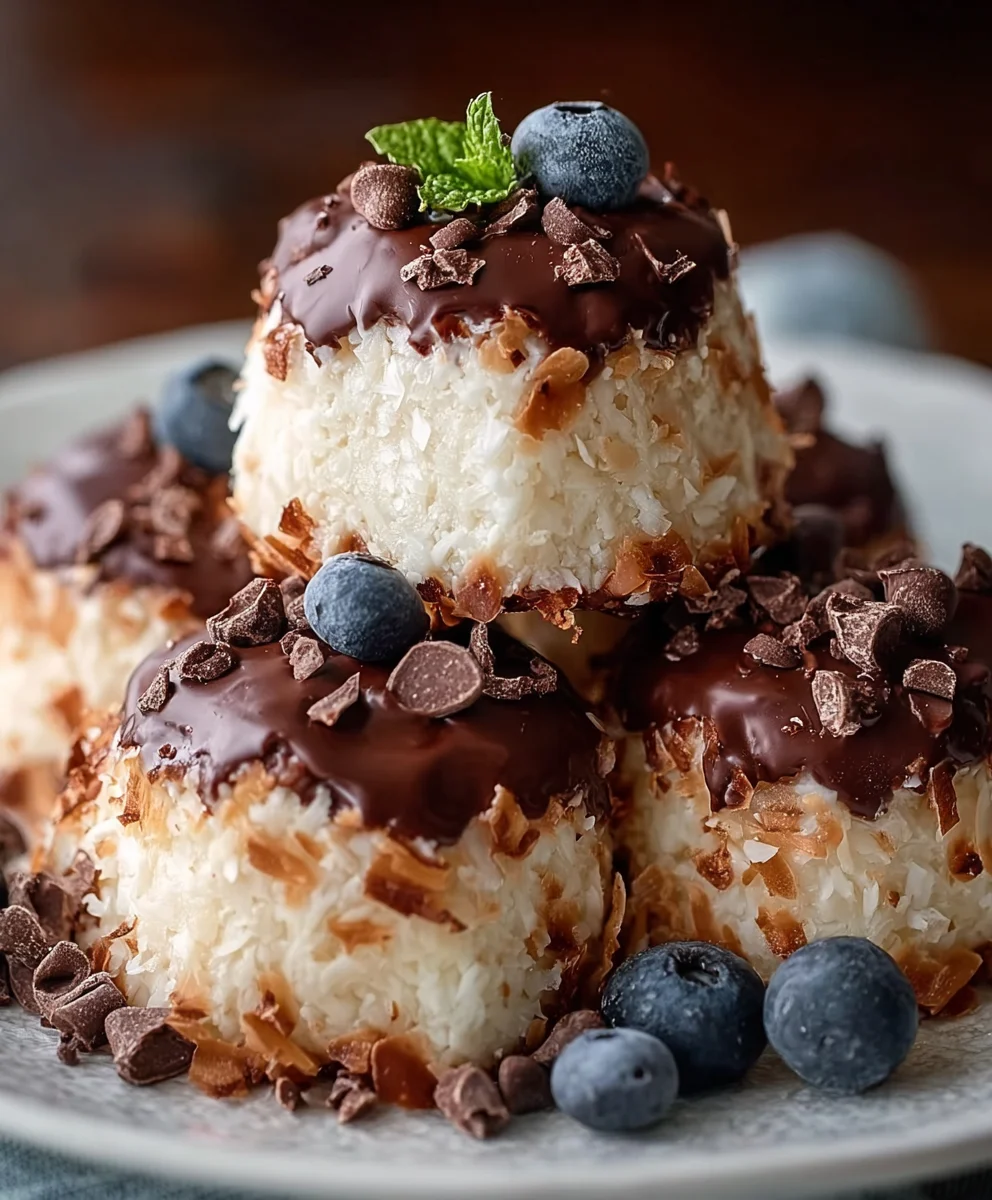
Easy No Bake Moose Farts – what a name, right? Don’t let the whimsical moniker fool you; these delightful little bites are a truly irresistible treat that have been bringing smiles to faces for years. I’m absolutely thrilled to share the recipe for these wonderfully addictive confections, which are guaranteed to become a new favorite in your household. Imagine a perfect blend of sweet, chewy, and slightly crunchy textures, all packed into a convenient, bite-sized package. They’re the kind of treat that disappears from the dessert table faster than you can say “moose!”
While their exact origins are shrouded in delightful mystery – likely born from a clever parent or a spontaneous potluck creation – their popularity is undeniable. They embody the spirit of joyful, uncomplicated indulgence. Perfect for last-minute gatherings, a quick after-school snack, or just a sweet pick-me-up, these treats require no oven and minimal effort, making them a true culinary lifesaver for busy individuals. This is precisely why learning to make Easy No Bake Moose Farts is a game-changer for anyone who loves delicious homemade sweets without the fuss. I promise you, once you try them, you’ll understand why they’ve become a beloved staple in so many homes.
Ingredients:
- 1/2 cup (113g) Unsalted Butter: I prefer unsalted so I can control the salt content myself, but if you only have salted, simply omit any extra salt you might add. This helps bind everything together and gives our Easy No Bake Moose Farts a lovely richness.
- 1 cup (250g) Creamy Peanut Butter: The heart and soul of these delicious little treats! Make sure it’s creamy, not chunky, for the best smooth texture in your Easy No Bake Moose Farts. Natural peanut butter can be used, but you might need to adjust the amount of powdered sugar slightly as it’s often less sweet and oilier.
- 1 teaspoon Pure Vanilla Extract: A touch of vanilla really elevates the flavor profile, adding a warm, inviting aroma to our Easy No Bake Moose Farts. Don’t skimp on the good stuff here!
- 2 cups (240g) Powdered Sugar (Confectioners’ Sugar): This provides the primary sweetness and helps to thicken the mixture without adding a grainy texture, which is crucial for the smooth consistency of our Easy No Bake Moose Farts. Sifting is optional but recommended if your powdered sugar is particularly lumpy.
- 1/2 cup (45g) Unsweetened Cocoa Powder: For that rich, chocolatey goodness! I love using a good quality unsweetened cocoa powder to ensure deep chocolate flavor without excessive sweetness. This is what gives our Easy No Bake Moose Farts their signature hue.
- 3 cups (270g) Old-Fashioned Rolled Oats: These are essential for the classic chewy texture of Easy No Bake Moose Farts. Quick oats can work in a pinch, but the texture will be slightly different – less substantial. Avoid instant oats as they tend to become mushy.
- 1/4 cup (60ml) Milk (any kind): I typically use whole milk, but 2%, skim, or even non-dairy alternatives like almond or oat milk work perfectly. This helps to bring the mixture together and adjust consistency if it’s too thick. You might need a tiny bit more or less depending on the specific peanut butter you use.
- Optional Coatings (for rolling):
- 1/2 cup Shredded Sweetened Coconut: This adds a lovely tropical hint and a fantastic textural contrast to the smooth interior of your Easy No Bake Moose Farts.
- 1/4 cup Additional Unsweetened Cocoa Powder: For an extra chocolatey exterior and a slightly sophisticated look.
- 1/4 cup Mini Chocolate Chips: Great for adding a bit more crunch and chocolatey goodness, either mixed into the dough or pressed onto the outside.
- Sprinkles: If you’re feeling festive or making these for a party, sprinkles add a pop of color and fun!
Gathering Your Supplies and Initial Preparations for Your Easy No Bake Moose Farts
- Prepare Your Workspace: Before we dive into the fun, let’s get our kitchen ready. I always find that having everything laid out makes the process so much smoother and more enjoyable. You’ll want a large mixing bowl, a sturdy wooden spoon or a rubber spatula, and a small saucepan or microwave-safe bowl.
- Line Baking Sheets: Grab two large baking sheets. I like to line mine with parchment paper or silicone baking mats. This step is super important because it prevents your Easy No Bake Moose Farts from sticking and makes for a much easier cleanup later on. Trust me, you don’t want to be scraping sticky treats off your pans!
- Measure All Ingredients: This is a classic baking rule, even for no-bake recipes, and it really does make a difference. Measure out all your ingredients precisely and have them ready to go. This “mise en place” approach means you won’t be scrambling for ingredients mid-mixing, which is especially helpful when dealing with a quick-setting mixture like the one for our Easy No Bake Moose Farts.
Crafting the Delicious Easy No Bake Moose Fart Mixture
- Melt the Butter: In your small saucepan, melt the 1/2 cup of unsalted butter over medium-low heat. You want it just melted and smooth, not browned or sizzling aggressively. Alternatively, you can melt it in a microwave-safe bowl in 30-second increments, stirring in between, until fully melted. Be careful not to overheat it, as this can affect the texture of the finished Easy No Bake Moose Farts.
- Combine Wet Ingredients: Once the butter is melted, carefully pour it into your large mixing bowl. Add the 1 cup of creamy peanut butter and the 1 teaspoon of pure vanilla extract. Using your sturdy wooden spoon or rubber spatula, stir these ingredients together until they are thoroughly combined and smooth. It should look like a glossy, uniform mixture. I find that taking a moment to really get this smooth pays off in the final texture of the Easy No Bake Moose Farts.
- Incorporate Dry Sweetness and Chocolate: Now, it’s time to add the sweetness and chocolatey goodness. Gradually add the 2 cups of powdered sugar and the 1/2 cup of unsweetened cocoa powder to the wet mixture. I usually add these in two batches, stirring well after each addition to prevent a cloud of cocoa powder from engulfing my kitchen! Stir vigorously until no streaks of powdered sugar or cocoa powder remain. The mixture will start to look quite thick and paste-like at this stage, which is exactly what we want for our Easy No Bake Moose Farts.
- Add the Oats and Milk: This is where the magic really starts to happen and our Easy No Bake Moose Farts take shape. Add the 3 cups of old-fashioned rolled oats to the bowl. Pour in the 1/4 cup of milk. Now, with a bit of elbow grease, stir everything together until the oats are evenly coated with the chocolate-peanut butter mixture. This might take a few minutes of good, solid mixing. You’re aiming for a consistency where all the oats are incorporated and the mixture holds together when pressed, but isn’t overly wet or crumbly. If it seems too dry, you can add another tablespoon of milk at a time until it reaches the right consistency. If, by some chance, it feels too wet, you can add a tiny bit more oats or powdered sugar, but this rarely happens if you’ve measured carefully. The consistency is key for easy rolling!
- Optional Mix-ins (The Fun Part!): If you’re incorporating any internal mix-ins like mini chocolate chips or extra shredded coconut into the dough itself, now is the time to fold them in. Gently stir them through the mixture until they are evenly distributed. These little additions add extra pops of flavor and texture to your Easy No Bake Moose Farts!
Rolling Your Easy No Bake Moose Farts into Perfect Spheres
- Prepare Your Rolling Station: Before you start rolling, set up your optional coatings on separate shallow plates or bowls. If you’re using shredded coconut, cocoa powder, or sprinkles, have them ready. This makes the rolling process much more efficient and less messy.
- Scoop and Roll: Now for the hands-on part! I like to use a small cookie scoop (about 1.5 tablespoons) to get uniform sizes for my Easy No Bake Moose Farts, but you can also just eyeball it. Scoop a portion of the mixture into your hands and gently roll it between your palms to form a smooth ball. The warmth of your hands helps to make the mixture more pliable. If the mixture starts to get too sticky, you can lightly dampen your hands with water or pop the bowl into the refrigerator for 10-15 minutes to firm it up slightly.
- Coat Your Moose Farts (Optional but Recommended!): Once you have a nicely shaped ball, immediately roll it in your chosen coating. Gently press it into the shredded coconut, cocoa powder, or sprinkles until it’s evenly coated on all sides. The coating adds visual appeal, an extra layer of flavor, and helps prevent them from sticking together.
- Place on Prepared Baking Sheets: As you finish rolling and coating each Easy No Bake Moose Fart, place it gently onto your parchment-lined baking sheets. Make sure to leave a little space between each one to allow for even chilling.
- Repeat Until All Mixture is Used: Continue this process, scooping, rolling, and coating, until you’ve used up all of your delicious Easy No Bake Moose Farts mixture. You should end up with a generous batch of these delightful treats!
Chilling and Storing for Perfection of Your Easy No Bake Moose Farts
- Chill to Set: This is a crucial step to ensure your Easy No Bake Moose Farts hold their shape and have the perfect firm-yet-chewy texture. Once all your moose farts are on the baking sheets, transfer the sheets to the refrigerator. Allow them to chill for at least 30 minutes to 1 hour. This chilling time lets the butter and peanut butter firm up, setting the shape and making them less sticky and much more enjoyable to eat. Patience is a virtue here!
- Transfer for Storage: Once thoroughly chilled and firm, you can transfer your Easy No Bake Moose Farts from the baking sheets. I usually move them into an airtight container for longer storage.
- Storage Guidelines:
- Room Temperature: While they are no-bake, I generally don’t recommend storing them at room temperature for extended periods, especially if your home is warm, as they can become too soft. If you plan to eat them within a day, a cool spot on the counter is fine.
- Refrigerator: For optimal freshness and texture, store your Easy No Bake Moose Farts in an airtight container in the refrigerator for up to 1-2 weeks. This keeps them firm and delicious, perfect for a quick snack or dessert.
- Freezer: For longer storage, these treats freeze beautifully! Place the chilled moose farts in a single layer on a baking sheet and freeze until solid. Then, transfer them to a freezer-safe airtight container or zip-top bag. They will last for up to 2-3 months. When you’re ready to enjoy, simply take them out of the freezer and let them thaw in the refrigerator for an hour or so, or at room temperature for about 15-20 minutes.
Tips and Tricks for the Ultimate Easy No Bake Moose Farts Experience
- Achieving the Right Consistency: The success of your Easy No Bake Moose Farts largely depends on the mixture’s consistency. If it’s too sticky to roll, pop it in the fridge for 15-20 minutes. If it’s too dry and crumbly, add an extra teaspoon of milk at a time until it comes together. Different brands of peanut butter can vary in oil content, affecting this.
- Uniform Sizing: For consistent baking (even though these are no-bake, it’s about presentation and even setting!), use a cookie scoop. A 1.5-tablespoon scoop is ideal for bite-sized Easy No Bake Moose Farts. This also ensures everyone gets an equally delightful treat!
- Experiment with Coatings: Don’t limit yourself to just coconut or cocoa! Consider finely chopped nuts (pecans, walnuts), finely crushed freeze-dried fruit, or even a drizzle of melted white chocolate after they’ve set for added flair. A sprinkle of sea salt can also be a wonderful counterpoint to the sweetness.
- Peanut Butter Alternatives: If you or your guests have a peanut allergy, feel free to substitute with another nut butter like almond butter or cashew butter, or a seed butter like sunflower seed butter (SunButter). Be aware that the flavor profile will change, and you might need to adjust the sweetness slightly. This is an excellent way to make your Easy No Bake Moose Farts inclusive for everyone.
- Make it a Family Affair: These Easy No Bake Moose Farts are so simple and fun to make, they’re perfect for involving kids! Let them help with measuring (the dry ingredients especially), mixing, and, of course, rolling and coating. It’s a fantastic way to spend time together in the kitchen without the heat of an oven. Just be prepared for a little mess – that’s part of the fun!
- Gifting Your Easy No Bake Moose Farts: These make wonderful homemade gifts! Arrange a few in a decorative box or bag, tie with a ribbon, and you have a thoughtful, delicious present that everyone will love. They travel well and are always a hit.
- For a Deeper Chocolate Flavor: If you’re a true chocoholic, consider using dark cocoa powder for a more intense, less sweet chocolate flavor in your Easy No Bake Moose Farts. You could also melt in a square of unsweetened baking chocolate with the butter for an extra rich base.
- Enjoying Your Creation: Finally, the best tip of all – take a moment to savor your hard work! These Easy No Bake Moose Farts are incredibly satisfying, packed with flavor, and so easy to whip up. They truly are a delightful snack, dessert, or sweet pick-me-up any time of day. Enjoy every single delicious bite!

Conclusion:
If there’s one recipe I’m truly passionate about sharing, it’s this one. I genuinely believe that everyone deserves a little bit of magic in their kitchen, especially when that magic comes without the fuss of an oven or a complex ingredient list. What we’ve just explored isn’t just a recipe; it’s an invitation to pure, unadulterated joy and effortless deliciousness. I’ve seen firsthand the smiles these treats bring, the surprised delight in people’s eyes when they realize how truly simple yet incredibly satisfying they are. This isn’t just another sweet treat; it’s a revelation for anyone who loves dessert but dreads the lengthy prep or the post-baking cleanup.
This recipe is an absolute must-try for so many reasons. First and foremost, the ‘no bake’ aspect is a complete game-changer. Imagine whipping up a batch of utterly delectable sweets without even turning on your oven, perfect for those sweltering summer days or when you simply don’t have the time to commit to traditional baking. It’s a lifesaver for last-minute potlucks, unexpected guests, or simply when a sudden craving strikes. The simplicity means it’s also a fantastic project to tackle with kids; they’ll love rolling the mixture into fun shapes and getting their hands a little messy, all while creating something truly delicious. Beyond the convenience, the texture and flavor profile are simply irresistible. Each bite offers a satisfying chewiness, a perfect balance of rich, comforting flavors that just melts in your mouth. You get that delightful combination of sweet, slightly nutty, and utterly satisfying, making them a perfect pick-me-up any time of day. Seriously, if you’re looking for a dessert that delivers on taste, fun, and absolute ease, these Easy No Bake Moose Farts are about to become your new kitchen obsession.
Now, let’s talk about the endless possibilities for serving and personalization. While fantastic on their own, these little gems can be elevated in so many delightful ways. For a sophisticated touch, arrange them on a beautiful platter alongside fresh berries and a dusting of powdered sugar – they instantly transform into an elegant dessert for any dinner party. Imagine them as part of a varied dessert spread at your next gathering, their unique name sparking curiosity and their incredible taste earning rave reviews. They make for wonderful homemade gifts, packaged in pretty tins or cellophane bags, tied with a ribbon. For a quick snack on the go, they are simply unparalleled; grab one or two for a boost of energy during your busy day or tuck them into lunchboxes for a delightful surprise.
But the fun doesn’t stop there! This recipe is incredibly adaptable, inviting you to unleash your inner culinary artist. Don’t be afraid to experiment with different additions to truly make them your own. Instead of just rolled oats, consider adding some crunchy rice cereal for an extra textural dimension, or swap out the traditional nut butter for almond butter or cashew butter to explore new flavor profiles. A sprinkle of mini chocolate chips, white chocolate chips, or even dried cranberries can add bursts of sweetness and color. For a truly decadent twist, try dipping half of each ball in melted dark chocolate and letting it set, or roll them in finely chopped nuts like pecans or pistachios for an added crunch and a beautiful presentation. You could even incorporate a pinch of cinnamon or a dash of almond extract into the mixture for an entirely different aromatic experience. For those with dietary restrictions, this recipe is remarkably forgiving; gluten-free oats work beautifully, and plant-based milks and vegan butter alternatives can easily make this a dairy-free or vegan-friendly treat without sacrificing any of the deliciousness. The beauty is in the boundless customization – each variation is an opportunity to discover a new favorite.
So, what are you waiting for? I genuinely can’t wait for you to experience the sheer delight of making and devouring these incredible treats. I urge you to set aside a little bit of time this week, gather your ingredients, and give this recipe a go. You’ll be amazed at how quickly you can whip up something so wonderfully satisfying. Once you’ve made your batch, I would absolutely love to hear about your experience! Did you stick to the classic version, or did you venture into some exciting variations? What were your favorite additions or serving suggestions? Please don’t hesitate to share your photos and tell me all about your delicious creations. Your feedback and creative twists inspire me and the entire community. Happy no-baking, my friends! Get ready to fall in love with your new favorite easy dessert!
Easy No Bake Moose Farts
Don’t let the whimsical moniker fool you; these delightful little bites are a truly irresistible treat that have been bringing smiles to faces for years. Imagine a perfect blend of sweet, chewy, and slightly crunchy textures, all packed into a convenient, bite-sized package. Requiring no oven and minimal effort, these treats are a true culinary lifesaver for busy individuals.
Ingredients
-
1 cup graham cracker crumbs
-
1/2 cup unsweetened cocoa powder
-
1/2 cup powdered sugar
-
1/2 cup creamy peanut butter
-
1/2 cup softened cream cheese
-
1 teaspoon vanilla extract
-
1/4 cup mini chocolate chips
-
Whipped cream (optional, for topping)
Instructions
-
Step 1
In a large bowl, cream together the softened cream cheese, peanut butter, and vanilla extract until smooth. -
Step 2
Gradually add the cocoa powder, powdered sugar, and graham cracker crumbs to the wet mixture. Mix until well combined and a dough-like consistency is formed. -
Step 3
Fold in the mini chocolate chips until evenly distributed throughout the mixture. -
Step 4
Scoop small portions of the mixture (about 1-1.5 tablespoons) and roll them into smooth balls between your palms. Place on a parchment-lined baking sheet. -
Step 5
Chill the moose farts in the refrigerator for at least 45 minutes to 1 hour, or until firm. -
Step 6
Serve chilled, optionally topped with whipped cream. Store leftovers in an airtight container in the refrigerator.
Important Information
Nutrition Facts (Per Serving)
It is important to consider this information as approximate and not to use it as definitive health advice.
Allergy Information
Please check ingredients for potential allergens and consult a health professional if in doubt.

Leave a Comment