
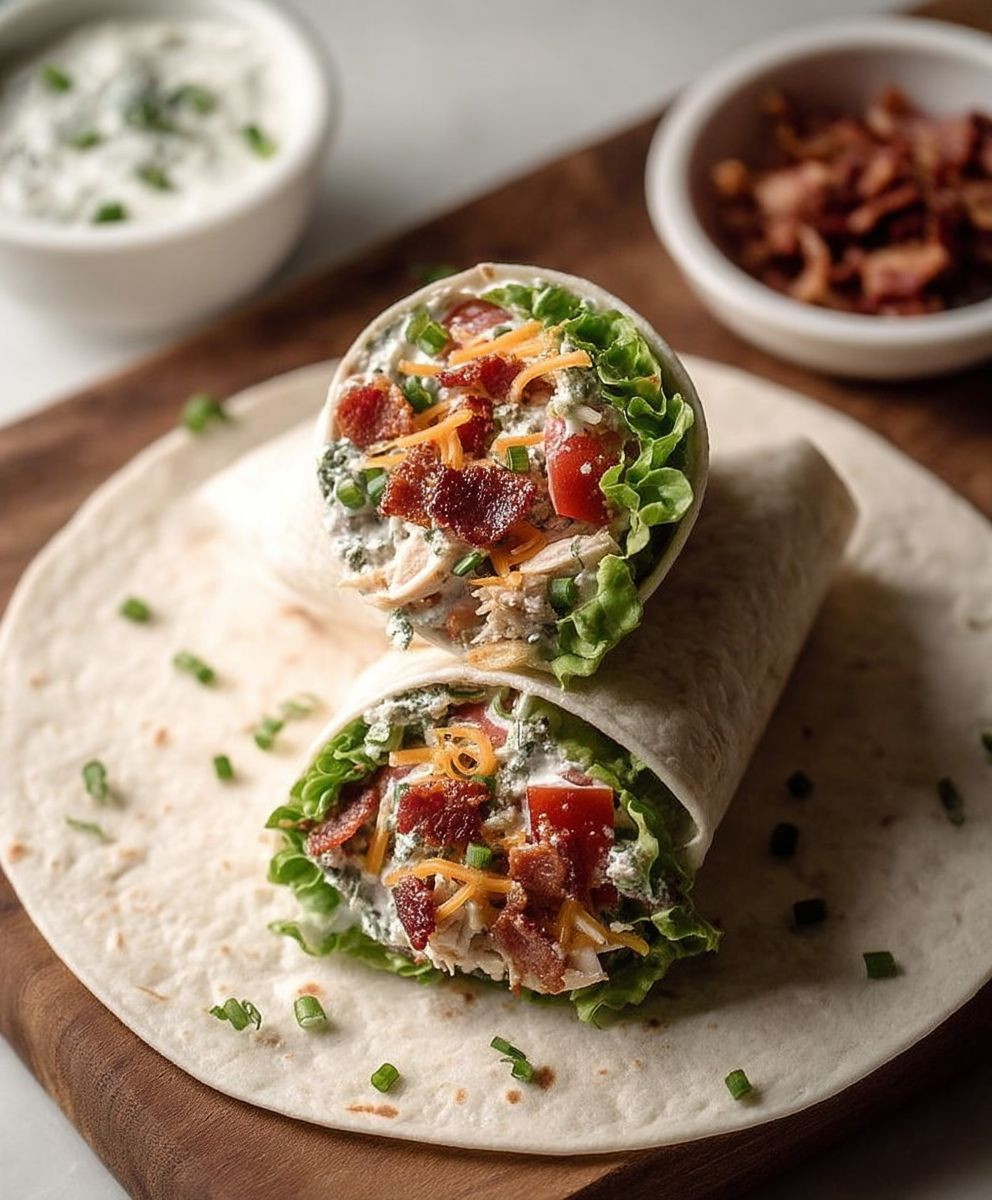
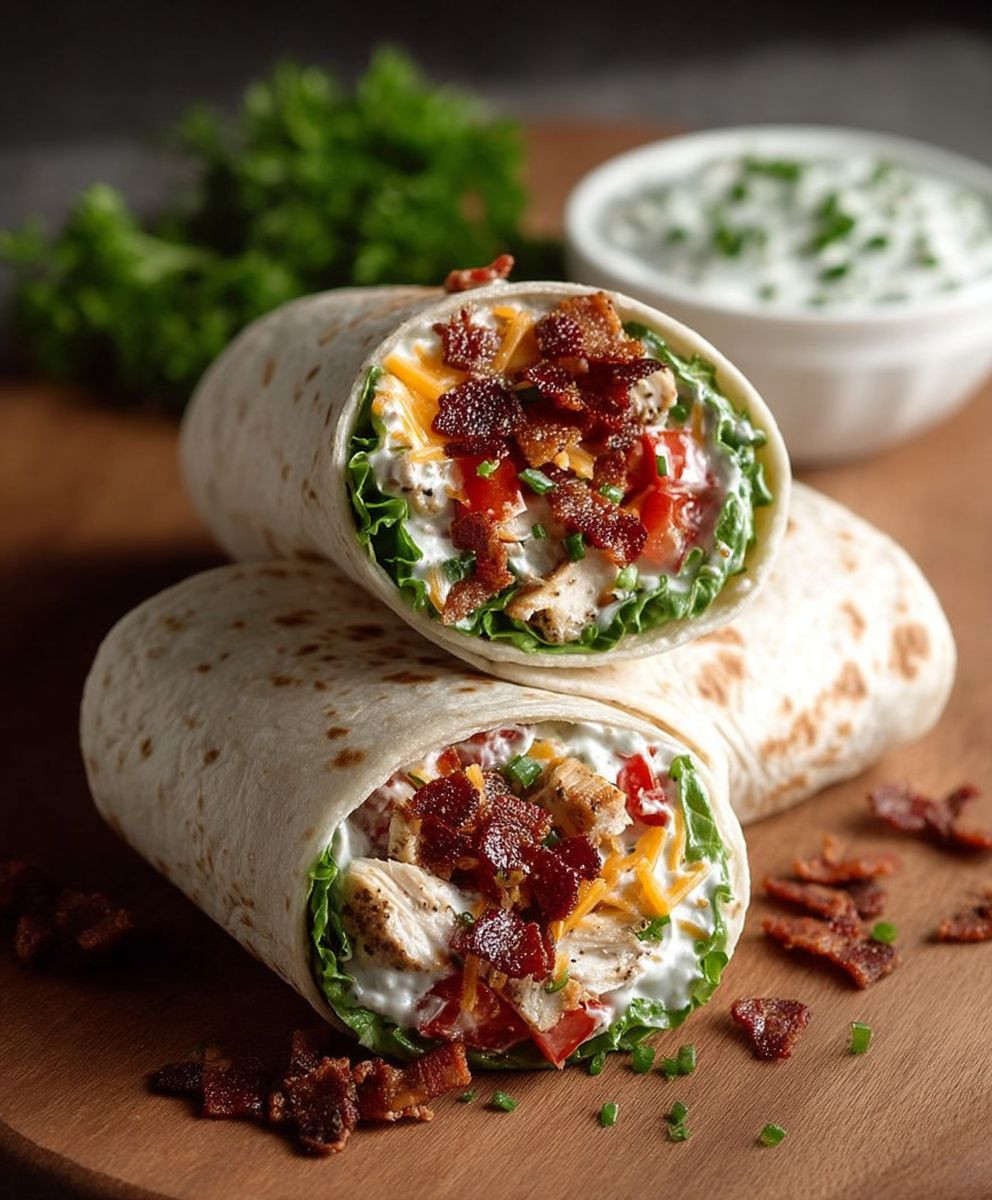
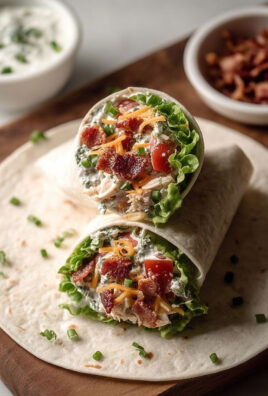
Chicken bacon ranch wraps: just the name alone conjures up images of creamy, savory deliciousness, doesn’t it? I know I’m not alone in craving that perfect combination of flavors! These aren’t just any wraps; they’re a symphony of textures and tastes that will have you reaching for seconds (and maybe thirds!).
While the exact origins of the chicken bacon ranch combination are a bit hazy, its popularity exploded in the late 20th century, becoming a staple in American comfort food. Think about it: the smoky saltiness of bacon, the tender, juicy chicken, and that tangy, herby ranch dressing – it’s a match made in culinary heaven! This flavor profile has become so ingrained in our food culture that it’s found its way into everything from salads to pizzas.
What makes chicken bacon ranch wraps so irresistible? For starters, they’re incredibly versatile. They’re perfect for a quick lunch, a satisfying dinner, or even a crowd-pleasing appetizer. The creamy ranch dressing perfectly complements the crispy bacon and savory chicken, creating a flavor explosion with every bite. Plus, they’re incredibly easy to customize! Add your favorite veggies, cheeses, or spices to create a wrap that’s uniquely yours. But beyond the taste, it’s the sheer convenience that makes these wraps a winner. They’re quick to assemble, portable, and require minimal cleanup. So, whether you’re a busy parent, a student on the go, or simply someone who appreciates a delicious and easy meal, these wraps are sure to become a new favorite!
Ingredients:
- 1 pound boneless, skinless chicken breasts, cut into bite-sized pieces
- 1 tablespoon olive oil
- 1 teaspoon garlic powder
- 1/2 teaspoon onion powder
- 1/4 teaspoon smoked paprika
- Salt and pepper to taste
- 8 slices bacon, cooked and crumbled
- 1 cup shredded cheddar cheese
- 1/2 cup ranch dressing
- 4 large flour tortillas
- Optional: chopped lettuce, diced tomatoes, sliced avocado for serving
Preparing the Chicken:
Okay, let’s get started with the chicken! This is the heart of our wraps, so we want to make sure it’s flavorful and cooked perfectly. I like to use bite-sized pieces because they’re easier to eat in the wraps, but you can also use larger pieces if you prefer. Just adjust the cooking time accordingly.
- Season the Chicken: In a medium bowl, toss the chicken pieces with olive oil, garlic powder, onion powder, smoked paprika, salt, and pepper. Make sure the chicken is evenly coated with the spices. This is where the magic happens, so don’t be shy with the seasoning! I sometimes add a pinch of cayenne pepper for a little kick.
- Cook the Chicken: Heat a large skillet over medium-high heat. Add the seasoned chicken to the skillet in a single layer. Avoid overcrowding the pan, as this will cause the chicken to steam instead of sear. If necessary, cook the chicken in batches.
- Ensure Thorough Cooking: Cook the chicken for about 5-7 minutes, or until it’s cooked through and no longer pink inside. The internal temperature should reach 165°F (74°C). Use a meat thermometer to be sure! I like to get a little bit of browning on the chicken for extra flavor.
- Set Aside: Once the chicken is cooked, remove it from the skillet and set it aside to cool slightly. This will prevent the tortillas from getting soggy later on.
Preparing the Bacon:
Bacon! Need I say more? Crispy, smoky bacon is a must-have in these wraps. You can cook it however you prefer, but I’ll share my favorite method for perfectly crispy bacon every time.
- Cook the Bacon: There are several ways to cook bacon, but I prefer baking it in the oven. Preheat your oven to 400°F (200°C). Line a baking sheet with parchment paper. Arrange the bacon slices on the baking sheet in a single layer.
- Bake to Perfection: Bake the bacon for 15-20 minutes, or until it’s crispy and golden brown. The exact cooking time will depend on the thickness of the bacon. Keep an eye on it to prevent burning.
- Drain Excess Grease: Once the bacon is cooked, remove it from the oven and transfer it to a plate lined with paper towels to drain the excess grease.
- Crumble the Bacon: Let the bacon cool slightly, then crumble it into small pieces. You can use your hands or a knife to do this.
Assembling the Wraps:
Now for the fun part – putting everything together! This is where you can get creative and customize your wraps to your liking. Feel free to add any other toppings you enjoy, such as lettuce, tomatoes, or avocado.
- Warm the Tortillas: Warm the tortillas in a dry skillet over medium heat for about 30 seconds per side, or until they’re pliable. This will make them easier to roll without tearing. You can also warm them in the microwave for a few seconds.
- Spread the Ranch Dressing: Lay a tortilla flat on a clean surface. Spread a generous amount of ranch dressing evenly over the tortilla, leaving a small border around the edges.
- Add the Chicken: Sprinkle a layer of cooked chicken over the ranch dressing.
- Add the Bacon: Sprinkle the crumbled bacon over the chicken. Don’t be shy with the bacon!
- Add the Cheese: Sprinkle the shredded cheddar cheese over the bacon.
- Optional Toppings: If desired, add any other toppings, such as chopped lettuce, diced tomatoes, or sliced avocado.
- Roll the Wrap: Fold in the sides of the tortilla, then tightly roll it up from the bottom.
- Secure the Wrap: If desired, you can secure the wrap with a toothpick to prevent it from unrolling.
- Repeat: Repeat steps 2-8 for the remaining tortillas.
Serving the Wraps:
These wraps are delicious served immediately. You can also cut them in half for easier eating. They’re perfect for lunch, dinner, or a quick snack!
- Cut and Serve: Cut each wrap in half on a diagonal. This makes them easier to handle and shows off all the delicious fillings inside.
- Serve Immediately: Serve the wraps immediately while they’re still warm and the cheese is melted.
- Optional Sides: Serve with your favorite sides, such as chips, salsa, or a side salad.
Tips and Variations:
Here are a few tips and variations to make these wraps even better!
- Spice it Up: Add a pinch of cayenne pepper to the chicken seasoning for a little heat. You can also use a spicy ranch dressing.
- Use Different Cheese: Try using a different type of cheese, such as Monterey Jack, pepper jack, or Colby Jack.
- Add Vegetables: Add some chopped vegetables, such as bell peppers, onions, or spinach.
- Make it Vegetarian: Substitute the chicken with black beans or grilled vegetables for a vegetarian option.
- Use Different Tortillas: Try using whole wheat tortillas or spinach tortillas for a healthier option.
- Make it Ahead: You can assemble the wraps ahead of time and store them in the refrigerator for up to 24 hours. Just wait to cut them until you’re ready to serve.
- Grill the Wraps: For a warm and crispy wrap, grill the assembled wraps for a few minutes per side until they’re golden brown and the cheese is melted.
- Air Fry the Wraps: You can also air fry the assembled wraps at 375°F (190°C) for 5-7 minutes, or until they’re golden brown and the cheese is melted.
Storage Instructions:
If you have any leftover wraps, you can store them in an airtight container in the refrigerator for up to 2 days. Reheat them in the microwave or oven before serving.
Nutritional Information (Approximate):
Please note that the nutritional information is an estimate and may vary depending on the specific ingredients used.
- Calories: Approximately 500-600 per wrap
- Fat: 30-40 grams
- Protein: 30-40 grams
- Carbohydrates: 30-40 grams
Enjoy!
I hope you enjoy these delicious Chicken Bacon Ranch Wraps! They’re a quick, easy, and satisfying meal that’s perfect for any occasion. Let me know what you think in the comments below!
Conclusion:
This Chicken Bacon Ranch Wrap recipe isn’t just another quick lunch option; it’s a flavor explosion waiting to happen! The creamy ranch dressing perfectly complements the savory bacon and juicy chicken, all nestled in a soft, warm tortilla. It’s the kind of meal that satisfies your cravings and leaves you feeling genuinely happy. Trust me, once you try it, you’ll be adding it to your regular rotation.
But the best part? It’s incredibly versatile! Looking for a lighter option? Swap out the regular ranch for a light version or even a Greek yogurt-based ranch dressing. Want to add some heat? A dash of hot sauce or a sprinkle of red pepper flakes will do the trick. For a vegetarian twist, replace the chicken with grilled halloumi cheese or seasoned chickpeas. The possibilities are truly endless!
Serving Suggestions and Variations:
* Picnic Perfect: These wraps are ideal for picnics or lunchboxes. Wrap them tightly in parchment paper or foil to keep them fresh and prevent them from getting soggy.
* Quick Dinner: Serve them with a side of sweet potato fries or a simple salad for a complete and satisfying dinner.
* Party Appetizer: Cut the wraps into smaller pinwheels for a crowd-pleasing appetizer. Secure them with toothpicks for easy handling.
* Spicy Kick: Add sliced jalapeños or a drizzle of sriracha mayo for an extra layer of flavor.
* Mediterranean Flair: Incorporate sun-dried tomatoes, feta cheese, and Kalamata olives for a Mediterranean-inspired wrap.
* Make it a Bowl: If you’re watching your carbs, skip the tortilla and enjoy all the delicious ingredients in a bowl. Top with extra ranch dressing and a sprinkle of fresh herbs.
* Grilled Goodness: For a smoky flavor, grill the wraps for a few minutes on each side until they are lightly charred and the cheese is melted.
* Add Some Greens: Spinach, arugula, or romaine lettuce will add a fresh and healthy element to your wrap.
I’ve personally made these Chicken Bacon Ranch Wraps countless times, and they’re always a hit. My family loves them, and I often find myself making them for friends and gatherings. They’re just so easy to customize and adapt to different tastes and preferences.
So, what are you waiting for? Gather your ingredients, follow the simple steps, and prepare to be amazed. I’m confident that this recipe will become a new favorite in your household. Don’t be afraid to experiment with different variations and make it your own.
And most importantly, I’d love to hear about your experience! Did you try the recipe? What variations did you make? What did you think? Share your photos and comments below. Let’s create a community of Chicken Bacon Ranch Wrap enthusiasts! I can’t wait to see what you come up with! Happy cooking!
Chicken Bacon Ranch Wraps: The Ultimate Recipe Guide
Quick and easy Chicken Bacon Ranch Wraps are a satisfying meal perfect for lunch or dinner! Packed with flavorful chicken, crispy bacon, cheddar cheese, and creamy ranch dressing, all wrapped in a warm tortilla.
Ingredients
Instructions
Recipe Notes
- Spice it Up: Add a pinch of cayenne pepper to the chicken seasoning for a little heat. You can also use a spicy ranch dressing.
- Use Different Cheese: Try using a different type of cheese, such as Monterey Jack, pepper jack, or Colby Jack.
- Add Vegetables: Add some chopped vegetables, such as bell peppers, onions, or spinach.
- Make it Vegetarian: Substitute the chicken with black beans or grilled vegetables for a vegetarian option.
- Use Different Tortillas: Try using whole wheat tortillas or spinach tortillas for a healthier option.
- Make it Ahead: You can assemble the wraps ahead of time and store them in the refrigerator for up to 24 hours. Just wait to cut them until you’re ready to serve.
- Grill the Wraps: For a warm and crispy wrap, grill the assembled wraps for a few minutes per side until they’re golden brown and the cheese is melted.
- Air Fry the Wraps: You can also air fry the assembled wraps at 375°F (190°C) for 5-7 minutes, or until they’re golden brown and the cheese is melted.
- Storage: Store leftover wraps in an airtight container in the refrigerator for up to 2 days. Reheat in the microwave or oven before serving.

Leave a Comment