
Cherry Rice Krispie Treats: Prepare to rediscover a childhood classic with a vibrant, fruity twist! Forget everything you thought you knew about this simple dessert because we’re taking it to a whole new level of deliciousness. Imagine the satisfying snap, crackle, and pop of traditional Rice Krispie Treats, now infused with the sweet and tangy flavor of cherries.
While the original Rice Krispie Treats were born in the Kellogg’s kitchen in the 1930s as a clever way to promote their cereal, this cherry-infused version adds a modern and playful spin. The combination of the marshmallow’s gooey sweetness and the crisp rice cereal creates a texture that’s both comforting and exciting. But why stop there? The addition of cherries not only elevates the flavor profile but also adds a beautiful visual appeal, making these treats perfect for parties, potlucks, or simply a delightful afternoon snack.
People adore Rice Krispie Treats for their simplicity and nostalgic charm. They’re quick to make, require minimal ingredients, and are endlessly customizable. These Cherry Rice Krispie Treats are no exception. The burst of cherry flavor complements the classic marshmallow base, creating a symphony of textures and tastes that will have everyone reaching for seconds. Get ready to experience a delightful explosion of flavor in every bite!

Ingredients:
- 1/4 cup (1/2 stick) unsalted butter
- 5 cups miniature marshmallows
- 6 cups Rice Krispies cereal
- 1 cup dried cherries, chopped
- 1/4 teaspoon almond extract (optional, but highly recommended!)
- Pinch of salt
Preparing the Cherry Rice Krispie Treat Mixture
- Melt the Butter: In a large, microwave-safe bowl, melt the butter. I usually microwave it in 30-second intervals, stirring in between, to prevent it from splattering everywhere. You can also melt the butter in a large saucepan over low heat on the stovetop if you prefer. Just keep a close eye on it so it doesn’t burn.
- Add the Marshmallows: Once the butter is melted, add the miniature marshmallows to the bowl. Stir them around to coat them evenly with the melted butter. This helps them melt smoothly and prevents sticking.
- Microwave the Marshmallows: Now, microwave the marshmallow and butter mixture. I recommend microwaving it in 30-second intervals, stirring well after each interval. This prevents the marshmallows from puffing up too much and potentially burning. The goal is to melt the marshmallows until they are smooth and gooey. The time it takes will depend on your microwave, but it usually takes about 1 to 2 minutes total. If you’re using the stovetop, melt the marshmallows over low heat, stirring constantly until smooth.
- Stir in Almond Extract and Salt: Once the marshmallows are completely melted and smooth, remove the bowl from the microwave (or the saucepan from the heat). Immediately stir in the almond extract (if using) and the pinch of salt. The almond extract adds a lovely subtle flavor that complements the cherries beautifully. The salt helps to balance the sweetness of the marshmallows and cherries.
- Incorporate the Rice Krispies Cereal: Now comes the fun part! Add the Rice Krispies cereal to the melted marshmallow mixture. Gently fold the cereal into the marshmallows until it is evenly coated. Be careful not to crush the cereal too much, as you want to maintain its crispy texture. I find that using a large spatula or wooden spoon works best for this.
- Add the Dried Cherries: Finally, add the chopped dried cherries to the mixture. Gently fold them in until they are evenly distributed throughout the Rice Krispie treats. Make sure the cherries are well incorporated so that every bite is bursting with cherry flavor.
Pressing and Setting the Treats
- Prepare the Pan: While you’re melting the butter and marshmallows, prepare your baking pan. I typically use a 9×13 inch baking pan for this recipe, but you can also use an 8×8 inch pan for thicker treats. Grease the pan generously with butter or cooking spray. Alternatively, you can line the pan with parchment paper, leaving an overhang on the sides. This makes it super easy to lift the treats out of the pan once they’ve set.
- Transfer the Mixture to the Pan: Once the cereal and cherries are evenly incorporated, immediately transfer the Rice Krispie treat mixture to the prepared baking pan.
- Press the Mixture Evenly: Using a spatula, your fingers (lightly greased or dampened), or a piece of parchment paper, gently press the mixture evenly into the pan. Be careful not to press too hard, as this can make the treats dense and hard. You want them to be firm but still slightly soft and chewy. I find that using a piece of parchment paper over the top of the mixture helps to prevent it from sticking to my hands or the spatula.
- Let the Treats Set: Once the mixture is evenly pressed into the pan, let the Rice Krispie treats set at room temperature for at least 30 minutes, or until they are firm to the touch. This allows the marshmallows to cool and solidify, holding the treats together. You can speed up the setting process by placing the pan in the refrigerator for about 15-20 minutes. However, be careful not to leave them in the refrigerator for too long, as they can become too hard.
Cutting and Serving
- Cut into Squares: Once the Rice Krispie treats are firm, it’s time to cut them into squares. Use a sharp knife to cut the treats into even squares. The size of the squares is up to you, but I usually cut them into about 2-inch squares. If you lined the pan with parchment paper, you can simply lift the treats out of the pan using the overhang and then cut them on a cutting board.
- Serve and Enjoy: Now comes the best part – serving and enjoying your homemade Cherry Rice Krispie Treats! These treats are perfect for parties, potlucks, or just a sweet snack. They are also a great treat to make with kids.
Tips and Variations
- Fresh Cherries: While this recipe calls for dried cherries, you can also use fresh cherries if you prefer. Pit and chop the fresh cherries before adding them to the mixture. Keep in mind that fresh cherries may make the treats slightly softer, so you may need to adjust the amount of Rice Krispies cereal accordingly.
- Different Extracts: If you’re not a fan of almond extract, you can substitute it with other extracts, such as vanilla extract or cherry extract. Vanilla extract will add a classic flavor, while cherry extract will enhance the cherry flavor even more.
- Chocolate Chips: For an extra touch of indulgence, you can add chocolate chips to the Rice Krispie treat mixture. Milk chocolate, dark chocolate, or white chocolate chips would all work well.
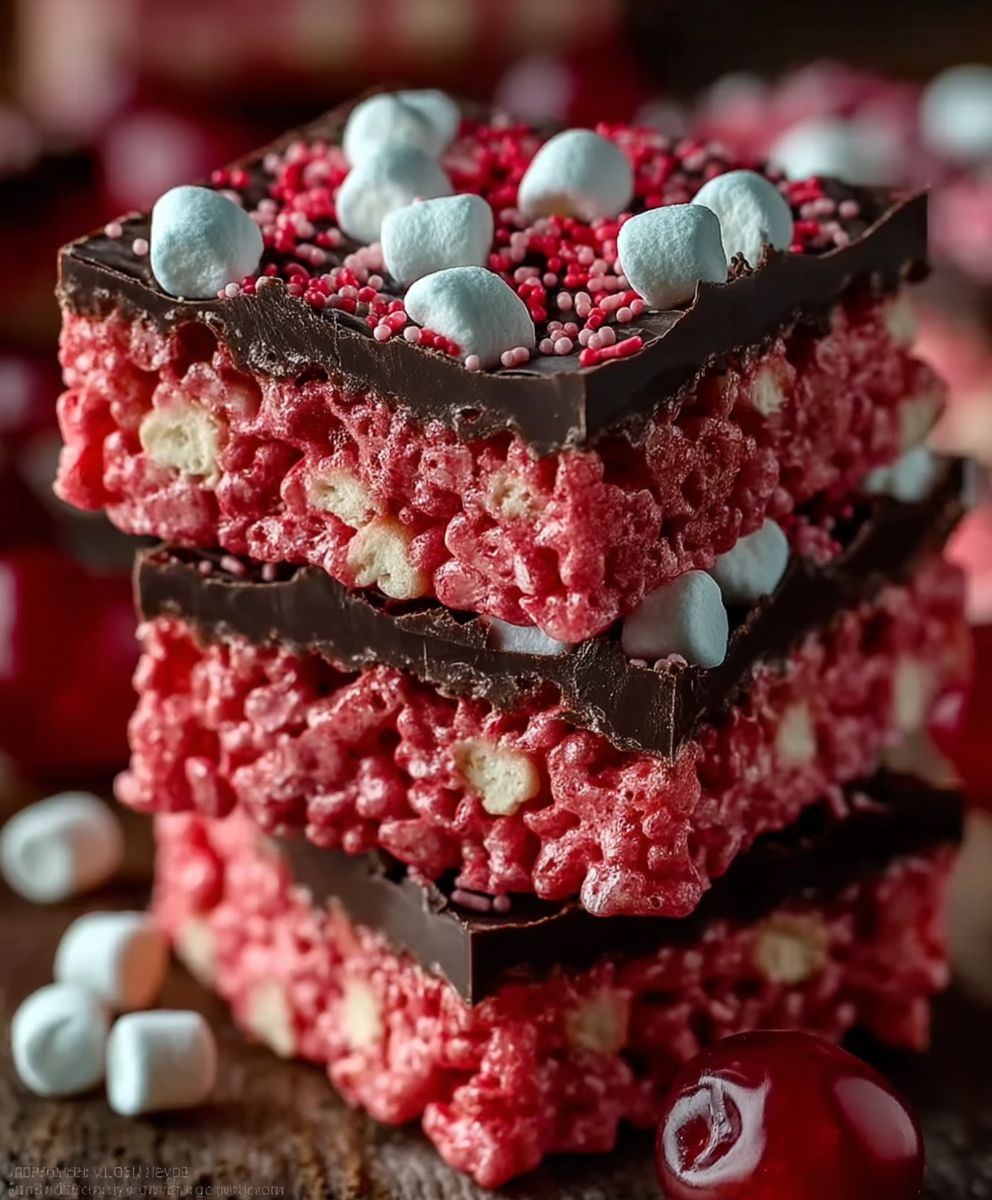
- Sprinkles: To make the treats even more festive, you can sprinkle them with sprinkles before they set. Red or pink sprinkles would be perfect for a cherry-themed treat.
- Brown Butter: For a richer, nuttier flavor, try browning the butter before adding the marshmallows. To brown the butter, melt it in a saucepan over medium heat. Continue cooking, swirling the pan occasionally, until the butter turns a golden brown color and has a nutty aroma. Be careful not to burn the butter.
- Marshmallow Variations: You can experiment with different types of marshmallows. Using flavored marshmallows, like strawberry or vanilla, can add another layer of flavor to your treats.
- Storage: Store the Rice Krispie treats in an airtight container at room temperature for up to 3 days. They are best enjoyed fresh, as they can become stale over time.
- Preventing Hard Treats: The key to soft and chewy Rice Krispie treats is to avoid overcooking the marshmallows and pressing the mixture too firmly into the pan. Overcooking the marshmallows will make them hard and brittle, while pressing the mixture too firmly will make the treats dense and tough.
- Greasing is Key: Don’t skimp on the greasing! A well-greased pan (or parchment paper lining) is essential for preventing the treats from sticking and making them easy to remove.
- Microwave Power Matters: Microwave wattages vary, so keep a close eye on the marshmallows while they’re melting. If your microwave is particularly powerful, you may need to reduce the cooking time.
Conclusion:
And there you have it! These Cherry Rice Krispie Treats are so much more than just a simple dessert; they’re a burst of nostalgic flavor with a delightful cherry twist. I truly believe this recipe is a must-try for anyone looking for a quick, easy, and utterly satisfying treat. The combination of the classic Rice Krispies crunch, the sweet and tart cherry flavor, and the gooey marshmallow binding is simply irresistible. It’s the perfect balance of textures and tastes that will have everyone reaching for seconds (and maybe even thirds!).
But what makes these treats truly special is their versatility. While they’re fantastic as is, there are so many ways you can customize them to your liking. Feeling adventurous? Try adding a drizzle of melted dark chocolate over the top for a decadent touch. The bitterness of the dark chocolate complements the sweetness of the cherry beautifully. Or, for a more festive look, sprinkle some red and green sprinkles on top before the marshmallow sets. These are especially perfect for holiday gatherings!
For a slightly different texture, you could experiment with using different types of cereal. While Rice Krispies provide that signature snap, crackle, and pop, you could try using puffed rice cereal for a slightly softer bite. You could even add a handful of chopped nuts, like almonds or pecans, for extra crunch and flavor. If you’re a fan of white chocolate, try melting some and swirling it into the marshmallow mixture before adding the cereal. The possibilities are truly endless!
Serving suggestions? These Cherry Rice Krispie Treats are perfect for just about any occasion. Pack them in lunchboxes for a sweet midday treat, bring them to potlucks and parties, or simply enjoy them as a comforting dessert after dinner. They’re also a great option for bake sales or fundraisers, as they’re always a crowd-pleaser. For an extra special touch, try cutting them into fun shapes using cookie cutters. Stars, hearts, or even simple squares – the choice is yours!
I’ve poured my heart into perfecting this recipe, and I’m confident that you’ll love it as much as I do. It’s a guaranteed hit with both kids and adults, and it’s so easy to make that even beginner bakers can whip up a batch in no time. The vibrant color and delicious flavor of these Cherry Rice Krispie Treats make them a standout dessert that’s sure to impress.
So, what are you waiting for? Gather your ingredients, preheat your oven (just kidding, no oven needed!), and get ready to create some magic in the kitchen. I’m so excited for you to try this recipe and experience the joy of these delightful treats for yourself.
And most importantly, I want to hear about your experience! Did you try any variations? Did you add any secret ingredients? What did your family and friends think? Please, please, please share your photos and stories with me in the comments below. I can’t wait to see your creations and hear all about your Cherry Rice Krispie Treat adventures! Happy baking (or should I say, happy no-baking!)! Let me know what you think!
Cherry Rice Krispie Treats: A Delicious & Easy Recipe
Classic Rice Krispie treats elevated with dried cherries and a hint of almond extract for a chewy, flavorful snack.
Ingredients
Instructions
Recipe Notes
- Fresh Cherries: You can use fresh cherries instead of dried. Pit and chop them before adding.
- Different Extracts: Substitute almond extract with vanilla or cherry extract.
- Chocolate Chips: Add milk chocolate, dark chocolate, or white chocolate chips.
- Sprinkles: Sprinkle with red or pink sprinkles before setting.
- Brown Butter: Brown the butter for a richer flavor.
- Marshmallow Variations: Use flavored marshmallows.
- Storage: Store in an airtight container at room temperature for up to 3 days.
- Preventing Hard Treats: Avoid overcooking the marshmallows and pressing the mixture too firmly.
- Greasing is Key: Grease the pan well or use parchment paper.
- Microwave Power Matters: Adjust cooking time based on your microwave’s wattage.


Leave a Comment