
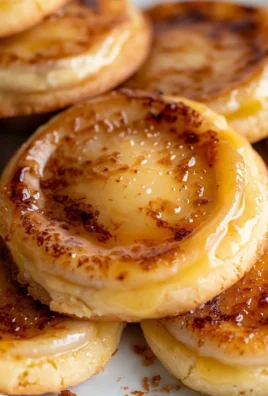
Caramel Apple Cheesecake Bars are not just a dessert; they are a symphony of autumnal flavors in every single bite, promising to be the star of your next gathering or a delightful treat for a cozy evening in. I’m absolutely thrilled to share this recipe with you, as I believe few desserts capture the essence of fall quite as perfectly as this one. Imagine the crisp, sweet-tartness of fresh apples bathed in rich, buttery caramel, all nestled atop a velvety smooth cheesecake layer and a buttery graham cracker crust. It’s a delightful journey for your taste buds that you won’t want to miss.
The individual components of this dish have long held a special place in our hearts and palates. Caramel apples evoke nostalgic memories of fall festivals and Halloween nights, a cherished tradition stretching back over a century. Cheesecake, with its ancient origins, has evolved into a global phenomenon, celebrated for its luxurious creaminess and endless versatility. When these two beloved concepts converge, as they do in these magnificent Caramel Apple Cheesecake Bars, pure culinary magic truly happens. People adore this dish not only for its incredible balance of sweet and tangy flavors and its irresistible creamy-crunchy texture, but also for its sheer convenience and shareability. It offers all the comfort of a classic apple pie and the indulgence of a cheesecake, without the fuss of slicing a traditional round cake. It’s truly a dessert that brings smiles, warmth, and a feeling of pure bliss.

Ingredients:
- For the Shortbread Crust:
- 1 ½ cups (180g) all-purpose flour, spooned and leveled
- ½ cup (100g) granulated sugar
- ¼ teaspoon salt
- 1 cup (2 sticks or 226g) unsalted butter, very cold and cut into ½-inch cubes
- For the Creamy Cheesecake Filling:
- 24 ounces (three 8-ounce blocks) full-fat cream cheese, softened to room temperature
- 1 cup (200g) granulated sugar
- 2 large eggs, room temperature
- 1 teaspoon pure vanilla extract
- ½ cup (120g) full-fat sour cream, room temperature
- 2 tablespoons all-purpose flour
- For the Spiced Apple Topping:
- 3-4 medium Granny Smith apples (about 450-550g total), peeled, cored, and sliced ¼-inch thick
- 2 tablespoons unsalted butter
- ¼ cup (50g) light brown sugar, packed
- 1 teaspoon ground cinnamon
- ¼ teaspoon ground nutmeg
- Pinch of salt
- 1 tablespoon fresh lemon juice
- For the Homemade Caramel Sauce (or 1 cup good quality store-bought caramel):
- 1 cup (200g) granulated sugar
- ¼ cup water
- ½ cup (120ml) heavy cream, warmed
- 2 tablespoons unsalted butter, cut into small pieces
- ½ teaspoon pure vanilla extract
- ¼ teaspoon flaky sea salt (optional, for garnish and flavor)
Preparing the Shortbread Crust
- Preheat your oven and prepare the pan: First things first, let’s get that oven ready. Preheat your oven to 350°F (175°C). Line a 9×13-inch baking pan with parchment paper, leaving an overhang on the longer sides. This parchment “sling” will be your best friend later when you need to lift the cooled bars out of the pan. A little spray of non-stick cooking spray beneath the parchment helps it stay put, too!
- Combine dry ingredients: In a large bowl, whisk together the 1 ½ cups of all-purpose flour, ½ cup of granulated sugar, and ¼ teaspoon of salt. Make sure everything is well combined. This ensures even distribution of flavor and helps prevent pockets of unseasoned flour.
- Incorporate the cold butter: Now for the butter! Add the very cold, cubed unsalted butter to the dry ingredients. You can do this in a couple of ways:
- Using a pastry blender: Cut the butter into the flour mixture until it resembles coarse crumbs with some pea-sized pieces remaining. This method helps maintain a flaky texture.
- Using your fingertips: Quickly rub the butter into the flour mixture until you reach the same coarse crumb consistency. Work quickly so the butter doesn’t melt from the heat of your hands.
- Using a food processor: For an even quicker method, pulse the butter and dry ingredients in a food processor until the mixture resembles coarse crumbs. Be careful not to over-process, as this can make the crust tough.
The key here is to keep the butter cold, which creates steam during baking, leading to a tender and flaky crust.
- Press into the pan and blind bake: Pour the crumbly mixture into your prepared 9×13-inch baking pan. Press the mixture evenly into the bottom of the pan to form a firm crust. You can use the bottom of a measuring cup or your clean hands to get it nice and compact. Make sure the thickness is consistent across the entire bottom.
- Partially bake the crust: Bake the crust in the preheated oven for 18-20 minutes, or until it’s lightly golden brown around the edges. This step, often called “blind baking,” is crucial. It helps to set the crust, preventing it from becoming soggy once the wet cheesecake filling is added. It also ensures a perfectly cooked crust that’s crisp, not raw-tasting, at the base of your bars. Once baked, remove the crust from the oven and let it cool slightly while you prepare the cheesecake filling. You can even leave the oven on, as we’ll be using it again shortly.
Crafting the Creamy Cheesecake Filling
- Prepare the cream cheese: In the bowl of a stand mixer fitted with the paddle attachment, or using a large bowl with an electric hand mixer, place the three 8-ounce blocks of softened full-fat cream cheese. It’s absolutely vital that your cream cheese is at room temperature. Cold cream cheese will result in a lumpy batter, no matter how long you beat it. Beat the cream cheese on medium speed for about 2-3 minutes, scraping down the sides of the bowl as needed, until it is completely smooth and creamy with no lumps. This aerates the cream cheese, making the final product wonderfully light.
- Add sugar and vanilla: Gradually add the 1 cup of granulated sugar to the cream cheese, beating on medium-low speed until just combined. Be careful not to overmix at this stage; we don’t want to incorporate too much air, which can cause cracks in the cheesecake. Once the sugar is mostly incorporated, stir in the 1 teaspoon of pure vanilla extract. Vanilla adds a beautiful depth of flavor that complements both the cream cheese and the apples.
- Incorporate the eggs: Add the large eggs, one at a time, beating on low speed until each egg is just combined before adding the next. This step requires patience! Do not overmix the eggs. Overmixing after adding the eggs introduces too much air, which expands during baking and then collapses as the cheesecake cools, leading to unsightly cracks. Beat just until the yolk disappears into the mixture.
- Finish with sour cream and flour: Finally, add the ½ cup of room temperature full-fat sour cream and the 2 tablespoons of all-purpose flour. Mix on low speed until just incorporated and the batter is smooth. The sour cream adds a delightful tang and helps create an incredibly smooth, velvety texture, while the flour acts as a stabilizer, further helping to prevent cracks. Again, scrape down the sides of the bowl to ensure everything is evenly mixed. The goal is a silky, lump-free batter.
Preparing the Spiced Apple Topping and Homemade Caramel
- Prepare the apples: Peel, core, and slice your 3-4 medium Granny Smith apples into ¼-inch thick pieces. Granny Smiths are fantastic here because their tartness provides a wonderful contrast to the sweet caramel and rich cheesecake, and they hold their shape well when cooked.
- Sauté the apples: In a large skillet or sauté pan, melt 2 tablespoons of unsalted butter over medium heat. Add the sliced apples to the pan. Cook for about 5-7 minutes, stirring occasionally, until the apples just begin to soften.
- Season the apples: Sprinkle the ¼ cup of packed light brown sugar, 1 teaspoon of ground cinnamon, ¼ teaspoon of ground nutmeg, and a pinch of salt over the apples. Continue to cook for another 3-5 minutes, stirring gently, until the apples are tender-crisp – meaning they are soft enough to bite through easily but still have a slight firmness. Finally, stir in 1 tablespoon of fresh lemon juice. The lemon juice brightens the flavor of the apples and helps prevent them from turning brown. Remove from heat and set aside.
- Make the homemade caramel sauce (if not using store-bought):
- Sugar syrup: In a heavy-bottomed saucepan (preferably light-colored so you can see the color change), combine 1 cup of granulated sugar and ¼ cup of water. Stir gently just to moisten all the sugar. Cook over medium-high heat without stirring. If sugar crystals form on the sides of the pan, brush them down with a wet pastry brush.
- Watch for color change: Continue to cook the sugar syrup. It will first boil, then turn clear, and then begin to bubble vigorously and take on a light amber color. This process requires close attention. Do not walk away! As soon as it reaches a rich, deep amber color (like an old penny), immediately remove it from the heat.
- Add cream and butter: Carefully, and in a slow, steady stream, pour the ½ cup of warmed heavy cream into the hot sugar syrup while whisking continuously. The mixture will bubble up violently and steam, so be cautious! Once the cream is incorporated, whisk in the 2 tablespoons of cold unsalted butter, piece by piece, until melted and smooth. The cold butter helps to cool the caramel down and gives it a glossy finish.
- Finish with vanilla and salt: Stir in the ½ teaspoon of pure vanilla extract and, if using, ¼ teaspoon of flaky sea salt. Let the caramel cool slightly in the saucepan before transferring about half of it to a heatproof bowl or jar for later drizzling. The remaining caramel will be gently folded into the sautéed apples.
- Important safety note: Caramel is extremely hot. Do not touch it or taste it until it has cooled considerably.
- Combine apples with caramel: Once the homemade caramel has cooled slightly (or if using store-bought), gently fold about half of the remaining caramel sauce (reserve the other half for drizzling after baking) into the sautéed apples. This coats the apples in a luscious, sweet layer that will deepen in flavor as the bars bake.
Assembling and Baking the Caramel Apple Cheesecake Bars
- Assemble the layers: Pour the creamy cheesecake filling over the partially baked shortbread crust in the pan. Gently spread the filling evenly with an offset spatula or the back of a spoon. You want a smooth, level surface for the apples.
- Arrange the apple topping: Carefully spoon the caramel-coated spiced apple mixture evenly over the cheesecake filling. You can arrange them in a neat pattern or simply scatter them; either way, they will sink slightly into the cheesecake as it bakes, creating beautiful pockets of apple goodness.
- Bake the bars: Place the baking pan into your preheated 350°F (175°C) oven. Bake for approximately 50-60 minutes. The cheesecake is done when the edges are set and lightly golden, and the center still has a slight jiggle (like firm Jell-O) when you gently shake the pan. Be careful not to overbake, as this can lead to a dry cheesecake and cracks.
- Cool gradually (critical for cheesecake): Once baked, turn off the oven, but leave the cheesecake bars inside with the oven door slightly ajar for at least 1 hour. This gradual cooling process is absolutely crucial for preventing the cheesecake from cracking. Sudden temperature changes are the enemy of a smooth cheesecake surface.
- Complete cooling and refrigerate: After the hour of gradual cooling in the oven, remove the pan and place it on a wire rack to cool completely to room temperature. This can take another 2-3 hours. Once at room temperature, cover the pan loosely with plastic wrap (or aluminum foil) and refrigerate for at least 4 hours, but ideally overnight. Chilling is non-negotiable! It allows the cheesecake to firm up, making it easier to slice and ensuring the best texture and flavor.
Finishing and Serving Your Masterpiece
- Remove from pan and slice: Once thoroughly chilled, use the parchment paper overhang to carefully lift the entire slab of caramel apple cheesecake bars out of the pan and onto a cutting board.
- Warm the reserved caramel: Gently warm the remaining reserved homemade caramel sauce (or store-bought) in the microwave for a few seconds or in a small saucepan over low heat until it’s pourable. You want it to be warm, not hot.
- Drizzle and garnish: Drizzle the warm caramel generously over the chilled cheesecake bars. For an extra touch of gourmet flair, sprinkle a pinch of flaky sea salt over the caramel drizzle. The saltiness provides a fantastic counterpoint to the sweetness. You could also sprinkle with finely chopped pecans or walnuts for added crunch.
- Cutting technique: For clean slices, use a large, sharp knife. Heat the knife under hot water, wipe it clean and dry, then make each cut. Repeat this process – heat, wipe, cut – for every slice. This will give you beautifully crisp edges. You should be able to get 12-16 bars, depending on how large you want them.
- Serve and store: Serve these delicious Caramel Apple Cheesecake Bars chilled. They are absolutely delightful on their own, or perhaps with a dollop of whipped cream or a scoop of vanilla ice cream. Store any leftover bars in an airtight container in the refrigerator for up to 4-5 days. The flavors will continue to meld and deepen over time, making them just as enjoyable (if not more so!) the next day. Enjoy every single bite of your homemade, impressive creation!

Conclusion:
Well, my wonderful friends, we’ve arrived at the grand finale of our culinary adventure, and I truly hope you’re as excited as I am about what we’ve created! If you’ve been searching for that quintessential dessert that effortlessly marries the cozy embrace of autumn with the timeless indulgence of a classic cheesecake, then look no further. These Caramel Apple Cheesecake Bars are not just a recipe; they are an experience, a symphony of flavors and textures designed to delight every single palate.
Why are these bars an absolute must-try, you ask? Let me count the ways! First, there’s that undeniably comforting, buttery shortbread crust, providing the perfect tender-crisp foundation. It’s the kind of crust that offers just the right amount of resistance before melting in your mouth. Then comes the star of the show: a lusciously creamy, subtly tangy cheesecake filling, so smooth and rich it feels like pure velvet on your tongue. But we don’t stop there; nestled within that creamy goodness are tender, spiced apple pieces, bursting with a sweet-tartness that cuts through the richness beautifully, adding a delightful chewiness and a hint of seasonal warmth. And finally, tying it all together into one glorious package is that irresistible, glistening swirl of salted caramel, offering a sticky, sweet, and perfectly balanced finish that will have you reaching for another bar before you’ve even finished the first. It’s a masterful blend of creamy, crunchy, sweet, and tart, making it far more dynamic and exciting than your average dessert. This isn’t just cheesecake; it’s a celebration of autumnal flavors transformed into an elegant, yet approachable, treat.
While these bars are absolutely divine served simply as they are, straight from the fridge and cut into generous squares, don’t be afraid to elevate your experience! For those chilly evenings or just a cozy moment, I highly recommend serving them ever-so-slightly warm. A quick zap in the microwave for 15-20 seconds can soften the caramel and make the apples even more fragrant, transforming them into an almost pie-like, comforting treat that’s simply irresistible. Imagine pairing that warmth with a generous dollop of freshly whipped cream, perhaps lightly sweetened with vanilla, or even a scoop of premium vanilla bean ice cream melting deliciously over the top. The contrast between the cool creaminess and the warm bar is truly divine! For an extra textural dimension and a touch of nutty richness, consider a sprinkle of toasted pecans or walnuts over the caramel layer just before serving. They add a fantastic crunch that complements the other soft textures beautifully. And for the ultimate caramel aficionado, a final, decadent drizzle of extra homemade or store-bought caramel sauce is never a bad idea – because can you ever really have too much caramel? These bars also make a fantastic companion to a steaming mug of hot coffee, a robust cup of black tea, or even a glass of sparkling apple cider for a festive touch during holiday gatherings. If you’re feeling a bit adventurous in the future, you could even experiment with different apple varieties next time – perhaps Granny Smith for a more pronounced tartness to balance the sweetness, or Honeycrisp for extra crispness and natural sweetness. You could also try adding a pinch of allspice or a dash of nutmeg to the apple mixture for a deeper, more complex spice profile.
Now, dear bakers, it’s your turn! I genuinely hope this recipe has inspired you to roll up your sleeves and bring these magnificent Caramel Apple Cheesecake Bars to life in your own kitchen. Trust me when I say the aroma alone as they bake will be enough to make your mouth water, and the first bite? Pure bliss. They are remarkably easy to make, requiring no special skills or fancy equipment, yet they yield such an impressive, show-stopping result, making them perfect for both seasoned bakers and enthusiastic beginners. They are guaranteed to earn you rave reviews and requests for the recipe! Once you’ve tasted the magic, I would absolutely love, love, love to hear about your experience. Did you add a special twist? What did your family and friends think? Please don’t hesitate to share your photos, your stories, and any delightful tweaks you made in the comments section or on social media. Your culinary adventures are truly what make this community so vibrant and inspiring for everyone. There’s nothing quite like the satisfaction of creating something so utterly delicious and beautiful from scratch, and these bars promise that satisfaction in spades. So go forth, bake with joy, enjoy every single crumb, and spread the sweet happiness!
Caramel Apple Cheesecake Bars
Caramel Apple Cheesecake Bars are a symphony of autumnal flavors in every single bite, promising to be the star of your next gathering or a delightful treat for a cozy evening in.
Ingredients
-
2 cups graham cracker crumbs
-
½ cup unsalted butter, melted
-
¼ cup granulated sugar
-
¼ tsp cinnamon
-
16 oz full-fat cream cheese, softened
-
½ cup granulated sugar
-
2 large eggs, room temperature
-
1 tsp pure vanilla extract
-
3 medium Granny Smith apples, peeled and diced
-
2 tbsp fresh lemon juice
-
¼ cup light brown sugar, packed
-
1 tsp ground cinnamon
-
¼ tsp ground nutmeg
-
½ cup all-purpose flour
-
1 cup prepared caramel sauce
Instructions
- Step 1
Preheat oven to 350°F (175°C). Line a 9×13-inch baking pan with parchment paper. In a bowl, mix graham cracker crumbs, ½ cup melted butter, ¼ cup granulated sugar, and ¼ tsp cinnamon. Press mixture evenly into the prepared pan. Bake for 10-12 minutes, until lightly golden. Let cool slightly. - Step 2
Beat 16 oz softened cream cheese until smooth. Gradually add ½ cup granulated sugar, then 1 tsp vanilla extract, mixing until just combined. Beat in 2 large eggs one at a time on low speed until yolk disappears. Gently mix in ½ cup all-purpose flour until the batter is smooth; avoid overmixing. - Step 3
In a separate bowl, combine 3 medium Granny Smith apples (peeled and diced) with 2 tbsp fresh lemon juice, ¼ cup light brown sugar, 1 tsp ground cinnamon, and ¼ tsp ground nutmeg. Mix well to coat the apples. - Step 4
Pour the cheesecake filling over the cooled crust, spreading evenly. Carefully spoon the apple mixture over the cheesecake filling. Bake in the preheated oven for 45-55 minutes, until edges are set and the center still has a slight jiggle. Turn off the oven, leave the door ajar, and let the bars cool in the oven for 1 hour. - Step 5
Remove from oven and cool completely to room temperature on a wire rack. Cover and refrigerate for at least 4 hours, or ideally overnight, until thoroughly chilled and firm. Lift the bars from the pan using the parchment overhang. Warm 1 cup of prepared caramel sauce until pourable and drizzle generously over the bars. Slice with a large, sharp knife heated under hot water and wiped clean between each cut. Serve chilled. Store leftovers in an airtight container in the refrigerator for up to 4-5 days.
Important Information
Nutrition Facts (Per Serving)
It is important to consider this information as approximate and not to use it as definitive health advice.
Allergy Information
Please check ingredients for potential allergens and consult a health professional if in doubt.

Leave a Comment