
Chicken Enchiladas, a truly iconic and universally adored dish, stands as a testament to the power of simple ingredients combined to create something extraordinary. I am thrilled to guide you through crafting this culinary masterpiece, a recipe that perfectly blends comforting warmth with an explosion of savory flavors. There’s an undeniable magic in the way tender, seasoned chicken nests within soft tortillas, all generously smothered in a vibrant sauce and crowned with a blanket of melted cheese. This isn’t just a meal; it’s an experience, a moment of pure culinary delight that brightens any table.
Rooted deeply in Mexican culinary traditions, the concept of wrapping ingredients in tortillas has a rich history, evolving over centuries into the beloved enchilada we cherish today. It’s a dish celebrated for its versatility and its ability to bring people together. People worldwide adore this recipe for its irresistible combination of textures—the soft tortillas, the juicy chicken, and the creamy, gooey cheese—paired with its harmonious, deeply satisfying taste. The convenience of preparing a large batch also makes these delectable Chicken Enchiladas a fantastic option for family dinners or entertaining guests. Get ready to create a dish that promises to become a firm favorite in your repertoire!
Ingredients:
- For the Chicken Filling:
- 2 lbs boneless, skinless chicken breasts or thighs
- 1 tablespoon olive oil
- 1 medium yellow onion, finely diced
- 2 cloves garlic, minced
- 1 teaspoon ground cumin
- 1 teaspoon chili powder
- 1/2 teaspoon smoked paprika
- 1/4 teaspoon cayenne pepper (optional, for extra kick)
- 1/2 cup chicken broth or water
- Salt and freshly ground black pepper to taste
- For the Homemade Enchilada Sauce:
- 6 medium Roma tomatoes, halved
- 2-3 jalapeño peppers, stems removed (remove seeds for less heat)
- 1 medium white onion, quartered
- 3 cloves garlic, peeled
- 1 tablespoon olive oil
- 1/2 teaspoon dried oregano
- 1/2 teaspoon ground cumin
- 1/4 teaspoon smoked paprika
- 1/4 teaspoon black pepper
- 1 teaspoon salt, or to taste
- 2 cups chicken broth (low sodium preferred)
- 1 tablespoon all-purpose flour (optional, for thickening)
- For Assembly:
- 12 (6-inch) corn tortillas (I prefer white corn for softness)
- 1 tablespoon vegetable oil (for softening tortillas)
- 2 cups shredded Monterey Jack cheese, Colby Jack, or a Mexican blend (about 8 oz)
- 1 cup shredded sharp cheddar cheese (about 4 oz)
- For Garnish (Optional):
- Sour cream or Mexican crema
- Fresh cilantro, chopped
- Sliced green onions
- Diced avocado
Preparing the Chicken:
-
Cook the Chicken: My favorite way to get perfectly tender, shreddable chicken is to simply boil it or use an Instant Pot.
- Boiling Method: Place your boneless, skinless chicken breasts or thighs in a large pot. Cover with water or chicken broth, ensuring the chicken is fully submerged. Add a pinch of salt and bring to a boil. Once boiling, reduce heat to a simmer, cover, and cook for 15-20 minutes, or until the internal temperature reaches 165°F (74°C) and the chicken is cooked through and easily shreddable.
- Instant Pot Method: For a quicker approach, place chicken breasts or thighs in your Instant Pot. Add 1 cup of chicken broth. Secure the lid, set the valve to sealing, and pressure cook on high for 8-10 minutes for breasts or 10-12 minutes for thighs. Allow for a natural pressure release for 5 minutes, then quick release any remaining pressure.
- Baking Method: If you prefer, you can also bake the chicken. Preheat your oven to 375°F (190°C). Season the chicken with a little salt and pepper, then bake for 20-25 minutes, or until cooked through.
Once cooked, remove the chicken from the liquid and allow it to cool slightly on a cutting board until it’s cool enough to handle.
- Shred the Chicken: Using two forks, shred the cooked chicken into bite-sized pieces. This is a satisfying part of the process! Set the shredded chicken aside in a medium bowl.
- Sauté the Aromatics and Season the Chicken: Heat 1 tablespoon of olive oil in a large skillet or Dutch oven over medium heat. Add the finely diced yellow onion and cook until softened and translucent, about 5-7 minutes. Stir in the minced garlic, ground cumin, chili powder, smoked paprika, and cayenne pepper (if using). Cook for another minute until fragrant, being careful not to burn the garlic.
- Combine and Finish the Filling: Add the shredded chicken to the skillet with the sautéed aromatics and spices. Pour in 1/2 cup of chicken broth or water. Stir everything together well, ensuring the chicken is evenly coated with the spices. Let it simmer gently for 5-7 minutes, allowing the flavors to meld and the liquid to be absorbed, keeping the chicken moist. Taste and adjust salt and pepper as needed. Remove from heat and set aside while you prepare the enchilada sauce. This seasoned chicken filling is the heart of your enchiladas, so make sure it’s flavorful!
Crafting the Homemade Enchilada Sauce:
Making your own enchilada sauce from scratch is incredibly rewarding and truly elevates the flavor of your Chicken Enchiladas. The depth you get from roasting the vegetables is incomparable!
-
Roast the Vegetables: Preheat your oven to 400°F (200°C). On a large baking sheet, arrange the halved Roma tomatoes, jalapeño peppers, quartered white onion, and peeled garlic cloves. Drizzle with 1 tablespoon of olive oil and toss gently to coat.
Roast for 20-25 minutes, or until the tomatoes are slightly collapsed and charred in spots, the jalapeños are softened, and the onion is tender and slightly caramelized. This roasting step is crucial for developing a rich, smoky depth of flavor that a canned sauce simply cannot replicate. Keep an eye on the garlic to ensure it doesn’t burn; if it’s browning too quickly, you can remove it earlier. -
Blend the Sauce: Carefully transfer all the roasted vegetables, including any pan juices, into a blender. Add 2 cups of chicken broth, dried oregano, ground cumin, smoked paprika, black pepper, and 1 teaspoon of salt. If you prefer a slightly thicker sauce, this is when you can add 1 tablespoon of all-purpose flour to the blender as well; it will help bind and thicken the sauce as it simmers.
Blend on high until the sauce is completely smooth and creamy. If it’s too thick for your liking, you can add a little more chicken broth, a tablespoon at a time, until you reach your desired consistency. - Simmer the Sauce: Pour the blended sauce into a medium saucepan or Dutch oven. Bring it to a gentle simmer over medium heat. Cook, stirring occasionally, for 10-15 minutes. This simmering time allows the flavors to truly meld and deepen, and for the sauce to thicken slightly. It’s during this phase that the magic happens, transforming a simple blend of ingredients into a complex and comforting sauce. Taste the sauce and adjust seasonings as needed – perhaps a little more salt, pepper, or a pinch of sugar to balance the acidity of the tomatoes if you find it too tart.
Assembling the Chicken Enchiladas:
Now for the fun part! Getting ready to bring all these delicious components together into one glorious dish.
- Prepare Your Workstation: Preheat your oven to 375°F (190°C). Lightly grease a 9×13-inch baking dish. Have your seasoned shredded chicken, homemade enchilada sauce, and shredded cheeses ready and within easy reach. Pour about 1/2 cup of the enchilada sauce into the bottom of your prepared baking dish, spreading it evenly. This helps prevent the enchiladas from sticking and adds extra flavor from the get-go.
-
Soften the Tortillas: Corn tortillas can be a bit stiff and prone to cracking when rolled cold. Softening them makes them pliable and prevents tearing.
- Skillet Method (My Preferred): Heat 1 tablespoon of vegetable oil in a small skillet over medium-high heat. Quickly dip each corn tortilla into the hot oil for about 15-20 seconds per side, just until it’s softened and pliable but not crispy. This also adds a touch of flavor and helps prevent sogginess. Transfer the softened tortillas to a plate lined with paper towels to drain any excess oil.
- Microwave Method: You can also wrap a stack of 5-6 tortillas in a damp paper towel and microwave for 30-45 seconds, or until warm and pliable. Repeat with the remaining tortillas. This method is quicker but doesn’t add the same flavor or protection against sogginess as the oil bath.
-
Dip and Fill: Take one softened tortilla. Dip both sides into your warm enchilada sauce. This step is essential for infusing flavor into the tortilla itself and keeping it moist during baking.
Place the sauce-coated tortilla on your clean work surface. Spoon about 1/4 cup of the seasoned chicken filling down the center of the tortilla. Sprinkle generously with a mix of your Monterey Jack and cheddar cheeses (about 1-2 tablespoons). - Roll the Enchiladas: Carefully roll the tortilla tightly, starting from one edge, until you have a neat cylinder. Place the rolled enchilada, seam-side down, into your prepared 9×13-inch baking dish.
- Repeat and Arrange: Continue this process with the remaining tortillas, chicken filling, and cheese, arranging the rolled enchiladas snugly in a single layer in the baking dish. Depending on the size of your tortillas and how tightly you roll them, you should comfortably fit 10-12 enchiladas in the dish.
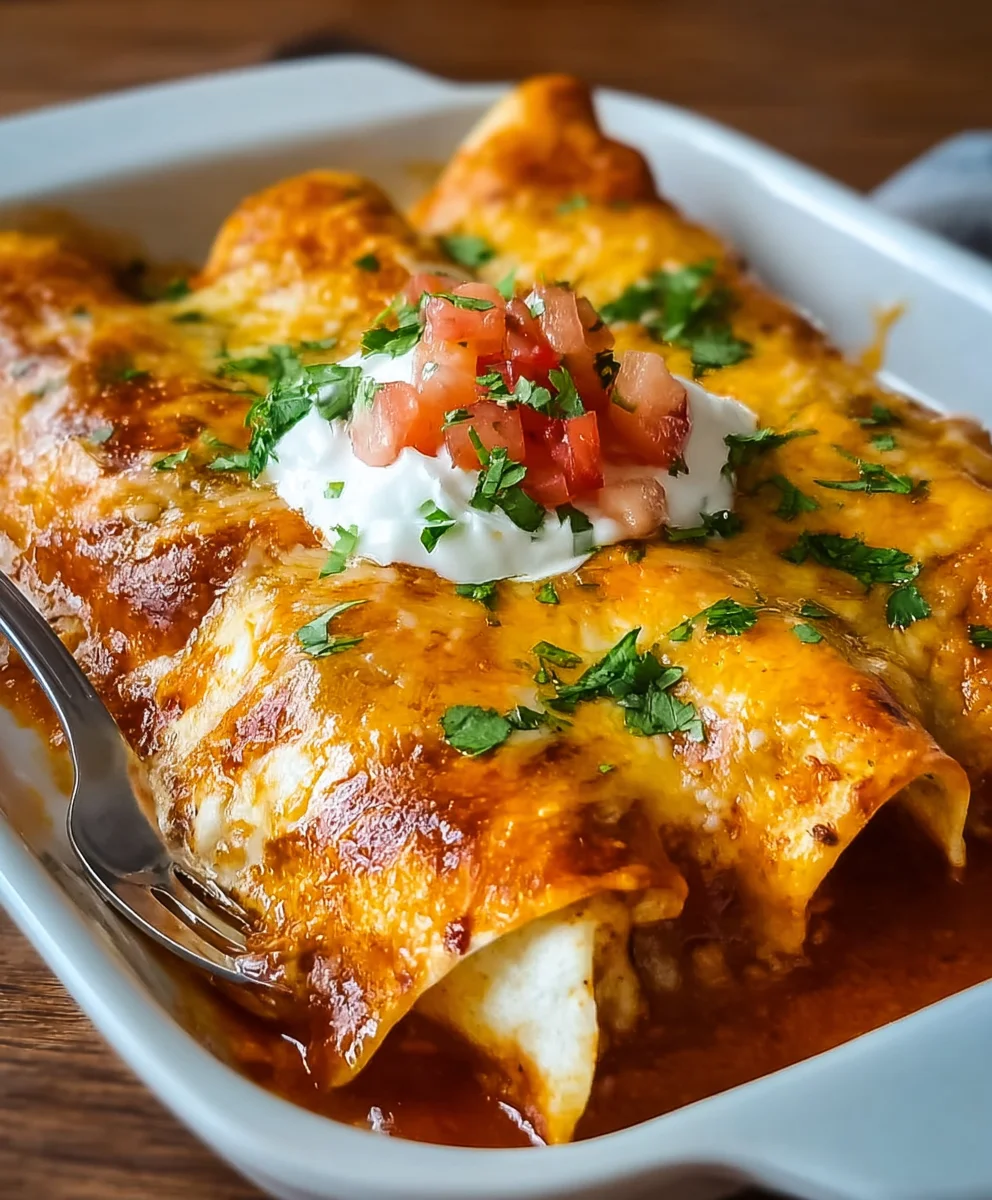
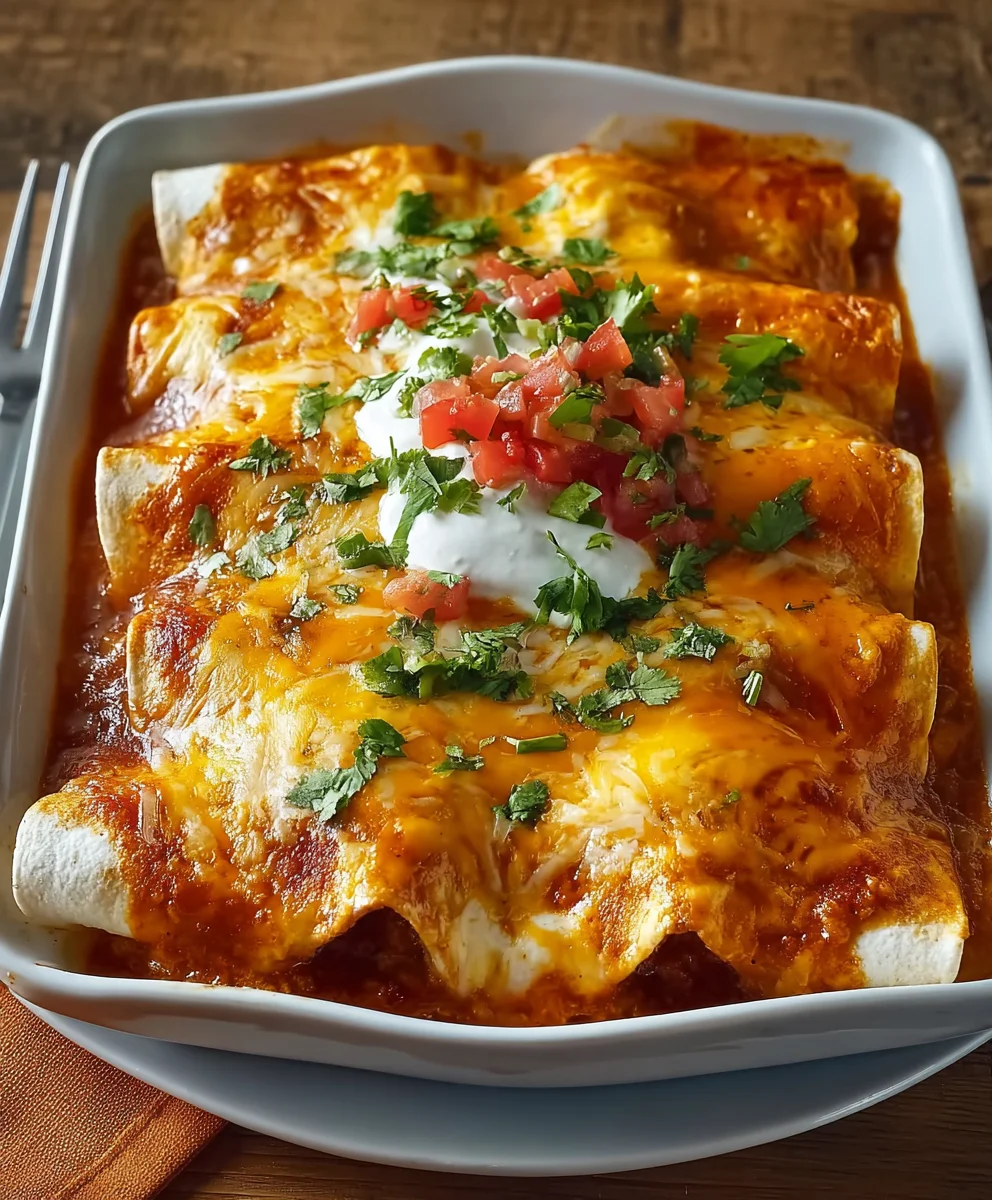
- Cover with Sauce and Cheese: Once all the enchiladas are arranged in the dish, pour the remaining homemade enchilada sauce evenly over the top, making sure every enchilada is generously coated. Finally, sprinkle the remaining shredded cheeses over the sauced enchiladas. Don’t be shy with the cheese here; a generous layer creates that irresistible golden-brown, bubbly crust!
Baking and Serving the Enchiladas:
The final stage before you can dig into your amazing homemade Chicken Enchiladas!
-
Bake to Perfection: Cover the baking dish loosely with aluminum foil. Bake in the preheated oven for 20 minutes.
After 20 minutes, remove the foil and continue baking for another 10-15 minutes, or until the cheese is melted, bubbly, and slightly golden brown around the edges, and the sauce is hot throughout. You’re looking for that glorious, bubbling, cheesy top that promises a delicious experience with every bite. -
Rest and Garnish: Once baked, remove the enchiladas from the oven. Allow them to rest for 5-10 minutes before serving. This resting period helps the enchiladas set up slightly, making them easier to serve and preventing them from falling apart.
Serve hot, garnished generously with your favorite toppings. A dollop of cool sour cream or Mexican crema, a sprinkle of fresh cilantro, some sliced green onions, or even diced avocado are all fantastic additions that add freshness and contrast to the rich flavors.
Tips for Success and Variations:
- Make Ahead: You can assemble the enchiladas completely, cover them tightly with plastic wrap and then foil, and refrigerate for up to 24 hours before baking. Add an extra 10-15 minutes to the covered baking time if baking from cold.
- Freezing: For a freezer-friendly meal, assemble the enchiladas in a foil pan (without baking). Cover tightly with foil and freeze for up to 3 months. To bake from frozen, thaw in the refrigerator overnight, then bake as directed, or bake from frozen (this will increase baking time significantly, potentially by 45-60 minutes, covered for the majority of the time).
- Spice Level: Adjust the heat of the sauce by leaving some seeds in the jalapeños for more kick, or adding a pinch of a hotter chili powder like ancho or chipotle. If you prefer a milder flavor, you can use bell peppers instead of jalapeños in the roasting step.
- Different Proteins: While these are Chicken Enchiladas, you can easily swap the protein. Ground beef, shredded pork (carnitas), or even black beans for a vegetarian option work wonderfully with this sauce. Just ensure your chosen protein is cooked and seasoned well.
- Cheese Choice: Feel free to experiment with your favorite melting cheeses! Oaxaca cheese, mild cheddar, or even a little queso fresco crumbled on top after baking can add a nice touch.
- Adding Veggies: For extra nutrition, consider adding finely diced bell peppers, corn, or black beans to your chicken filling. Sauté them with the onion and garlic for best results.
There you have it – a truly comforting and incredibly flavorful dish of homemade Chicken Enchiladas, perfect for a family dinner or a gathering with friends. The effort of making the sauce from scratch is truly worth it for the depth of flavor you achieve! Enjoy every cheesy, saucy bite!
Conclusion:
Well, friends, we’ve reached the end of our culinary journey, and I genuinely hope you’re as excited as I am about this incredible recipe. If there’s one dish that truly embodies comfort, flavor, and a touch of homemade magic, it’s these Chicken Enchiladas. What makes this particular recipe a must-try, you ask? It’s the perfect harmony of tender, seasoned chicken, enveloped in soft tortillas, generously smothered in a rich, savory sauce, and baked to bubbly, cheesy perfection. It’s not just a meal; it’s an experience. Every bite is a delightful explosion of textures and tastes, from the gooey cheese to the spiced chicken and the comforting warmth of the sauce. I’ve refined this recipe over countless iterations to ensure that it’s not only incredibly delicious but also straightforward enough for even a novice cook to master with confidence. Forget bland or dry enchiladas; my recipe guarantees a moist, flavorful, and deeply satisfying dish that will undoubtedly become a staple in your home. It’s the kind of meal that brings smiles to faces and warmth to chilly evenings, a true crowd-pleaser that satisfies even the pickiest eaters. The secret lies in the balance of spices and the quality of the ingredients, ensuring a depth of flavor that is simply unparalleled. You won’t find a more rewarding dish to prepare and share with your loved ones.
Serving Suggestions and Creative Variations to Elevate Your Meal
Now that you’re ready to dive into making these amazing enchiladas, let’s talk about how to make them even more special. While they are undeniably fantastic on their own, pairing them with the right accompaniments or experimenting with variations can transform your meal. For a classic Mexican feast, I highly recommend serving your enchiladas with a generous dollop of sour cream or Mexican crema, a sprinkle of fresh cilantro, and a side of creamy refried beans and fluffy Mexican rice. A simple avocado salad or a vibrant pico de gallo can add a wonderful fresh contrast to the richness of the enchiladas. Don’t forget a squeeze of fresh lime juice over the top – it really brightens all the flavors!
Feeling adventurous? Let’s explore some delicious variations! If you prefer a bit more heat, try adding a finely diced jalapeño or serrano pepper to your chicken filling, or even a dash of your favorite hot sauce to the enchilada sauce. For those who love a vegetarian option, you could easily swap the chicken for a medley of sautéed bell peppers, onions, zucchini, and black beans. Another fantastic idea is to experiment with different cheeses; while cheddar and Monterey Jack are traditional, a blend that includes Oaxaca cheese or Cotija can add an authentic touch. You could also try making a batch with a different protein, like shredded beef or pork carnitas, or even explore a green enchilada sauce (salsa verde) for a different flavor profile. Don’t be afraid to customize! These enchiladas are incredibly forgiving and adaptable, making them perfect for tweaking to suit your family’s preferences. Perhaps you’re a fan of corn and black bean salsa inside? Go for it! Or maybe a smoked paprika kick? The possibilities are truly endless, and that’s one of the reasons I love this recipe so much.
Your Turn to Create and Share!
Now, it’s your moment to shine in the kitchen! I wholeheartedly encourage you to give this Chicken Enchiladas recipe a try. Trust me, the aroma alone as they bake will be enough to get everyone eagerly gathered around the dinner table. There’s something uniquely satisfying about preparing a meal from scratch that brings so much joy. I pour my heart into developing these recipes, and nothing makes me happier than hearing about your experiences with them. So, once you’ve made them, I would absolutely love to hear all about it! Did you try a unique variation? What sides did you serve? Did they become an instant family favorite? Please don’t hesitate to share your culinary triumphs in the comments section below. Your feedback, tips, and photos not only inspire me but also help our growing community of home cooks. Let’s make this recipe a shared success story! Happy cooking, everyone!
Best Chicken Enchiladas Recipe – Quick & Flavorful Dinner
Chicken Enchiladas, a truly iconic and universally adored dish, stands as a testament to the power of simple ingredients combined to create something extraordinary. I am thrilled to guide you through crafting this culinary masterpiece, a recipe that perfectly blends comforting warmth with an explosion of savory flavors. There’s an undeniable magic in the way tender, seasoned chicken nests within soft tortillas, all generously smothered in a vibrant sauce and crowned with a blanket of melted cheese. This isn’t just a meal; it’s an experience, a moment of pure culinary delight that brightens any table.
Ingredients
-
2 cups Cooked, shredded chicken
-
1 can (10 oz) Red enchilada sauce
-
2 cups Shredded Monterey Jack cheese
-
8 Flour tortillas
-
1 tbsp Vegetable oil
-
1 small Onion, chopped
-
2 cloves Garlic, minced
-
1 tsp Cumin
-
1 tsp Chili powder
-
Salt and pepper, to taste
-
Chopped cilantro, for garnish
-
Sour cream, for serving
Instructions
-
Step 1
Heat 1 tbsp vegetable oil in a skillet. Sauté 1 chopped onion until soft (5-7 min). Add 2 minced garlic cloves, 1 tsp cumin, 1 tsp chili powder; cook 1 min until fragrant. Stir in 2 cups cooked, shredded chicken. Season with salt and pepper. Cook 5-7 min until flavors meld. Set aside. -
Step 2
Preheat oven to 375°F (190°C). Lightly grease a 9×13-inch baking dish. Spread about 1/2 cup of canned red enchilada sauce on the bottom. Warm 8 flour tortillas until pliable (microwave or quick pan-fry). Dip each tortilla in enchilada sauce. Fill with approx. 1/4 cup chicken mixture and 1-2 tbsp shredded Monterey Jack cheese. Roll tightly and place seam-side down in the dish. -
Step 3
Pour remaining enchilada sauce evenly over the rolled enchiladas. Top generously with the remaining shredded Monterey Jack cheese. Cover loosely with foil and bake for 20 minutes. Remove foil and bake for another 10-15 minutes, or until cheese is melted, bubbly, and slightly golden. -
Step 4
Let enchiladas rest for 5-10 minutes before serving. Garnish with chopped cilantro and serve with sour cream.
Important Information
Nutrition Facts (Per Serving)
It is important to consider this information as approximate and not to use it as definitive health advice.
Allergy Information
Please check ingredients for potential allergens and consult a health professional if in doubt.


Leave a Comment