
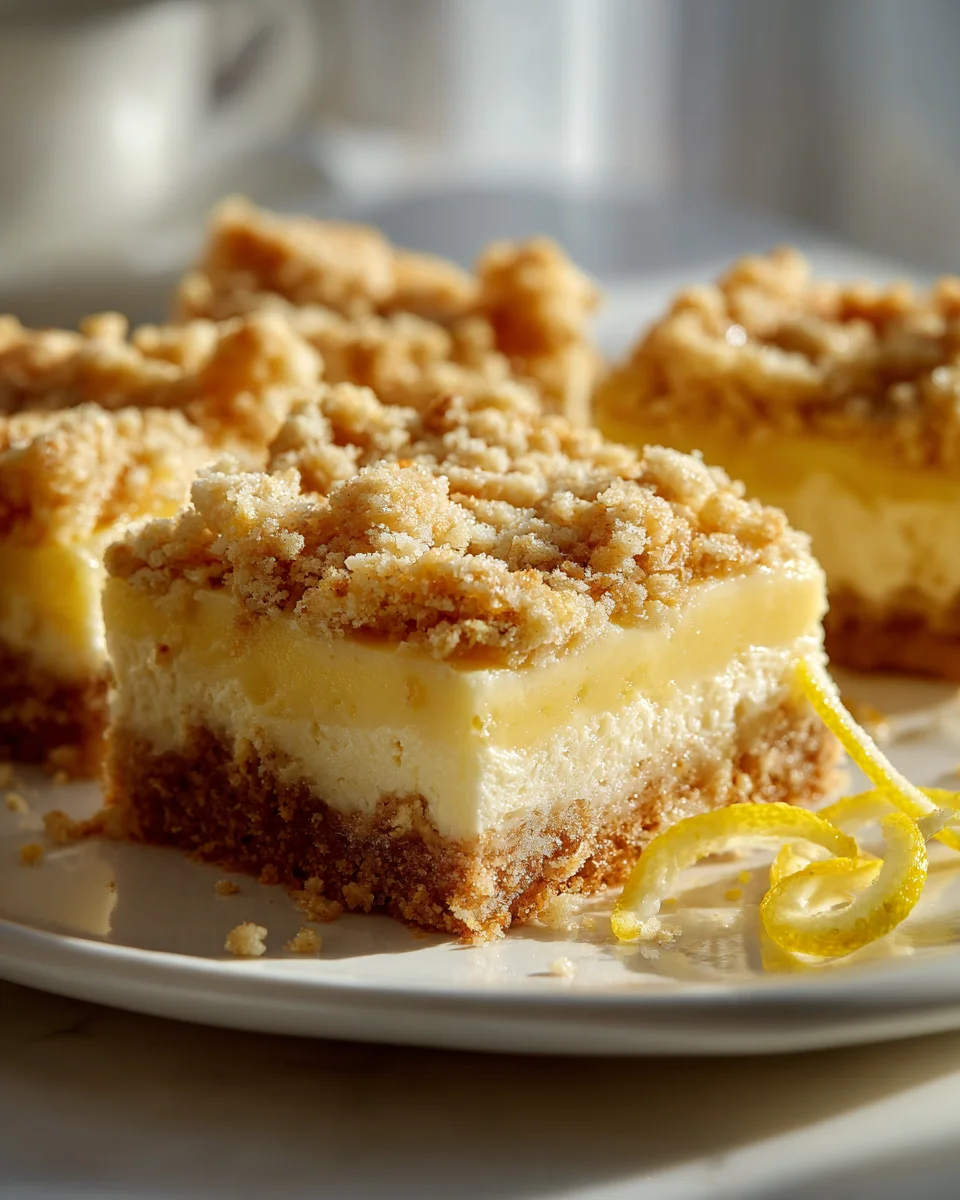
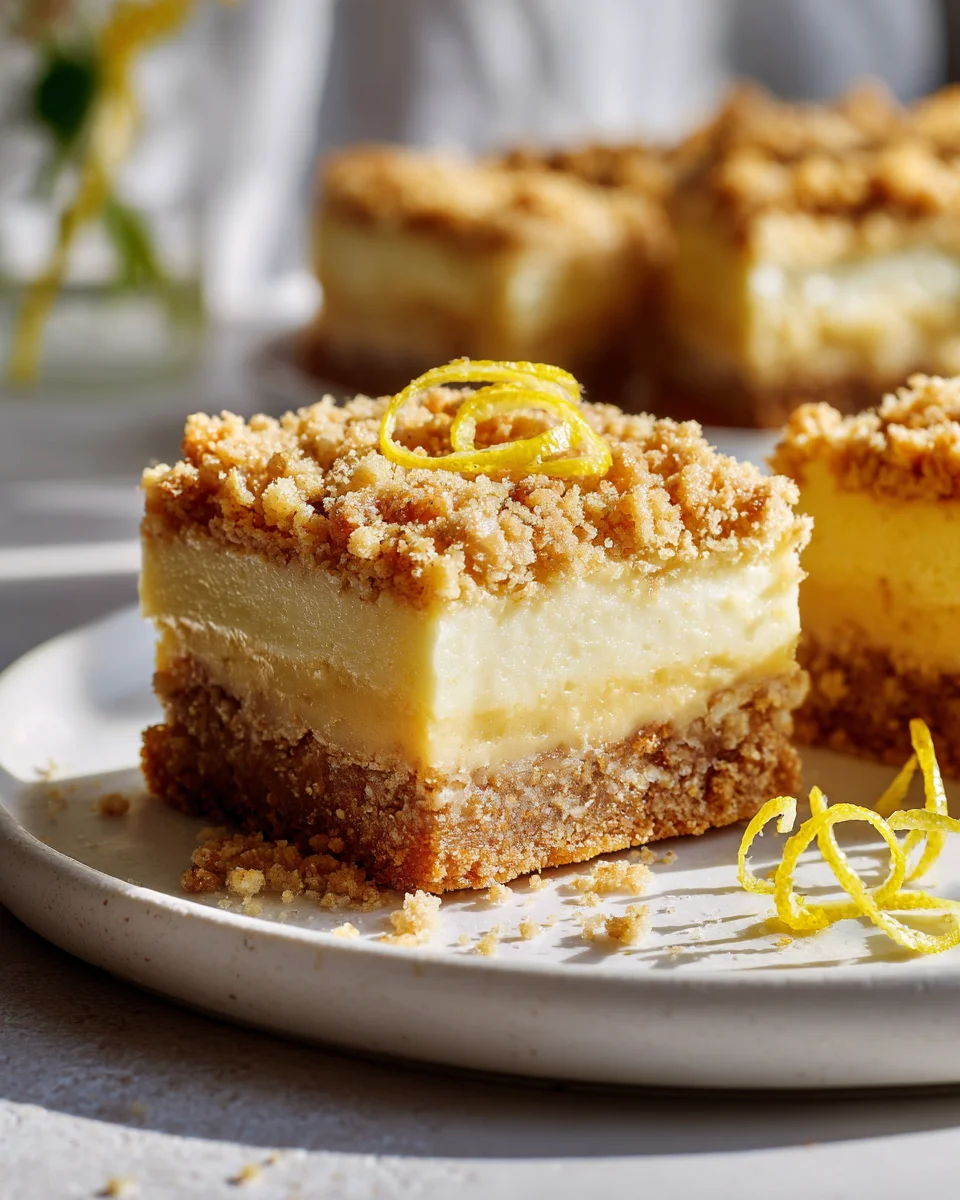
Creamy Lemon Cheesecake Crum extractb Bars
Oh, prepare yourselves for a treat that’s about to become your new favorite obsession! When I first envisioned Creamy Lemon Cheesecake Crum extractb Bars, I knew I was onto something truly special. Forget the fuss of a traditional cheesecake – these bars deliver all the luxurious, tangy-sweet indulgence you crave, but in a perfectly portioned, utterly delightful format. This isn’t just any dessert; it’s a symphony of textures and flavors that will brighten any day.
What makes these bars truly stand out? It’s the irresistible dance between the vibrant, zesty lemon and the rich, velvety cream cheese filling. We’re talking about a lemon flavor that’s bright and refreshing, perfectly balanced by that classic cheesecake creaminess. And then there’s the ‘crum extractb’ element – think of a wonderfully buttery, crisp crumb base and a generous streusel topping that adds an incredible textural contrast to the smooth filling. It’s that delightful crunch paired with the melt-in-your-mouth center that makes every single bite an experience.
You’ll absolutely love how these bars are a sophisticated twist on a classic, yet so approachable and easy to share. They’re perfect for bringing to a potluck, packing for a picnic, or simply enjoying with a cup of coffee. The beauty of these Creamy Lemon Cheesecake Crum extractb Bars lies in their effortless elegance: a golden, crumbly foundation, a luscious lemon cheesecake layer bursting with fresh flavor (perhaps even enhanced by a hint of pure lemon extract to deepen that citrus note), and another sprinkle of buttery crumbs on top. Trust me, these are more than just a dessert; they’re a little ray of sunshine in every bite, promising pure joy without any fuss.
Ingredient Notes
Making truly delicious Creamy Lemon Cheesecake Crumb Bars starts with understanding the role each ingredient plays. I’ve found that using quality ingredients makes all the difference, especially when you’re aiming for that perfect balance of tangy lemon and rich, creamy sweetness.
Creamy Lemon Cheesecake Filling Essentials
- Full-Fat Block Cream Cheese: This is non-negotiable for a cheesecake filling that sets beautifully and has that signature rich, dense texture. Please, avoid the whipped or spreadable tubs, as they contain too much water and won’t set correctly. I always make sure mine is at room temperature before mixing to prevent lumps and ensure a silky-smooth batter.
- Granulated Sugar: For sweetness, of course! It also helps with the texture, dissolving into the cream cheese mixture.
- Fresh Lemon Juice and Zest: The heart of the lemon flavor! Fresh is absolutely key here. Bottled lemon juice just doesn’t deliver the same vibrant, bright tang or aromatic quality. I love to use a microplane for the zest to get those fine, flavorful particles without the bitter white pith. Remember to zest before you juice!
- Large Eggs: Eggs act as a binder, helping the cheesecake set and providing structure. Like the cream cheese, I let them come to room temperature to ensure they incorporate smoothly without overmixing.
- Sour Cream or Heavy Cream: A touch of either of these adds an extra layer of creaminess and a subtle tang that complements the lemon beautifully. Full-fat sour cream is my go-to, but heavy cream works wonderfully too. If you prefer a lighter option, full-fat Greek yogurt can also be used, but the texture might be slightly different.
- Vanilla Extract: While lemon is the star, a good quality vanilla extract enhances all the other flavors, adding a warm, comforting note in the background.
Crumb Base and Topping Must-Haves
- Graham Crackers or Digestive Biscuits: These are my top picks for the crumb. They create a wonderfully buttery, slightly sweet base and topping that complements the cheesecake perfectly. You can also use shortbread biscuits or even vanilla wafers if you prefer. Just ensure they’re finely crushed.
- Unsalted Butter: Melted butter binds the crumbs together for a firm, delicious base and adds richness to the topping. I always use unsalted so I can control the salt level myself.
- Granulated Sugar (for crumbs): A little extra sugar in the crumb mixture ensures it’s perfectly sweetened and gets nice and golden.
- Pinch of Salt (for crumbs): Don’t skip this! A tiny bit of salt really brings out the flavor in the butter and crumbs, balancing the sweetness.
Substitutions I’ve Tried and Loved (or Learnt From!)
- Crumb Base: While graham crackers are classic, I’ve had great success with crushed digestive biscuits or even shortbread cookies for a richer, more buttery base. For a gluten-free version, simply use gluten-free graham crackers or biscuits.
- Lemon Flavor: For an even more intense lemon punch, you can add a tiny bit of lemon extract alongside the fresh juice and zest, but be sparing as it can be very strong.
- Creaminess Factor: If you don’t have sour cream, full-fat Greek yogurt is a decent substitute, providing a similar tang, though it might make the filling slightly firmer.
Step-by-Step Instructions
Crafting these Creamy Lemon Cheesecake Crumb Bars is a delightful process, and I’ll walk you through each step just as I make them in my kitchen. Precision really helps achieve that perfect balance of textures and flavors!
Step 1: Prepare Your Pan and Oven
First things first, let’s get ready! Preheat your oven to 325°F (160°C). Line a 9×13-inch baking pan with parchment paper, leaving an overhang on the sides. This “sling” will make it incredibly easy to lift the entire cheesecake out of the pan once it’s chilled, allowing for neat, clean cuts.
Step 2: Create the Crumb Base and Topping
- Crush the Crumbs: In a food processor, pulse your graham crackers (or preferred biscuits) until they form fine crumbs. Alternatively, place them in a sealed plastic bag and crush them with a rolling pin.
- Mix the Crumb Mixture: Transfer the crumbs to a medium bowl. Add the granulated sugar and a pinch of salt, then pour in the melted unsalted butter. Mix thoroughly until all the crumbs are moistened and resemble wet sand.
- Form the Base: Press about two-thirds of the crumb mixture evenly into the bottom of your prepared baking pan. Really press it down firmly to create a compact base. The remaining one-third of the crumbs will be for your topping.
- Pre-Bake the Base (Optional but Recommended): Bake the pressed crumb base for 8-10 minutes. This helps to set it, making it less likely to crumble when you cut the bars later. Remove from the oven and let it cool slightly while you prepare the filling.
Step 3: Whip Up the Creamy Lemon Cheesecake Filling
- Soften Cream Cheese: In a large mixing bowl, using an electric mixer (stand mixer or hand mixer), beat the softened full-fat block cream cheese on medium speed until it’s completely smooth and creamy, with no lumps. This is crucial for a smooth filling.
- Add Sweetness and Zest: Gradually add the granulated sugar to the cream cheese, beating until just combined and smooth. Then, beat in the fresh lemon zest until evenly distributed and fragrant.
- Incorporate Liquids: Beat in the fresh lemon juice, vanilla extract, and sour cream (or heavy cream) until the mixture is uniform and creamy. Scrape down the sides of the bowl as needed to ensure everything is well combined.
- Add Eggs Gently: Finally, add the eggs one at a time, beating on low speed only until each egg is just incorporated. The key here is to not overmix after adding the eggs, as this can incorporate too much air, which can lead to cracks in your cheesecake.
Step 4: Assemble and Bake the Bars
- Pour the Filling: Carefully pour the lemon cheesecake filling evenly over the pre-baked (or unbaked, if you skipped that step) crumb base in the pan.
- Add Crumb Topping: Evenly sprinkle the remaining one-third of the crumb mixture over the top of the cheesecake filling.
- Bake to Perfection: Place the pan in the preheated oven. Bake for 35-45 minutes, or until the edges of the cheesecake are set and slightly golden, but the center still has a slight jiggle when you gently shake the pan. This slight jiggle is normal and means it’s perfectly cooked.
- Cool Gradually: Once baked, turn off the oven, crack the door open slightly, and leave the cheesecake bars inside for about 30 minutes. This gradual cooling helps prevent cracks.
Step 5: Chill and Slice
- Cool Completely: Remove the pan from the oven and place it on a wire rack to cool completely to room temperature. This can take 1-2 hours.
- Chill Thoroughly: Once at room temperature, transfer the pan to the refrigerator and chill for at least 4 hours, or preferably overnight. Chilling is essential for the bars to firm up properly and for clean slicing.
- Slice and Serve: Once fully chilled, use the parchment paper overhangs to lift the entire cheesecake out of the pan. Place it on a cutting board. For super clean slices, I like to run a sharp knife under hot water, wipe it dry, and then slice, cleaning the knife after each cut. Cut into squares or bars of your desired size.
Tips & Suggestions
Over the years of perfecting these Creamy Lemon Cheesecake Crumb Bars, I’ve picked up a few tricks that I love to share. These little details can really elevate your baking experience and the final delicious outcome!
- Room Temperature Ingredients are Your Best Friend: I cannot stress this enough, especially for the cream cheese and eggs. If your cream cheese is cold, it won’t blend smoothly, resulting in a lumpy filling. Cold eggs don’t emulsify as well. So, plan ahead and take them out of the fridge at least an hour before you start baking.
- Don’t Overmix the Filling: This is crucial, especially after you add the eggs. Overmixing incorporates too much air into the batter. This air will expand during baking, then collapse as the cheesecake cools, which can lead to unsightly cracks on the surface. Beat just until combined for a smooth, dense texture.
- The Gentle Bake and Cool Method: Cheesecakes, even in bar form, appreciate a gentle approach to baking and cooling. The relatively low oven temperature and the slow cool-down period (leaving the oven door ajar) help to prevent rapid temperature changes that can shock the cheesecake and cause cracking. It also promotes an even set.
- Zest Before Juicing: This might seem obvious to some, but it’s an important reminder! It’s much easier to zest a whole lemon than a juiced half. Plus, all that fragrant oil is in the zest, so you want to capture it before you cut it.
- For Cleaner Cuts: A perfectly chilled cheesecake bar is easier to cut cleanly. Before slicing, I like to dip a sharp knife into hot water, wipe it clean, and then make a cut. Repeat this process for each slice. It helps to glide through the creamy filling without dragging.
- Vary Your Crumb: While graham crackers are classic, feel free to experiment! Shortbread cookies will give a richer, buttery flavor, while vanilla wafers offer a slightly softer texture. For a hint of spice, you could even add a pinch of cinnamon or nutmeg to your crumb mixture.
- Garnish for Elegance: A simple garnish can really make these bars shine. A dusting of powdered sugar, a swirl of whipped cream, a few fresh berries (raspberries or blueberries are gorgeous with lemon!), or even a thin slice of candied lemon peel can add a beautiful touch.
- Don’t Rush the Chill: I know the temptation to dig in is strong, but a minimum of 4 hours (and ideally overnight) in the refrigerator is essential. This allows the cheesecake to fully set, develop its flavors, and become firm enough for clean, perfect bars.
Storage
Once you’ve gone to the effort of making these delightful Creamy Lemon Cheesecake Crumb Bars, you’ll want to store them properly to maintain their freshness and deliciousness. Here’s how I typically handle storage:
Refrigeration
Due to their dairy content (cream cheese, eggs, sour cream), these cheesecake bars absolutely must be stored in the refrigerator. I always make sure they are completely cooled to room temperature before placing them in the fridge to prevent condensation from forming on the surface.
- Airtight Container: My preferred method is to place the cut bars in an airtight container. This protects them from absorbing any odors from other foods in your fridge and keeps them from drying out. If you stack them, I recommend placing a small piece of parchment paper between layers to prevent them from sticking together.
- Cling Film: Alternatively, you can cover the entire slab of cheesecake (if you haven’t cut it yet) or individual bars tightly with plastic cling film. Make sure it’s snug against the surface to minimize air exposure.
- Shelf Life: Stored properly in the refrigerator, these Creamy Lemon Cheesecake Crumb Bars will stay fresh and delicious for 4 to 5 days. After that, while still safe to eat, the texture and flavor might start to diminish slightly.
Freezing
Good news! These lemon cheesecake bars freeze exceptionally well, making them perfect for meal prep or having a treat on hand whenever a craving strikes. I often make a big batch and freeze some for later.
- Prepare for Freezing: Ensure the bars are completely chilled and firm from the refrigerator. I like to cut them into individual portions before freezing.
- Individual Wrapping: Wrap each individual bar tightly in a layer of plastic cling film, then follow with a layer of aluminum foil. The double layer helps prevent freezer burn.
- Airtight Container/Bag: Place the individually wrapped bars into a freezer-safe airtight container or a heavy-duty freezer bag. This adds an extra layer of protection.
- Shelf Life in Freezer: When stored correctly, these cheesecake bars can be kept in the freezer for up to 1 month without a significant loss in quality. Beyond that, they might still be safe, but the texture could start to change.
- Thawing: To enjoy a frozen bar, simply remove it from the freezer and unwrap it. Place it on a plate and let it thaw in the refrigerator for a few hours (typically 2-4 hours, depending on thickness) or at room temperature for about 30-60 minutes. I personally prefer thawing in the fridge for the best texture.
Always remember to label your containers or bags with the date of freezing so you can easily keep track of freshness!
Final Thoughts
And there you have it – your very own batch of the delightful Creamy Lemon Cheesecake Crum extractb Bars! I truly believe this recipe is a must-try for anyone who loves a dessert that perfectly balances rich creaminess with a zesty lemon kick, all encased in a wonderful, buttery crumb. It’s the kind of treat that brightens any day, makes a fantastic impression at gatherings, or simply becomes your go-to for a comforting sweet escape. The way the smooth, tangy cheesecake filling harmonizes with the sweet, crumbly layers is pure magic in every bite. Go ahead, bake a batch, and prepare to fall in love with these irresistible bars!
Easy Creamy Lemon Cheesecake Bars – Bright & Tangy Treat!

Indulge in these delightful Creamy Lemon Cheesecake Bars that combine a buttery crumb base with a rich, tangy lemon filling. Perfect for any occasion, these bars are sure to brighten your day!
- Prep Time: 30 mins
- Cook Time: 45 mins
- Total Time: 1 hour 15 minutes
- Yield: 12 servings
- Category: Dessert
- Method: Baking
- Cuisine: American
Ingredients
- Full-Fat Block Cream Cheese
- Granulated Sugar
- Fresh Lemon Juice and Zest
- Large Eggs
- Sour Cream or Heavy Cream
- Vanilla Extract
- Graham Crackers or Digestive Biscuits
- Unsalted Butter
- Granulated Sugar (for crumbs)
- Pinch of Salt (for crumbs)
Instructions
- Preheat your oven to 325°F (160°C). Line a 9×13-inch baking pan with parchment paper, leaving an overhang on the sides.
- In a food processor, pulse your graham crackers (or preferred biscuits) until they form fine crumbs.
- Transfer the crumbs to a medium bowl. Add the granulated sugar and a pinch of salt, then pour in the melted unsalted butter. Mix thoroughly until all the crumbs are moistened.
- Press about two-thirds of the crumb mixture evenly into the bottom of your prepared baking pan. Pre-bake the crumb base for 8-10 minutes, then let it cool slightly.
- In a large mixing bowl, beat the softened cream cheese on medium speed until smooth and creamy.
- Gradually add the granulated sugar to the cream cheese, beating until smooth. Then, beat in the fresh lemon zest.
- Beat in the fresh lemon juice, vanilla extract, and sour cream (or heavy cream) until uniform and creamy.
- Add the eggs one at a time, beating on low speed only until each egg is just incorporated.
- Pour the lemon cheesecake filling evenly over the pre-baked crumb base in the pan.
- Evenly sprinkle the remaining one-third of the crumb mixture over the top of the cheesecake filling.
- Bake for 35-45 minutes, or until the edges are set and slightly golden, but the center still has a slight jiggle.
- Once baked, turn off the oven, crack the door open slightly, and leave the cheesecake bars inside for about 30 minutes.
- Remove the pan from the oven and place it on a wire rack to cool completely to room temperature.
- Once at room temperature, transfer the pan to the refrigerator and chill for at least 4 hours, or preferably overnight.
- Use the parchment paper overhangs to lift the entire cheesecake out of the pan. Slice into squares or bars.
Nutrition
- Serving Size: 1 bar
- Calories: 250
- Sugar: 20 g
- Sodium: 150 mg
- Fat: 15 g
- Saturated Fat: 9 g
- Unsaturated Fat: 4 g
- Trans Fat: 0 g
- Carbohydrates: 25 g
- Fiber: 1 g
- Protein: 4 g
- Cholesterol: 80 mg
Keywords: Ensure all ingredients are at room temperature for the best results. Don't overmix the filling after adding the eggs to prevent cracks.
Leave a Comment