
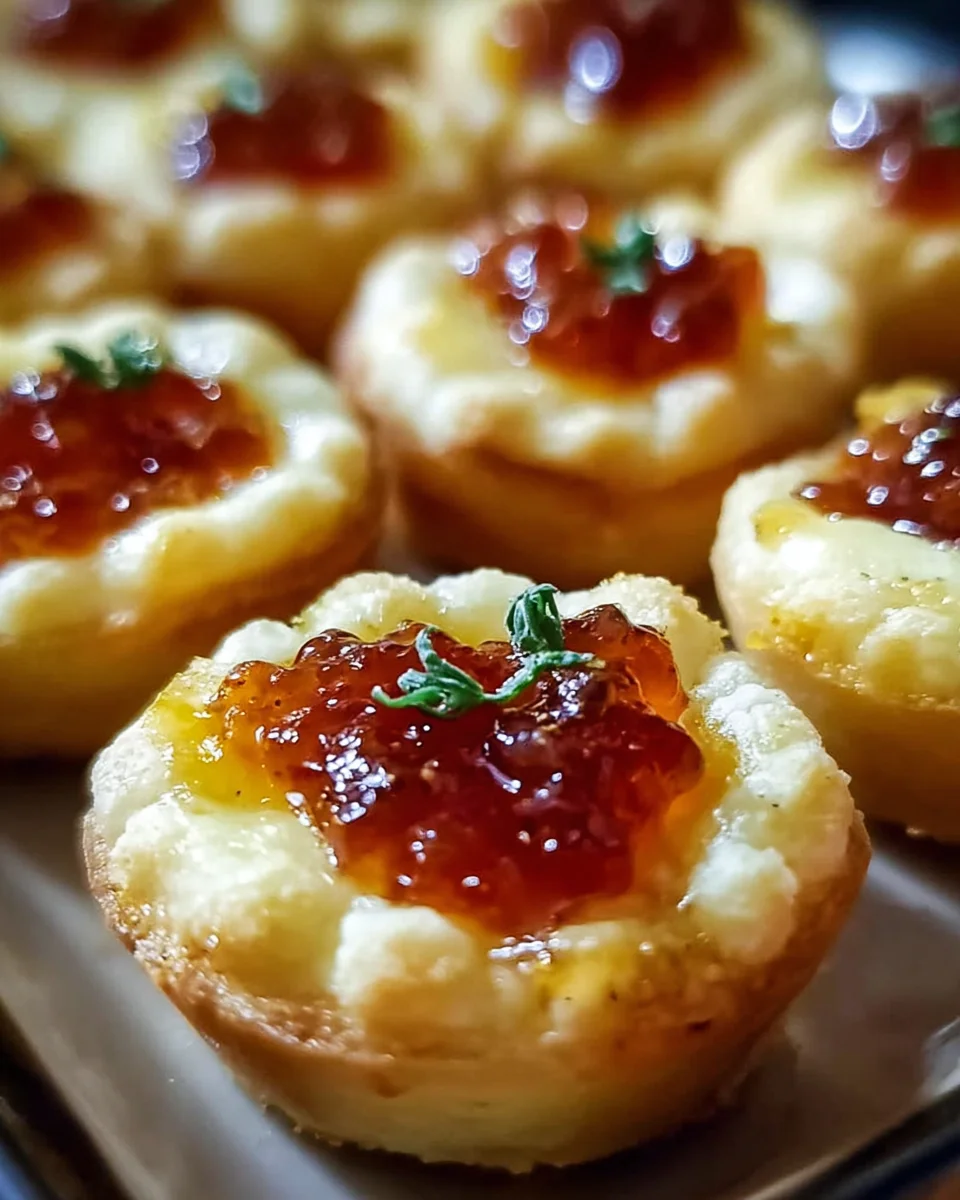
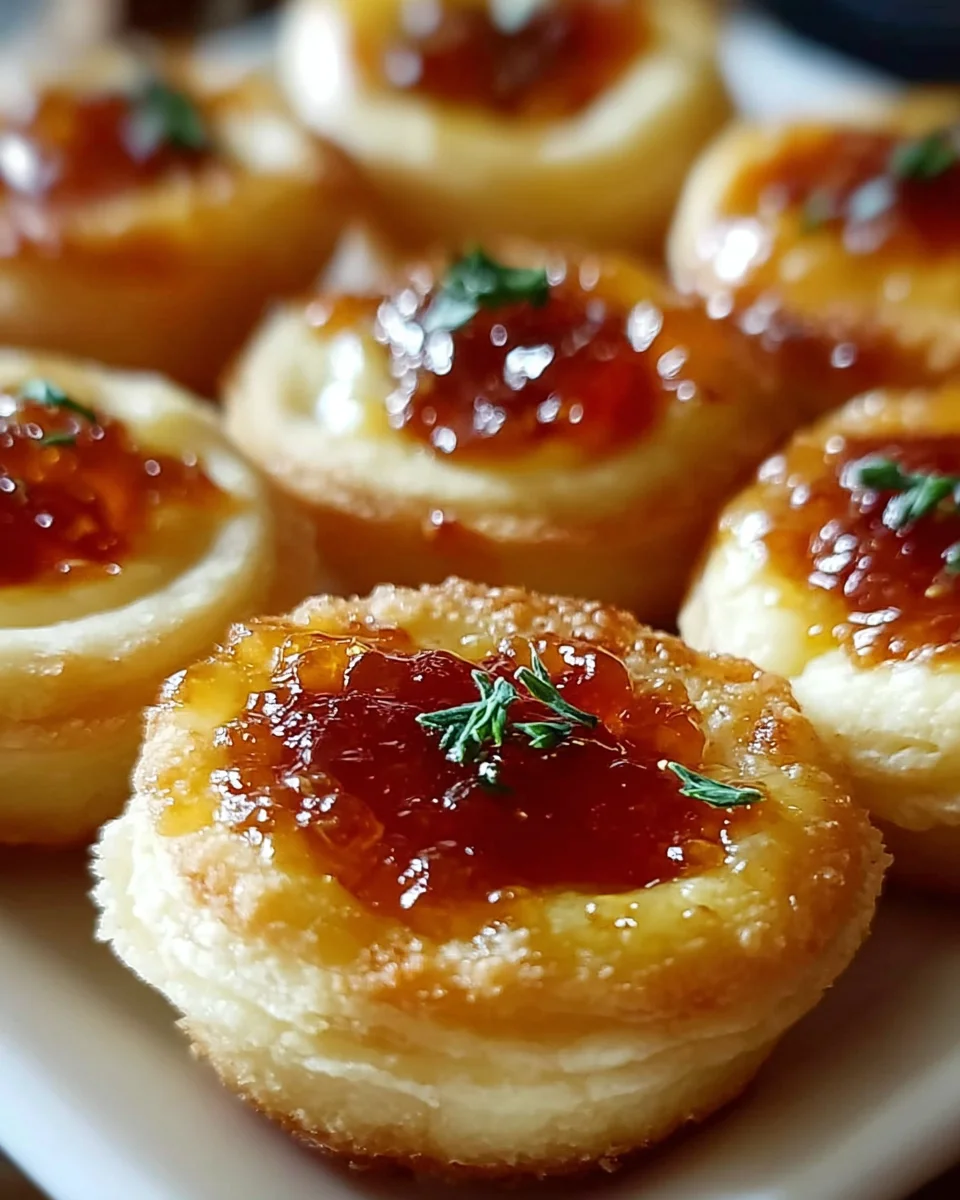
Cheesy Thumbprint Appetizers With Hot Pepper Jelly are truly a revelation, transforming the humble appetizer into a vibrant symphony of flavors that will undoubtedly steal the show at any gathering. Imagine a tender, savory shortbread-like base, rich with cheese, perfectly cradling a glistening dollop of spicy-sweet hot pepper jelly. This isn’t just another finger food; it’s an experience!
A Savory Twist on a Cherished Tradition
While the concept of thumbprint cookies dates back generations, evolving from classic Linzer tarts with their fruit jam centers, we’ve given it a delightful savory twist, making it utterly irresistible for the modern palate. People absolutely adore these delightful bites for so many compelling reasons. The initial burst of sharp, cheesy goodness from the base is beautifully contrasted by the unexpected sweet heat of the jelly, creating an addictive interplay of tastes and textures that keeps everyone coming back for more. They are incredibly convenient to prepare, often able to be made ahead, and their exquisite appearance makes them a sophisticated yet approachable addition to any party spread or holiday table. I promise you, serving these Cheesy Thumbprint Appetizers With Hot Pepper Jelly will have your guests clamoring for the recipe.
Ingredients:
- For the Cheesy Dough:
-
1 cup (2 sticks or 226g) unsalted butter, softened: Make sure your butter is truly softened, but not melted. It should be pliable enough to leave an impression when you gently press it, but still cool to the touch. This is absolutely crucial for achieving that light, crumbly texture in our cheesy dough. Using unsalted butter allows us to control the salt content precisely.
-
2 cups (240g) all-purpose flour: I always recommend sifting your flour before measuring, or at least spooning it into the measuring cup and leveling it off with a straight edge. This prevents compaction and ensures you get the right amount, which directly impacts the texture of our Cheesy Thumbprint Appetizers With Hot Pepper Jelly. If you add too much flour, the dough can become dry and crumbly in a bad way.
-
2 cups (226g) sharp cheddar cheese, finely grated: Grating your own cheese from a block is a game-changer! Pre-shredded cheeses often contain anti-caking agents that can affect how well the cheese melts and incorporates into the dough, sometimes leading to a less tender result. Sharp cheddar offers a wonderful, robust flavor that truly shines. You could also experiment with a blend of cheddar and a touch of Parmesan or Gruyere for added complexity.
-
1 teaspoon salt: This brings out all the wonderful flavors in our cheesy dough. I typically use fine sea salt, but kosher salt works beautifully too. Adjust slightly to your preference, especially if your cheese is particularly salty.
-
½ teaspoon cayenne pepper: This is my secret weapon for adding a subtle warmth and a little kick without making the appetizers overtly spicy. It complements the cheese beautifully and provides a fantastic counterpoint to the sweetness and heat of the hot pepper jelly. If you prefer more heat, you can increase this to ¾ teaspoon or even a full teaspoon. For a milder version, you can reduce it to ¼ teaspoon or omit it entirely, though I highly recommend keeping at least a pinch!
-
- For the Filling:
-
½ cup hot pepper jelly: This is the star of the show for the filling! The sweet, tangy, and subtly spicy notes of the hot pepper jelly are what make these Cheesy Thumbprint Appetizers With Hot Pepper Jelly so irresistible. You can choose your favorite brand and level of heat – from a mild red pepper jelly to something with a serious kick, like a habanero or ghost pepper jelly, depending on your preference and adventurousness! I find a medium-heat jelly works best to please a crowd.
-
- Optional Garnish:
-
Fresh chives or parsley, finely chopped: A sprinkle of fresh herbs adds a lovely pop of color and a fresh, aromatic finish to these delightful bites. It’s entirely optional, but highly recommended for presentation.
-
Equipment You’ll Need:
- Large mixing bowl(s)
- Electric mixer (stand mixer with paddle attachment or hand mixer)
- Measuring cups and spoons
- Fine-mesh sieve (for flour, optional but recommended)
- Rubber spatula
- Grater (for cheese)
- Plastic wrap
- Baking sheets
- Parchment paper or silicone baking mats
- Small spoon (for filling)
- Wire cooling rack
Preparing Your Cheesy Dough:
-
Get Your Butter Ready: Begin by ensuring your 1 cup (2 sticks) of unsalted butter is perfectly softened. As mentioned, this means it’s pliable but still cool. If it’s too cold, it won’t cream properly, leading to a dense dough. If it’s too warm or melted, your dough will be greasy and difficult to work with. If you’re short on time, you can cut the butter into smaller pieces and let it sit at room temperature, or gently microwave it for very short bursts (5-10 seconds) until just right. Place the softened butter into the bowl of your electric mixer fitted with the paddle attachment, or a large mixing bowl if you’re using a hand mixer.
-
Cream the Butter: Beat the softened butter on medium speed for about 2-3 minutes until it becomes light, fluffy, and noticeably paler in color. This process, known as creaming, incorporates air into the butter, which contributes to the tender texture of our finished Cheesy Thumbprint Appetizers With Hot Pepper Jelly. Scrape down the sides of the bowl with your rubber spatula halfway through to ensure everything is evenly mixed.
-
Add the Cheese and Spices: To the creamed butter, add your 2 cups of finely grated sharp cheddar cheese, 1 teaspoon of salt, and ½ teaspoon of cayenne pepper. Continue to beat on medium speed for another 1-2 minutes until the cheese is well incorporated and the mixture is even more cohesive. It might look a little lumpy from the cheese, but that’s perfectly normal. Make sure to scrape the bowl down again to catch any unmixed bits.
-
Introduce the Flour: Next, gradually add the 2 cups of all-purpose flour to the butter and cheese mixture. I like to add it in two batches. Begin mixing on the lowest speed possible to avoid a “flour cloud” forming in your kitchen. Mix only until the flour is just combined and no streaks of dry flour remain. This is a critical step: do not overmix! Overmixing develops the gluten in the flour too much, which can result in tough, chewy appetizers instead of the desired tender, melt-in-your-mouth texture we’re aiming for with these Cheesy Thumbprint Appetizers With Hot Pepper Jelly. The dough might appear crumbly at first, but as you continue to mix gently, it will come together into a soft, pliable dough.
-
Form and Chill the Dough: Once the dough has come together, gather it into a cohesive ball. Flatten it slightly into a disc, wrap it tightly in plastic wrap, and place it in the refrigerator for at least 1 hour. Chilling the dough is absolutely essential. It not only makes the dough much easier to handle and shape, preventing it from sticking, but also allows the flavors to meld beautifully and helps the cookies maintain their shape during baking. You can even chill the dough overnight if that fits your schedule better; just be sure to let it sit out at room temperature for about 10-15 minutes before shaping if it’s been in the fridge for an extended period, so it’s not rock hard.
Forming the Thumbprint Appetizers:
-
Preheat Your Oven: While your dough is chilling, or once it’s nearing the end of its chill time, preheat your oven to 350°F (175°C). Line two large baking sheets with parchment paper or silicone baking mats. This prevents sticking and makes cleanup a breeze, ensuring your Cheesy Thumbprint Appetizers With Hot Pepper Jelly slide right off the tray.
-
Portion the Dough: Remove the chilled dough from the refrigerator. If it’s too hard, let it sit on the counter for a few minutes to soften just enough to be workable. Using a small cookie scoop (about 1 tablespoon in size) or simply rolling with your hands, portion the dough into uniform balls. Each ball should be roughly 1 inch in diameter. Aim for consistency in size, as this ensures even baking across all your appetizers. I find that a small scoop makes this process quick and keeps my hands less messy.
-
Roll and Shape: Roll each portion of dough between your palms to form a smooth, round ball. Place the rolled balls onto your prepared baking sheets, leaving about 1 to 1.5 inches of space between them to allow for slight spreading during baking. These won’t spread dramatically, but a little room is always a good idea.
-
Create the Thumbprints: Now for the signature thumbprint! Using your thumb or the back of a small round measuring spoon (like a ½ teaspoon measure, which I find works perfectly for creating a nicely defined well), gently press an indentation into the center of each dough ball. Be careful not to press all the way through to the bottom of the cookie. You want to create a well deep enough to hold a generous amount of hot pepper jelly, but with a sturdy base. If the edges crack a little during this process, gently reshape them with your fingers. This step is crucial for holding the delicious filling of our Cheesy Thumbprint Appetizers With Hot Pepper Jelly.
Baking Your Cheesy Thumbprint Appetizers:
-
Bake Until Golden: Place the baking sheets into your preheated oven. Bake for 14-18 minutes, or until the edges of the cheesy thumbprint appetizers are lightly golden brown and the centers are set. The exact baking time can vary depending on your oven, so keep a close eye on them, especially towards the end of the baking cycle. I usually rotate my baking sheets halfway through the baking time (after about 7-9 minutes) to ensure even browning. The aroma of baking cheese will fill your kitchen – it’s absolutely wonderful!
-
Re-Press if Needed: As the appetizers bake, sometimes the centers might puff up slightly, diminishing the indentation. If this happens, immediately after removing them from the oven (while they are still hot and pliable), gently re-press the thumbprint with your thumb or the back of your small spoon to redefine the well. Be careful, as they will be hot!
-
Cooling Down: Allow the baked Cheesy Thumbprint Appetizers With Hot Pepper Jelly to cool on the baking sheets for about 5 minutes before carefully transferring them to a wire cooling rack to cool completely. It’s important for them to cool down entirely before filling, as a warm cookie can cause the jelly to melt and run, making for a messy presentation.
Filling and Finishing Your Cheesy Thumbprint Appetizers:
-
Prepare the Jelly: While your cheesy appetizers are cooling, prepare your hot pepper jelly. If your jelly is very firm, you can gently warm it in a small saucepan over low heat for a few minutes, or in a microwave-safe bowl for about 15-20 seconds, stirring until it’s slightly more liquid and easy to spoon. However, be careful not to overheat it, as it will become too thin. A slightly softened consistency is ideal for easy filling.
-
Fill the Thumbprints: Once the cheesy appetizers are completely cool, it’s time for the best part – filling them with that vibrant hot pepper jelly! Using a small spoon (a ½ teaspoon measuring spoon works wonders here), carefully spoon about ½ to 1 teaspoon of hot pepper jelly into each thumbprint. Fill them generously, but avoid overfilling to the point where the jelly spills over the edges. The bright, jewel-like color of the jelly contrasting with the golden cheese base is visually stunning and incredibly appetizing.
-
Garnish (Optional): For an extra touch of elegance and fresh flavor, sprinkle a tiny pinch of finely chopped fresh chives or parsley over the top of the jelly in each appetizer. This adds a beautiful pop of green and a fresh aromatic note that beautifully complements the cheese and the heat of the jelly. It truly elevates the presentation of these delicious Cheesy Thumbprint Appetizers With Hot Pepper Jelly.
Storage and Make-Ahead Tips for Your Cheesy Thumbprint Appetizers:
These Cheesy Thumbprint Appetizers With Hot Pepper Jelly are perfect for entertaining, and thankfully, they offer excellent make-ahead options!
-
Storing Unfilled Appetizers: The baked, unfilled cheesy cookies can be stored in an airtight container at room temperature for up to 3-4 days, or in the refrigerator for up to a week. Make sure they are completely cool before storing. This is a fantastic option if you want to get a head start on your party prep!
-
Storing Filled Appetizers: Once filled with hot pepper jelly, these appetizers are best enjoyed within 1-2 days. Store them in a single layer in an airtight container in the refrigerator. Over time, the jelly can start to soften the cheesy base, so for optimal texture, I recommend filling them closer to when you plan to serve them.
-
Freezing the Dough: You can absolutely make the cheesy dough ahead of time and freeze it! Form the dough into a disc, wrap it tightly in plastic wrap, and then wrap it again in aluminum foil or place it in a freezer-safe bag. It will keep in the freezer for up to 2-3 months. When you’re ready to bake, thaw the dough overnight in the refrigerator, then proceed with the shaping and baking instructions as usual.
-
Freezing Baked, Unfilled Appetizers: You can also freeze the baked, unfilled cheesy cookies. Once completely cooled, arrange them in a single layer on a baking sheet and freeze until solid (about 1-2 hours). Then transfer them to a freezer-safe bag or airtight container, separated by parchment paper, for up to 1 month. Thaw them at room temperature for a couple of hours or reheat gently in a 300°F (150°C) oven for about 5-7 minutes to crisp them up before filling. This is incredibly convenient for last-minute gatherings!
Pro Tips for Perfect Cheesy Thumbprint Appetizers Every Time:
-
Cheese Choice Matters: While sharp cheddar is my go-to for its robust flavor, don’t be afraid to experiment! Gruyere adds a nutty complexity, while aged Parmesan can lend a salty, umami depth. A blend of cheeses can offer a more nuanced flavor profile. Always grate your own cheese for the best texture and melt. The quality of your cheese directly impacts the deliciousness of your Cheesy Thumbprint Appetizers With Hot Pepper Jelly.
-
Don’t Overwork the Dough: I cannot stress this enough – overmixing the dough is the enemy of a tender cookie. Mix just until the flour is incorporated. A slightly crumbly dough that comes together when pressed is what you’re looking for. This ensures that light, melt-in-your-mouth texture.
-
Chilling is Non-Negotiable: Resist the urge to skip or shorten the chilling time for the dough. This step is crucial for preventing spread during baking, making the dough easier to handle, and allowing the flavors to fully develop. A well-chilled dough is the foundation of a perfectly shaped and textured cheesy appetizer.
-
Uniformity for Even Baking: When rolling your dough balls, try to make them as close to the same size as possible. This ensures that all your Cheesy Thumbprint Appetizers With Hot Pepper Jelly bake evenly and are done at the same time, preventing some from being overbaked while others are still raw.
-
Hot Pepper Jelly Varieties: The beauty of this recipe is its adaptability to your preferred spice level. If you love heat, opt for a habanero or ghost pepper jelly. For a milder crowd, a sweet red pepper jelly or even a fig jam can be a delicious alternative, though you lose the “hot pepper” aspect of the focus keyword. I find a medium-heat jelly offers a delightful balance of sweet, tangy, and spicy that truly makes these appetizers shine.
-
Serving Suggestions: These delightful bites are incredibly versatile. They make an excellent addition to any charcuterie board, a fantastic appetizer for cocktail parties, or a unique offering at holiday gatherings. They pair wonderfully with a crisp white wine like Sauvignon Blanc or a light-bodied red, or even a craft beer. Their combination of savory cheese and sweet-spicy jelly makes them highly addictive and a guaranteed crowd-pleaser!
Conclusion:
Well, my friends, we’ve reached the sweet (and spicy!) end of our culinary journey together. I genuinely hope that by now, you’re as excited as I am about these incredible appetizers. Why are they an absolute must-try for your next gathering, or even just a cozy night in? Simply put, they are a symphony of flavors and textures, perfectly balanced and utterly addictive. Imagine a rich, savory, and tender cheesy biscuit base, baked to a golden perfection. Then, picture that delightful crater cradling a generous dollop of vibrant, shimmering hot pepper jelly, which delivers that irresistible kick of heat alongside a touch of sweetness. It’s this ingenious combination – the creamy, sharp cheese mingling with the sweet and fiery jelly – that makes these little bites truly unforgettable. They look elegant, but are surprisingly simple to whip up, proving that you don’t need to spend hours in the kitchen to create something truly impressive.
The beauty of this recipe lies not just in its flavor, but also in its versatility and ease. They are the ultimate crowd-pleaser, perfect for holiday parties, game-day spreads, casual get-togethers, or even a sophisticated wine tasting. Each bite offers a delightful contrast – a slightly crispy edge giving way to a soft, cheesy interior, all brightened by that luscious, sticky jelly. Trust me, once you taste them, you’ll understand why I’m so enthusiastic. These aren’t just any appetizers; they’re conversation starters, mood lifters, and quite possibly, your new go-to snack for any occasion. They have a magical way of disappearing from the platter almost as quickly as you can set them down!
Serving Suggestions and Creative Variations:
Now that you’re armed with the knowledge of how to make these delightful morsels, let’s talk about how to serve them and how you can put your own creative spin on the recipe. For the absolute best experience, I strongly recommend serving your Cheesy Thumbprint Appetizers With Hot Pepper Jelly warm, fresh from the oven. The cheese is wonderfully gooey then, and the flavors are at their peak. A simple garnish of finely chopped fresh chives or a sprig of cilantro can add a lovely pop of color and a fresh herbaceous note that complements the richness. For a little extra flair, a tiny sprinkle of flaky sea salt over the jelly just before serving can enhance the flavors even more. Pair them with a crisp, dry white wine like Sauvignon Blanc, a light-bodied red, or even a craft beer that has a hint of citrus to cut through the richness and heat. They also make a fantastic addition to a cheese board, offering a warm, baked element among cold cheeses and charcuterie.
But don’t stop there! The base recipe is so forgiving and adaptable. Here are a few ideas to inspire your inner chef:
Cheese Play:
- Try swapping out the cheddar for other delicious cheeses. A smoked gouda would add a wonderfully smoky depth, Gruyere would offer a nutty richness, or even Monterey Jack for a milder, creamier texture.
- For a bolder flavor, a sharp white cheddar or even a touch of crumbled blue cheese could be exciting, though be mindful of its strong flavor overpowering the jelly.
Jelly Journeys:
- While hot pepper jelly is iconic here, feel free to experiment with other sweet and spicy (or just sweet!) options. Fig jam, apricot preserves, or even a homemade cranberry sauce during the holidays would be absolutely divine.
- If you want less heat, a classic red pepper jelly or even a sweet onion jam could be a fantastic alternative. For those who love heat, seek out an extra-spicy ghost pepper jelly, but proceed with caution!
Dough Enhancements:
- Stir in a pinch of smoked paprika or garlic powder to the dough for an extra layer of savory flavor.
- For an added crunch, finely chop some toasted pecans or walnuts and fold them into the dough mixture before shaping.
Presentation Twists:
- Instead of thumbprints, you could press the dough into mini muffin tins to create little cups, which you then fill with cheese and jelly before baking for a different aesthetic.
- A sprinkle of sesame seeds or poppy seeds on the dough before baking can add visual appeal and a subtle nutty crunch.
I truly hope you’ll take the plunge and give this recipe a try. There’s immense satisfaction in creating something so delicious and seeing the smiles on the faces of those you share it with. Don’t be shy! Embrace the joy of cooking and sharing good food. Once you’ve made them, please come back and tell me all about your experience. Did you stick to the original recipe, or did you put your own unique twist on it? I can’t wait to hear your stories and see your culinary creations. Happy baking, everyone!
Cheesy Thumbprint Appetizers With Hot Pepper Jelly
Cheesy Thumbprint Appetizers With Hot Pepper Jelly are a revelation, transforming the humble appetizer into a vibrant symphony of flavors. A tender, savory shortbread-like base, rich with cheese, perfectly cradles a glistening dollop of spicy-sweet hot pepper jelly, creating an addictive interplay of tastes and textures.
Ingredients
Instructions
Important Information
Nutrition Facts (Per Serving)
It is important to consider this information as approximate and not to use it as definitive health advice.
Allergy Information
Please check ingredients for potential allergens and consult a health professional if in doubt.
Leave a Comment