
Strawberry Crunch Cheesecake Tacos are not just a dessert; they are a delightful culinary experience that promises to surprise and satisfy. I remember the first time I heard about this ingenious creation, and my curiosity was instantly piqued. It’s a brilliant fusion that takes the beloved elements of classic cheesecake, the refreshing sweetness of strawberries, and that iconic, crumbly strawberry crunch topping, then nestles them into a crispy, dessert-friendly taco shell.
While this particular dessert doesn’t boast centuries of history, its popularity has exploded in recent years, becoming a true sensation on social media and at gatherings. It embodies the modern love for innovative and fun food experiences. People absolutely adore Strawberry Crunch Cheesecake Tacos because of their incredible textural contrast and harmonious flavors. Imagine biting into a crisp shell, only to be met with a velvety smooth, tangy cheesecake filling, a burst of fresh strawberries, and the delightful crunch of the strawberry crumb. It’s a symphony of sweet and tart, creamy and crunchy, making every bite an adventure. This recipe truly transforms simple ingredients into an unforgettable treat.
Ingredients:
- For the Strawberry Taco Shells:
- 1 ½ cups (180g) all-purpose flour, plus more for dusting
- ½ teaspoon baking powder
- ¼ teaspoon salt
- ½ cup (113g) unsalted butter, softened
- ¾ cup (150g) granulated sugar
- 1 large egg
- 1 teaspoon pure vanilla extract
- 1-2 drops red food coloring (gel preferred for vibrant color)
- For the No-Bake Cheesecake Filling:
- 16 ounces (2 packages) full-fat cream cheese, softened
- 1 cup (120g) powdered sugar, sifted
- 1 teaspoon pure vanilla extract
- 1 tablespoon fresh lemon juice (optional, but adds a nice tang!)
- 2 cups (480ml) cold heavy cream
- For the Fresh Strawberry Topping:
- 1 pound (about 3 cups) fresh strawberries, hulled and diced
- ¼ cup (50g) granulated sugar (adjust to your sweetness preference)
- 2 tablespoons water
- 1 teaspoon lemon juice
- ½ teaspoon cornstarch mixed with 1 tablespoon cold water (optional, for thickening)
- For the Strawberry Crunch Topping:
- 1 ½ cups Golden Oreo cookies or vanilla wafers (about 15-20 cookies), cream filling removed if using Oreos
- ½ cup freeze-dried strawberries
- ¼ cup (56g) unsalted butter, melted
Crafting Your Delightful Strawberry Taco Shells:
Okay, let’s dive into making these incredible, vibrant pink taco shells! This is where the “taco” magic truly begins for our Strawberry Crunch Cheesecake Tacos, and trust me, they’re not nearly as intimidating as they might sound. The key here is a little patience and quick hands once they come out of the oven.
- First things first, let’s get our dry ingredients ready. In a medium bowl, whisk together the 1 ½ cups of all-purpose flour, ½ teaspoon of baking powder, and ¼ teaspoon of salt. Give it a good whisk to ensure everything is evenly distributed. This prevents any pockets of leavening or salt in your cookies. Set this bowl aside for a moment.
- Now, in a larger bowl, or the bowl of your stand mixer fitted with the paddle attachment, cream together the ½ cup of softened unsalted butter and ¾ cup of granulated sugar. You want to beat this on medium speed until the mixture is light and fluffy. This process incorporates air into the butter and sugar, which contributes to a tender, delicate cookie. Scrape down the sides of the bowl often to ensure everything gets mixed in properly.
- Next, we’ll add our wet ingredients. Beat in the large egg until it’s fully incorporated, then stir in the 1 teaspoon of pure vanilla extract. Vanilla is non-negotiable for a delicious cookie, it truly enhances all the other flavors. Finally, add 1 to 2 drops of red gel food coloring. Start with one drop, mix it in, and if you want a deeper pink, add another. Gel food coloring provides a much more concentrated and vibrant color without adding excess liquid, which is perfect for baking. Mix until the color is evenly distributed throughout the butter mixture.
- With our wet ingredients looking beautiful and pink, it’s time to gradually add the dry ingredients to the wet mixture. Do this in two or three additions, mixing on low speed after each addition just until combined. Be careful not to overmix the dough once the flour is added, as overmixing can lead to tough cookies. We’re aiming for tender, melt-in-your-mouth shells!
- Once the dough comes together, gently form it into a disk, wrap it tightly in plastic wrap, and refrigerate it for at least 30 minutes. This chilling time is super important! It allows the butter to firm up, making the dough much easier to handle and preventing the cookies from spreading too much in the oven. It also gives the flavors a chance to meld together beautifully. You could even chill it for an hour or two, or even overnight if you’re planning ahead.
- While the dough chills, preheat your oven to 375°F (190°C). Prepare your baking sheets by lining them with parchment paper or silicone baking mats. If you have taco shell molds, this is the time to get them out! If not, don’t worry, you can improvise by draping the warm cookies over a wooden spoon handle or a clean, oven-safe rack placed between two heavy objects to create the taco shape.
- Once your dough is nicely chilled, remove it from the fridge. Lightly flour a clean work surface and your rolling pin. Roll out the dough to about 1/8-inch thick. You want it relatively thin so it bakes up crisp, but not so thin that it’s impossible to handle.
- Using a 3-inch or 3.5-inch round cookie cutter (or even the rim of a glass if you don’t have a cutter), cut out as many circles as you can. Carefully transfer these circles to your prepared baking sheets, leaving a little space between each one.
- Bake the cookie circles for 6-8 minutes, or until the edges are just barely golden and the cookies are set. They will still be soft when they come out of the oven, and that’s exactly what we want!
- Now, here’s the crucial part for shaping: working quickly, as soon as the cookies come out of the oven, gently lift each warm cookie and drape it over your taco shell mold or your improvised shaping tool (like a wooden spoon handle). Gently press them to create that distinctive taco shape. They will firm up as they cool, holding their shape perfectly. If a cookie cools too much before you get to it and becomes brittle, you can pop it back in the oven for about 30 seconds to soften it again. Allow the shaped shells to cool completely on the molds before carefully removing them. Repeat the process with any remaining dough, re-rolling scraps as needed. You should get about 18-24 shells, depending on the size of your cutter.
- Once all your shells are shaped and completely cooled, they’re ready for filling! Store them in an airtight container at room temperature until you’re ready to assemble your tacos.
Whipping Up the Dreamy No-Bake Cheesecake Filling:
This is arguably the heart of our Strawberry Crunch Cheesecake Tacos – a rich, creamy, and utterly delightful no-bake cheesecake filling. The beauty of a no-bake filling is its simplicity and velvety texture, making it quick to prepare and incredibly satisfying.
- Let’s start by getting our cream cheese ready. In a large mixing bowl, or the bowl of your stand mixer fitted with the paddle attachment, beat the 16 ounces of softened full-fat cream cheese on medium speed until it’s super smooth and creamy. It’s really important that your cream cheese is at room temperature to prevent any lumps, so take it out of the fridge at least an hour before you plan to start. Beat it for a good 2-3 minutes, scraping down the sides of the bowl frequently, until it’s light and airy.
- Next, gradually add the 1 cup of sifted powdered sugar to the cream cheese, mixing on low speed until fully incorporated. Sifting the powdered sugar beforehand is a small but mighty step that helps ensure your filling is wonderfully smooth and lump-free. Once the sugar is mixed in, increase the speed to medium and beat for another minute or two until the mixture is fluffy.
- Now, stir in the 1 teaspoon of pure vanilla extract. This classic flavor pairs perfectly with strawberry and cheesecake. If you’re using it, add the 1 tablespoon of fresh lemon juice now too. The lemon juice is optional, but I highly recommend it! It adds a touch of brightness and cuts through the richness of the cream cheese, elevating the overall flavor profile without making it taste distinctly lemony.
- In a separate, very cold bowl (preferably a metal bowl chilled in the freezer for 10-15 minutes), whip the 2 cups of cold heavy cream. Use a whisk attachment if you have a stand mixer, or an electric hand mixer. Whip on high speed until stiff peaks form. Stiff peaks mean that when you lift the whisk, the cream holds its shape firmly. Be careful not to over-whip, or you’ll end up with butter!
- Finally, it’s time to gently combine the two mixtures. Take about a third of your whipped cream and fold it into the cream cheese mixture using a spatula. This first addition lightens the cream cheese mixture, making it easier to incorporate the rest of the whipped cream without deflating it. Then, add the remaining whipped cream and gently fold it in until no streaks of cream cheese or whipped cream remain. The key here is to be gentle, preserving all that lovely air you just whipped into the cream, which gives the filling its light and airy texture.
- Cover the bowl with plastic wrap and refrigerate the cheesecake filling for at least 30 minutes to an hour. This chilling time allows the filling to firm up slightly, making it much easier to pipe or spoon into your taco shells, and ensures it’s nice and cold for serving.
Creating the Luscious Fresh Strawberry Topping:
Every “Strawberry Crunch Cheesecake Taco” needs a burst of fresh strawberry flavor, and this simple topping delivers just that. It’s a wonderful contrast to the creamy filling and crunchy shell, providing a juicy, slightly tart element that truly makes the dish sing.
- Begin by preparing your fresh strawberries. Hull and dice 1 pound of strawberries into small, manageable pieces. You want them small enough to fit nicely into your tacos and to be easily spooned.
- In a small saucepan, combine the diced strawberries, ¼ cup of granulated sugar, and 2 tablespoons of water. The amount of sugar can be adjusted based on the sweetness of your strawberries and your personal preference. If your strawberries are super sweet, you might need less; if they’re a bit tart, you might want to add a touch more.
- Bring the mixture to a gentle simmer over medium heat, stirring occasionally. As it heats up, the strawberries will start to release their juices, creating a beautiful syrup. Continue to simmer for about 5-7 minutes, or until the strawberries have softened slightly and the sauce has thickened a bit. You can use the back of a spoon or a potato masher to gently mash some of the strawberries if you prefer a chunkier, more saucy consistency. If you like a few whole pieces, leave them as is!
- If you want a slightly thicker topping (which I often do for ease of handling in tacos), now is the time to add your cornstarch slurry. Whisk together ½ teaspoon of cornstarch with 1 tablespoon of cold water in a small bowl until smooth. Pour this mixture into the simmering strawberries, stirring constantly, and cook for another minute or two until the sauce visibly thickens. This step is optional, but it helps prevent the topping from running out of your tacos.
- Remove the saucepan from the heat and stir in 1 teaspoon of fresh lemon juice. Just like with the cheesecake filling, the lemon juice brightens the flavor of the strawberries and keeps them from tasting too one-note sweet.
- Transfer the strawberry topping to a bowl and let it cool completely to room temperature before refrigerating. Chilling the topping makes it even more delicious and ensures it won’t warm up your cheesecake filling when you assemble the tacos. You can make this topping a day or two in advance and store it in an airtight container in the fridge.
Preparing the Irresistible Strawberry Crunch Topping:
The “crunch” in “Strawberry Crunch Cheesecake Tacos” is absolutely essential, and this topping is where all that glorious texture and extra strawberry flavor comes from. It’s incredibly easy to make, but it adds a layer of deliciousness that truly sets these tacos apart.
- Let’s get crunchy! First, we need to prepare our cookie crumbs. If you’re using Golden Oreos, twist them open and scrape out the cream filling – we only want the cookie part for this crunch. If you’re using vanilla wafers, you can use them whole. Place the cookies into a food processor and pulse until you have fine crumbs. You can also place them in a zip-top bag and crush them with a rolling pin for a slightly coarser texture, which I sometimes prefer for extra crunch. Aim for about 1 ½ cups of crumbs.
- Next, let’s incorporate those wonderful freeze-dried strawberries. Place ½ cup of freeze-dried strawberries into your food processor with the cookie crumbs, or if you’re crushing by hand, add them to the bag and crush them along with the cookies. Pulse or crush until they’re broken down into small pieces that mix well with the cookie crumbs. Freeze-dried strawberries pack a huge punch of natural strawberry flavor and a lovely bright color without adding any moisture, which is perfect for a crunchy topping.
- In a medium bowl, combine the cookie and freeze-dried strawberry crumbs. Pour ¼ cup of melted unsalted butter over the crumb mixture. Stir everything together thoroughly with a fork until all the crumbs are evenly moistened by the butter. The butter helps bind the crumbs together slightly and adds to that irresistible crunchy texture.
- At this point, you can spread the mixture onto a small baking sheet and bake it at 300°F (150°C) for about 5-7 minutes, stirring once, for an even deeper toastier flavor and extra crispness. However, this step is completely optional. The topping is fantastic even without baking it further. If you choose to toast it, make sure to let it cool completely before using.
- Set your strawberry crunch topping aside. It’s now ready to be generously sprinkled over your magnificent Strawberry Crunch Cheesecake Tacos!
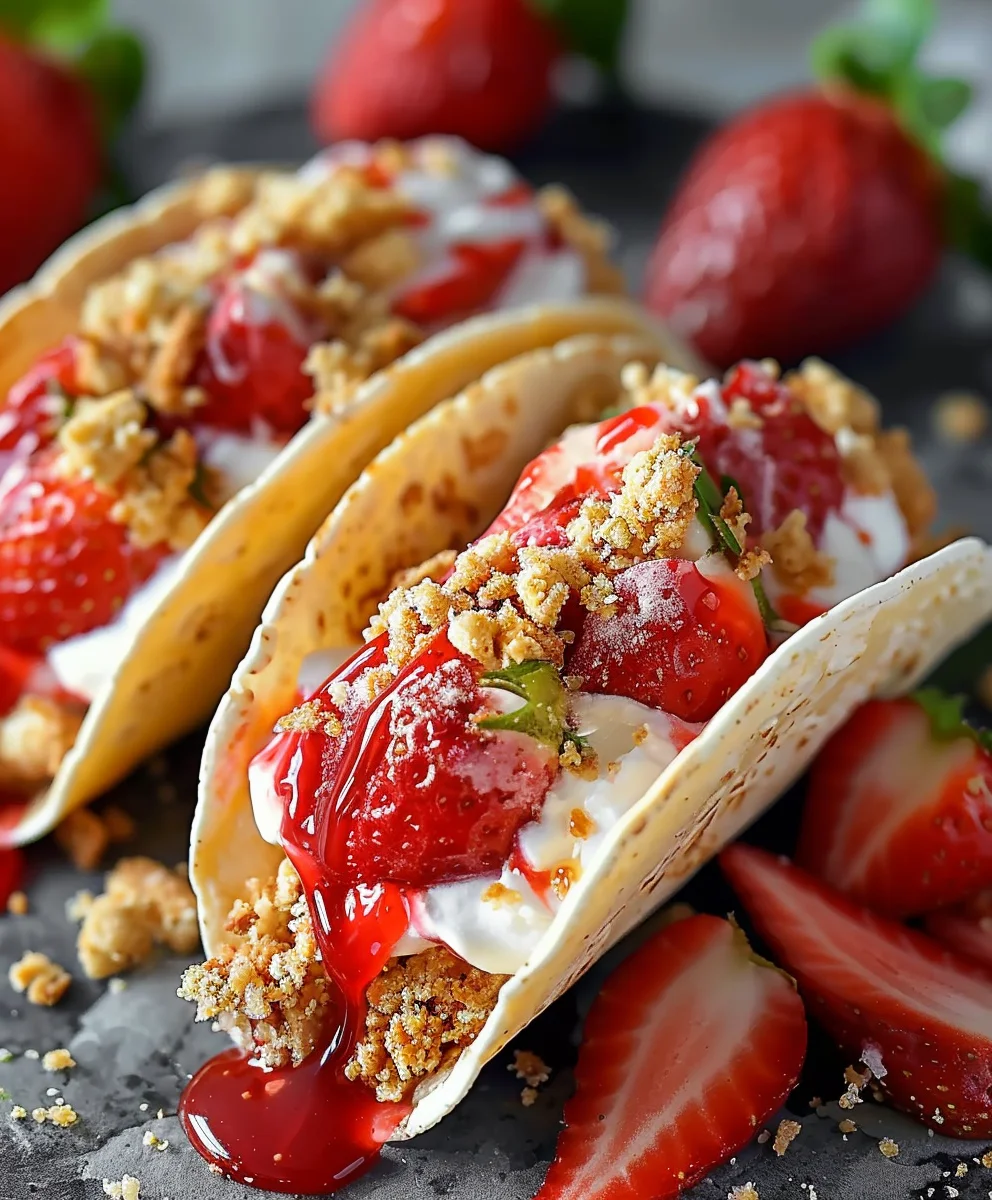
Assembling Your Strawberry Crunch Cheesecake Tacos:
This is the moment we’ve been building up to! All your delicious components are ready, chilled, and waiting to be brought together into these show-stopping Strawberry Crunch Cheesecake Tacos. Get ready for a symphony of flavors and textures in every bite.
- First, retrieve your beautifully shaped strawberry taco shells from their airtight container. Lay them out on a serving platter or individual plates.
- Next, grab your chilled no-bake cheesecake filling. For the neatest presentation, I highly recommend transferring the filling to a piping bag fitted with a large star tip (or any tip you prefer, or even just a snip off the corner of a sturdy zip-top bag). If you don’t have a piping bag, a spoon works perfectly fine too!
- Carefully pipe or spoon a generous amount of the creamy cheesecake filling into each strawberry taco shell. Fill them up nicely, but leave a little room for the toppings. The smooth, cool filling will contrast wonderfully with the crisp shell.
- Now it’s time for that luscious fresh strawberry topping. Spoon a dollop of the cooled strawberry topping over the cheesecake filling in each taco. Don’t be shy; let some of those vibrant red berries peek out! The natural sweetness and slight tartness of the fresh strawberries really brighten the whole experience.
- Finally, for the pièce de résistance – the strawberry crunch! Generously sprinkle the prepared strawberry crunch topping over the strawberry sauce and cheesecake filling in each taco. Make sure you get a good amount on there, as this is where a significant part of the “crunch” and an extra layer of strawberry flavor comes from. You want to see those golden crumbs and bits of freeze-dried strawberry shining.
- Your Strawberry Crunch Cheesecake Tacos are now ready to be devoured! You can serve them immediately for the freshest, crispiest shell experience. If you need to prepare them slightly in advance, they can be refrigerated for up to an hour before serving without the shells getting too soft. For longer storage, it’s best to store the components separately and assemble just before serving to maintain the integrity of the shell.
- To enjoy, simply pick one up and take a big bite! The delightful snap of the cookie shell, the silky smooth cheesecake, the juicy burst of strawberries, and that incredible crunch will create an unforgettable dessert experience. These are perfect for parties, gatherings, or simply as a special treat for yourself. Enjoy every single amazing bite of your homemade Strawberry Crunch Cheesecake Tacos!
Conclusion:
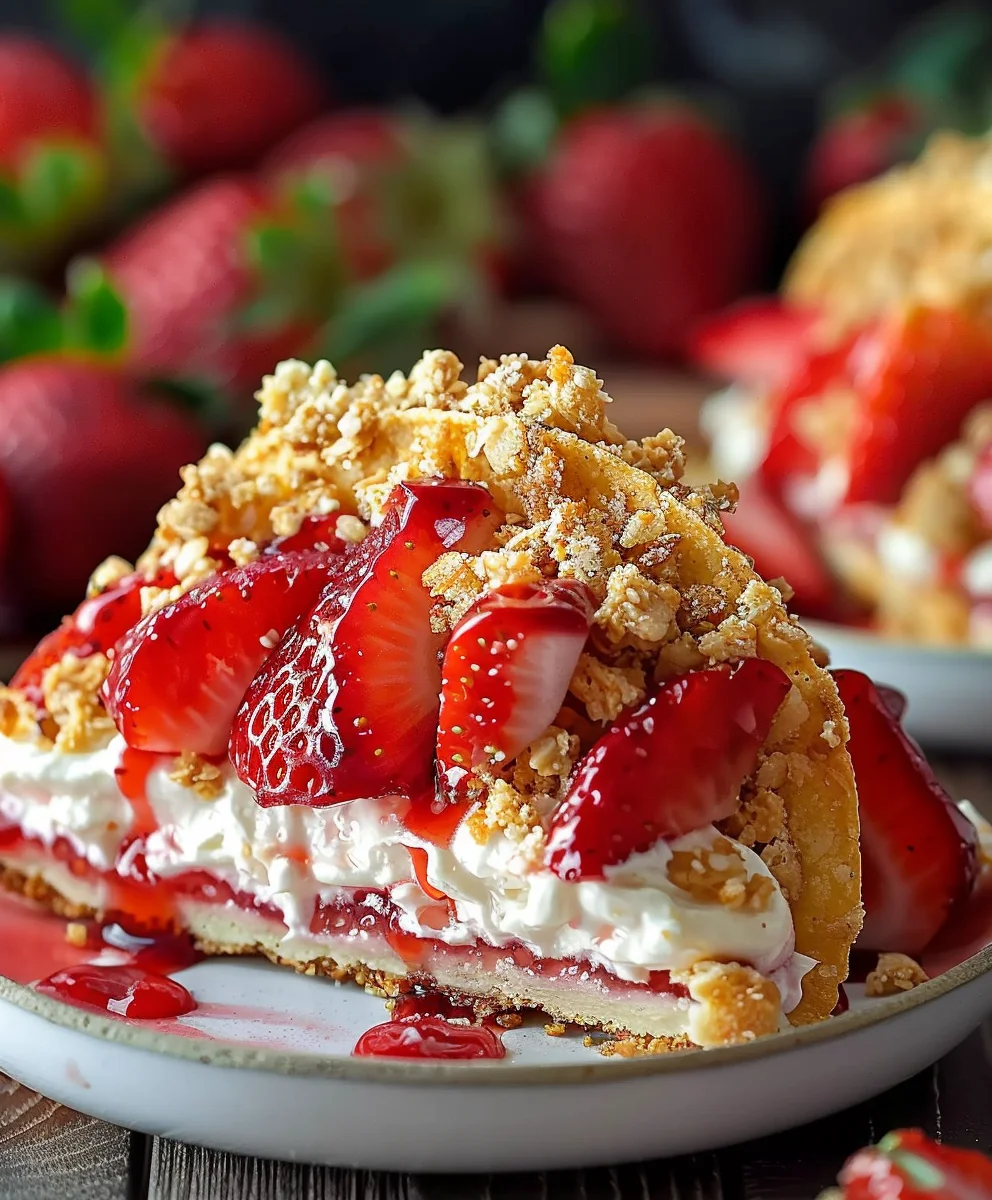
Oh, my goodness, if you’ve made it this far, then you know exactly what I’m talking about when I say this recipe isn’t just a dessert; it’s a celebration! We’ve journeyed through the creation of something truly extraordinary, a treat that combines the best of all worlds: the creamy, tangy lusciousness of cheesecake, the sweet burst of fresh strawberries, and an irresistible, addictive crunch that keeps you coming back for more. This isn’t your average dessert; it’s a showstopper, a conversation starter, and quite frankly, a pure moment of joy in every single bite. I truly believe that once you taste the delightful harmony of textures and flavors, you’ll understand why this recipe has quickly become one of my absolute favorites, and why it deserves a permanent spot in your dessert repertoire.
What makes these particular treats an absolute must-try, you ask? Well, it’s the ingenious combination, isn’t it? The way the crispy, cinnamon-kissed ‘taco’ shell cradles a velvety smooth cream cheese filling, which then gets crowned with bright, juicy strawberries and that glorious, golden crunch topping. It’s a symphony for your taste buds, a perfect balance of sweet and slightly tart, soft and incredibly crisp. Seriously, these Strawberry Crunch Cheesecake Tacos are more than just a dessert; they’re an experience, a delightful surprise that delights both the eyes and the palate. They look incredibly impressive, yet the process is surprisingly straightforward, making them perfect for both seasoned bakers and adventurous beginners looking to impress. They bring a level of whimsy and gourmet flair that elevates any occasion, whether it’s a casual weeknight treat or a grand party centerpiece.
Now, let’s talk about making these beauties your own! While absolutely perfect as is, there are so many delightful ways to serve and vary these amazing treats. For serving, I love arranging them artfully on a large platter, perhaps with a dusting of powdered sugar and a few extra fresh mint leaves for a pop of color. They pair wonderfully with a robust cup of coffee, a light sparkling wine, or even a glass of cold milk for a comforting classic combination. Don’t be shy about experimenting with the fruit; while strawberries are quintessential for the “crunch” aspect, imagine swapping them out for plump blueberries, juicy raspberries, or even a medley of mixed berries for a seasonal twist. A drizzle of dark chocolate sauce or a swirl of salted caramel on top of the cheesecake filling before adding the crunch would also be absolutely divine, adding another layer of indulgence.
Feeling even more adventurous with variations? You could try different “crunch” components! Instead of the strawberry cookie crumble, consider a crushed graham cracker crust mixed with butter, or even a spiced shortbread cookie crumble for a richer flavor profile. For those who love a salty-sweet combination, a pretzel crunch would be unexpectedly delicious! And if you’re not entirely set on the taco shape, the filling and crunch topping are incredibly versatile. You could layer them into small dessert glasses for individual parfaits, or even press the crunch into the bottom of a springform pan for a full-sized cheesecake, topping it with the creamy filling and fresh strawberries. For dietary considerations, gluten-free cookie crumbles and taco shells are readily available, and there are fantastic dairy-free cream cheese alternatives on the market that would work beautifully to create a vegan version. The possibilities truly are endless, and that’s part of the fun!
So, what are you waiting for? This recipe is more than just instructions; it’s an invitation to create something truly special and delicious in your own kitchen. I truly hope you’ll take the leap and give these incredible cheesecake tacos a try. You’ll be amazed at how easily you can whip up such a stunning and delectable dessert. There’s an unparalleled joy in creating something with your own hands that brings smiles to faces, and I promise you, these delightful treats will do just that. They’re a guaranteed crowd-pleaser and a fantastic way to brighten anyone’s day.
Once you’ve embarked on your own Strawberry Crunch Cheesecake Taco adventure, please, please, please come back and share your experience with me and the rest of our cooking community! I absolutely love hearing about your culinary successes, your clever variations, and seeing photos of your beautiful creations. Did you try a different fruit? Did you experiment with the crunch? What was your favorite part of making them? Your insights and tips are invaluable and inspire us all to keep experimenting and enjoying the art of baking. Happy cooking, my friends, and get ready to fall in love with your new favorite dessert!
Strawberry Crunch Cheesecake Tacos
Experience the delightful fusion of creamy cheesecake, fresh strawberries, and a crunchy graham cracker base, presented as a fun, individual dessert. While not traditional taco shells, these creations capture the essence of a beloved dessert in an innovative, bite-sized form with a satisfying crunch.
Ingredients
-
8 ounces (226g) cream cheese, softened
-
1/2 cup (100g) granulated sugar
-
1 teaspoon vanilla extract
-
1/4 cup (60ml) heavy cream, cold
-
1 cup (150g) fresh strawberries, finely chopped
-
1 1/2 cups (180g) graham cracker crumbs
-
1/4 cup (50g) unsalted butter, melted
-
1/4 cup (35g) chopped toasted pecans (optional)
-
Additional chopped strawberries for garnish (optional)
Instructions
-
Step 1
Combine 1 ½ cups graham cracker crumbs, ¼ cup melted butter, and optional ¼ cup toasted pecans in a bowl. Mix well. Press this mixture firmly into the bottom of 6 individual dessert dishes or molds, shaping it up the sides to form a ‘taco’ or cup-like base. Refrigerate while preparing the filling. -
Step 2
In a large bowl, beat 8 ounces softened cream cheese with ½ cup granulated sugar and 1 teaspoon vanilla extract until smooth. In a separate cold bowl, whip ¼ cup cold heavy cream until soft peaks form. Gently fold the whipped cream into the cream cheese mixture until just combined. Stir in 1 cup finely chopped fresh strawberries. -
Step 3
Spoon or pipe the strawberry cheesecake filling over the prepared graham cracker crusts in each dish. Smooth the top. Cover and refrigerate for at least 3-4 hours, or until completely set. For best results, chill overnight. -
Step 4
Before serving, garnish each ‘taco’ with additional fresh chopped strawberries, if desired. Serve chilled for an unforgettable dessert experience.
Important Information
Nutrition Facts (Per Serving)
It is important to consider this information as approximate and not to use it as definitive health advice.
Allergy Information
Please check ingredients for potential allergens and consult a health professional if in doubt.
Leave a Comment