
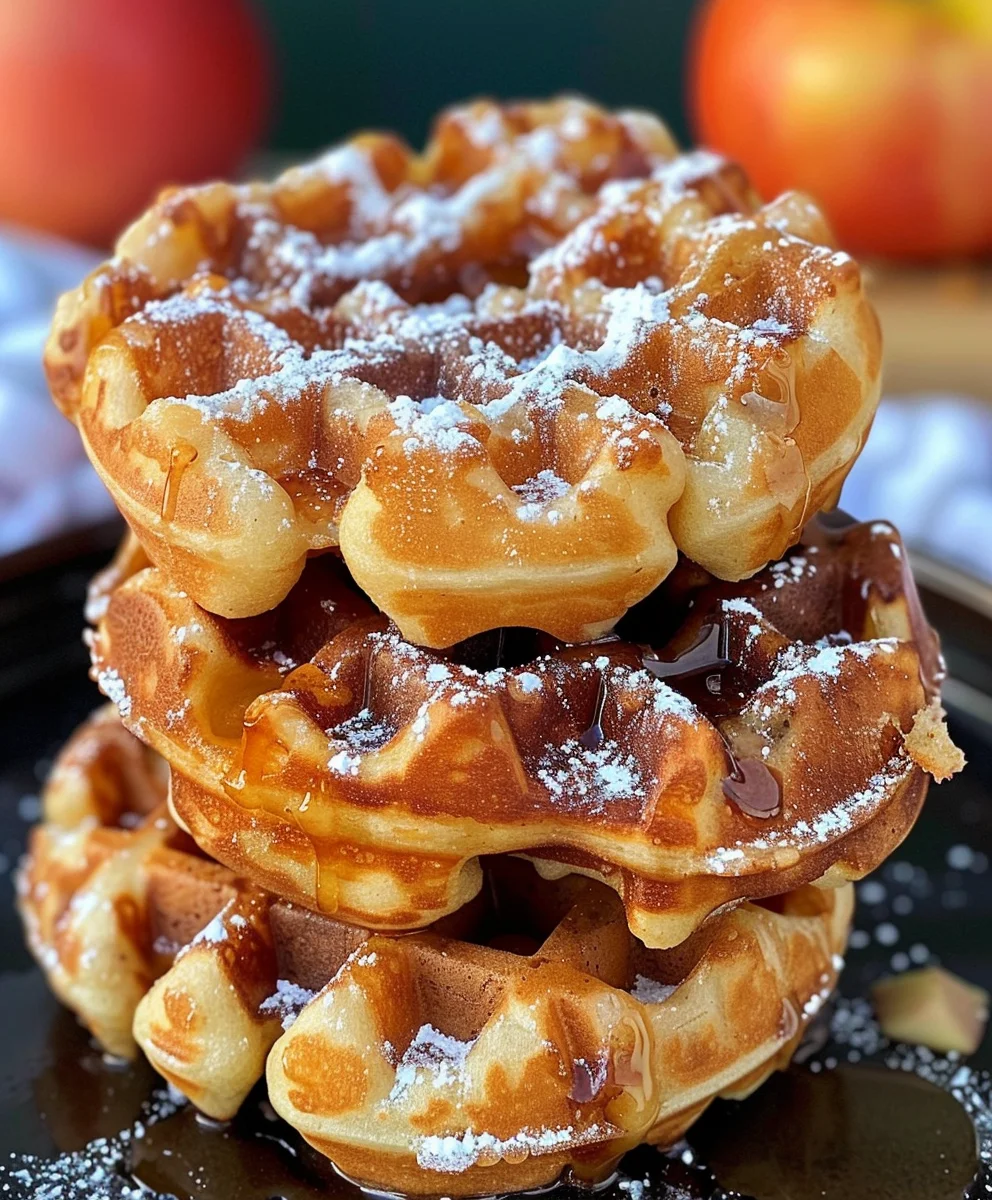
Homemade Apple Fritter Waffle Donuts Recipe is not just a mouthful to say; it’s an absolute game-changer for anyone who adores the comforting flavors of apple fritters but perhaps shies away from the mess of traditional deep-frying. Imagine biting into a treat that boasts the crisp, golden exterior of a perfect waffle, the tender, spiced apple chunks found in a classic fritter, and the delightful shape and soft interior of a donut. This innovative creation truly brings the best of three beloved worlds into one incredibly satisfying experience.
I understand the allure of a freshly fried apple fritter—those nostalgic memories of autumn fairs and grandma’s kitchen often come to mind, evoking a sense of warmth and simple joy. And who doesn’t love the simple pleasure of a warm, sugary donut? This recipe beautifully marries those cherished elements with the sheer convenience of a waffle iron, transforming a potentially messy endeavor into a delightfully simple process. You’ll be able to achieve that irresistible crispy edge and fluffy center, studded with sweet, caramelized apples and hints of cinnamon, all without a vat of hot oil. This Homemade Apple Fritter Waffle Donuts Recipe offers a gourmet twist on a beloved classic, making it perfect for a special breakfast, a delightful brunch, or an unforgettable dessert. It’s truly a celebration of flavor and ingenuity, and I am so excited to share it with you.
Ingredients:
- For the Homemade Apple Fritter Waffle Donuts:
- All-purpose flour: 2 ½ cups (approximately 300g) – I find that using a good quality, unbleached flour makes a noticeable difference in texture.
- Granulated sugar: ½ cup (approximately 100g) – For that perfect touch of sweetness in the batter itself.
- Baking powder: 2 teaspoons – This is our main leavening agent, giving those lovely pockets of air.
- Baking soda: ½ teaspoon – Works with the buttermilk to create a tender crumb.
- Ground cinnamon: 1 ½ teaspoons – Essential for that warm, cozy apple fritter flavor. Don’t skimp!
- Ground nutmeg: ½ teaspoon – A little dash goes a long way to enhance the other spices. Freshly grated is even better if you have it!
- Salt: ½ teaspoon – Crucial for balancing all the sweet flavors and bringing them to life.
- Large eggs: 2 – At room temperature, please! This helps them incorporate better into the batter.
- Buttermilk: 1 cup (approximately 240ml) – The tanginess of buttermilk really tenderizes the batter. If you don’t have it, you can make a quick substitute by adding 1 tablespoon of white vinegar or lemon juice to regular milk and letting it sit for 5-10 minutes.
- Unsalted butter: ¼ cup (4 tablespoons or 56g) – Melted and slightly cooled. This adds richness and a wonderful flavor.
- Vanilla extract: 1 teaspoon – Pure vanilla is always best!
- Apples: 2 medium-sized (about 1 ½ cups diced) – I love using a mix of tart and sweet, like Granny Smith combined with Honeycrisp or Fuji. They hold their shape well when cooked.
- For the Classic Glaze:
- Powdered sugar (confectioners’ sugar): 2 cups (approximately 240g) – Sifted, to avoid any lumps in our smooth glaze.
- Milk (any kind): 3-4 tablespoons – Start with 3 and add more a tiny bit at a time until you reach your desired consistency. Whole milk or half-and-half makes for a richer glaze.
- Vanilla extract: ½ teaspoon – Again, pure vanilla makes all the difference here.
- For Waffling:
- Non-stick cooking spray or vegetable oil: For greasing your waffle iron.
Preparing Your Apples for the Homemade Apple Fritter Waffle Donuts
The star of our “Homemade Apple Fritter Waffle Donuts Recipe” is, of course, the apples! Taking the time to prepare them properly ensures a delightful texture and even distribution throughout your final product.
- Wash and Peel the Apples: Start by thoroughly washing your two medium-sized apples under cool running water. Then, using a vegetable peeler, carefully remove all the skin. I find that a good sharp peeler makes this task quick and easy.
- Core and Dice: Once peeled, quarter each apple and carefully remove the core. You can use an apple corer for speed, or simply cut around it with a knife. Now, here’s where precision matters: dice the apples into small, uniform pieces, about ¼-inch to ½-inch cubes. The goal is for them to be small enough to cook through tenderly within the waffle iron’s cooking time, but still large enough to provide a pleasant burst of apple flavor and texture. Avoid overly large chunks, as they might prevent the waffle from cooking evenly or make it difficult to close your waffle iron.
- Set Aside: Once diced, place your beautiful apple pieces into a small bowl and set them aside. They’ll be ready to be folded into our glorious batter shortly. There’s no need to toss them with lemon juice unless you’re dicing them far in advance, as they’ll be mixed into the batter fairly quickly.
Crafting the Homemade Apple Fritter Waffle Donut Batter
This is where the magic truly begins for your “Homemade Apple Fritter Waffle Donuts Recipe”! A well-made batter is the foundation for fluffy, flavorful results. Pay attention to these steps for the best possible texture.
- Combine Dry Ingredients: In a large mixing bowl, whisk together your 2 ½ cups of all-purpose flour, ½ cup of granulated sugar, 2 teaspoons of baking powder, ½ teaspoon of baking soda, 1 ½ teaspoons of ground cinnamon, ½ teaspoon of ground nutmeg, and ½ teaspoon of salt. Whisk them really well for about 30 seconds to a minute. This ensures that the leavening agents and spices are evenly distributed, so you don’t end up with pockets of plain flour or an uneven rise. I often give my bowl a little shake too, just to be sure.
- Prepare Wet Ingredients: In a separate, medium-sized bowl, gently whisk your 2 large eggs until the yolks and whites are just combined. Then, add in your 1 cup of buttermilk, ¼ cup of melted and slightly cooled unsalted butter, and 1 teaspoon of vanilla extract. Whisk these wet ingredients together until they are fully combined and appear uniform. Make sure your butter isn’t too hot, as it could scramble the eggs! “Slightly cooled” is key here.
- Combine Wet and Dry: Pour the wet ingredient mixture into the large bowl with your dry ingredients. Using a rubber spatula or a wooden spoon, gently fold them together. This is a critical step: do not overmix! Mix only until just combined and a few streaks of flour remain. A slightly lumpy batter is perfectly fine and actually desirable for tender waffles. Overmixing develops the gluten in the flour too much, which can lead to tough, chewy waffle donuts – and we’re aiming for tender, fluffy goodness!
- Fold in the Apples: Now, carefully add your diced apples into the batter. Using your spatula, gently fold them in until they are evenly distributed. Again, be gentle. You want the apples throughout, but you don’t want to mash them or overwork the batter.
- Rest the Batter (Optional, but Recommended): If you have 10-15 minutes, allow your batter to rest at room temperature. This short rest allows the flour to fully hydrate, the gluten to relax slightly, and the leavening agents to begin their work, resulting in an even more tender and flavorful waffle donut. It’s a little secret step that makes a big difference in the final product of our “Homemade Apple Fritter Waffle Donuts Recipe.”
Cooking Your Homemade Apple Fritter Waffle Donuts
Now for the exciting part – transforming that delicious batter into golden, crispy-on-the-outside, tender-on-the-inside “Homemade Apple Fritter Waffle Donuts”! A good waffle iron and careful timing are your best friends here.
- Preheat Your Waffle Iron: Plug in your waffle iron and set it to your desired temperature, usually medium-high. Allow it to fully preheat according to the manufacturer’s instructions. Most waffle irons will have an indicator light that turns off or changes color when it’s ready. It’s crucial for the iron to be hot enough before you add any batter, as this is what gives you that perfect crispy exterior.
- Grease the Waffle Iron: Once preheated, lightly spray the top and bottom plates of your waffle iron with non-stick cooking spray, or brush them with a small amount of vegetable oil. Even if your waffle iron is non-stick, a little extra grease ensures that your apple fritter waffle donuts won’t stick and will release beautifully. This also contributes to that golden-brown crust.
- Portion the Batter: Carefully scoop about ½ to ¾ cup of batter onto the center of the bottom plate of your hot waffle iron. The exact amount will depend on the size and type of your waffle iron (standard vs. Belgian). You want enough batter to fill the grids without overflowing significantly. If you’re using a standard round waffle iron, I find about ½ cup is usually perfect. If it’s a larger Belgian waffle maker, you might need closer to ¾ cup. You can always start with a smaller amount and adjust for subsequent waffle donuts.
- Close and Cook: Gently close the lid of the waffle iron. Do not press down or force it shut, especially if your batter is on the thicker side with the apples. Allow the waffle donut to cook for approximately 3-5 minutes, or until it’s golden brown and steam is no longer vigorously escaping from the sides of the iron. Most waffle irons will have an indicator light that signals when cooking is complete. The exact cooking time will vary based on your waffle iron and your preferred level of crispiness. I personally love them a little on the darker side for extra crunch!
- Check for Doneness: To ensure your “Homemade Apple Fritter Waffle Donuts” are cooked through and perfectly crispy, gently lift the lid and peek. They should be beautifully golden brown, and easily lift off the plates with a fork or tongs. If they stick or seem undercooked, close the lid and cook for another minute. Don’t be afraid to experiment with the cooking time to find your perfect level of crispness.
- Remove and Keep Warm: Once cooked, carefully remove the waffle donut from the iron and place it on a wire rack set over a baking sheet. If you’re making multiple waffle donuts and want to serve them all warm, you can keep the cooked ones in a warm oven (around 200°F or 93°C) while you finish cooking the rest of the batch. This also helps to keep them from getting soggy.
- Repeat: Continue this process with the remaining batter, re-greasing your waffle iron as needed between each waffle donut to prevent sticking. You’ll likely get about 6-8 substantial “Homemade Apple Fritter Waffle Donuts” from this recipe, depending on the size of your waffle iron.
Whipping Up the Classic Apple Fritter Glaze
No “Homemade Apple Fritter Waffle Donuts Recipe” would be complete without a sweet, luscious glaze! This simple step elevates our waffle donuts from delicious to absolutely irresistible.
- Sift Powdered Sugar: In a medium-sized bowl, measure out your 2 cups of powdered sugar. It’s a really good idea to sift it before mixing. Powdered sugar tends to clump easily, and sifting will ensure a perfectly smooth, lump-free glaze. You can use a fine-mesh sieve for this, gently tapping it to push the sugar through.
- Add Wet Ingredients: To the sifted powdered sugar, add your ½ teaspoon of vanilla extract. Now, start adding your milk, 1 tablespoon at a time.
- Whisk to Desired Consistency: Using a whisk, stir the mixture vigorously until it’s completely smooth and free of any lumps. You’re aiming for a glaze that’s thick enough to coat the back of a spoon but still thin enough to drip slowly when lifted. It should be pourable, not runny like water, but also not so thick it’s unspreadable. I usually find 3 tablespoons of milk is just right for a thick, decadent glaze, but sometimes, depending on humidity and how packed your sugar was, you might need a tiny bit more – up to 4 tablespoons. If it’s too thick, add a tiny splash more milk; if it’s too thin, add another tablespoon of sifted powdered sugar.
- Immediate Use: Once your glaze is mixed, it’s best to use it fairly quickly, as it can start to set.
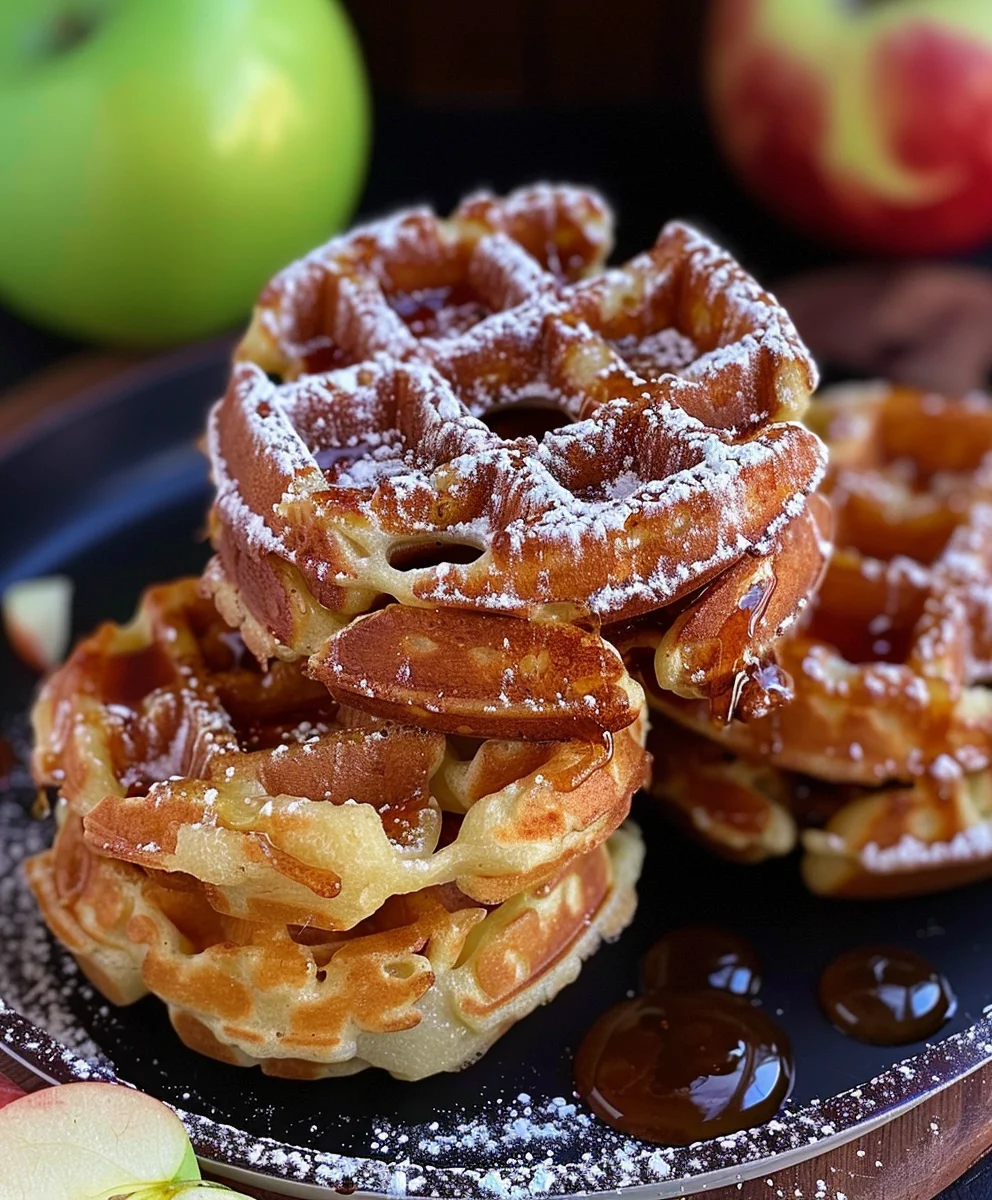
Finishing Touches: Glazing and Serving Your Homemade Apple Fritter Waffle Donuts
The final step in our “Homemade Apple Fritter Waffle Donuts Recipe” journey is perhaps the most satisfying: glazing them to perfection and getting them ready for enjoyment!
- Timing is Everything for Glazing: For the best results, you want to glaze your apple fritter waffle donuts while they are still warm, but not piping hot. If they are too hot, the glaze will simply melt and run off. If they are completely cold, the glaze won’t adhere as well. Let your cooked waffle donuts cool on the wire rack for about 5-10 minutes after coming out of the waffle iron. They should still be warm to the touch.
- Glazing Technique: You have a couple of options here, depending on how much glaze you like and the presentation you prefer.
- Dipping Method: My personal favorite for a full, even coating! Carefully pick up a warm waffle donut by its edges and gently dip one side into the prepared glaze. Allow any excess glaze to drip off back into the bowl for a few seconds.
- Drizzling Method: If you prefer a lighter coating or a more artful look, you can use a spoon to drizzle the glaze generously over the top of each waffle donut. You can also use a pastry brush to apply the glaze.
Place the glazed waffle donut back onto the wire rack. If you’re going for a double glaze (which I highly recommend for extra sweetness and shine!), let the first coat set for a minute or two before applying a second dip or drizzle.
- Allow Glaze to Set: Let the glazed “Homemade Apple Fritter Waffle Donuts” sit on the wire rack for another 5-10 minutes, or until the glaze has mostly set. This prevents sticky fingers and ensures that beautiful sheen.
- Serve Warm and Enjoy: These “Homemade Apple Fritter Waffle Donuts” are truly best served warm, shortly after glazing. The crisp exterior, the tender interior, the soft pockets of warm apple, and that sweet vanilla glaze create an absolutely divine experience. They make a fantastic breakfast, a special brunch item, or even a delightful dessert.
- Storage (If There Are Any Left!): If by some miracle you have any leftovers, store them in an airtight container at room temperature for up to 2 days. To reheat, I suggest a quick toast in a toaster oven or a short burst in the microwave (though the crispness won’t be quite the same). The glaze might get a little soft upon reheating, but the flavor will still be wonderful. However, truly, the magic of this “Homemade Apple Fritter Waffle Donuts Recipe” is in eating them fresh!
Conclusion:
And there you have it, my friends! We’ve reached the sweet end of our journey, but for you, it’s just the beginning of a truly delightful culinary adventure. I genuinely believe that this particular recipe isn’t just another item in your breakfast rotation; it’s a revelation, a joyful fusion that takes the best elements of a classic apple fritter and transforms them into something entirely new and exciting with the help of your trusty waffle iron. Think about it: all the warm, spiced apple goodness, the tender cake-like interior, and those irresistible crispy edges that only a waffle can deliver, all without the fuss and mess of deep-frying. It’s pure genius, if I do say so myself!
What makes this creation an absolute must-try? For starters, the texture combination is simply out of this world. You get that perfectly golden-brown, slightly crisp exterior from the waffle iron, giving way to a wonderfully soft and fluffy interior studded with tender, sweet apples. Each bite is a symphony of contrasting textures and comforting flavors – the warmth of cinnamon and nutmeg dancing with the sweet-tartness of the apples, all enrobed in a delicate glaze that melts in your mouth. It’s the kind of treat that doesn’t just satisfy a craving; it creates a memorable experience, a moment of pure, unadulterated bliss in every single bite. The aroma alone, as these cook, is enough to pull anyone out of bed with a smile!
Making it Your Own: Serving Suggestions & Variations
Now, let’s talk about how you can elevate this already spectacular treat even further, or simply tailor it to your personal preferences. While they are undeniably perfect straight off the waffle iron, perhaps with a simple dusting of powdered sugar or our suggested light glaze, the possibilities for customization are endless. For a truly indulgent breakfast or brunch, serve these warm with a generous dollop of freshly whipped cream and a side of crispy bacon – the sweet and savory combination is always a winner. They also make an incredible dessert when paired with a scoop of vanilla bean ice cream and a drizzle of warm caramel sauce. Imagine that at your next dinner party!
Feeling adventurous with your glazes? Instead of a classic vanilla glaze, try a maple glaze for an extra autumnal touch, or even a cream cheese glaze for a tangier, richer finish. A simple cinnamon-sugar coating, applied while they’re still warm, also works wonders if you prefer a less liquid topping. Don’t limit yourself to just apples, either! While apple is king in a fritter, you could easily experiment with other fruits. Pears work beautifully, offering a slightly different sweetness and texture. Or, for a berry twist, try folding in a cup of fresh blueberries or raspberries into the batter. Just be mindful that softer fruits might release more moisture, so adjust your cooking time slightly if needed.
For an extra layer of flavor and crunch, consider adding a handful of chopped walnuts or pecans to the batter along with the apples. A pinch of cardamom can also add an exotic, fragrant note to the spice profile. And if you’re making these for a special occasion, a sprinkle of flaky sea salt over the finished glaze can really make those sweet flavors pop. These variations allow you to truly make this recipe your signature dish!
Your Turn! Share Your Delicious Creations
So, what are you waiting for? I’ve shared all my secrets and tips, and now it’s your turn to bring this magic to life in your own kitchen. I truly believe this Homemade Apple Fritter Waffle Donuts Recipe will become a beloved staple in your home, turning ordinary mornings into extraordinary ones. It’s easier than you think, incredibly rewarding, and promises to fill your home with the most inviting aromas imaginable.
Don’t just read about it; make it, savor it, and share the joy! I absolutely love hearing from you all and seeing your culinary triumphs. Please, once you’ve whipped up your batch of these incredible waffle donuts, take a picture and share your experience. Did you try a unique variation? What was your favorite part? Did your family rave about them? Your insights and creativity inspire me and our entire cooking community. Let’s make some delicious memories together!
Homemade Apple Fritter Waffle Donuts Recipe
This innovative creation brings the best of three beloved worlds into one incredibly satisfying experience: the crisp, golden exterior of a perfect waffle, the tender, spiced apple chunks found in a classic fritter, and the delightful shape and soft interior of a donut, all made without deep-frying.
Ingredients
-
2 ½ cups (300g) all-purpose flour
-
½ cup (100g) granulated sugar
-
2 teaspoons baking powder
-
½ teaspoon baking soda
-
1 ½ teaspoons ground cinnamon
-
½ teaspoon ground nutmeg
-
½ teaspoon salt
-
2 large eggs, room temperature
-
1 cup (240ml) buttermilk
-
¼ cup (56g) unsalted butter, melted & cooled
-
1 teaspoon vanilla extract (for batter)
-
2 medium apples (about 1 ½ cups diced), like Granny Smith & Honeycrisp
-
2 cups (240g) powdered sugar, sifted
-
3-4 tablespoons milk (any kind)
-
½ teaspoon vanilla extract (for glaze)
-
Non-stick cooking spray or vegetable oil (for waffle iron)
Instructions
-
Step 1
Wash, peel, core, and dice 2 medium apples into ¼-inch to ½-inch uniform pieces. Set aside. -
Step 2
In a large mixing bowl, whisk together 2 ½ cups all-purpose flour, ½ cup granulated sugar, 2 teaspoons baking powder, ½ teaspoon baking soda, 1 ½ teaspoons ground cinnamon, ½ teaspoon ground nutmeg, and ½ teaspoon salt. -
Step 3
In a separate medium bowl, whisk 2 large eggs, 1 cup buttermilk, ¼ cup melted and cooled unsalted butter, and 1 teaspoon vanilla extract until combined. -
Step 4
Pour the wet ingredient mixture into the dry ingredients. Gently fold until just combined, being careful not to overmix; a slightly lumpy batter is desirable. Gently fold in the diced apples until evenly distributed. Optionally, let the batter rest for 10-15 minutes at room temperature. -
Step 5
Preheat your waffle iron to medium-high and lightly grease the plates with non-stick cooking spray or vegetable oil. Scoop about ½ to ¾ cup of batter onto the center of the hot waffle iron. Close the lid and cook for approximately 3-5 minutes, or until golden brown and steam is no longer vigorously escaping. Remove cooked waffle donut to a wire rack. -
Step 6
In a medium bowl, sift 2 cups powdered sugar. Add ½ teaspoon vanilla extract and start with 3 tablespoons milk. Whisk vigorously until completely smooth and a pourable consistency is reached. Adjust with more milk (up to 4 tablespoons total) or powdered sugar if needed. -
Step 7
Allow cooked waffle donuts to cool on the wire rack for about 5-10 minutes until warm, not piping hot. Dip one side of each warm waffle donut into the prepared glaze, letting excess drip off, or generously drizzle glaze over the tops. Place glazed waffle donuts back on the wire rack and let the glaze set for 5-10 minutes. Serve warm. Store any leftovers in an airtight container at room temperature for up to 2 days.
Important Information
Nutrition Facts (Per Serving)
It is important to consider this information as approximate and not to use it as definitive health advice.
Allergy Information
Please check ingredients for potential allergens and consult a health professional if in doubt.
Leave a Comment