
No Bake Pumpkin Cheesecake Balls are an absolute game-changer when it comes to seasonal treats. Imagine the rich, spiced flavor of classic pumpkin cheesecake, but transformed into delightful, bite-sized morsels that require zero oven time. Yes, you heard that right! As an avid home cook (and sometimes a very busy one!), I’ve always appreciated recipes that deliver maximum flavor with minimal effort.
These little spheres of joy perfectly encapsulate the cozy essence of autumn in every creamy, decadent bite. While traditional pumpkin pies and cheesecakes hold a cherished place in our fall celebrations, the rise of ‘no-bake’ innovations reflects a modern desire for delicious, homemade treats without the fuss. These No Bake Pumpkin Cheesecake Balls offer a contemporary twist on a beloved autumnal classic, making them an ideal addition to any holiday platter or a simple, comforting snack on a crisp evening.
People adore this dish for its undeniably smooth, rich texture and the perfect balance of sweet pumpkin and warm spices. Their convenience makes them a crowd-pleaser, easy to prepare ahead of time, portable for gatherings, and requiring no oven space – a huge bonus during busy holiday seasons. Get ready to fall in love with your new favorite fall dessert!
Ingredients:
- For the Pumpkin Cheesecake Mixture:
- 16 ounces (two 8-ounce blocks) full-fat cream cheese, softened to room temperature
- 1 cup canned pumpkin puree (make sure it’s 100% pumpkin, not pumpkin pie filling)
- ¾ cup powdered sugar (also known as confectioners’ sugar), sifted to prevent lumps
- ½ teaspoon ground cinnamon
- ¼ teaspoon ground nutmeg
- ⅛ teaspoon ground cloves
- ⅛ teaspoon ground ginger
- ½ teaspoon pure vanilla extract
- ½ cup graham cracker crumbs (finely crushed, about 4-5 full graham cracker sheets)
- For the Coating Options:
- 12 ounces white chocolate chips or white melting wafers
- 2 tablespoons coconut oil or shortening (optional, for smoother melting)
- ½ cup graham cracker crumbs, extra for rolling
- ¼ cup granulated sugar, for rolling
- 1 teaspoon pumpkin pie spice, for rolling
- Optional: chopped pecans or walnuts, sprinkles, or cocoa powder for additional coatings
Equipment You’ll Need:
To ensure your journey to creating perfect No Bake Pumpkin Cheesecake Balls is smooth and enjoyable, gathering the right tools beforehand is a great idea. Here’s what I recommend having on hand:
- Large mixing bowl: Essential for combining all your delicious ingredients.
- Electric mixer (stand mixer or hand-held): This will make light work of creaming your cheese and blending your pumpkin mixture into a wonderfully smooth consistency.
- Rubber spatula: Perfect for scraping down the sides of your bowl and gently folding in the graham cracker crumbs.
- Measuring cups and spoons: Accuracy is key in baking, even for no-bake treats!
- Sifter: For the powdered sugar, to ensure a silky-smooth mixture without any unwanted lumps.
- Small cookie scoop (approximately 1.5 tablespoons): This is my secret weapon for uniform No Bake Pumpkin Cheesecake Balls. Consistency in size ensures even chilling and a professional look.
- Parchment paper or silicone baking mats: For lining baking sheets, preventing sticking, and making cleanup a breeze.
- Baking sheets: You’ll need at least two, possibly three, to hold your chilling and coated balls.
- Microwave-safe bowl or double boiler: For melting your white chocolate coating safely and smoothly.
- Shallow bowls or plates: For holding your various coating options (graham cracker crumbs, spiced sugar, etc.).
- Toothpicks or dipping forks: Invaluable for dipping your cheesecake balls into the melted chocolate with minimal mess.
- Airtight container: For storing your finished No Bake Pumpkin Cheesecake Balls.
Preparing Your “No Bake Pumpkin Cheesecake Balls” Mixture:
- Softening the Cream Cheese: First things first, we need to ensure our cream cheese is beautifully soft. This is a crucial step for achieving a smooth, lump-free base for your No Bake Pumpkin Cheesecake Balls. If your cream cheese isn’t at room temperature, it won’t cream properly and you’ll end up with a grainy texture. I usually take mine out of the fridge at least an hour, or even two, before I plan to start. You should be able to press into it easily with your finger.
- Creaming the Cream Cheese: In your large mixing bowl, place the softened cream cheese. Using your electric mixer, beat the cream cheese on medium speed for about 2-3 minutes. We’re looking for it to become incredibly light and fluffy, almost cloud-like. Scrape down the sides of the bowl frequently with your rubber spatula to ensure everything gets incorporated. This aeration is important for the texture of your No Bake Pumpkin Cheesecake Balls.
- Adding the Pumpkin and Flavorings: Now, add the canned pumpkin puree to the creamed cream cheese. Make absolutely sure you’re using 100% pumpkin puree and not pumpkin pie filling, as the latter contains added sugars and spices that will throw off our carefully balanced recipe. Follow with the sifted powdered sugar, ground cinnamon, nutmeg, cloves, ginger, and pure vanilla extract. Sifting the powdered sugar beforehand is a small but mighty step that prevents those pesky little sugar lumps from appearing in your smooth mixture.
- Mixing Until Combined and Smooth: Continue beating the mixture with your electric mixer on medium speed for another 3-4 minutes. You want everything to be thoroughly combined, smooth, and homogenous. The mixture should take on a lovely light orange hue and smell absolutely divine with all those warming spices. Again, remember to pause and scrape down the sides and bottom of the bowl a couple of times to ensure every bit of cream cheese and pumpkin is fully incorporated. This thorough mixing creates the foundation for truly irresistible No Bake Pumpkin Cheesecake Balls.
- Folding in the Graham Cracker Crumbs: Once your pumpkin cheesecake mixture is perfectly smooth, it’s time to gently fold in the ½ cup of fine graham cracker crumbs. This adds a subtle texture and a classic cheesecake flavor note to your No Bake Pumpkin Cheesecake Balls. Switch to your rubber spatula for this step. Gently fold the crumbs into the mixture until they are just incorporated. Overmixing here isn’t ideal; we just want them evenly distributed. The mixture will be quite thick, which is exactly what we want.
- Initial Chill for Firmness: Cover the bowl with plastic wrap and refrigerate the mixture for at least 1 hour. I often find 2 hours works even better, especially if my kitchen is warm. This chilling period is absolutely vital for your No Bake Pumpkin Cheesecake Balls. It allows the mixture to firm up considerably, making it much easier to scoop and roll into neat, uniform balls without a sticky mess. Don’t skip or shorten this step! Patience here will pay off immensely.
Chilling and Rolling Your “No Bake Pumpkin Cheesecake Balls”:
- Preparing for Rolling: While your cheesecake mixture is chilling, prepare your baking sheets by lining them with parchment paper or silicone mats. This will prevent your delicate No Bake Pumpkin Cheesecake Balls from sticking and make them easy to transfer later. Have your small cookie scoop ready.
- Scooping the Mixture: Remove the chilled pumpkin cheesecake mixture from the refrigerator. Using your small cookie scoop (approximately 1.5 tablespoons), scoop out portions of the mixture. Try to make each scoop as uniform as possible for consistent results. Drop each scooped portion onto your prepared baking sheets, leaving a little space between each one.
- Rolling into Balls: Once you have a tray full of scooped portions, it’s time to roll them into perfect spheres. Take one scooped portion and, using the palms of your hands, gently roll it into a smooth, round ball. If the mixture starts to get too sticky on your hands, you can lightly dust your palms with a little powdered sugar or, even better, quickly rinse your hands under cold water and dry them thoroughly. The cold hands will help prevent the mixture from sticking and melting. Repeat this process for all the scooped portions, placing the finished No Bake Pumpkin Cheesecake Balls back onto the parchment-lined baking sheets.
- Second Chill for Optimal Structure: Once all your cheesecake mixture has been rolled into balls, return the baking sheets with the balls to the refrigerator for another 30-60 minutes. This second chill is super important because it ensures the balls are firm enough to handle the coating process without losing their shape or getting too soft. A well-chilled ball is a happy ball, ready for its delicious outer layer.
Coating Your Delicious “No Bake Pumpkin Cheesecake Balls”:
- Preparing the Coating Stations: While your No Bake Pumpkin Cheesecake Balls are firming up in the fridge, let’s get our coating options ready.
Graham Cracker & Spiced Sugar Coating:
In a shallow bowl or plate, combine the extra ½ cup graham cracker crumbs, ¼ cup granulated sugar, and 1 teaspoon pumpkin pie spice. Stir well to ensure the spice is evenly distributed. This mixture will give your cheesecake balls a classic, crunchy, and aromatic finish.
Melting the White Chocolate:
For the white chocolate coating, place the white chocolate chips or wafers in a microwave-safe bowl. If you’re using it, add the coconut oil or shortening. Microwave on 50% power in 30-second intervals, stirring thoroughly after each interval, until the chocolate is completely melted and smooth. This typically takes about 1.5 to 3 minutes, depending on your microwave. Be careful not to overheat the white chocolate, as it can seize and become unusable. Alternatively, you can use a double boiler method for a more controlled melt.
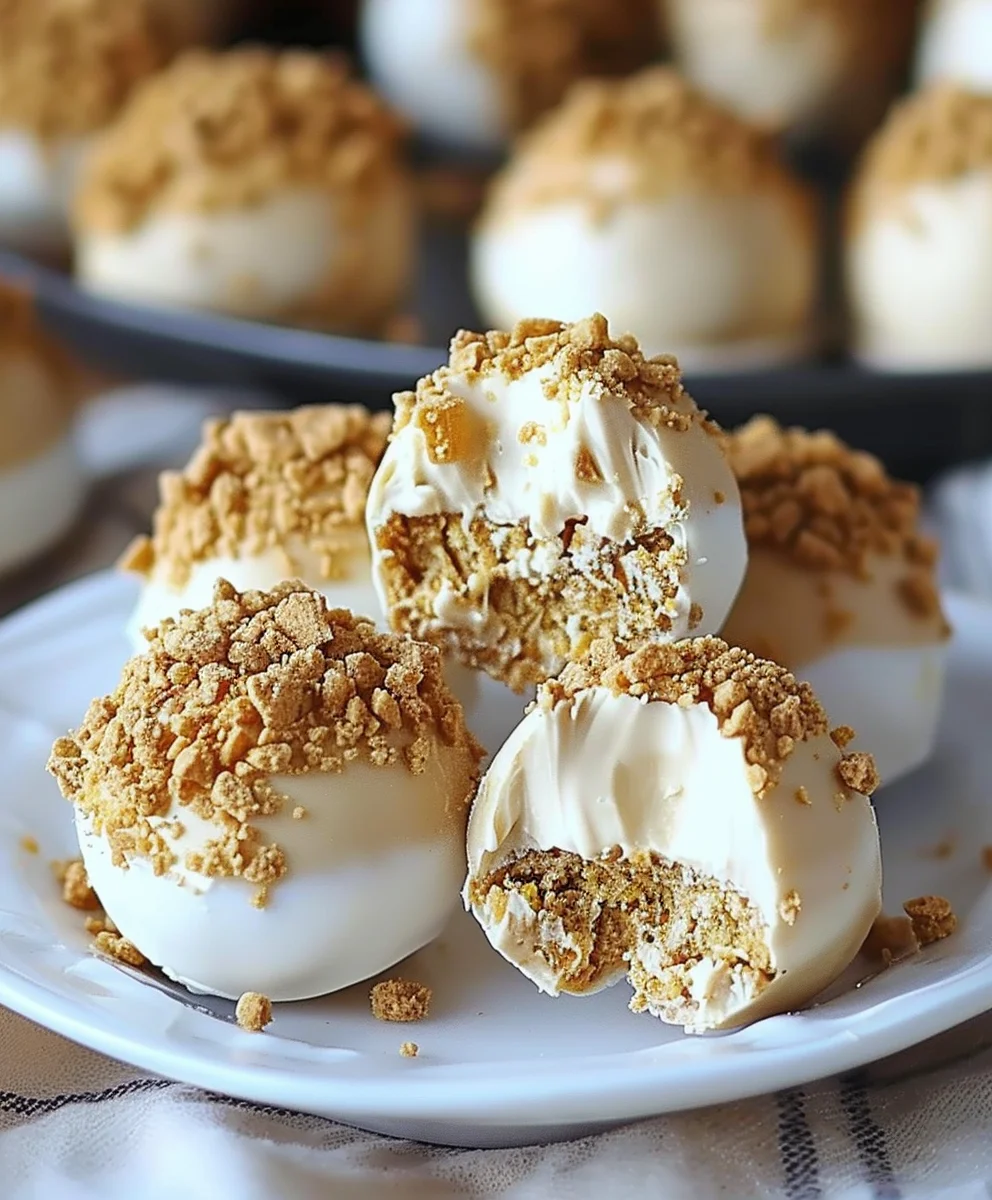
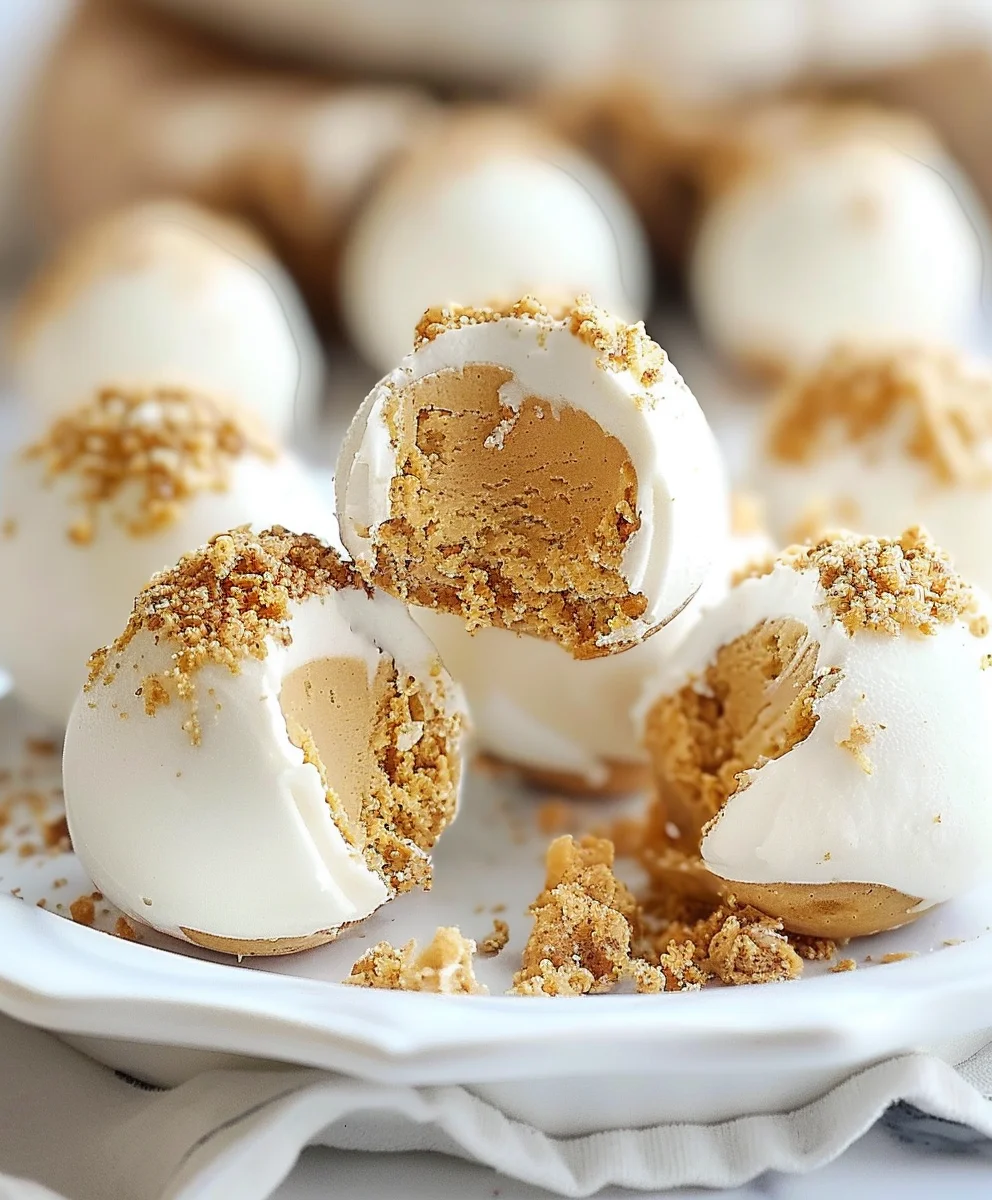
- Dipping and Coating with White Chocolate: Remove a few of the chilled No Bake Pumpkin Cheesecake Balls from the refrigerator at a time (keeping the rest cold is key!). Insert a toothpick or a dipping fork into one of the balls, piercing it about halfway through. Dip the ball into the melted white chocolate, rotating it gently to coat it completely. Lift the ball out of the chocolate, tapping the toothpick gently against the rim of the bowl to allow any excess chocolate to drip off. You want a nice, even, thin coat.
- Adding Decorative Touches (Optional):
Immediately after dipping in white chocolate, if desired, you can roll the coated ball in some of the spiced graham cracker mixture, sprinkle it with chopped nuts, or add some festive sprinkles. This needs to be done quickly before the chocolate sets.
- Coating with Graham Cracker & Spiced Sugar Mixture: For the balls you want to coat solely in the graham cracker and spiced sugar mixture, simply roll the firm, naked No Bake Pumpkin Cheesecake Balls directly into the prepared mixture. Gently press the crumbs onto the ball to ensure it’s fully covered. The natural moisture and slight stickiness of the chilled cheesecake ball will help the coating adhere beautifully.
- Setting the Coatings: As you finish coating each No Bake Pumpkin Cheesecake Ball, place it back onto a clean parchment-lined baking sheet. If you used toothpicks for dipping, gently twist and remove them, carefully smoothing over any small holes left behind with your finger or a clean toothpick before the chocolate fully sets. Once all your balls are coated, return the baking sheets to the refrigerator for at least 15-20 minutes to allow the white chocolate to fully set and the other coatings to adhere firmly.
Final Chilling and Serving Your “No Bake Pumpkin Cheesecake Balls”:
- Final Chill Before Serving: Once the coatings are completely set, your No Bake Pumpkin Cheesecake Balls are almost ready for their grand debut! I recommend giving them one final chill in the refrigerator for at least 30 minutes. This ensures they are perfectly firm, delightfully cold, and at their absolute best for serving. The flavors will also have more time to meld and deepen, making each bite even more satisfying.
- Serving Your Delicious Creation: Arrange your beautiful No Bake Pumpkin Cheesecake Balls on a platter. They make a stunning presentation for any fall gathering, holiday party, or just as a special treat for yourself. You can serve them in mini cupcake liners for an extra touch of elegance and easier handling.
Storage Tips for Longevity:
These delightful treats can be stored in an airtight container in the refrigerator for up to 5-7 days. While they are best enjoyed within the first few days, they do hold up remarkably well. If you’re planning ahead for a party, you can definitely make them a day or two in advance. Remember, because they are “No Bake Pumpkin Cheesecake Balls” and contain dairy, keeping them chilled is absolutely essential for food safety and optimal taste.
- Creative Variations and Enhancements:
Don’t be afraid to get creative with your No Bake Pumpkin Cheesecake Balls! You could try dipping them in dark chocolate for a richer flavor profile, or even milk chocolate. A drizzle of caramel or a sprinkle of flaky sea salt over the white chocolate coating would be absolutely divine. For an extra kick of spice, you could add a pinch more ginger or even a tiny amount of ground cardamom to the pumpkin mixture. If you love texture, incorporate finely chopped pecans or walnuts directly into the cheesecake mixture before chilling, or use them as a coating. These small changes can open up a world of new flavor experiences with your favorite no-bake pumpkin treat.
Troubleshooting Tips:
- Mixture is too sticky to roll: This usually means it hasn’t chilled long enough. Pop it back in the fridge for another 30-60 minutes. A slightly sticky mixture can also be managed by lightly dusting your hands with powdered sugar or keeping your hands very cold.
- Chocolate is seizing: This happens when water gets into melted chocolate or when it’s overheated. To prevent this, ensure your bowl and utensils are completely dry. When melting, go slow with low power in the microwave or use a double boiler. If it seizes, sometimes adding a tiny bit of shortening or coconut oil (as specified in the recipe) can help bring it back, but it’s often best to start fresh.
- Coatings aren’t sticking: Make sure your No Bake Pumpkin Cheesecake Balls are sufficiently chilled and firm. If they’re too warm, they might “sweat” slightly, which can affect adherence. For the dry coatings, gently press the crumbs onto the ball to ensure good coverage.
I genuinely hope you enjoy making and, more importantly, devouring these incredibly easy and delicious No Bake Pumpkin Cheesecake Balls. They are truly a perfect autumnal treat!
<h2>Conclusion:</h2>
<p>And there you have it! We’ve journeyed through the simple steps to create a truly unforgettable dessert that I genuinely believe will become a staple in your recipe collection. These delightful <strong>No Bake Pumpkin Cheesecake Balls</strong> are more than just a sweet treat; they’re a testament to how incredible flavors and textures can come together with minimal effort. I’ve found that the combination of creamy, spiced pumpkin and tangy cream cheese, all rolled into a convenient bite-sized form, is simply irresistible. It’s the perfect antidote to those intense baking cravings without the need to preheat an oven, wrestle with water baths, or fuss over delicate crusts. The ease of preparation makes this recipe a true game-changer, especially when you’re short on time but refuse to compromise on taste.</p>
<h4>Why This Recipe is an Absolute Must-Try</h4>
<p>What makes these <strong>No Bake Pumpkin Cheesecake Balls</strong> a standout? First, their incredible flavor profile. The warm spices like cinnamon, nutmeg, and ginger perfectly complement the rich, earthy pumpkin, while the cream cheese adds that signature cheesecake tang and velvety smooth mouthfeel. Each bite is a harmonious blend of autumnal warmth and creamy indulgence. Secondly, it’s the sheer convenience. Imagine being able to whip up a gourmet-quality dessert in under an hour, with most of that time simply waiting for them to chill. This recipe is your secret weapon for impressing guests, delighting your family, or simply treating yourself after a long day. They offer all the beloved flavors of a classic pumpkin cheesecake without any of the stress, making them ideal for holiday gatherings, potlucks, or just a cozy night in. The portability of these little gems also makes them fantastic for taking to parties or enjoying on the go. <strong>They truly are a delightful alternative to traditional baked goods</strong>, delivering big on flavor with a fraction of the work.</p>
<h4>Serving Suggestions & Creative Variations</h4>
<p>While these <strong>No Bake Pumpkin Cheesecake Balls</strong> are utterly delicious on their own, I love experimenting with different ways to serve and personalize them. For a beautiful presentation, arrange them artfully on a dessert platter, perhaps dusted with a little extra cinnamon or a drizzle of caramel sauce just before serving. They pair wonderfully with a hot cup of coffee, a fragrant chai tea, or even a glass of chilled dessert wine after dinner. For a truly decadent experience, consider serving them alongside a scoop of vanilla bean ice cream or a dollop of fresh whipped cream. To elevate them even further, you could try rolling some in finely chopped pecans or walnuts for an added crunch and nutty flavor. <strong>Another fantastic variation</strong> is to dip them halfway into melted white chocolate or dark chocolate, allowing the chocolate to set for a striking visual contrast and an extra layer of sweetness. You could also experiment with different spice blends – perhaps a touch of allspice or a hint of cardamom could add another dimension. For a lighter touch, a simple dusting of powdered sugar or cocoa powder can create an elegant finish. The possibilities are truly endless when it comes to customizing these versatile treats to suit your taste and occasion.</p>
<h4>Your Turn to Create & Share!</h4>
<p>Now that you have all the tools and inspiration, I wholeheartedly encourage you to dive into your kitchen and give this recipe a try. <strong>You won’t regret it!</strong> These <strong>No Bake Pumpkin Cheesecake Balls</strong> are not just easy; they’re genuinely delicious, versatile, and incredibly satisfying. I’m confident they’ll bring a smile to your face and to the faces of anyone you share them with. Once you’ve made them, I would absolutely love to hear about your experience. Did you try any of the suggested variations, or did you come up with your own brilliant twists? Please don’t hesitate to share your thoughts, photos, and any creative ideas you had in the comments below. Your feedback and culinary adventures inspire me, and I can’t wait to see your wonderful creations. Happy “no-baking”!</p>
No Bake Pumpkin Cheesecake Balls: Easy Fall Dessert!
These No Bake Pumpkin Cheesecake Balls are a delightful, bite-sized twist on classic pumpkin cheesecake, requiring zero oven time. Creamy, spiced, and perfectly portable, they’re an ideal fall treat for any gathering or a simple comforting snack. Easy to make ahead, they promise maximum flavor with minimal effort.
Ingredients
-
8 oz cream cheese, softened
-
⅓ cup powdered sugar, sifted
-
⅔ cup pumpkin puree
-
1 tsp pumpkin pie spice
-
1 ½ cups graham cracker crumbs
-
1 ½ cups gingersnap crumbs
-
12 oz white almond bark
-
2 tbsp shortening (for melting bark)
-
Optional: 1 cup orange candy melts (for drizzle)
Instructions
-
Step 1
In a large bowl, beat softened cream cheese until light and fluffy (2-3 minutes). Add pumpkin puree, sifted powdered sugar, and pumpkin pie spice; beat until smooth and well combined (3-4 minutes). Fold in graham cracker and gingersnap crumbs until just incorporated. The mixture will be thick. -
Step 2
Cover the bowl and refrigerate the mixture for at least 1-2 hours, or until firm enough to roll. -
Step 3
Line baking sheets with parchment paper. Scoop the chilled mixture into 1.5-tablespoon portions. Roll each portion into a smooth, round ball using your palms. Place rolled balls onto the prepared baking sheets. -
Step 4
Return the baking sheets with the rolled balls to the refrigerator for another 30-60 minutes to ensure they are very firm for coating. -
Step 5
Melt white almond bark with shortening in a microwave-safe bowl (30-second intervals at 50% power, stirring between) or via a double boiler until smooth. If desired, melt orange candy melts separately for drizzling. -
Step 6
Remove a few chilled cheesecake balls at a time from the refrigerator. Dip each ball into the melted white almond bark, ensuring it’s fully coated. Allow excess to drip off. Place on a clean parchment-lined baking sheet. Optionally, immediately drizzle with melted orange candy melts before the white bark sets. -
Step 7
Chill the coated balls in the refrigerator for at least 15-20 minutes, or until the coatings are fully set. Serve cold. Store any leftover No Bake Pumpkin Cheesecake Balls in an airtight container in the refrigerator for up to 5-7 days.
Important Information
Nutrition Facts (Per Serving)
It is important to consider this information as approximate and not to use it as definitive health advice.
Allergy Information
Please check ingredients for potential allergens and consult a health professional if in doubt.
Leave a Comment