
Halloween Augapfel Cupcakes – are you ready to bake a treat that will undoubtedly be the talk of your next spooky gathering? I’ve always been fascinated by the magic of Halloween, a time when creativity truly comes alive, especially in the kitchen.
These delightfully ghoulish cupcakes offer the perfect blend of eerie aesthetics and scrumptious flavor, making them an absolute showstopper.
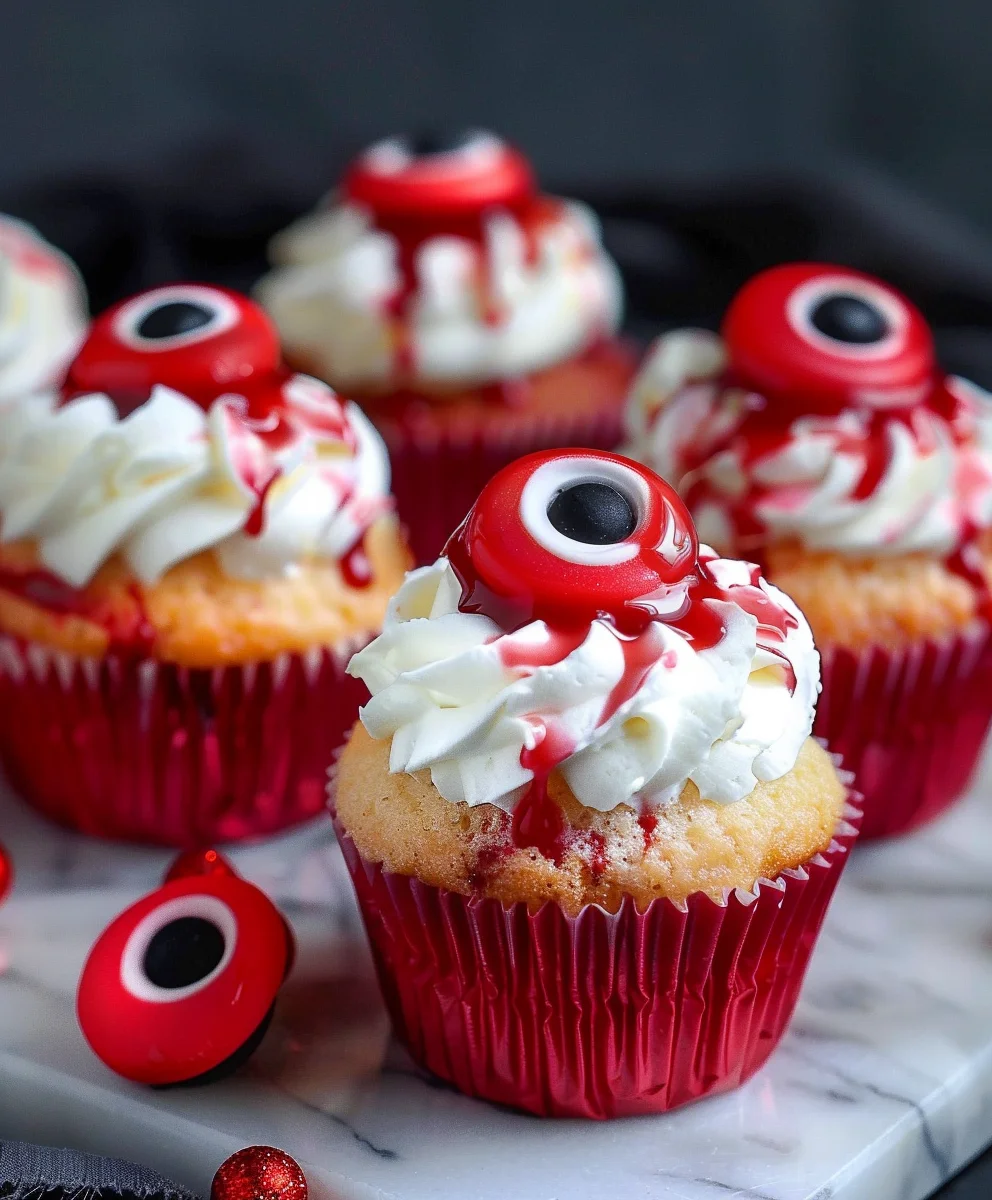
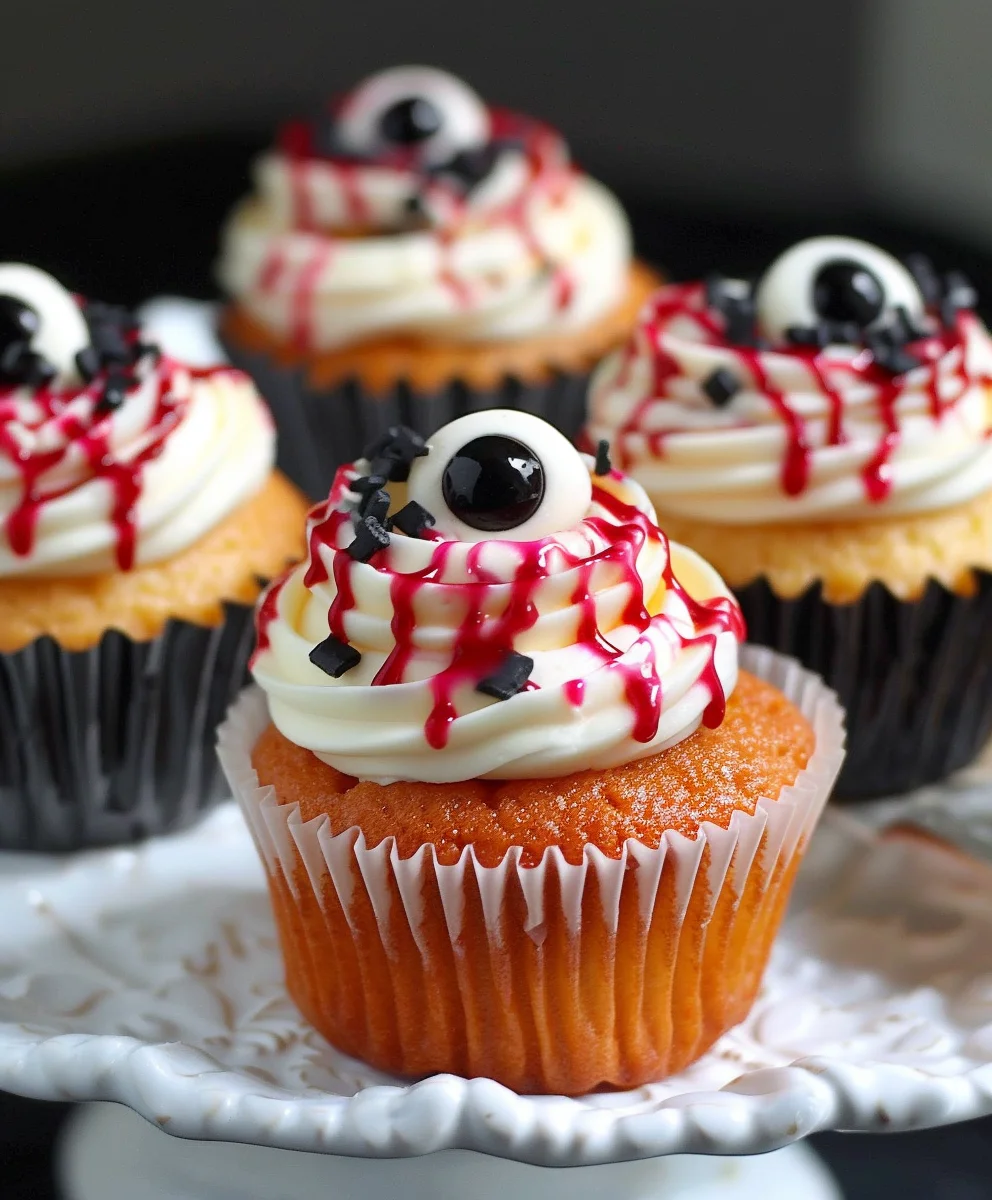
Imagine the gasps of delight and perhaps a few playful shudders as your guests encounter these remarkably realistic “eyeball” treats! It’s an opportunity to infuse your celebrations with a touch of whimsical fright, creating a memorable experience for everyone.
For centuries, the autumn season and its culminating holiday, Halloween, have inspired festive foods that range from hearty harvest meals to playful, themed confections. It’s a cherished tradition to craft dishes that reflect the season’s unique charm and mystery, and these cupcakes embody that spirit perfectly. They are not only a fantastic way to embrace the fun side of fright but also surprisingly simple to assemble, proving that you don’t need to be a master baker to create something truly extraordinary. People adore this dish for its incredible visual appeal, its ease of preparation, and, of course, its genuinely delicious taste!
What makes these particular treats so beloved? It’s their irresistible combination of moist, fluffy cake, creamy frosting, and the playful, slightly unsettling detail that makes them so iconic for the season. Whether you’re hosting a grand Halloween bash or simply looking for a fun activity with family, preparing these Halloween Augapfel Cupcakes promises both joy in the making and utter delight in the eating. Get ready to create a centerpiece that tastes as fantastic as it looks!
Ingredients:
- For the Spooky Chocolate Cupcakes:
- 1 ½ cups (190g) all-purpose flour – I always make sure mine is sifted for a lighter crumb.
- 1 cup (200g) granulated sugar – provides the perfect sweetness without being cloying.
- ½ cup (45g) unsweetened cocoa powder – a good quality Dutch-processed cocoa will give a richer, darker color and flavor, ideal for our Halloween theme.
- 1 teaspoon baking soda – helps with the rise and creates a tender texture.
- ½ teaspoon baking powder – works in conjunction with baking soda for that perfect lift.
- ½ teaspoon salt – essential for balancing out the sweetness and enhancing the chocolate flavor.
- ½ cup (113g) unsalted butter, softened to room temperature – this is absolutely crucial for creaming properly and achieving a smooth batter.
- 2 large eggs, also at room temperature – room temperature eggs emulsify better with the butter and sugar.
- 1 teaspoon pure vanilla extract – enhances all the flavors beautifully.
- ½ cup (120ml) buttermilk – its acidity reacts with the baking soda for extra fluffiness; if you don’t have it, you can make your own by adding 1 tablespoon of lemon juice or white vinegar to regular milk and letting it sit for 5-10 minutes.
- ½ cup (120ml) hot water or hot brewed coffee – using hot liquid helps to “bloom” the cocoa powder, intensifying the chocolate flavor and ensuring a smooth, lump-free batter. Coffee also subtly deepens the chocolate notes without tasting like coffee.
- For the Ghastly Vanilla Buttercream:
- 1 cup (226g) unsalted butter, softened to room temperature – again, room temperature is key for a truly smooth, fluffy frosting.
- 4 cups (450g) powdered sugar (confectioners’ sugar), sifted – sifting prevents lumps and makes for a silky-smooth buttercream.
- 1-2 tablespoons heavy cream or milk, as needed – to achieve the perfect spreadable consistency.
- 1 teaspoon pure vanilla extract – the classic flavor that everyone loves.
- Gel food coloring (green, blue, brown, red, and black) – I prefer gel colors because they are concentrated and won’t thin out your frosting like liquid colors can.
- For the Eerie Edible Eyeballs:
- 1 cup (170g) white candy melts – the base for our eyeballs.
- ¼ cup (40g) various colored candy melts (blue, green, brown) – for the irises.
- Black gel food coloring or a black edible food marker – for the pupils.
- Red gel food coloring – for those spooky bloodshot veins.
For the Spooky Chocolate Cupcakes:
Creating these “Halloween Augapfel Cupcakes” starts with a fantastic chocolate base. I find that a rich, moist chocolate cupcake perfectly complements the playful, spooky eyeball decoration.
- Prepare Your Battlefield (and Oven): First things first, let’s get organized! Preheat your oven to 350°F (175°C). Line a 12-cup muffin tin with paper liners. I like to use dark-colored liners if I have them, as they tend to fade into the background when we add our frosting, but any liners will do the trick! Preparing your equipment beforehand ensures a smooth baking process and prevents any frantic scrambling later on.
- Whisk the Dry Wonders: In a medium bowl, combine your all-purpose flour, granulated sugar, unsweetened cocoa powder, baking soda, baking powder, and salt. Give them a good whisk for about 30 seconds to a minute. This step is more important than you might think; it evenly distributes all the leavening agents and ensures that every bite of your cupcake will have the perfect texture and flavor. No one wants a mouthful of unmixed baking soda!
- Cream the Buttery Dream: In a large mixing bowl, using an electric mixer (either a stand mixer with a paddle attachment or a hand mixer), cream together the softened unsalted butter and granulated sugar on medium speed. This should take about 2-3 minutes. You’re looking for a mixture that is light in color and fluffy in texture. This process, called creaming, incorporates air into the butter, which contributes significantly to the cupcakes’ light and tender crumb. Scrape down the sides of the bowl occasionally to ensure everything is thoroughly combined.
- Egg-cellent Additions: Add the eggs to the creamed butter and sugar mixture, one at a time, mixing well after each addition. After the first egg is incorporated, scrape down the sides of the bowl again. Then, add the second egg and mix until just combined. Overmixing at this stage can sometimes lead to tougher cupcakes, so gentle is key. Finally, beat in the vanilla extract until its fragrant aroma fills your kitchen.
- The Alternating Dance: Now it’s time to bring everything together! With the mixer on low speed, alternately add the dry ingredients mixture and the buttermilk to the wet ingredients, beginning and ending with the dry ingredients. My usual rhythm is: one-third dry, half buttermilk, one-third dry, remaining buttermilk, and then the final one-third dry ingredients. Mix only until just combined after each addition. The goal here is to avoid overmixing, which develops the gluten in the flour and can result in tough, dense cupcakes. A few small lumps are perfectly fine; we’re aiming for tenderness, not perfection.
- The Hot Liquid Boost: Gently stir in the hot water or hot brewed coffee into the batter. This step might make the batter seem quite thin, but trust me, it’s going to result in incredibly moist and flavorful chocolate cupcakes. The hot liquid truly blooms the cocoa, intensifying its flavor and giving the cupcakes a lovely, dark hue. Stir just until it’s incorporated.
- Fill ‘Em Up: Divide the cupcake batter evenly among the 12 lined muffin cups. I usually fill each liner about two-thirds full. An ice cream scoop works wonderfully for this, ensuring consistent sizes for all your “Halloween Augapfel Cupcakes.” Don’t overfill, or you risk having your cupcakes bake over the tops of the liners, creating a mess and potentially uneven domes.
- Bake to Perfection: Bake for 18-22 minutes, or until a wooden skewer or toothpick inserted into the center of a cupcake comes out clean, or with just a few moist crumbs attached. Every oven is a little different, so keep an eye on them starting around the 18-minute mark. When they’re done, remove the muffin tin from the oven and let the cupcakes cool in the tin for about 5 minutes. This allows them to set up slightly before you move them.
- Cool Down: After 5 minutes, carefully transfer the cupcakes to a wire rack to cool completely. It’s absolutely essential that the cupcakes are entirely cool before you even think about frosting them. Warm cupcakes will melt your beautiful buttercream, and we definitely don’t want that for our spooky creations!
Whipping Up the Ghastly Vanilla Buttercream:
A good, sturdy buttercream is paramount for holding our “Halloween Augapfel Cupcakes” decorations. This recipe yields a wonderfully smooth and pipes beautifully.
- Butter’s Big Moment: In a large mixing bowl, using your electric mixer, beat the softened unsalted butter on medium-high speed for about 3-4 minutes until it becomes very light, fluffy, and almost white in color. This process aerates the butter, which is the secret to a truly light and airy buttercream, not just a sugary paste. Don’t skimp on this step!
- Sugar Rush (Gradual Style): Gradually add the sifted powdered sugar to the butter, about ½ cup at a time, beating on low speed until each addition is incorporated. Once all the sugar is in, increase the speed to medium-high and beat for another 2-3 minutes. Make sure to scrape down the sides and bottom of the bowl frequently to ensure all the sugar is fully mixed in and there are no hidden lumps. This is key for a silky-smooth finish on your “Halloween Augapfel Cupcakes”.
- Flavor and Flow: Add the vanilla extract and 1 tablespoon of heavy cream (or milk). Beat on medium-high speed for another 1-2 minutes until the frosting is incredibly light and fluffy. If the frosting seems too thick, add the remaining tablespoon of cream, ½ teaspoon at a time, until it reaches your desired consistency – thick enough to hold its shape for piping, but still easily spreadable. I want it to be perfect for our eyeball creations!
- Coloring for Creepiness: Divide a small portion of your white buttercream into several small bowls. Keep the majority of the buttercream white for the base of the eyeballs. In one small bowl, add a few drops of red gel food coloring and mix until you achieve a vibrant, bloody red – this will be for our bloodshot veins. In other small bowls, mix in blue, green, and brown gel food coloring respectively, to create various iris colors for your “Halloween Augapfel Cupcakes”. If you plan to frost the entire cupcake with a base color other than white, reserve a larger portion of buttercream and color it green or black now.
Crafting the Eerie Edible Eyeballs:
This is where the magic happens! Turning simple ingredients into realistic, albeit edible, eyeballs is the heart of these “Halloween Augapfel Cupcakes.”
- Melting the Whites: Place the white candy melts in a microwave-safe bowl. Heat in 30-second intervals, stirring well after each interval, until completely melted and smooth. Be careful not to overheat, as this can cause the candy melts to seize up and become unusable. Alternatively, you can use a double boiler over simmering water for a gentler melting process.
- Piping the Eyeball Bases: Line a baking sheet with parchment paper or wax paper. Spoon the melted white candy melts into a piping bag fitted with a small round tip (or just snip a tiny corner off the bag). Pipe 12-18 circular shapes, about 1 ½ to 2 inches in diameter, onto the parchment paper. These will be the whites of your eyeballs. Try to make them as perfectly round as possible, but don’t worry too much about minor imperfections – they add character! Let these white circles set completely at room temperature or, to speed things up, pop them in the refrigerator for 5-10 minutes. They need to be firm before the next step.
- Adding the Iris Colors: Once the white bases are firm, melt your colored candy melts (blue, green, brown) separately, following the same microwave or double boiler method as before. Spoon each color into its own small piping bag with an even tinier tip. Pipe a smaller circle, about ¾ to 1 inch in diameter, in the center of each white candy melt circle. These are your irises. Use different colors for variety – some blue eyes, some green, some brown. Allow these colored irises to set completely, again, either at room temperature or in the refrigerator.
- The All-Important Pupil: Once the irises are firm, it’s time for the pupil. You have two excellent options here:
- Option A (Edible Marker): If you have a black edible food marker, simply draw a small, dark circle in the very center of each iris. This is usually the easiest and most precise method.
- Option B (Black Gel): If using black gel food coloring, dip a clean toothpick or the very tip of a fine-tipped food-safe brush into the black gel. Carefully dot a small, round pupil in the center of each iris. This requires a steady hand, but the effect can be quite striking.
Allow these pupils to set for a few minutes.
- Bloodshot Details: Now for the really spooky part – the bloodshot veins! Take your small bowl of red gel food coloring. Using a very fine-tipped brush or a clean toothpick, carefully draw thin, squiggly lines radiating outwards from the pupil onto the white part of the eyeball. You want them to look like broken capillaries, so don’t make them too uniform. A few strategically placed lines are more effective than a dense network. This step truly brings the “Halloween Augapfel Cupcakes” to life, or rather, to a spooky un-life!
- Final Set: Once all the details are added, allow the edible eyeballs to set completely. You can place them back in the refrigerator for 10-15 minutes to ensure they are firm and won’t smudge when you handle them.
Assembling Your Halloween Augapfel Cupcakes:
The moment of truth! Bringing all these delightful and eerie components together to create your truly unique “Halloween Augapfel Cupcakes”.
- Frosting the Cupcakes: Take your completely cooled chocolate cupcakes. If you plan to use a colored frosting as a base (e.g., green or black to make the eyeballs pop against a darker background), now is the time to apply it. Otherwise, use your white vanilla buttercream (or any color you prefer for the base) to frost each cupcake generously. You can use an offset spatula to spread a smooth layer, or for a more professional look, use a piping bag with a large round or star tip to create a beautiful swirl. I often opt for a slightly messy, organic swirl, as it provides a nice texture for the eyeball to sit upon, almost like a fleshy mound.
- Placing the Eyeballs: Carefully pick up one of your finished edible eyeballs from the parchment paper. Gently press it onto the center of each frosted cupcake. The frosting should act as a perfect adhesive, holding the eyeball securely in place. Arrange them so that each “Halloween Augapfel Cupcake” proudly displays its eerie gaze.
- Optional Spooky Edges: For an extra touch of creepiness, you can take a tiny amount of the red buttercream (or just red gel food coloring on a toothpick) and dab it around the very base of where the eyeball meets the cupcake frosting. This creates a slightly “bloody” or inflamed look, making the eyeballs seem even more realistic and unsettling. If you used a dark base frosting, the white eyeball contrasting with the dark background is already quite striking.
- Serve Your Spooky Creations: Your “Halloween Augapfel Cupcakes” are now complete and ready to scare and delight! These are best served fresh, but if you need to store them, they will keep in an airtight container at room temperature for up to 2-3 days, or in the refrigerator for up to a week. Just remember to bring them back to room temperature before serving for the best texture and flavor. They are sure to be the star of any Halloween gathering!
Conclusion:
So there you have it, my friends! We’ve journeyed through the creation of a truly show-stopping treat that’s guaranteed to be the star of any ghoulish gathering. If you’re looking for a dessert that marries whimsical spookiness with undeniable deliciousness, this recipe is, without a doubt, a quintessential must-try. These aren’t just any ordinary cupcakes; they are edible works of art, designed to elicit gasps of delight and perhaps a tiny shiver of delicious dread from all who behold them. The beauty of this recipe lies in its perfect balance: an incredibly moist and flavorful base, a rich, creamy frosting that’s a joy to devour, and a strikingly creepy, yet utterly charming, eye design that is far easier to achieve than you might imagine. I’ve personally seen faces light up when these are unveiled, and that’s precisely why I’m so passionate about sharing this particular culinary adventure with you. It’s a chance to flex your creative muscles in the kitchen and bring a genuine smile, or perhaps a wonderfully wicked smirk, to everyone’s face this Halloween season. The satisfaction of crafting something so visually impactful and incredibly tasty is truly immense, making this recipe a standout in your festive baking repertoire.
Elevating Your Spooky Spread: Serving & Variation Ideas
Once your masterpieces are complete, the fun doesn’t stop at just baking them. Presentation is key, especially when dealing with such visually engaging treats! For an ultimate display, arrange your finished Halloween Augapfel Cupcakes on a tiered stand amidst cobwebs and plastic spiders, creating a truly immersive centerpiece for your party table. They pair wonderfully with a bubbling cauldron of spooky punch, ghost-shaped cookies, or even miniature “graveyard” brownie bites. Consider placing them on individual themed saucers for a more personal touch, perhaps with a tiny plastic bat perched on the side. Don’t be afraid to experiment with your serving setup to maximize the eerie enchantment!
And when it comes to variations, the sky’s the limit for your ghastly gourmands! While I’ve guided you through a fantastic vanilla base, feel free to swap it out for a rich chocolate, a vibrant red velvet, or even a spiced pumpkin cupcake batter to perfectly capture those autumnal Halloween flavors. For the “eyes,” think beyond the classic bloodshot look: how about alien eyes with multiple pupils, or zombie eyes with greenish hues and jagged irises? You could even add a tiny drop of edible red gel food coloring right into the pupil for an extra “bloodshot” effect, or use edible glitter around the iris for an otherworldly shimmer. For those with a sweet tooth, a surprise filling of raspberry jam (for a bloody center) or a gooey caramel could elevate these treats to another level of indulgence. Don’t hesitate to personalize the frosting colors too – a vibrant green, a deep purple, or an ominous black base would make the eyeball pop even more. For dietary needs, feel free to adapt the base recipe using your favorite gluten-free flour blend or a dairy-free milk substitute; the decorative elements will remain just as impactful.
Your Turn to Bewitch & Beguile!
Now that you’re armed with all the knowledge and inspiration, I wholeheartedly encourage you to don your apron, preheat your oven, and dive into the delightful challenge of creating these spectacular Halloween treats. Trust me, the joy of seeing these come to life in your own kitchen is a reward in itself. This isn’t just about following instructions; it’s about embracing the spirit of Halloween, one delicious, eerie cupcake at a time. I’m genuinely excited for you to experience the fun and satisfaction that comes with baking something so unique and festive. Once you’ve conjured your batch of spooky delights, I would absolutely LOVE to see your creations! Share your photos, your triumphs, your clever variations, and even your comical mishaps (we all have them!) in the comments below, or tag me on your favorite social media platforms. Your creativity inspires not only me but also our entire community of fellow bakers. Let’s make this Halloween the most deliciously eerie one yet with these unforgettable treats. Happy baking, and may your spooky season be filled with sweet scares and even sweeter smiles!
Creepy Halloween Augapfel Cupcakes: Eyeball Treats!
These delightfully ghoulish Halloween Augapfel Cupcakes offer the perfect blend of eerie aesthetics and scrumptious flavor. Moist chocolate cupcakes topped with creamy vanilla buttercream and realistic edible candy eyeballs, complete with bloodshot veins, make for an absolute showstopper at any spooky gathering. Surprisingly simple to assemble, they’re visually stunning and genuinely delicious.
Ingredients
-
1 ½ cups (190g) all-purpose flour
-
1 cup (200g) granulated sugar
-
½ cup (45g) unsweetened cocoa powder
-
1 teaspoon baking soda
-
½ teaspoon baking powder
-
½ teaspoon salt
-
½ cup (113g) unsalted butter, softened
-
2 large eggs, room temperature
-
1 teaspoon pure vanilla extract
-
½ cup (120ml) buttermilk (or milk + 1 tbsp lemon juice/vinegar)
-
½ cup (120ml) hot water or hot brewed coffee
-
1 cup (226g) unsalted butter, softened
-
4 cups (450g) powdered sugar, sifted
-
1-2 tablespoons heavy cream or milk
-
1 teaspoon pure vanilla extract
-
Gel food coloring (green, blue, brown, red, black)
-
1 cup (170g) white candy melts
-
¼ cup (40g) various colored candy melts (blue, green, brown)
-
Black gel food coloring or a black edible food marker
-
Red gel food coloring
Instructions
-
Step 1
Preheat oven to 350°F (175°C). Line a 12-cup muffin tin. In a medium bowl, whisk together flour, sugar, cocoa powder, baking soda, baking powder, and salt. In a large bowl, cream softened butter and granulated sugar for 2-3 minutes until light and fluffy. Add eggs one at a time, then vanilla extract. Alternately add dry ingredients and buttermilk to wet, beginning and ending with dry; mix until just combined. Stir in hot water or coffee. Divide batter among lined cups, filling two-thirds full. -
Step 2
Bake for 18-22 minutes, or until a toothpick comes out clean. Cool in tin for 5 minutes, then transfer to a wire rack to cool completely. -
Step 3
In a large bowl, beat softened butter for 3-4 minutes until light and fluffy. Gradually add sifted powdered sugar, then vanilla extract and 1 tbsp heavy cream; beat until light and fluffy. Add more cream as needed for desired consistency. Divide a small portion into bowls: color one red for veins, others blue, green, and brown for irises. Keep most buttercream white for cupcake base. -
Step 4
Melt white candy melts. Line a baking sheet with parchment. Pipe 12-18 circular shapes (1.5-2 inches) onto parchment for eyeball whites. Let set completely (5-10 min in fridge). -
Step 5
Melt colored candy melts separately. Pipe smaller circles (0.75-1 inch) in the center of each white base for irises; use various colors. Let set. Using a black edible marker or toothpick with black gel, dot a small pupil in the center of each iris. Let set. -
Step 6
Using a fine-tipped brush or toothpick with red gel, draw thin, squiggly lines radiating from the pupil onto the white part of the eyeball. Allow all details to set completely (10-15 min in fridge). -
Step 7
Frost cooled chocolate cupcakes generously with white vanilla buttercream (or desired base color). Carefully press one finished edible eyeball onto the center of each frosted cupcake. For an optional creepy touch, dab a tiny amount of red buttercream or gel around the eyeball base. -
Step 8
Serve fresh. Store in an airtight container at room temperature for 2-3 days, or refrigerate for up to a week. Bring to room temperature before serving for best texture.
Important Information
Nutrition Facts (Per Serving)
It is important to consider this information as approximate and not to use it as definitive health advice.
Allergy Information
Please check ingredients for potential allergens and consult a health professional if in doubt.
Leave a Comment