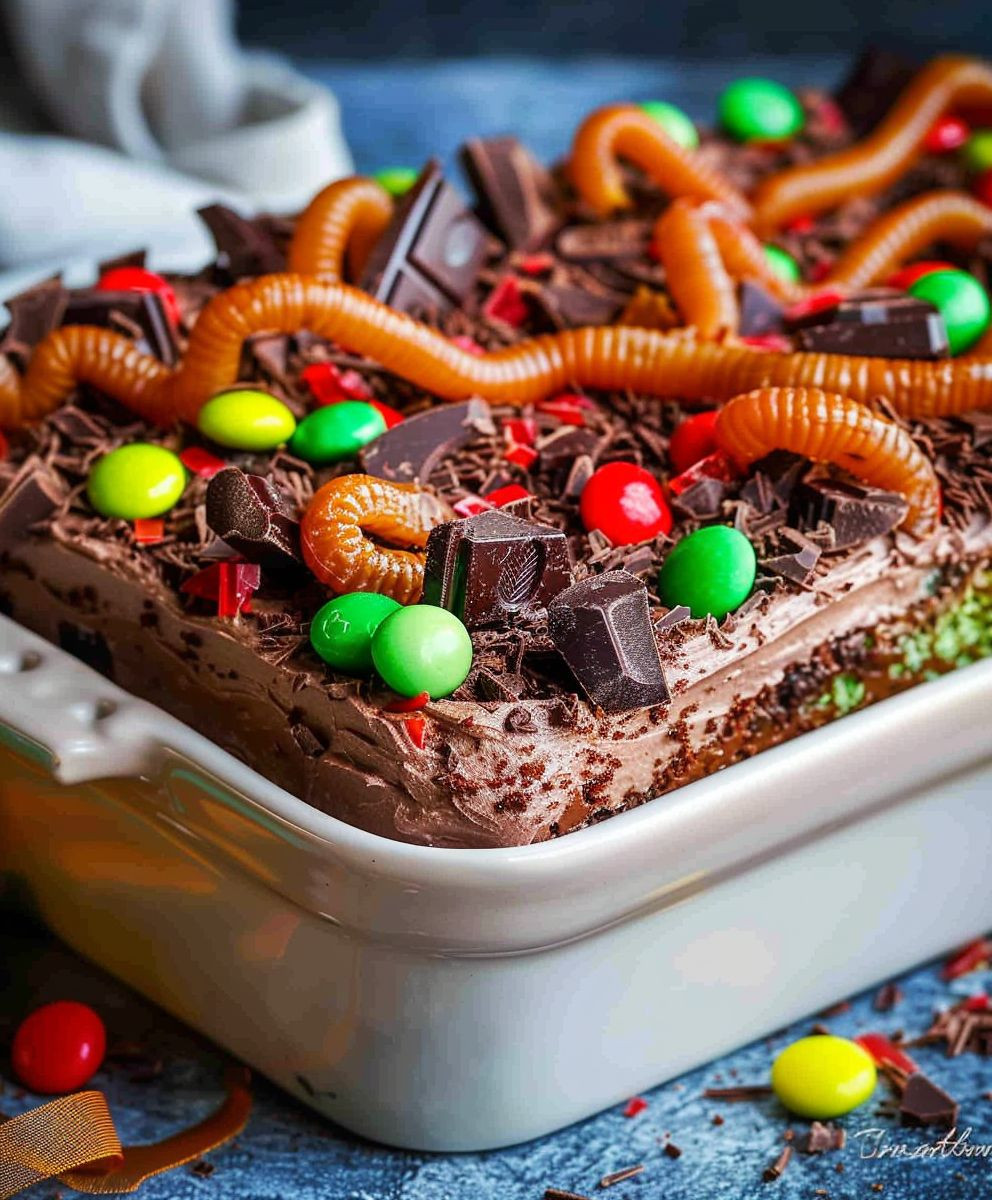
Chocolate Dirt Cake
Chocolate Dirt Cake: The name alone conjures up images of rich, decadent chocolate, playfully disguised as something earthy and fun. And let me tell you, the reality far surpasses the imagination! This isn’t your grandmother’s chocolate cake; it’s a no-bake masterpiece, a delightful dessert that’s as easy to make as it is to devour. I’ve perfected this recipe over the years, drawing inspiration from various old family recipes and modern baking techniques, resulting in a truly unforgettable treat.
While the precise origins of this delightful dessert are a bit murky, the concept of a “dirt cake” – a chocolate pudding base layered with crushed cookies to resemble soil – likely emerged from a desire to create a fun and visually appealing dessert, particularly for children’s parties. The simplicity of the recipe, requiring no oven and minimal baking skills, also contributed to its widespread popularity. It’s a dessert that transcends generations, bringing back cherished childhood memories for many.
What makes Chocolate Dirt Cake so beloved? It’s the perfect combination of textures and flavors. The creamy, intensely chocolatey pudding provides a rich and satisfying base, while the crunchy cookie “dirt” adds a delightful textural contrast. The sweetness is balanced perfectly, avoiding any cloying aftertaste. It’s also incredibly convenient; no lengthy baking time is required, making it ideal for busy weeknights or impromptu gatherings. Plus, the whimsical presentation always makes it a conversation starter, guaranteed to impress your guests.
So, are you ready to embark on this delicious culinary adventure? Let’s get started on creating your own batch of this irresistible Chocolate Dirt Cake!
Ingredients:
- 1 package (18.2 ounces) chocolate cake mix
- 1 package (3.4 ounces) instant chocolate pudding mix
- 1 cup milk
- 1/2 cup vegetable oil
- 4 large eggs
- 1 cup boiling water
- 1 cup heavy cream
- 1/2 cup powdered sugar
- 1 teaspoon vanilla extract
- 1 cup chocolate sandwich cookies, finely crushed (Oreos recommended)
- 1/2 cup chocolate shavings or chocolate sprinkles
- Optional: gummy worms, plastic spiders, or other Halloween-themed candies
Preparing the Cake Batter:
- Preheat your oven to 350°F (175°C). Grease and flour a 9×13 inch baking pan. I find using baking spray with flour works best for this step, saving me a little time and mess.
- In a large bowl, combine the chocolate cake mix, chocolate pudding mix, milk, vegetable oil, and eggs. Give it a good, thorough mixing. I usually use my electric mixer for this part; it makes it so much smoother and quicker.
- Gradually add the boiling water to the batter while mixing on low speed. Be careful, the boiling water will steam! This is where the magic happens – the batter will become wonderfully smooth and decadent.
- Pour the batter into the prepared baking pan and spread it evenly. Make sure it reaches all the corners for even baking.
- Bake for 30-35 minutes, or until a wooden skewer inserted into the center comes out clean. Every oven is a little different, so keep an eye on it towards the end of the baking time.
- Once baked, let the cake cool completely in the pan before frosting. This is crucial to prevent the frosting from melting.
Making the Whipped Cream Frosting:
- In a chilled bowl, beat the heavy cream with an electric mixer until soft peaks form. Make sure your bowl and beaters are cold for best results – this helps the cream whip up nicely.
- Gradually add the powdered sugar and vanilla extract, continuing to beat until stiff peaks form. Don’t overbeat, or you’ll end up with butter!
- Once the frosting is ready, gently fold in about half of the crushed chocolate sandwich cookies. I like to reserve some for topping.
Assembling the Chocolate Dirt Cake:
- Once the cake is completely cool, frost the top evenly with the whipped cream frosting. Try to get a nice, smooth layer.
- Sprinkle the remaining crushed chocolate sandwich cookies over the frosting to create the “dirt” effect. I like to use a spoon to gently press some of the crumbs into the frosting for a more textured look.
- Gently sprinkle the chocolate shavings or sprinkles over the “dirt” for added decoration. A little goes a long way here.
- Optional: Add gummy worms, plastic spiders, or other Halloween-themed candies to create a spooky effect. This is where you can really get creative and have fun!
- Refrigerate the cake for at least 30 minutes before serving to allow the flavors to meld and the frosting to set. This step is important for the best flavor and texture.
- For an even more intense chocolate flavor, consider adding a layer of melted chocolate between the cake and the frosting. Let it cool slightly before adding the whipped cream.
- If you want a richer, more intense chocolate flavor, you can substitute dark chocolate pudding mix for the regular chocolate pudding mix. This will add a more sophisticated taste to your cake.
- To make the cake ahead of time, you can bake the cake a day or two in advance and store it in an airtight container at room temperature. Prepare the frosting the day of serving to maintain its fluffy texture.
- For a variation, try using different types of cookies for the “dirt” layer. Graham cracker crumbs or even crushed biscotti could add a unique twist.
- Experiment with different types of chocolate shavings or sprinkles. White chocolate shavings would create a beautiful contrast against the dark chocolate cake and frosting.
- If you don’t have heavy cream, you can use whipped topping as a substitute, but the texture might not be as rich and creamy. However, it’s a good option if you’re in a pinch.
Tips and Variations:
This recipe is incredibly versatile! Feel free to experiment with different toppings and additions to personalize your Chocolate Dirt Cake. You can even add a layer of chocolate ganache for an extra decadent treat. Remember, baking is all about having fun and expressing your creativity!
Conclusion:
So there you have it – my incredibly decadent and surprisingly easy Chocolate Dirt Cake recipe! I truly believe this recipe is a must-try for several reasons. First, the flavor is simply divine. That rich, intensely chocolatey pudding base, combined with the satisfying crunch of the Oreo “dirt” and the creamy sweetness of the whipped cream topping, creates a symphony of textures and tastes that’s hard to resist. It’s the perfect balance of sweet and slightly bitter, making it incredibly moreish.
Secondly, this Chocolate Dirt Cake is incredibly versatile. It’s a showstopper dessert that’s surprisingly simple to make, perfect for everything from casual weeknight gatherings to impressive dinner parties. The preparation time is minimal, and the chilling time allows you to get on with other things, making it a stress-free dessert option even when you’re short on time.
And finally, the presentation! This cake is visually stunning. The “dirt” layer looks so realistic, and the whole thing just screams deliciousness. It’s a guaranteed conversation starter, and I’ve yet to meet anyone who hasn’t been impressed by its appearance.
Serving Suggestions & Variations:
While the recipe stands perfectly on its own, there are countless ways to personalize your Chocolate Dirt Cake to suit your preferences. For a more intense chocolate flavor, try using dark chocolate Oreos or adding a tablespoon of cocoa powder to the pudding mix. You can also get creative with the toppings! Instead of whipped cream, consider using chocolate ganache, a dollop of caramel sauce, or even a sprinkle of chopped nuts for added texture and flavor.
For a festive touch, consider adding gummy worms or plastic spiders to the “dirt” for a Halloween-themed dessert. For a summery twist, use crushed chocolate sandwich cookies instead of Oreos and top with fresh berries. The possibilities are truly endless!
I’ve also found that serving this Chocolate Dirt Cake in individual glasses or small bowls makes it perfect for parties or potlucks. It allows guests to easily serve themselves and prevents the cake from getting messy. Alternatively, you can bake the pudding layer in a springform pan for a more traditional cake presentation.
Don’t Forget the Finishing Touches!
To really elevate your Chocolate Dirt Cake, consider adding a few extra touches. A dusting of cocoa powder over the “dirt” layer adds a beautiful, rustic finish. You can also use a piping bag to create decorative swirls of whipped cream on top. A few chocolate shavings or sprinkles can also add a touch of elegance.
Ready to Give it a Try?
I wholeheartedly encourage you to try this recipe and experience the magic of this incredibly delicious Chocolate Dirt Cake for yourself. It’s a guaranteed crowd-pleaser, and I’m confident it will become a staple in your dessert repertoire. Once you’ve made it, I’d love to hear about your experience! Share your photos and feedback on social media using #ChocolateDirtCake – I can’t wait to see your creations!
Remember to adjust the sweetness and chocolate intensity to your liking. Baking is all about experimentation and finding what works best for you. So get baking, and happy creating!
Chocolate Dirt Cake: An Easy No-Bake Recipe
Spooky chocolate cake layers, creamy whipped cream frosting, and crushed chocolate cookies create a delicious and visually appealing dessert perfect for Halloween.
Ingredients
Instructions
Recipe Notes
- For a richer chocolate flavor, use dark chocolate pudding mix.
- You can bake the cake a day or two in advance and store it in an airtight container at room temperature. Prepare the frosting the day of serving.
- Consider adding a layer of melted chocolate between the cake and frosting (let cool slightly before adding whipped cream).
- Experiment with different cookie crumbs or chocolate toppings.
- Whipped topping can be substituted for heavy cream, but the texture may be less rich.


Leave a Comment