
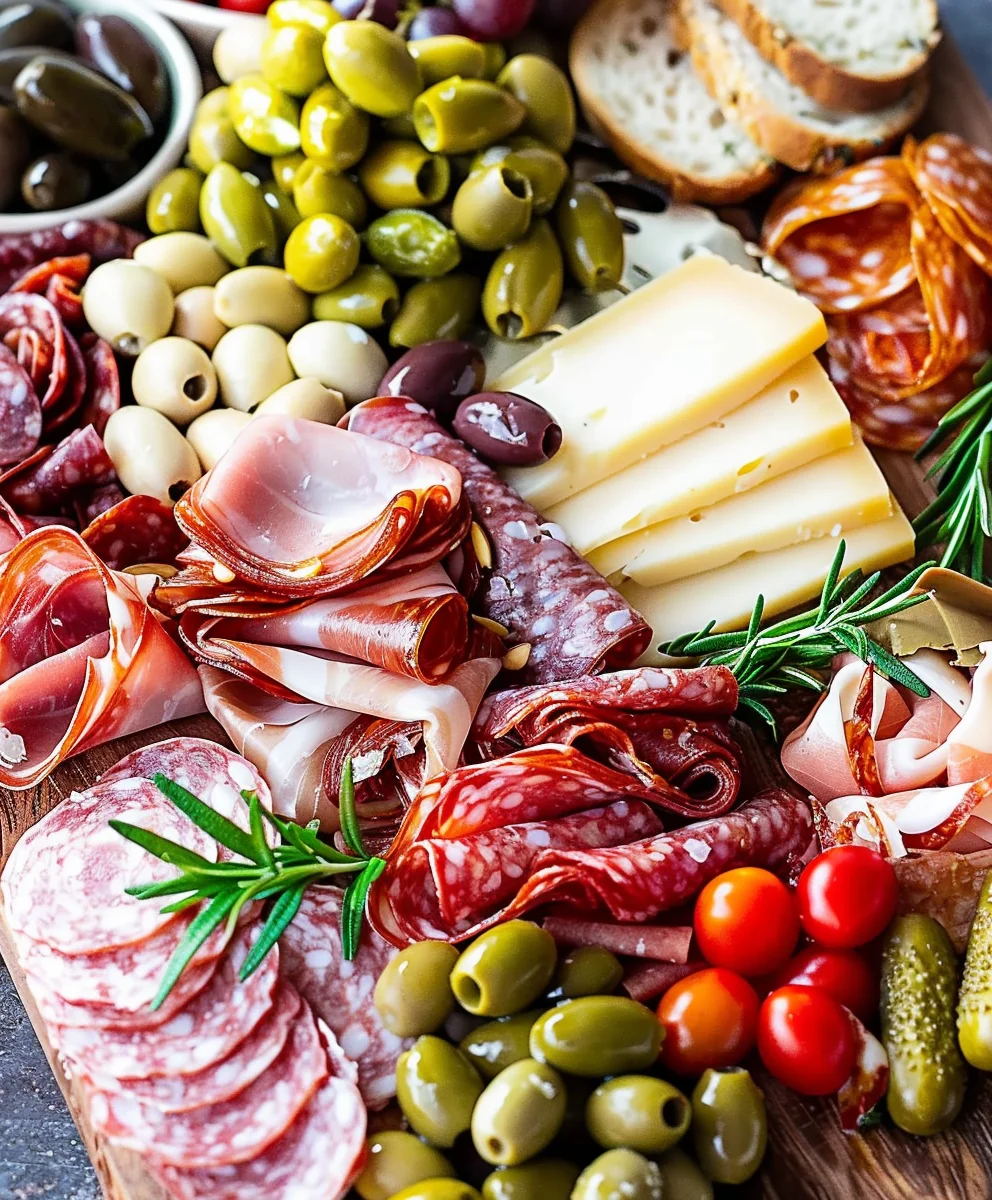
Mediterranean Charcuterie Board. Imagine a vibrant tableau of sun-drenched flavors, a feast for both the eyes and the palate, effortlessly gracing your table. This isn’t just an appetizer; it’s an invitation to savor the essence of the Mediterranean lifestyle, known for its emphasis on fresh, wholesome ingredients and communal dining. Drawing deeply from the rich culinary traditions of countries like Greece, Italy, and Spain, where mezze, tapas, and antipasti reign supreme, a charcuterie board in this style embodies the joyous spirit of sharing small, delectable bites. It’s a centuries-old tradition reimagined for modern entertaining.
I find people utterly adore a Mediterranean Charcuterie Board because it masterfully combines incredible convenience with an explosion of diverse tastes and textures. From the salty allure of Kalamata olives and creamy feta to the sweet juiciness of ripe figs, crunchy fresh vegetables, and savory cured meats, every element works in harmonious synergy. It’s incredibly adaptable, accommodating various dietary preferences, and offers a wonderfully healthy yet utterly satisfying way to entertain. Best of all, it allows you to spend precious moments with your loved ones, creating cherished memories around a beautifully curated spread, rather than being confined to the kitchen.
Ingredients:
- For the Creamy Hummus:
- 1 (15-ounce) can chickpeas, rinsed and drained (I often reserve a tablespoon or two of the liquid)
- 1/4 cup fresh lemon juice (from 1-2 lemons, I always use fresh!)
- 1/4 cup tahini
- 1 small garlic clove, minced (or 1/2 a larger one, you decide your garlic preference!)
- 2 tablespoons olive oil, plus more for drizzling
- 1/2 teaspoon ground cumin
- Salt to taste (I start with 1/2 teaspoon)
- 2-4 tablespoons ice water, for desired consistency
- Pinch of paprika or sumac for garnish
- Fresh parsley, chopped, for garnish
- For the Refreshing Tzatziki:
- 1 large cucumber (English or regular, I find English varieties less seedy)
- 1 1/2 cups plain Greek yogurt (full-fat or 2%, I prefer full-fat for richness)
- 2 cloves garlic, minced
- 1 tablespoon olive oil
- 1 tablespoon fresh dill, chopped (or a mix of dill and mint, which I adore!)
- 1 tablespoon fresh lemon juice
- 1/2 teaspoon salt, plus more for draining cucumber
- Freshly ground black pepper to taste
- Cheeses & Meats:
- 8 ounces Halloumi cheese, sliced into 1/2-inch thick pieces (perfect for grilling!)
- 4-6 ounces Feta cheese, crumbled or presented as a block
- 4-6 ounces soft goat cheese, plain or herb-crusted
- 4-6 ounces thinly sliced Prosciutto
- 4-6 ounces assorted cured meats (e.g., Salami, Mortadella, or Chorizo, I love variety!)
- Marinated Olives:
- 1 1/2 cups mixed Mediterranean olives (Kalamata, Castelvetrano, Manzanilla, pitted or unpitted, I enjoy the contrast)
- 1/4 cup olive oil (good quality extra virgin, please!)
- 2 cloves garlic, thinly sliced
- 1 sprig fresh rosemary or thyme (or both!)
- 1 strip lemon peel (about 2 inches long, I use a vegetable peeler to get it)
- Pinch of red pepper flakes (optional, for a little kick!)
- Fresh Vegetables:
- 1 large cucumber, sliced into rounds or sticks
- 1 pint cherry tomatoes, halved or left whole (a mix of colors looks beautiful)
- 1-2 bell peppers (any color, I often choose red and yellow for brightness), sliced into strips
- 1 cup baby carrots or carrot sticks
- 4-6 radishes, thinly sliced (for a peppery crunch)
- Fresh Fruits:
- 1 bunch red or green grapes
- 2-3 fresh figs, quartered (when in season, they are a must!)
- 1 small melon (cantaloupe or honeydew), cut into wedges or cubes
- 1 orange or clementine, segmented
- Breads & Crackers:
- 3-4 pieces pita bread, cut into wedges (I love them warmed or lightly toasted!)
- 1 crusty baguette or artisan bread, sliced
- Assorted crackers (water crackers, whole grain crackers, I pick a few types)
- Nuts & Dried Fruits:
- 1/2 cup raw almonds or pistachios
- 1/2 cup dried apricots or dates (pitted and halved)
- Garnishes & Extras:
- Fresh herbs (parsley, dill, mint, or oregano) for decoration
- Lemon wedges
- Extra virgin olive oil for drizzling
- Honey (for goat cheese, if desired)
- Small bowls or ramekins for dips and smaller items
Phase 1: Preparing the Dips
Step 1: Crafting the Creamy Homemade Hummus
- First things first, I take my canned chickpeas and drain them well, giving them a good rinse under cold water. If I’m feeling extra fancy and want the absolute creamiest hummus, I’ll even take a few minutes to gently rub the chickpeas between my fingers to remove their thin skins. It’s a little extra effort, but it really makes a difference in texture!
- In a food processor, I combine the tahini and fresh lemon juice. I process this mixture for about 1-2 minutes until it becomes pale and creamy. This step is crucial for achieving that light, fluffy texture that everyone loves in a good hummus. Scrape down the sides of the bowl as needed to ensure everything is well incorporated.
- Next, I add the drained chickpeas, minced garlic, 2 tablespoons of olive oil, ground cumin, and about 1/2 teaspoon of salt to the food processor.
- I process the mixture for 3-5 minutes, stopping frequently to scrape down the sides. The hummus will look thick and perhaps a bit clumpy at first.
- While the processor is running, I slowly add 2 to 4 tablespoons of ice water, one tablespoon at a time, until the hummus reaches my desired smooth and creamy consistency. The ice water helps to lighten the hummus and makes it incredibly airy. Taste and adjust seasonings – you might want more salt, lemon, or cumin. Don’t be shy about seasoning to your liking!
- Once it’s perfect, I transfer the hummus to a small serving bowl. I like to make a little swirl on top with the back of a spoon and drizzle generously with extra olive oil. A sprinkle of paprika or sumac and some chopped fresh parsley make it look absolutely inviting.
Step 2: Mixing the Refreshing Tzatziki
- For the tzatziki, the key is to manage the cucumber’s water content. I start by grating the cucumber on the large holes of a box grater.
- Once grated, I place the cucumber in a colander, sprinkle it generously with about 1/2 teaspoon of salt, and let it sit for at least 15-20 minutes. The salt will draw out the excess moisture.
- After resting, I take handfuls of the grated cucumber and squeeze out as much liquid as possible. I mean, really squeeze it! You’ll be surprised how much water comes out. This step prevents your tzatziki from becoming watery later.
- In a medium bowl, I combine the squeezed cucumber with the Greek yogurt, minced garlic, 1 tablespoon of olive oil, fresh dill (and mint, if I’m using it!), and fresh lemon juice.
- I stir everything together until it’s well combined. Then, I season with salt and freshly ground black pepper to taste. I recommend tasting it and adjusting the seasoning here.
- I transfer the tzatziki to a serving bowl. For the best flavor, I cover it and refrigerate it for at least 30 minutes before serving. This allows the flavors to meld beautifully. I often make it a few hours ahead, which makes preparing the “Mediterranean Charcuterie Board” so much smoother.
Phase 2: Preparing Cheeses and Marinated Olives
Step 3: Grilling the Halloumi Cheese
- I start by slicing the block of Halloumi cheese into 1/2-inch thick pieces. These are the perfect size for getting a good sear without overcooking.
- Heat a grill pan or a non-stick skillet over medium-high heat. You can brush the pan lightly with olive oil, or if your Halloumi is a bit oily itself, it might not even be necessary.
- Once the pan is hot, I place the Halloumi slices on it in a single layer, being careful not to overcrowd the pan.
- Grill for 2-4 minutes per side, or until beautiful golden-brown grill marks appear and the cheese is softened but still holds its shape. The key is to get that lovely caramelization!
- I remove the Halloumi from the pan and set it aside. It’s best served warm, so I try to grill it just before assembling or serving the “Mediterranean Charcuterie Board”.
Step 4: Crafting the Aromatic Marinated Olives
- In a small saucepan, I combine the 1/4 cup of good quality olive oil, thinly sliced garlic, fresh rosemary (or thyme), and the strip of lemon peel. If I’m adding a little heat, I’ll toss in a pinch of red pepper flakes here too.
- I gently heat this mixture over low heat for about 5-7 minutes. The goal is to infuse the olive oil with the aromatics, not to fry them. You’ll smell the lovely fragrance filling your kitchen.
- Once fragrant, I remove the saucepan from the heat and let the infused oil cool slightly.
- In a small bowl, I combine the mixed Mediterranean olives. Pour the warm, infused olive oil mixture over the olives, making sure all the lovely garlic and herbs are distributed.
- I stir gently to combine everything. For the best flavor, I let the olives marinate at room temperature for at least 30 minutes, or even longer in the refrigerator (just bring them back to room temperature before serving for optimal flavor). These marinated olives are a standout on any Mediterranean Charcuterie Board!
Step 5: Preparing Other Cheeses and Cured Meats
- For the Feta cheese, I can either crumble it into a small bowl or present a beautiful block on the board for guests to break off pieces. Sometimes I drizzle it with a tiny bit of olive oil and a sprinkle of dried oregano.
- For the goat cheese, I simply unwrap it and place it in a small dish. If it’s a log, it looks lovely sliced into rounds. A drizzle of honey over the goat cheese can be a delightful addition.
- The cured meats, like Prosciutto, Salami, and Mortadella, require very little preparation. I carefully arrange them on the board, often folding or rolling the thin slices to create texture and visual interest. Presentation is everything for a stunning Mediterranean Charcuterie Board!
Phase 3: Preparing Fresh Produce and Breads
Step 6: Washing and Cutting Fresh Vegetables
- I thoroughly wash all the fresh vegetables.
- The cucumber can be sliced into elegant rounds or practical sticks.
- Cherry tomatoes are often halved, but some I leave whole for visual variety.
- Bell peppers get their seeds and membranes removed, then I slice them into neat strips, perfect for dipping.
- Baby carrots are easy; just a quick wash. If I’m using larger carrots, I’ll peel and cut them into sticks.
- Radishes are trimmed and thinly sliced, adding a pop of color and a delightful peppery crunch.
- I arrange these colorful vegetables in various spots on the board, making sure they’re easily accessible.
Step 7: Preparing Fresh Fruits
- I wash the grapes and arrange them in a small cluster, or pull them into smaller bunches for easier access.
- Fresh figs, when they’re in season, are a true treat! I quarter them to expose their beautiful interior.
- Melon can be cut into small wedges or bite-sized cubes.
- For oranges or clementines, I peel and segment them, removing any pith, so they’re ready to enjoy.
- The vibrant colors of the fruits add another layer of visual appeal to the “Mediterranean Charcuterie Board.”
Step 8: Preparing and Arranging Breads and Crackers
- I love to warm or lightly toast the pita bread. I cut each pita into 6-8 wedges. You can do this in a dry skillet, a toaster oven, or even a microwave for a few seconds. Warm pita is much more inviting and aromatic.
- The crusty baguette or artisan bread should be sliced into manageable pieces, about 1/2 inch thick.
- I select a variety of crackers and arrange them in small piles or fanned out on the board. Having different shapes and textures makes the board more interesting.
- These elements are crucial for scooping up dips and pairing with cheeses and meats, making them a central part of the “Mediterranean Charcuterie Board” experience.
Phase 4: Assembling Your Mediterranean Charcuterie Board
Step 9: The Grand Assembly – Bringing Your Mediterranean Vision to Life
- Choose Your Board: First, I select a large serving platter, a wooden cutting board, or a beautiful marble slab. The bigger, the better, as you want space to spread everything out invitingly.
- Anchor with Dips: I always start by placing the small bowls of homemade hummus and refreshing tzatziki on the board. These are often central points, so I position them strategically to allow easy access from all sides of the board. Sometimes I’ll place them diagonally from each other to create balance.
- Distribute Cheeses: Next, I arrange the cheeses. The grilled Halloumi, still warm or at room temperature, goes onto the board. I might stack a few pieces or lay them out. I then place the crumbled Feta in a small dish or directly onto the board in a nice pile, and the goat cheese log or crumbles in another spot. Varying the placement of these dairy delights adds visual interest.
- Add the Marinated Olives and Nuts/Dried Fruits: I carefully spoon the marinated olives into a small bowl, ensuring some of the flavorful herbs and garlic pieces are visible. These bowls, along with smaller bowls of nuts (almonds, pistachios) and dried fruits (apricots, dates), are nestled into gaps around the dips and cheeses. These smaller items are perfect for filling in spaces and adding different textures.
- Arrange the Cured Meats: This is where I get creative with folding and rolling. I artfully arrange the Prosciutto, Salami, and other cured meats in various clusters around the board. I don’t just lay them flat; I might fold Prosciutto into ribbons, fan out slices of salami, or create small rosettes. This adds height and dimension to your “Mediterranean Charcuterie Board”.
- Incorporate Fresh Vegetables: Now, I begin to fill in larger sections with the colorful fresh vegetables. I arrange the sliced cucumbers, bell pepper strips, cherry tomatoes, carrot sticks, and radishes in appealing clusters. I try to spread the colors evenly across the board so that there are vibrant hues everywhere.
- Introduce the Fresh Fruits: The fresh fruits come next. I place the grapes in a prominent spot, perhaps spilling slightly over the edge of the board. The quartered figs are arranged elegantly, exposing their beautiful interior. Melon wedges and orange segments add sweetness and more bright colors.
- Place Breads and Crackers: I strategically place the warmed pita wedges, sliced baguette, and assorted crackers around the perimeter of the board, or in open spots, making sure they are easily reachable. Sometimes I’ll have a separate small basket of bread nearby if the board gets too full.
- Final Touches and Garnishes: My favorite part! I drizzle a little extra virgin olive oil over some of the cheeses or vegetables. I tuck in fresh herb sprigs (parsley, dill, mint) strategically to add bursts of green and freshness. Lemon wedges are placed in a couple of spots, ready for squeezing over various elements. These small details truly elevate your Mediterranean Charcuterie Board from good to spectacular.
- Step Back and Admire: Finally, I take a moment to step back and look at my creation. I adjust anything that looks too crowded or sparse. The goal is to make it look abundant, inviting, and utterly delicious. A well-assembled “Mediterranean Charcuterie Board” is not just food; it’s an experience, a feast for the eyes as much as for the palate! Enjoy sharing this wonderful spread with your loved ones!
Conclusion:
If there’s one recipe I genuinely hope you’ll add to your culinary repertoire, it’s this one. I’ve shared countless meals with friends and family, and time and time again, this dish proves to be an absolute showstopper – a genuine crowd-pleaser that effortlessly combines vibrant flavors with surprising simplicity. It’s not just a recipe; it’s an experience, a celebration of fresh ingredients and heartwarming aromas that will linger in your memory long after the last bite. What truly sets this dish apart is its incredible ability to deliver on all fronts: taste, presentation, and ease of preparation. You don’t need to be a gourmet chef to achieve spectacular results; the magic lies in the quality of the components and the straightforward steps we’ve outlined.
I find myself turning to it again and again because it consistently delivers that “wow” factor without any of the stress typically associated with preparing an impressive meal. Imagine bringing this to your next potluck, or serving it up for a relaxed weekend lunch – the compliments are guaranteed! The blend of textures, from the tender main components to the crisp, fresh garnishes, creates a symphony in your mouth that is both refreshing and deeply satisfying. And the aroma? Oh, the aroma alone is enough to draw everyone to the kitchen, eagerly anticipating what’s to come. Trust me when I say, this is one of those dishes that just feels good to eat, nourishing your body and delighting your palate in equal measure. It’s a testament to how incredible simple, good food can truly be.
Now, let’s talk about making it your own! While the core recipe is utterly fantastic as is, I always encourage a little culinary adventure. For a delightful twist, consider serving this alongside some warm pita bread, crusty artisan baguette slices, or even crisp vegetable sticks like cucumber and bell peppers for a lighter option. It also pairs beautifully with a fresh green salad dressed with a simple lemon vinaigrette. If you’re looking to enhance the protein content, grilled chicken breast or pan-seared halloumi cheese would be wonderful additions. For those who love a bit of heat, a pinch of red pepper flakes sprinkled over the top before serving adds a lovely kick. And don’t be afraid to experiment with different fresh herbs; a sprinkle of fresh dill or chives can introduce a whole new layer of flavor. This recipe is incredibly versatile, making it the perfect candidate to anchor an elaborate spread or even shine as the star attraction on your next Mediterranean Charcuterie Board. Imagine the vibrant colors and enticing aromas it would bring to an array of cheeses, olives, and cured meats – truly a feast for the senses! You could even prepare individual mini portions in small ramekins for an elegant appetizer presentation.
So, there you have it. My heartfelt plea to you is this: please, please give this recipe a try. I promise it won’t disappoint. Step into your kitchen, gather these wonderful ingredients, and let the magic unfold. Cooking should be an enjoyable, creative process, and this dish truly embodies that spirit. I am absolutely certain you’ll fall in love with its simplicity, its incredible flavors, and its universal appeal. Once you’ve made it, I would be absolutely thrilled to hear about your experience! Did you stick to the original recipe, or did you put your own unique spin on it? What did your friends and family think? Please feel free to share your photos, your feedback, and any amazing variations you come up with in the comments section below or on social media. Your culinary adventures inspire me, and I can’t wait to see what wonderful creations you’ll bring to life. Happy cooking, my friends!
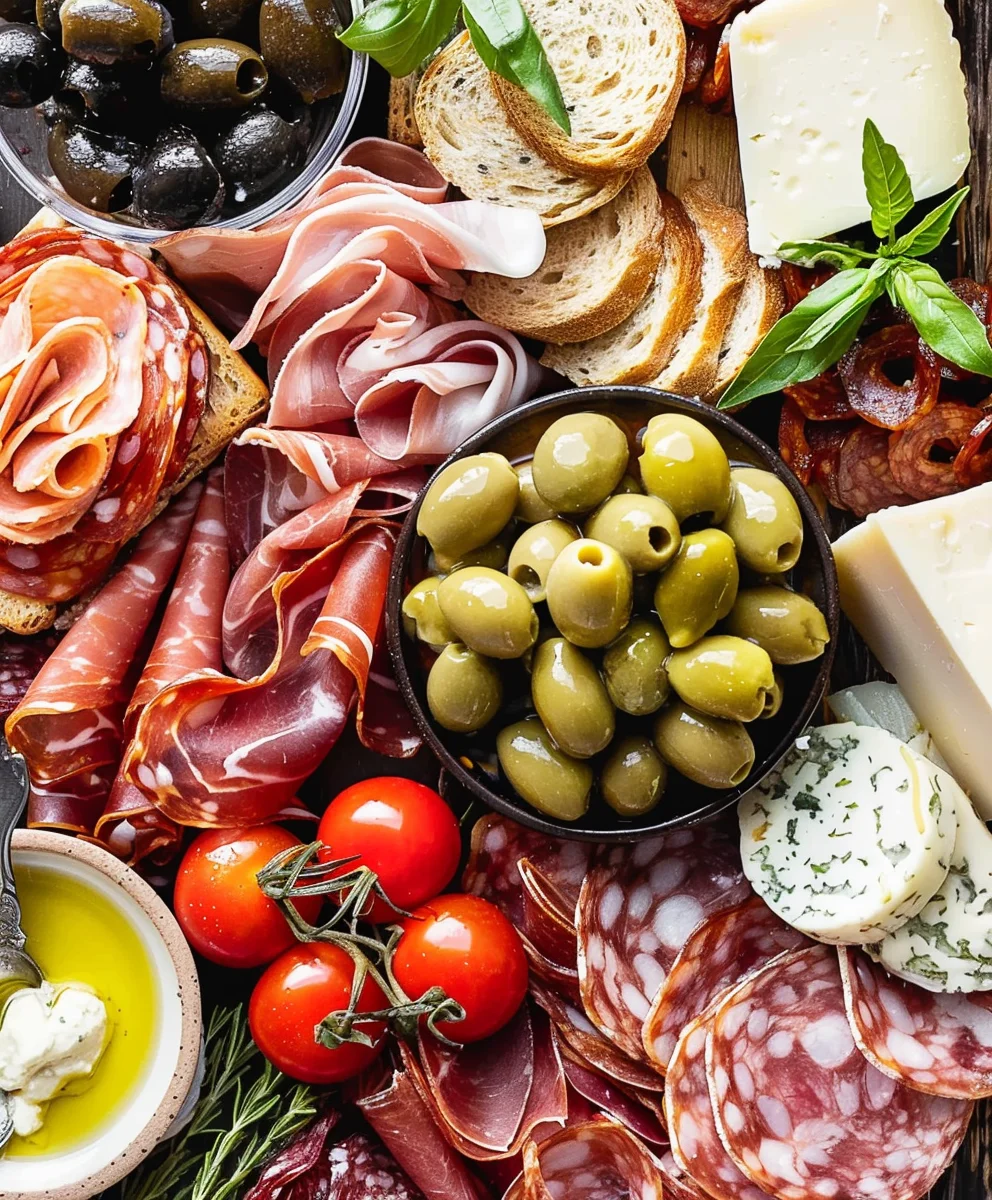
Ultimate Mediterranean Charcuterie Board for Easy Entertaining
A vibrant Mediterranean Charcuterie Board offering sun-drenched flavors, fresh ingredients, and a variety of textures, perfect for easy and healthy entertaining. Embrace the joyous spirit of sharing small, delectable bites with loved ones.
Ingredients
-
5oz (150g) beef prosciutto crudo
-
7oz (200g) beef prosciutto cotto or beef ham
-
7oz (200g) beef salami (plain, peppered, parmesan coated)
-
7oz (200g) beef mortadella
-
5oz (150g) bresaola
-
5oz (150g) cured beef sausage (mini sticks or thinly sliced)
-
7oz (200g) Gravera (or Gruyere)
-
7oz (200g) cheddar
-
7oz (200g) blue cheese
-
5oz (150g) mini mozzarella balls
-
1 cup cherry tomatoes
-
1 cup cucumber (in sticks)
-
1 cup olives
-
1 cup fresh fruit (such as grapes, pomegranate, sliced apple)
-
½ cup dried fruit (such as prunes or dried apricots)
Instructions
-
Step 1
Rinse & drain 1 (15-ounce) can chickpeas. Process 1/4 cup tahini & 1/4 cup fresh lemon juice (1-2 min). Add chickpeas, 1 small minced garlic clove, 2 tbsp olive oil, 1/2 tsp ground cumin, 1/2 tsp salt; process 3-5 min. Slowly add 2-4 tbsp ice water for desired consistency. Adjust seasoning. Transfer to bowl, drizzle with olive oil, garnish with paprika/sumac & chopped fresh parsley. -
Step 2
Grate 1 large cucumber, sprinkle with 1/2 tsp salt, and let sit 15-20 min. Squeeze out all excess liquid thoroughly. Combine squeezed cucumber with 1 1/2 cups plain Greek yogurt, 2 minced garlic cloves, 1 tbsp olive oil, 1 tbsp fresh dill, 1 tbsp fresh lemon juice. Season with salt & freshly ground black pepper. Stir well. Chill for at least 30 min before serving. -
Step 3
Slice 8 oz Halloumi cheese into 1/2-inch thick pieces. Heat a grill pan or non-stick skillet over medium-high heat. Grill Halloumi 2-4 min per side until golden-brown grill marks appear and cheese softens. Remove and set aside. Best served warm. -
Step 4
In a small saucepan, combine 1/4 cup good quality olive oil, 2 thinly sliced garlic cloves, 1 sprig fresh rosemary/thyme, 1 strip lemon peel, and optional pinch red pepper flakes. Gently heat on low for 5-7 min until fragrant. Remove from heat and cool slightly. Pour over 1 1/2 cups mixed Mediterranean olives in a small bowl. Marinate at room temperature for at least 30 min. -
Step 5
Thoroughly wash and cut all fresh vegetables and fruits. This includes: slicing 1 large cucumber (for sticks/rounds), halving 1 pint cherry tomatoes, slicing 1-2 bell peppers into strips, washing 1 cup baby carrots or carrot sticks, trimming and thinly slicing 4-6 radishes. For fruits: arranging 1 bunch red/green grapes, quartering 2-3 fresh figs, cutting 1 small melon (cantaloupe/honeydew) into wedges/cubes, and segmenting 1 orange/clementine. -
Step 6
Warm or lightly toast 3-4 pieces pita bread and cut into 6-8 wedges. Slice 1 crusty baguette or artisan bread. Select and arrange assorted crackers (e.g., water crackers, whole grain crackers). -
Step 7
Choose a large serving platter or board. Place small bowls of prepared hummus, tzatziki, and the 1 1/2 cups marinated olives strategically. Arrange the prepared grilled Halloumi, 4-6 oz Feta (crumbled or as a block), and 4-6 oz soft goat cheese. Also arrange the specified cheeses: 7oz Gravera (or Gruyere), 7oz cheddar, 7oz blue cheese, and 5oz mini mozzarella balls. Artfully arrange the cured beef meats: 5oz beef prosciutto crudo, 7oz beef prosciutto cotto or beef ham, 7oz beef salami, 7oz beef mortadella, 5oz bresaola, and 5oz cured beef sausage, folding or rolling slices for texture and visual interest. -
Step 8
Fill in remaining spaces with prepared fresh vegetables (sliced cucumber, cherry tomatoes, bell peppers, carrots, radishes) and fresh fruits (grapes, figs, melon, orange/clementine). Nest bowls of 1/2 cup raw almonds or pistachios and 1/2 cup dried apricots or dates. Place warmed pita wedges, sliced baguette, and assorted crackers around the board. Drizzle extra virgin olive oil over some cheeses/vegetables. Tuck in fresh herb sprigs (parsley, dill, mint, oregano) and lemon wedges for garnish. Enjoy sharing this wonderful, abundant spread!
Important Information
Nutrition Facts (Per Serving)
It is important to consider this information as approximate and not to use it as definitive health advice.
Allergy Information
Please check ingredients for potential allergens and consult a health professional if in doubt.


Leave a Comment