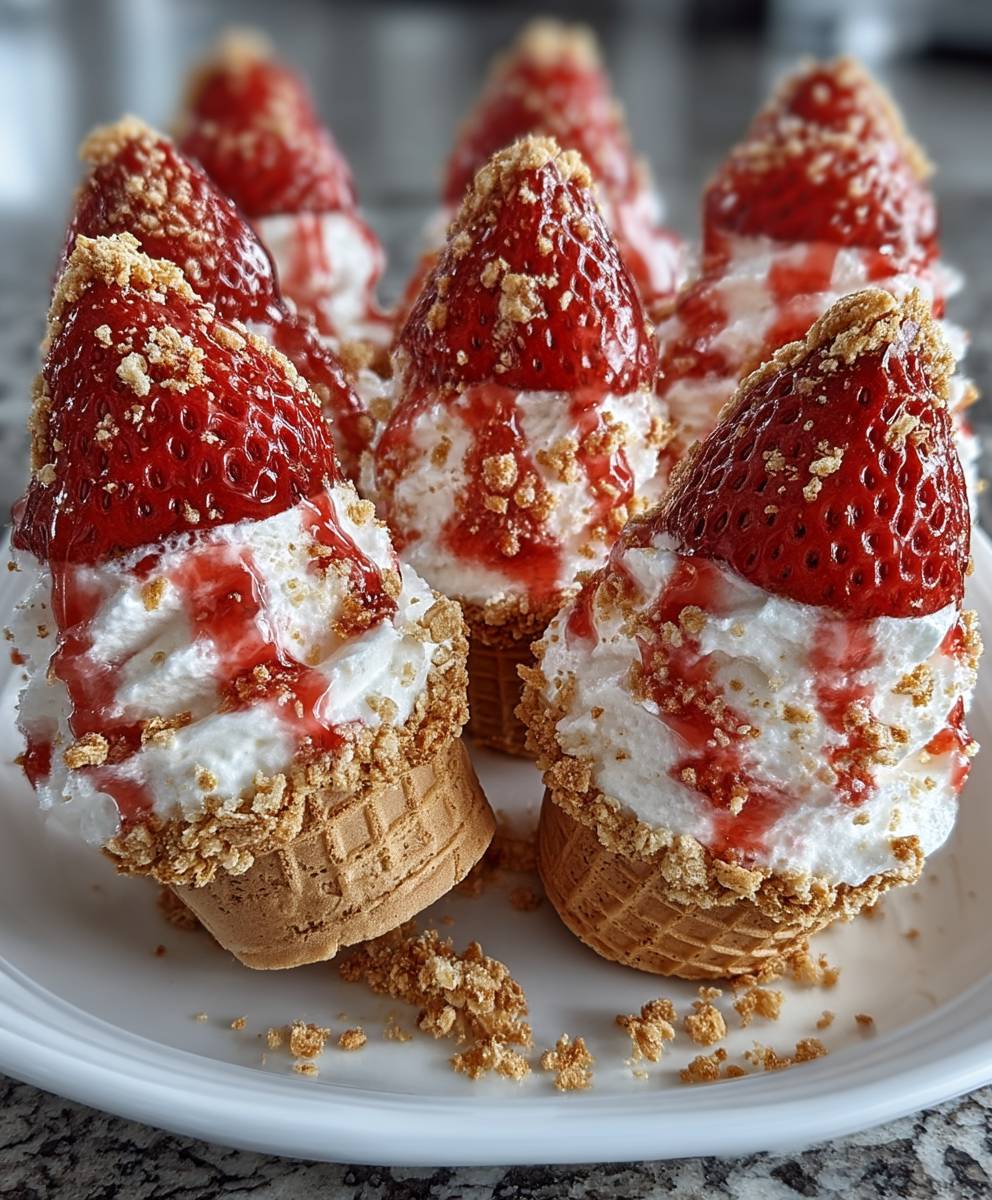
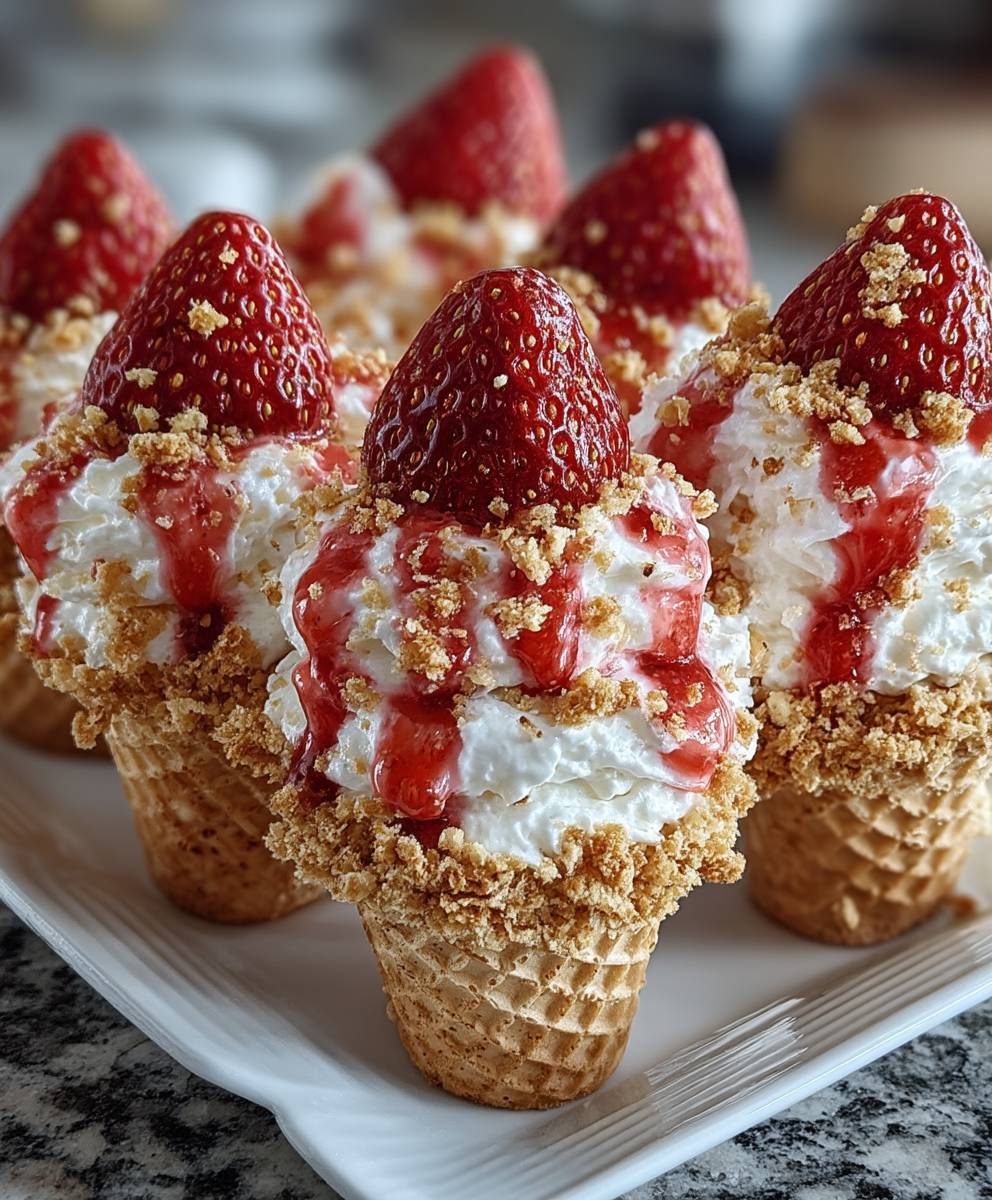
Strawberry Crunch Cheesecake Cones: Prepare to be amazed! Imagine the creamy, tangy delight of a classic cheesecake, the sweet burst of fresh strawberries, and the satisfying crunch of a golden, buttery topping, all perfectly nestled inside a crispy waffle cone. Sounds heavenly, right? Well, stop imagining and start creating because this recipe brings that dream to life!
While not steeped in ancient history, the concept of combining cheesecake elements with portable treats is a relatively modern marvel, born from the desire for convenient indulgence. Think of it as the ultimate dessert mashup, taking the best parts of several beloved treats and fusing them into one unforgettable experience. The inspiration draws from the iconic strawberry shortcake ice cream bars we all know and love!
What makes these Strawberry Crunch Cheesecake Cones so irresistible? It’s the symphony of textures and flavors. The smooth, rich cheesecake filling contrasts beautifully with the crumbly, crunchy topping and the crisp waffle cone. The sweetness of the strawberries perfectly complements the tanginess of the cheesecake, creating a balanced and utterly addictive treat. Plus, they are incredibly fun to eat! Perfect for parties, picnics, or simply a delightful afternoon snack, these cones are guaranteed to bring a smile to everyone’s face. So, let’s get started and create some dessert magic!
Ingredients:
- For the Cheesecake Filling:
- 8 ounces cream cheese, softened
- 1/2 cup granulated sugar
- 1/4 cup sour cream
- 1 teaspoon vanilla extract
- 1/4 cup heavy cream
- For the Strawberry Crunch Coating:
- 1 cup Golden Oreo cookies, finely crushed
- 1/4 cup freeze-dried strawberries, finely crushed
- 2 tablespoons melted butter
- 1/4 teaspoon strawberry extract (optional, for enhanced flavor)
- For the Cones:
- 12 waffle cones
- 4 ounces white chocolate, melted (for sealing the cones)
- For Garnish (optional):
- Fresh strawberries, sliced
- Whipped cream
Preparing the Strawberry Crunch Coating:
- Crush the Golden Oreos: Place the Golden Oreo cookies in a food processor and pulse until they are finely crushed into crumbs. If you don’t have a food processor, you can place them in a resealable bag and crush them with a rolling pin. The finer the crumbs, the better the coating will adhere to the cheesecake.
- Crush the Freeze-Dried Strawberries: Similarly, crush the freeze-dried strawberries into a fine powder. A food processor works best for this, but you can also use a mortar and pestle or place them in a bag and crush them with a rolling pin. Freeze-dried strawberries add an intense strawberry flavor and vibrant color to the crunch coating.
- Combine the Crumbs: In a medium bowl, combine the crushed Golden Oreo crumbs and the crushed freeze-dried strawberries. Mix them well to ensure an even distribution of strawberry flavor and color.
- Add Melted Butter and Strawberry Extract: Pour the melted butter over the crumb mixture. If using, add the strawberry extract at this stage. The butter will help bind the crumbs together and create a slightly clumpy texture, which is perfect for the “crunch” effect. The strawberry extract will boost the strawberry flavor, especially if your freeze-dried strawberries aren’t super potent.
- Mix Thoroughly: Use a fork or your hands to mix the butter and extract (if using) into the crumb mixture until everything is evenly moistened. The mixture should resemble wet sand. Set aside.
Making the Cheesecake Filling:
- Soften the Cream Cheese: Ensure your cream cheese is completely softened to room temperature. This is crucial for a smooth and lump-free cheesecake filling. If you’re short on time, you can microwave it in 15-second intervals, but be careful not to melt it.
- Cream the Cream Cheese and Sugar: In a large bowl, using an electric mixer (either a stand mixer or a hand mixer), beat the softened cream cheese and granulated sugar together until light and fluffy. This usually takes about 2-3 minutes. Make sure to scrape down the sides of the bowl occasionally to ensure everything is evenly mixed.
- Add Sour Cream and Vanilla Extract: Add the sour cream and vanilla extract to the cream cheese mixture. Beat until just combined. The sour cream adds a tangy flavor and helps to create a creamy texture.
- Incorporate Heavy Cream: Gradually add the heavy cream to the mixture, beating on low speed until just combined. Be careful not to overmix, as this can cause the cheesecake filling to become too thin. The heavy cream adds richness and helps to create a smooth, luscious texture.
- Taste and Adjust: Taste the cheesecake filling and adjust the sweetness or vanilla extract to your liking. Remember that the strawberry crunch coating will also add sweetness, so don’t make the filling overly sweet.
- Chill the Filling (Optional but Recommended): For easier handling, you can chill the cheesecake filling in the refrigerator for about 30 minutes before filling the cones. This will help it firm up slightly and prevent it from being too runny.
Sealing and Filling the Cones:
- Melt the White Chocolate: Melt the white chocolate in a double boiler or in the microwave in 30-second intervals, stirring in between, until smooth. Be careful not to overheat the chocolate, as it can seize up.
- Seal the Cones: Dip the open end of each waffle cone into the melted white chocolate, coating the inside of the cone about an inch up. This will create a waterproof seal and prevent the cheesecake filling from making the cone soggy.
- Let the Chocolate Set: Place the cones upside down on a wire rack or parchment paper to allow the white chocolate to set completely. This usually takes about 10-15 minutes.
- Fill the Cones: Once the white chocolate has set, transfer the cheesecake filling to a piping bag fitted with a large round tip. Alternatively, you can use a large resealable bag and snip off a corner.
- Pipe the Filling: Pipe the cheesecake filling into each cone, filling it almost to the top. You can create a swirl on top for a more decorative look.
Coating the Cones:
- Prepare Your Workspace: Have the bowl of strawberry crunch coating ready and a clean surface to place the coated cones.
- Dip the Cones: Gently dip the top of each filled cone into the strawberry crunch coating, pressing lightly to ensure the crumbs adhere to the cheesecake filling. You can also spoon the crumbs over the top of the cone if you prefer.
- Coat Evenly: Rotate the cone to ensure the entire top surface is evenly coated with the strawberry crunch.
- Gently Press: Lightly press the crumbs onto the cheesecake filling to help them adhere securely.
- Place on a Tray: Place the coated cones on a tray lined with parchment paper.
Chilling and Serving:
- Chill the Cones: Place the tray of coated cones in the refrigerator for at least 30 minutes to allow the cheesecake filling to firm up and the strawberry crunch coating to set. This will also help prevent the cones from becoming soggy.
- Garnish (Optional): Before serving, you can garnish the cones with fresh strawberry slices and a dollop of whipped cream for an extra touch of elegance.
- Serve and Enjoy: Serve the Strawberry Crunch Cheesecake Cones immediately and enjoy! These are best enjoyed fresh, as the cones can become soggy over time.
Tips and Variations:
- Make Ahead: You can prepare the strawberry crunch coating and cheesecake filling ahead of time and store them separately in the refrigerator. Assemble the cones just before serving.
- Different Flavors: Experiment with different flavors of Oreo cookies and freeze-dried fruits to create your own unique crunch coatings. For example, you could use chocolate Oreos and freeze-dried raspberries or peanut butter Oreos and freeze-dried bananas.
- Chocolate Drizzle: Drizzle melted chocolate (milk, dark, or white) over the coated cones for an extra layer of flavor and visual appeal.
- Nuts: Add chopped nuts (such as pecans, walnuts, or almonds) to the strawberry crunch coating for added texture and flavor.
- Mini Cones: Use mini waffle cones for a bite-sized treat. This is perfect for parties or gatherings.
- Storage: Store leftover cones in an airtight container in the refrigerator for up to 2 days. Keep in mind that the cones may become slightly soggy over time.
- Vegan Option: Use vegan cream cheese, vegan butter, and vegan Oreo cookies to make a vegan version of this recipe.
- Gluten-Free Option: Use gluten-free waffle cones and gluten-free Oreo cookies to make a gluten-free version of this recipe.
Troubleshooting:
- Cheesecake Filling Too Runny: If your cheesecake filling is too runny, try chilling it in the refrigerator for a longer period of time. You can also add a tablespoon of cornstarch to the filling to help thicken it.
- Strawberry Crunch Coating Not Sticking: Make sure the cheesecake filling is slightly chilled before dipping the cones in the strawberry crunch coating. This will help the crumbs adhere better. You can also lightly press the crumbs onto the filling to help them stick.
- Cones Becoming Soggy: Ensure the inside of the cones are properly sealed with white chocolate. This will prevent the cheesecake filling from making the cones soggy. Also, avoid storing the cones for too long, as they will eventually become soggy.
Conclusion:
And there you have it! These Strawberry Crunch Cheesecake Cones are truly a must-try dessert that will impress everyone, from your family to your party guests. The combination of the creamy, tangy cheesecake filling, the sweet and juicy strawberries, and that irresistible crunchy topping is simply divine. It’s a symphony of textures and flavors that will leave you wanting more. I know I always do!
But why is this recipe a must-try, you ask? Well, beyond the incredible taste, it’s also surprisingly easy to make. You don’t need to be a professional baker to whip up a batch of these delightful treats. The steps are straightforward, and the ingredients are readily available. Plus, they are incredibly portable and perfect for picnics, barbecues, or any occasion where you want a fun and delicious dessert that’s easy to handle. Forget complicated cakes and messy pies; these cones are the answer!
Now, let’s talk about serving suggestions and variations. While these Strawberry Crunch Cheesecake Cones are fantastic as is, there’s always room for a little personalization. For a truly decadent experience, try drizzling them with melted white chocolate or dark chocolate. A sprinkle of chopped nuts, like pistachios or almonds, would also add a lovely textural element.
If you’re feeling adventurous, you could experiment with different fruit combinations. Imagine a blueberry cheesecake cone with a lemon crumble topping, or a raspberry cheesecake cone with a chocolate cookie crumble. The possibilities are endless! You could even try using different flavored cream cheeses, like vanilla bean or chocolate, to create unique and exciting flavor profiles.
For a more adult-friendly version, consider adding a splash of liqueur to the cheesecake filling. A little bit of strawberry liqueur or even a hint of amaretto would complement the flavors beautifully. Just be sure to adjust the sweetness accordingly.
Another fun variation is to use different types of cones. Waffle cones, sugar cones, or even chocolate-dipped cones would all work well. You could also try using mini cones for a bite-sized treat that’s perfect for parties.
Don’t be afraid to get creative and experiment with different ingredients and techniques. The most important thing is to have fun and enjoy the process. After all, baking should be a joyful experience!
I truly believe that these Strawberry Crunch Cheesecake Cones will become a new favorite in your household. They’re the perfect combination of sweet, creamy, and crunchy, and they’re sure to put a smile on everyone’s face.
So, what are you waiting for? Grab your ingredients, preheat your oven (if you’re making the crumble from scratch, otherwise no oven needed!), and get ready to create some magic. I’m confident that you’ll love these cones as much as I do.
And now, for the most important part: I want to hear about your experience! Once you’ve made these Strawberry Crunch Cheesecake Cones, please share your photos and comments with me. Let me know what variations you tried, what your family and friends thought, and any tips or tricks you discovered along the way. I’m always eager to learn from my readers and see how they put their own spin on my recipes. You can find me on [Insert Social Media Links Here] – I can’t wait to see your creations! Happy baking!
Strawberry Crunch Cheesecake Cones: The Ultimate Dessert Recipe
Creamy cheesecake filling piped into waffle cones, dipped in white chocolate, and coated with a sweet strawberry Oreo crunch.
Ingredients
- 8 ounces cream cheese, softened
- 1/2 cup granulated sugar
- 1/4 cup sour cream
- 1 teaspoon vanilla extract
- 1/4 cup heavy cream
- 1 cup Golden Oreo cookies, finely crushed
- 1/4 cup freeze-dried strawberries, finely crushed
- 2 tablespoons melted butter
- 1/4 teaspoon strawberry extract (optional, for enhanced flavor)
- 12 waffle cones
- 4 ounces white chocolate, melted (for sealing the cones)
- Fresh strawberries, sliced
- Whipped cream
Instructions
- Prepare the Strawberry Crunch Coating: Crush Golden Oreos and freeze-dried strawberries separately until finely crushed. Combine in a bowl, add melted butter and strawberry extract (if using), and mix thoroughly.
- Make the Cheesecake Filling: Beat softened cream cheese and sugar until light and fluffy. Add sour cream and vanilla extract, then gradually add heavy cream until just combined. Taste and adjust sweetness if needed. Chill for 30 minutes for easier handling.
- Seal and Fill the Cones: Melt white chocolate and dip the inside of each cone to seal. Let the chocolate set completely. Transfer cheesecake filling to a piping bag and pipe into each cone.
- Coat the Cones: Dip the top of each filled cone into the strawberry crunch coating, pressing lightly to adhere.
- Chill and Serve: Place coated cones on a tray lined with parchment paper. Chill in the refrigerator for at least 30 minutes. Garnish with fresh strawberries and whipped cream (optional). Serve immediately.
Notes
- Make Ahead: Prepare the strawberry crunch coating and cheesecake filling ahead of time and store them separately in the refrigerator. Assemble the cones just before serving.
- Different Flavors: Experiment with different flavors of Oreo cookies and freeze-dried fruits to create your own unique crunch coatings. For example, you could use chocolate Oreos and freeze-dried raspberries or peanut butter Oreos and freeze-dried bananas.
- Chocolate Drizzle: Drizzle melted chocolate (milk, dark, or white) over the coated cones for an extra layer of flavor and visual appeal.
- Nuts: Add chopped nuts (such as pecans, walnuts, or almonds) to the strawberry crunch coating for added texture and flavor.
- Mini Cones: Use mini waffle cones for a bite-sized treat. This is perfect for parties or gatherings.
- Storage: Store leftover cones in an airtight container in the refrigerator for up to 2 days. Keep in mind that the cones may become slightly soggy over time.
- Vegan Option: Use vegan cream cheese, vegan butter, and vegan Oreo cookies to make a vegan version of this recipe.
- Gluten-Free Option: Use gluten-free waffle cones and gluten-free Oreo cookies to make a gluten-free version of this recipe.


Leave a Comment