
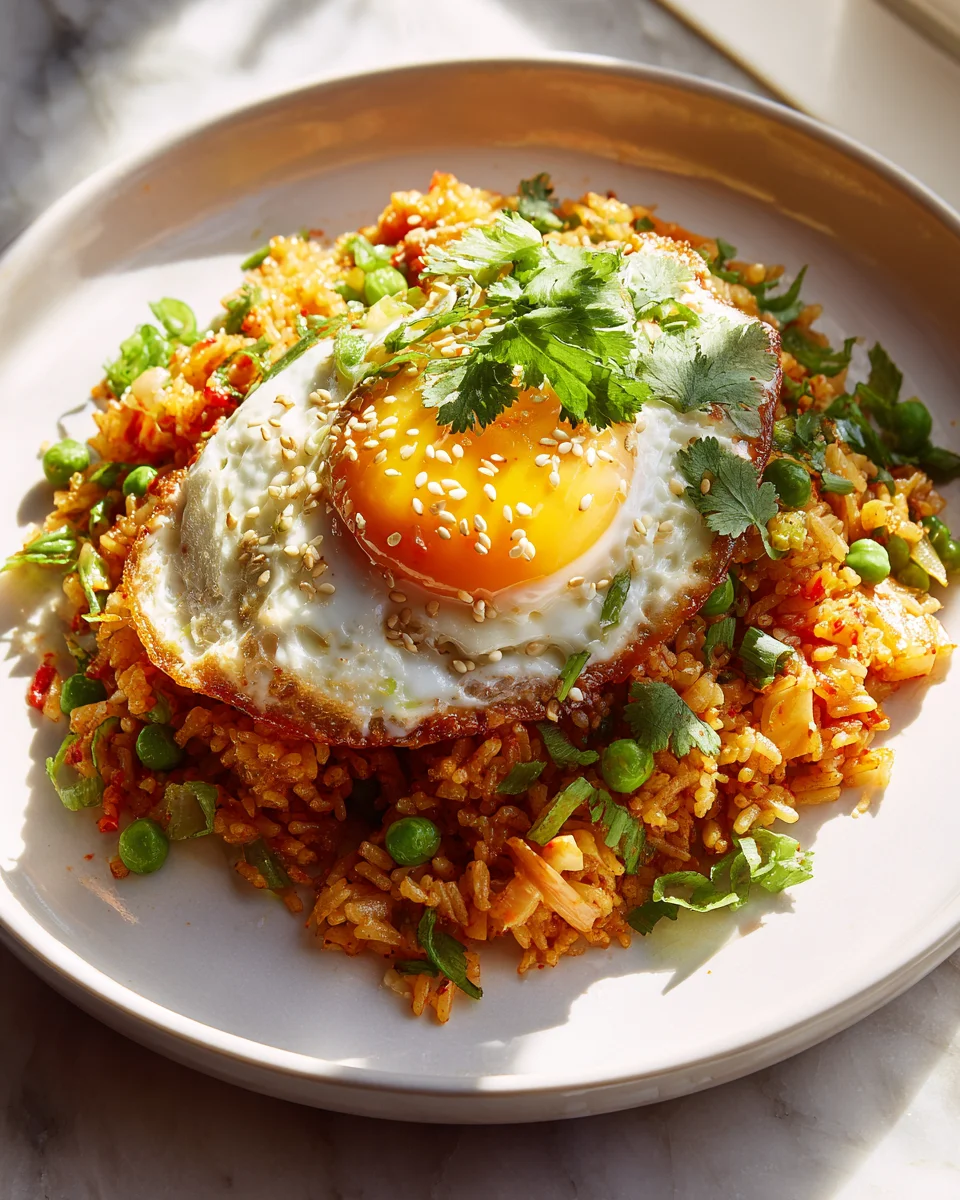
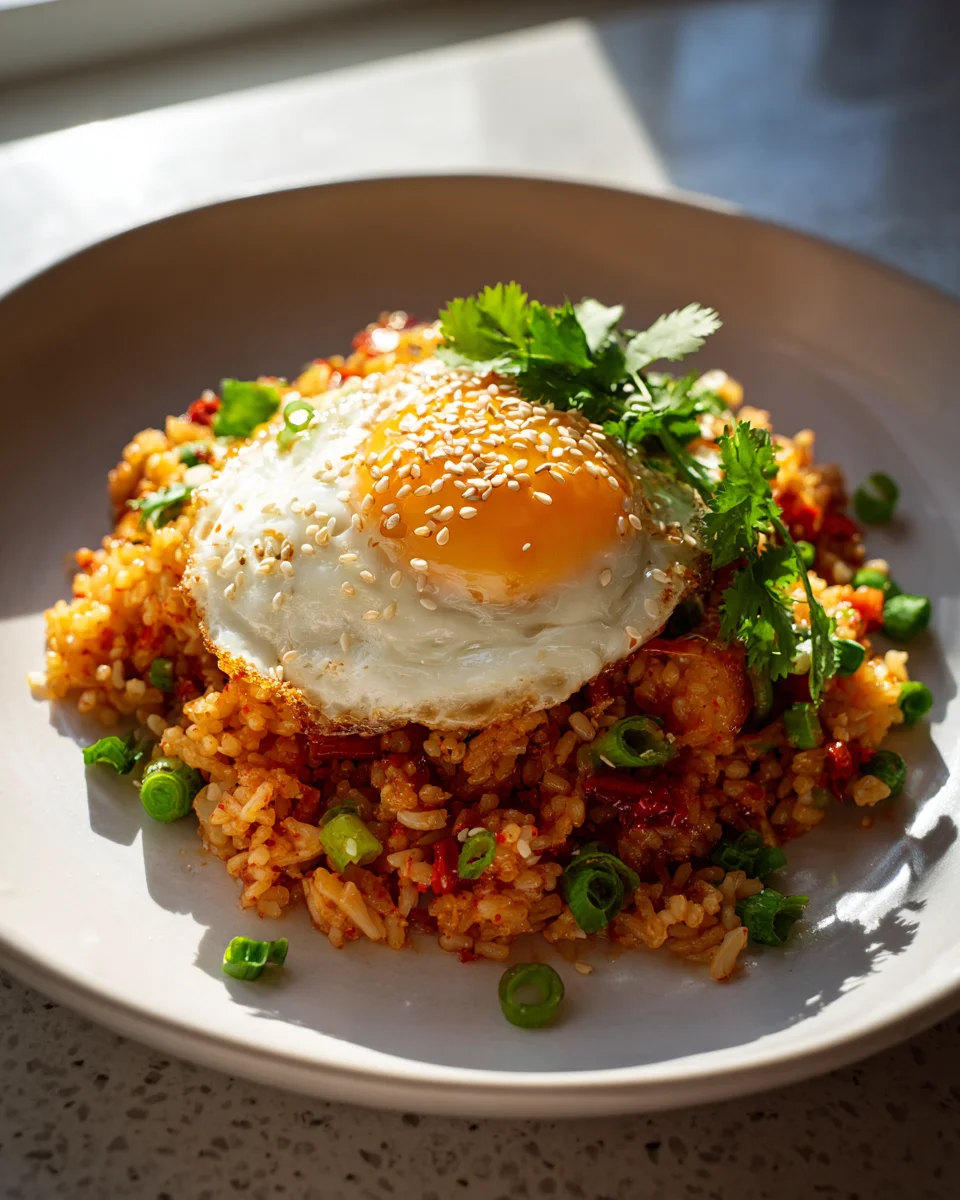
Spicy Kimchi Fried Rice With Fried Egg
Oh, prepare yourselves, because I am absolutely thrilled to share one of my all-time favorite comfort dishes with you: Spicy Kimchi Fried Rice With Fried Egg. This isn’t just any fried rice; it’s a vibrant explosion of flavor, a symphony of textures, and quite frankly, my go-to when I need a hug in a bowl. What makes this recipe truly special is the incredible depth of flavor from well-fermented kimchi, which transforms from a simple side dish into the star of the show, bringing its signature tang and a delightful crunch to every bite. We’re talking about that perfect balance of spicy, savory, and just a touch of sweet, all elevated by the rich umami of gochujang.
You’re going to love this dish for so many reasons. For starters, it’s ridiculously satisfying and surprisingly quick to whip up, especially if you have some leftover day-old rice on hand (which, let’s be honest, is the secret weapon for any good fried rice!). It’s the kind of meal that makes you feel like a culinary genius with minimal effort. Imagine perfectly seasoned, slightly crispy rice studded with flavorful kimchi, perhaps some tender strips of beef for extra heartiness, all topped with a glorious fried egg. The magic really happens when that warm, runny yolk breaks, cascading over the spicy rice and creating an extra layer of creamy deliciousness. It’s pure bliss, a complete meal that hits all the right notes for a quick lunch or a cozy dinner.
In essence, this dish is a masterclass in transforming simple ingredients into something extraordinary. We’ll be taking day-old rice, stir-frying it to perfection with that tangy, spicy kimchi and a robust Korean chili paste, maybe adding some savory beef, and then crowning it with the ultimate topping: a perfectly cooked fried egg. Get ready to fall in love with your new favorite go-to meal!
Ingredient Notes
Creating truly delicious Spicy Kimchi Fried Rice with a perfect fried egg begins with understanding your key ingredients. Each component plays a crucial role in building the robust, tangy, and spicy flavors that make this dish so irresistible.
- Kimchi: This is the star of our show, so choose wisely! For the best kimchi fried rice, you’ll want well-fermented, sour kimchi. You can usually tell it’s ready when the jar starts to bulge a bit, and it has a distinctly tangy aroma. The sourness from ripe kimchi cuts through the richness of the rice and beef beautifully, creating a more complex flavor profile. If your kimchi isn’t quite sour enough, don’t worry, you can always add a splash of kimchi juice during cooking to boost the tang. Make sure to chop it into bite-sized pieces so it mixes well with the rice.
- Day-Old Cooked Rice: This is a non-negotiable ingredient for superior fried rice. Freshly cooked rice is too moist and will result in a soggy, clumpy mess. Day-old (or even two-day-old) rice that’s been refrigerated dries out and firms up, allowing it to separate into individual grains that fry up perfectly, absorbing the flavors without becoming gummy. Any medium to long-grain white rice works well, like Jasmine or Calrose.
- Beef: Instead of traditional pork, we’re using beef for a hearty and flavorful alternative. I recommend thinly sliced beef sirloin, ribeye, or even flank steak. The key is to slice it against the grain to ensure tenderness. Marinating it briefly with a little soy sauce and a pinch of sugar can add an extra layer of flavor and keep it moist during quick stir-frying.
- Eggs: Of course, a fried egg is essential for this recipe! I love to cook mine sunny-side up with a gloriously runny yolk. The rich yolk, when broken and mixed into the spicy rice, adds an incredible creaminess that perfectly balances the heat.
- Gochujang (Korean Chili Paste): This fermented chili paste is the heart of the “spicy” in our kimchi fried rice. It adds a deep, complex heat, a touch of sweetness, and umami. Don’t skip it!
- Gochugaru (Korean Chili Flakes): Optional, but highly recommended if you love extra heat and a vibrant red color. It adds a clean, bright spiciness that complements the gochujang.
- Soy Sauce: For salty, savory depth. Use a good quality light or all-purpose soy sauce. If you’re gluten-free, tamari is an excellent substitute.
- Sesame Oil: A drizzle of toasted sesame oil right at the end adds a wonderful nutty aroma and flavor that ties all the ingredients together.
- Aromatics: Onion and garlic form the foundational flavor base. Don’t skimp on these for maximum deliciousness!
- Non-Alcohol Alternatives: If a recipe calls for rice wine or mirin, you can effectively substitute by using a small amount of low-sodium beef broth or even water, along with a pinch of sugar to mimic the subtle sweetness. This helps to deglaze the pan and add moisture without the alcohol.
- Scallions: Freshly sliced scallions are perfect for garnish, adding a pop of color and a fresh, mild oniony bite.
Step-by-Step Instructions
Let’s get cooking! This is how I achieve perfect Spicy Kimchi Fried Rice with a runny fried egg every single time. It’s all about building layers of flavor.
- Prepare Your Ingredients:
- First, gather and prep everything. Thinly slice your beef against the grain into bite-sized pieces. If you like, you can marinate it briefly (10-15 minutes) with a teaspoon of soy sauce and a tiny pinch of sugar.
- Chop your well-fermented kimchi into small, manageable pieces, about ½ inch.
- Mince your garlic and finely dice your onion.
- Have your day-old rice ready, gently breaking up any large clumps with your hands or a fork.
- Slice your scallions for garnish.
- Cook the Beef:
- Heat a large non-stick skillet or a wok over medium-high heat. Add a tablespoon of cooking oil (like vegetable or canola oil).
- Once hot, add your sliced beef in a single layer. Cook for 2-3 minutes per side until beautifully browned and cooked through. Avoid overcrowding the pan; cook in batches if necessary.
- Once cooked, remove the beef from the skillet and set it aside on a plate. We’ll add it back later to keep it tender.
- Sauté Aromatics and Kimchi:
- Add another tablespoon of oil to the same skillet if needed. Reduce the heat slightly to medium.
- Add the diced onion and sauté for 2-3 minutes until it starts to soften and become translucent.
- Add the minced garlic and cook for another minute until fragrant, being careful not to burn it.
- Now, add your chopped kimchi to the skillet. Stir-fry for 5-7 minutes, stirring occasionally. You want the kimchi to soften, caramelize slightly, and release its wonderful juices. This step is crucial for developing deep kimchi flavor.
- Stir in the gochujang and gochugaru (if using) and cook for another minute, stirring constantly to incorporate it evenly into the kimchi and aromatics.
- Add the Rice:
- Increase the heat back to medium-high. Add the day-old rice to the skillet with the kimchi mixture.
- Using your spatula, press the rice down and spread it out, then let it sit for about a minute without stirring to allow some grains to get slightly crispy. Then, stir and toss the rice, breaking up any remaining clumps. Continue stir-frying for 5-7 minutes, until the rice is heated through and some grains start to get a little toasted and golden.
- Season and Combine:
- Return the cooked beef to the skillet with the rice.
- Drizzle in the soy sauce and ½ teaspoon of toasted sesame oil. Stir well to combine all the ingredients and ensure the rice is evenly coated with the seasonings. Taste and adjust seasoning if needed – you might want a touch more soy sauce or a pinch of sugar to balance the flavors.
- Cook for another 1-2 minutes, tossing constantly.
- Fry the Egg:
- While the rice is finishing, heat a separate small non-stick pan over medium heat. Add a tiny bit of oil.
- Crack an egg into the pan. Cook it sunny-side up until the whites are set and the yolk is still wonderfully runny. Season with a pinch of salt and pepper.
- Serve:
- Divide the spicy kimchi fried rice among serving bowls.
- Carefully slide a freshly fried egg on top of each serving.
- Garnish generously with fresh scallions. Serve immediately and enjoy breaking that beautiful runny yolk into the warm, spicy rice!
Tips & Suggestions
Achieving truly excellent Spicy Kimchi Fried Rice isn’t just about following the steps; it’s about understanding the nuances. Here are some of my favorite tips to elevate your dish:
- Don’t Rush the Kimchi: I cannot stress this enough – let your kimchi fry! Cooking it down for 5-7 minutes, allowing it to soften and caramelize, is where so much of the deep, rich flavor of the fried rice comes from. It sweetens slightly and mellows its raw tanginess.
- Hot Pan, Not Overcrowded: For proper stir-frying and crispy rice, a screaming hot pan (or wok) is essential. Also, avoid overcrowding the pan. If you’re making a large batch, it’s better to cook the rice in two separate portions to ensure it fries rather than steams.
- Day-Old Rice is Your Best Friend: Seriously, this is the most important tip. The moisture content in fresh rice will make your fried rice clumpy and mushy. Always use cold, day-old rice that has had time to dry out in the fridge. Gently break up any clumps before adding it to the pan.
- Embrace the Runny Yolk: While you can cook your egg to your preference, I highly recommend a sunny-side up egg with a runny yolk. The rich, creamy yolk, when mixed into the spicy rice, acts like a natural sauce, adding a luxurious texture and balancing the spice beautifully.
- Adjust Spice to Your Liking: The amount of gochujang and gochugaru listed in recipes is a guideline. Feel free to adjust it to your personal spice tolerance. If you love heat, add more gochugaru. If you prefer it milder, reduce the gochujang. You can always add more, but you can’t take it away!
- Don’t Be Afraid to Press Down: When adding the rice, press it firmly against the hot pan for a minute or two before stirring. This helps create those coveted slightly crispy, toasted bits of rice that add fantastic texture.
- Add a Touch of Sweetness (Optional): Sometimes, a tiny pinch of sugar (¼ to ½ teaspoon) can help balance the sourness of the kimchi and the heat of the gochujang, especially if your kimchi is very sour. Add it when you add the gochujang.
- Consider Extra Toppings: Beyond the fried egg and scallions, feel free to get creative! A sprinkle of toasted seaweed flakes (gim), a handful of shredded mozzarella cheese (which melts into gooey deliciousness), or even some extra stir-fried vegetables like peas or corn can make it even better.
Storage
Spicy Kimchi Fried Rice with Fried Egg is definitely best enjoyed fresh, hot off the pan, especially with that perfect runny yolk. However, if you do find yourself with leftovers, here’s how to store and reheat it:
- Refrigeration:
- Allow the fried rice to cool completely before storing.
- Transfer the cooled rice to an airtight container.
- It can be safely stored in the refrigerator for up to 3-4 days. Note that the texture of the fried egg might change, especially the yolk, if stored. I generally recommend storing the rice separately and frying a fresh egg when reheating.
- Freezing:
- Freezing fried rice is generally not recommended, as the texture of the rice can become mushy or grainy after thawing and reheating. The kimchi might also lose some of its crispness.
- If you absolutely must freeze it, spread the cooled fried rice in a single layer on a baking sheet and flash freeze for an hour or two. Then transfer to a freezer-safe bag or container. This can help prevent clumping. It can be stored for up to 1 month, but expect a significant change in texture.
- Reheating:
- Stovetop (Recommended): This is my preferred method for reheating. Heat a non-stick skillet over medium-high heat with a little cooking oil. Add the cold fried rice and stir-fry, breaking up any clumps, until it’s heated through and some of the grains get crispy again, about 5-7 minutes.
- Microwave: Place the fried rice in a microwave-safe dish. Add a tablespoon of water and cover loosely. Microwave on high for 1-2 minutes, stirring halfway through, until thoroughly heated. The rice won’t be as crispy as on the stovetop, but it’s a quick and convenient option.
- Always ensure the rice is piping hot (165°F or 74°C) before serving.
Final Thoughts
And there you have it! I truly believe that Spicy Kimchi Fried Rice With Fried Egg isn’t just another meal; it’s an experience. The vibrant tang of the kimchi, perfectly balanced with that satisfying kick of spice, all wonderfully melded into a comforting bed of rice, makes for an absolutely irresistible dish. Top it off with a perfectly fried egg, whose creamy yolk cascades over everything, and you’ve got a symphony of flavors and textures that is simply unmatched. It’s quick enough for a weeknight, yet exciting enough to impress, and incredibly satisfying. I promise you, once you taste the delightful harmony of flavors in this Spicy Kimchi Fried Rice With Fried Egg, it will quickly become a cherished favorite in your kitchen. Go ahead, give it a try – your taste buds will thank you!
Spicy Kimchi Fried Rice with Fried Egg: Your New Favorite!

Experience a vibrant explosion of flavor with this Spicy Kimchi Fried Rice topped with a perfectly fried egg. It’s a quick and satisfying meal that brings comfort and excitement to your table.
- Prep Time: 15 mins
- Cook Time: 30 mins
- Total Time: 45 minutes
- Yield: 4 servings
- Category: Dinner
- Method: Stir-frying
- Cuisine: Korean
Ingredients
- well-fermented sour kimchi
- day-old cooked rice
- thinly sliced beef sirloin, ribeye, or flank steak
- eggs
- gochujang (Korean chili paste)
- gochugaru (Korean chili flakes)
- soy sauce
- toasted sesame oil
- onion
- garlic
- scallions
- cooking oil (vegetable or canola oil)
- kimchi juice (optional)
- low-sodium beef broth or water (non-alcohol alternative, optional)
- pinch of sugar (optional)
Instructions
- Prepare Your Ingredients: Gather and prep everything. Thinly slice your beef against the grain into bite-sized pieces. If you like, you can marinate it briefly (10-15 minutes) with a teaspoon of soy sauce and a tiny pinch of sugar. Chop your well-fermented kimchi into small, manageable pieces, about ½ inch. Mince your garlic and finely dice your onion. Have your day-old rice ready, gently breaking up any large clumps with your hands or a fork. Slice your scallions for garnish.
- Cook the Beef: Heat a large non-stick skillet or a wok over medium-high heat. Add a tablespoon of cooking oil. Once hot, add your sliced beef in a single layer. Cook for 2-3 minutes per side until beautifully browned and cooked through. Avoid overcrowding the pan; cook in batches if necessary. Once cooked, remove the beef from the skillet and set it aside on a plate.
- Sauté Aromatics and Kimchi: Add another tablespoon of oil to the same skillet if needed. Reduce the heat slightly to medium. Add the diced onion and sauté for 2-3 minutes until it starts to soften and become translucent. Add the minced garlic and cook for another minute until fragrant. Now, add your chopped kimchi to the skillet. Stir-fry for 5-7 minutes, stirring occasionally. Stir in the gochujang and gochugaru (if using) and cook for another minute.
- Add the Rice: Increase the heat back to medium-high. Add the day-old rice to the skillet with the kimchi mixture. Press the rice down and spread it out, then let it sit for about a minute without stirring. Stir and toss the rice, breaking up any remaining clumps. Continue stir-frying for 5-7 minutes, until the rice is heated through and some grains start to get a little toasted.
- Season and Combine: Return the cooked beef to the skillet with the rice. Drizzle in the soy sauce and ½ teaspoon of toasted sesame oil. Stir well to combine all the ingredients. Cook for another 1-2 minutes, tossing constantly.
- Fry the Egg: While the rice is finishing, heat a separate small non-stick pan over medium heat. Add a tiny bit of oil. Crack an egg into the pan. Cook it sunny-side up until the whites are set and the yolk is still wonderfully runny. Season with a pinch of salt and pepper.
- Serve: Divide the spicy kimchi fried rice among serving bowls. Carefully slide a freshly fried egg on top of each serving. Garnish generously with fresh scallions. Serve immediately.
Nutrition
- Serving Size: 1 bowl
- Calories: 600
- Sugar: 5 g
- Sodium: 800 mg
- Fat: 20 g
- Saturated Fat: 5 g
- Unsaturated Fat: 10 g
- Trans Fat: 0 g
- Carbohydrates: 85 g
- Fiber: 3 g
- Protein: 25 g
- Cholesterol: 180 mg
Keywords: Let your kimchi fry for 5-7 minutes to develop deep flavor. Use day-old rice for the best texture. Adjust spice levels to your liking, and consider adding extra toppings like seaweed flakes or cheese.
Leave a Comment