
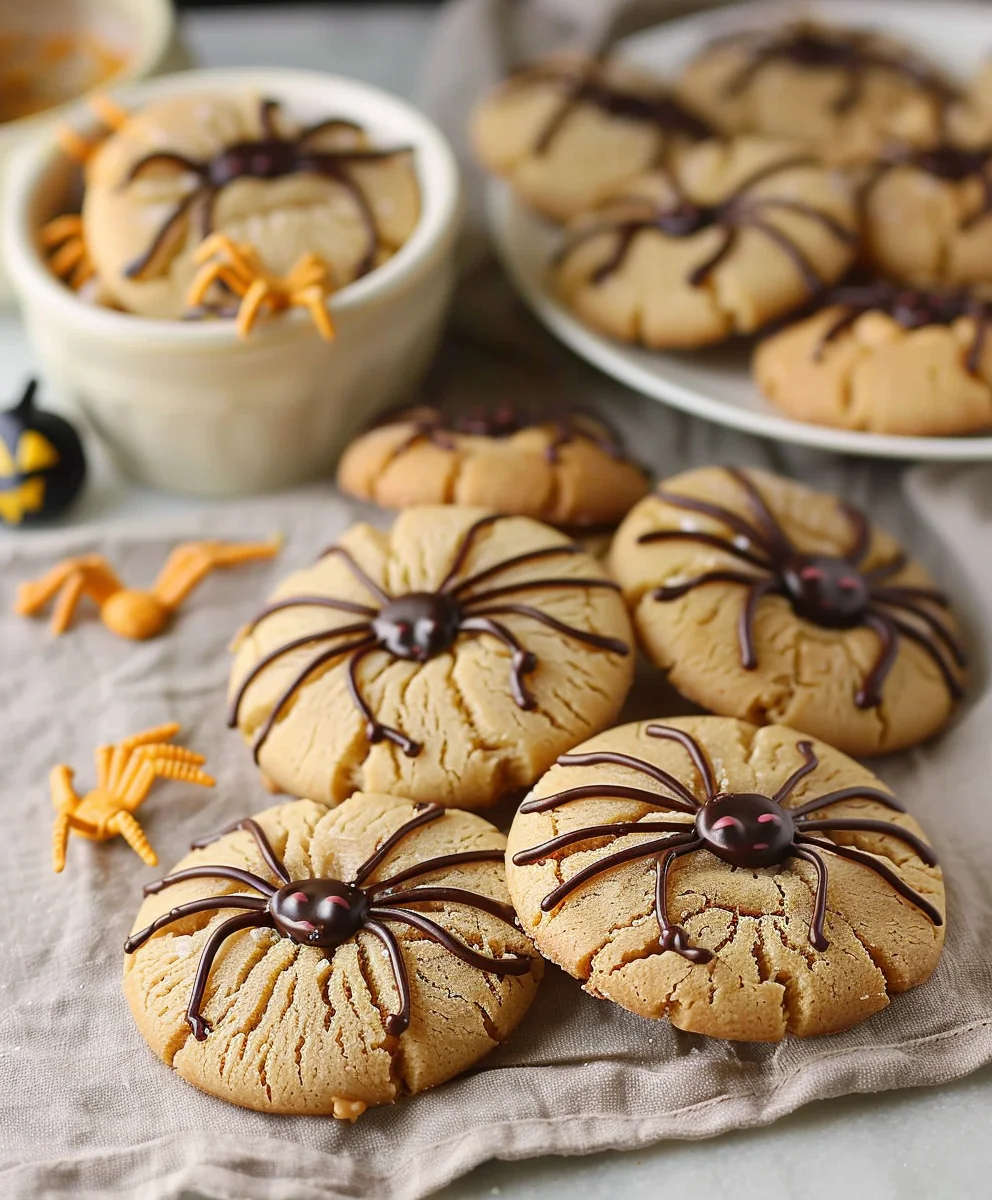
Peanut Butter Spider Halloween Cookies are the ultimate treat to cast a spell of delicious fun over your spooky season celebrations! As the leaves begin to turn and the air grows crisp, our thoughts inevitably drift to Halloween—a time for playful frights, creative costumes, and, most importantly, delightfully themed culinary creations.
Why These Spooky Treats Are a Halloween Must-Have
These charmingly spooky cookies perfectly embody the spirit of the holiday, offering a perfect blend of a little bit creepy and a whole lot of delicious. The classic combination of rich, nutty peanut butter and smooth, decadent chocolate has long been a universally adored duo. But when you transform this beloved flavor profile into adorable, edible arachnids, you truly elevate the experience to something extraordinary.
Kids and adults alike adore these not-so-creepy crawlers for their irresistible taste and charming, ghoulish design. They’re surprisingly simple to assemble, making them a fantastic activity for families looking to add a homemade, festive touch to their Halloween festivities. Whether you’re hosting a haunted house party, preparing for trick-or-treaters, or simply seeking a fun, festive snack, these Peanut Butter Spider Halloween Cookies promise to be a delightful addition, bringing smiles (and maybe a few happy shivers!) to everyone who tries them. I can’t wait for you to try making them!

Ingredients:
- For the Peanut Butter Cookies:
- 1 cup (2 sticks or 226g) unsalted butter, softened to room temperature. This is crucial for creaming properly!
- 1 cup (200g) granulated sugar.
- 1 cup (200g) packed light brown sugar. I find the combination of sugars gives these cookies the perfect chewiness.
- 1 large egg, also at room temperature. This helps everything emulsify beautifully.
- 1 teaspoon pure vanilla extract. Don’t skimp on the good stuff; it makes a difference!
- 1 cup (250g) creamy peanut butter (not natural, oil-separated kind, unless you like a different texture). My personal preference is for Jif or Skippy for consistency.
- 2 ½ cups (300g) all-purpose flour.
- 1 teaspoon baking soda.
- ½ teaspoon salt. This balances the sweetness and enhances the peanut butter flavor.
- For the Spiders (Body):
- Approximately 36 miniature peanut butter cups (like Reese’s Mini Peanut Butter Cups), unwrapped. You’ll need one for each cookie, so grab a big bag!
- Alternatively, small chocolate-covered cherry candies, or even just chocolate truffles work if you want a different “body” for your Peanut Butter Spider Halloween Cookies.
- For the Legs and Eyes (Decorations):
- 1 cup (about 170g) semi-sweet chocolate chips or melting wafers. These are for melting and piping the spider legs.
- 2 tablespoons unsalted butter or 1 tablespoon shortening (optional, for smoother melting chocolate).
- Small edible candy eyes (these are widely available in baking sections around Halloween!). About 72 of them, two for each spider.
- Alternatively, you can use mini chocolate chips or even pipe small dots of white frosting with a black pupil for eyes.
Preparing the Peanut Butter Cookie Dough – The Foundation for Our Spooky Spiders
- Preheat and Prep: First things first, let’s get our workspace ready! Preheat your oven to 375°F (190°C). Then, line a couple of large baking sheets with parchment paper or silicone baking mats. This prevents sticking and makes cleanup a breeze, which is something I always appreciate!
- Cream the Wet Ingredients: In a large mixing bowl, using an electric mixer (either a stand mixer with the paddle attachment or a hand mixer), cream together the softened unsalted butter, granulated sugar, and light brown sugar. You’ll want to beat this on medium speed for about 2-3 minutes until the mixture is light, fluffy, and pale in color. This creaming process incorporates air, which is vital for a tender cookie texture, so don’t rush it! Make sure to scrape down the sides of the bowl with a rubber spatula a few times to ensure everything is evenly combined.
- Incorporate the Flavor Base: Now, add the room temperature large egg and the pure vanilla extract to the creamed butter and sugar mixture. Beat on medium speed until just combined, about 30 seconds. Again, a quick scrape of the bowl never hurts to ensure all that eggy goodness is fully mixed in. Then, add the creamy peanut butter. Beat on medium speed until it’s completely smooth and fully incorporated into the mixture. This is where that signature peanut butter flavor truly comes to life!
- Whisk the Dry Ingredients: In a separate medium-sized bowl, whisk together the all-purpose flour, baking soda, and salt. Whisking them together before adding them to the wet ingredients ensures that the leavening agent (baking soda) and salt are evenly distributed throughout the flour. This means every cookie will rise consistently and have balanced seasoning.
- Combine Wet and Dry: Gradually add the dry ingredient mixture to the wet mixture in three additions, beating on low speed after each addition until just combined. Be careful not to overmix at this stage! Overmixing flour can develop the gluten too much, leading to tough cookies. As soon as you no longer see streaks of dry flour, stop mixing. The dough will be quite thick and somewhat crumbly, but it should hold together when pressed.
- Chill (Optional but Recommended): While you can technically bake these cookies immediately, I find that chilling the dough for at least 30 minutes (or even an hour) in the refrigerator makes the dough easier to handle and helps prevent the cookies from spreading too much. This also allows the flavors to meld beautifully. If you’re short on time, you can skip this step, but for the best Peanut Butter Spider Halloween Cookies, I highly recommend it!
Baking the Peanut Butter Cookies – Crafting the Spiders’ Base
- Forming the Cookie Balls: Once your dough is ready (chilled or not), scoop out portions of dough, about 1 ½ tablespoons each. I like to use a cookie scoop for consistency, which results in uniformly sized cookies that bake evenly. Roll each portion into a smooth ball between your palms. Place these dough balls about 2 inches apart on your prepared baking sheets. We want to give them enough room to spread a little without merging into one giant cookie!
- The Classic Crisscross (Optional but Traditional): For a classic peanut butter cookie look, you can gently flatten each ball with the tines of a fork in a crisscross pattern. This also helps the cookies bake more evenly. However, since we’ll be placing a spider body on top, this step is entirely optional for these Peanut Butter Spider Halloween Cookies; they’ll taste great either way!
- Baking Time: Bake the cookies in your preheated oven for 8-10 minutes, or until the edges are lightly golden and the centers are set but still look a little soft. Watch them closely! Ovens vary, and overbaked peanut butter cookies can become dry. I usually pull mine out right around the 9-minute mark for that perfect balance of chewy and soft.
- Creating the Indentation for the Spider Body: This is a crucial step for our Peanut Butter Spider Halloween Cookies! As soon as you remove the cookies from the oven, while they are still warm and soft, gently press the center of each cookie with the back of a spoon or a small measuring spoon to create a slight indentation. This little hollow will be the perfect nest for our miniature peanut butter cup spider body. If the cookies cool too much, they might crack when you try to make the indentation, so speed is key here!
- Cooling: Let the cookies cool on the baking sheets for about 5 minutes. They are quite delicate when hot, so this brief cooling period allows them to set up a bit. After 5 minutes, carefully transfer the cookies to a wire rack to cool completely. They must be fully cooled before we add the chocolate spider bodies and decorations, otherwise, everything will melt into a delicious, but messy, puddle.
Assembling the Peanut Butter Spider Halloween Cookies – Bringing the Spiders to Life
- Prepare the Chocolate Spider Bodies: While the cookies are cooling, make sure all your miniature peanut butter cups are unwrapped and ready to go. You want them easily accessible for the next step.
- Melt the Chocolate (for Legs and Eyes): In a microwave-safe bowl, combine the semi-sweet chocolate chips (and butter or shortening, if using). Microwave in 20-30 second intervals, stirring well after each, until the chocolate is completely melted and smooth. Be careful not to overheat the chocolate, as it can seize up and become grainy. You can also use a double boiler method for melting if you prefer; simply place the chocolate in a heatproof bowl over a pot of simmering water, stirring until melted.
- Transfer Melted Chocolate: Once melted, carefully spoon the chocolate into a piping bag fitted with a very small round tip (or simply snip a tiny corner off a Ziploc bag). Having a small, controlled opening is essential for creating delicate spider legs and eyes.
- Place the Spider Bodies: Once the cookies are completely cool, place one unwrapped miniature peanut butter cup firmly into the indentation you created earlier on each cookie. The residual heat from the cookie might still be enough to slightly soften the bottom of the peanut butter cup, helping it adhere, but if not, a tiny dab of your melted chocolate on the bottom of the peanut butter cup will act as a “glue.” This is the core of our “Peanut Butter Spider Halloween Cookies” – the delicious peanut butter cup body!
Decorating Your Spooky Peanut Butter Spider Halloween Cookies – The Fun Part!
- Piping the Spider Legs: Now for the artistic part! Hold your piping bag with the melted chocolate firmly. On each side of the miniature peanut butter cup, pipe four thin lines extending outwards from the “body” onto the cookie, curving them slightly downwards to resemble spider legs. Aim for 8 legs total per spider (4 on each side). This step truly transforms your humble peanut butter cookies into festive Peanut Butter Spider Halloween Cookies! Don’t worry if they’re not perfect; real spider legs aren’t always perfectly symmetrical either! You can make them long and spindly or short and stubby, depending on your preferred spider aesthetic.
- Attaching the Edible Eyes: While the chocolate for the legs is still slightly wet (or if it’s set, add a tiny dot of melted chocolate to the back of each eye), gently place two edible candy eyes onto the top-front portion of each miniature peanut butter cup. These little eyes instantly add personality and a touch of creepiness to our spiders! If you’re not using candy eyes, you can pipe two tiny dots of white frosting and then, once slightly set, add a tiny dot of melted chocolate in the center of each for the pupils, or simply use two mini chocolate chips.
- Allow to Set: Once all your spiders have their legs and eyes, let the decorated Peanut Butter Spider Halloween Cookies sit at room temperature for at least 30 minutes, or until the chocolate has fully set and hardened. If you’re in a hurry, you can pop them into the refrigerator for 10-15 minutes to speed up the setting process. This is important to prevent smudging and ensure your spooky creations hold together when handled.
- Serving and Storage: Once the chocolate is completely set, your delightful and spooky Peanut Butter Spider Halloween Cookies are ready to be served! Arrange them on a platter for your Halloween party, or package them up as a fun treat. These cookies are always a massive hit! Store any leftover cookies in an airtight container at room temperature for up to 3-4 days. I find they taste even better the next day once all the flavors have had a chance to meld. They make a fantastic addition to any Halloween spread and are always the first to disappear! Enjoy making these fun and delicious holiday treats!
Conclusion:
And there you have it, fellow baking enthusiasts! As we wrap up our delightful journey into the world of these spooky, yet utterly adorable, treats, I sincerely hope you’re feeling as inspired as I am to whip up a batch (or five!). Truly, these aren’t just any cookies; they are an experience waiting to happen, a culinary creation that promises to bring smiles, laughter, and a touch of enchanting fright to any occasion. I’ve found that the magic of these cookies lies in their perfect symphony of flavors – that undeniably rich, creamy peanut butter base, perfectly balanced with the sweet, dark chocolate, all coming together in a soft, chewy bite that simply melts in your mouth. But beyond the taste, there’s the sheer joy of creation. The process is incredibly forgiving, making it an ideal project for bakers of all skill levels, and especially a fantastic way to involve younger family members in the kitchen. Witnessing their excitement as those candy eyes are placed, transforming a simple cookie into a charmingly creepy arachnid, is a reward in itself. These Peanut Butter Spider Halloween Cookies are more than just a recipe; they’re a centerpiece for your Halloween spread, a conversation starter, and a tangible piece of holiday cheer you can share.
When it comes to serving these irresistible morsels, the possibilities are as numerous as the legs on our eight-legged friends! Naturally, they shine brightest on a festive Halloween-themed platter, perhaps nestled amongst some candy corn, gummy worms, or other ghoulish delights. Imagine a tiered serving stand, with these charming spiders adorning the top layer, inviting gasps and giggles from your guests. For a truly comforting experience, pair them with a tall glass of cold milk, a steaming mug of hot chocolate, or a rich, dark coffee for the adults – the creamy beverage perfectly complements the sweetness of the cookies. Don’t be afraid to experiment with variations either! While our classic design is foolproof, consider using different sizes or colors of candy eyes to give your spiders unique personalities. You could swap out the chocolate-covered pretzels for thin strips of black licorice for even chewier legs, or pipe on intricate webs with white chocolate for an extra touch of flair. For an indulgent surprise, press a mini peanut butter cup into the center of the cookie dough before baking, creating an extra layer of peanut butter goodness that will delight anyone who bites in. Or, for a more sophisticated touch, sprinkle a tiny pinch of flaky sea salt over the melted chocolate before it sets; the salt crystals enhance the peanut butter flavor beautifully, elevating these fun treats to gourmet status. Think about making them mini too! A batch of bite-sized spider cookies can be just as impactful and perhaps even more addictive for a party setting.
So now, dear reader, the whisk is in your hand, metaphorically speaking! I genuinely encourage you to roll up your sleeves, gather your ingredients, and dive headfirst into making these spectacular cookies. Don’t be intimidated; embrace the fun and the slight mess that comes with any great baking adventure. The satisfaction of pulling a tray of these perfectly baked, adorably spooky treats from the oven is unparalleled. And once you’ve created your own army of delightful spiders, please, please, please share your experience with me and our wonderful community! I’d be absolutely thrilled to hear about your baking triumphs, see your creative variations, or even chuckle along with any comical mishaps that might occur (because let’s be honest, those often make the best stories!). What kind of eyes did your spiders get? Did you add any unique touches? Did they become the star of your Halloween party? Your feedback and shared creations inspire us all. Let’s make this Halloween the most delicious one yet, filled with the simple, heartwarming joy of homemade treats. Happy baking, and happy haunting!
Peanut Butter Spider Halloween Cookies
These Peanut Butter Spider Halloween Cookies are a delightful and spooky treat, combining classic peanut butter cookies with chocolate peanut butter cups, edible eyes, and piped chocolate legs for a fun Halloween snack. Perfect for parties or a festive homemade activity.
Ingredients
-
1 3/4 cups all-purpose flour
-
1 tsp. baking soda
-
1/4 tsp. salt
-
1/2 cup Unsalted butter, room temperature
-
1/2 cup light brown sugar
-
1/2 cup granulated sugar
-
1/2 cup smooth peanut butter
-
1 egg
-
2 tsp. vanilla extract
-
1 Tbsp. whole milk
-
15-20 miniature reese’s peanut butter cups
-
1/4 cup semi-sweet chocolate
-
30-40 candy eyes
Instructions
-
Step 1
Preheat oven to 375°F (190°C) and line baking sheets. In a large bowl, cream softened butter with granulated and light brown sugars until light and fluffy. Beat in egg, vanilla extract, smooth peanut butter, and whole milk until well combined. In a separate bowl, whisk together flour, baking soda, and salt. Gradually add dry ingredients to wet, mixing on low speed until just combined. Chill dough for 30 minutes if desired for easier handling. -
Step 2
Scoop 1.5 tablespoon portions of dough, roll into balls, and place 2 inches apart on prepared baking sheets. Bake for 8-10 minutes until edges are lightly golden and centers are set but still soft. -
Step 3
Immediately after removing cookies from the oven, gently press the center of each warm cookie with the back of a spoon to create an indentation for the spider body. -
Step 4
Let cookies cool on baking sheets for 5 minutes, then carefully transfer them to a wire rack to cool completely before decorating. -
Step 5
Unwrap miniature peanut butter cups. Melt semi-sweet chocolate until smooth (microwave or double boiler method). Transfer melted chocolate to a piping bag fitted with a small round tip or a Ziploc bag with a tiny corner snipped off. -
Step 6
Once cookies are completely cool, place one unwrapped miniature peanut butter cup firmly into each cookie’s indentation. Pipe four thin chocolate lines on each side of the peanut butter cup, extending onto the cookie, to create spider legs (8 total per spider). While the chocolate is still wet, gently place two candy eyes onto the top-front portion of each miniature peanut butter cup. -
Step 7
Allow chocolate to set completely at room temperature (approx. 30 minutes) or in the refrigerator (10-15 minutes) before serving. Store any leftover cookies in an airtight container at room temperature for up to 3-4 days.
Important Information
Nutrition Facts (Per Serving)
It is important to consider this information as approximate and not to use it as definitive health advice.
Allergy Information
Please check ingredients for potential allergens and consult a health professional if in doubt.


Leave a Comment