
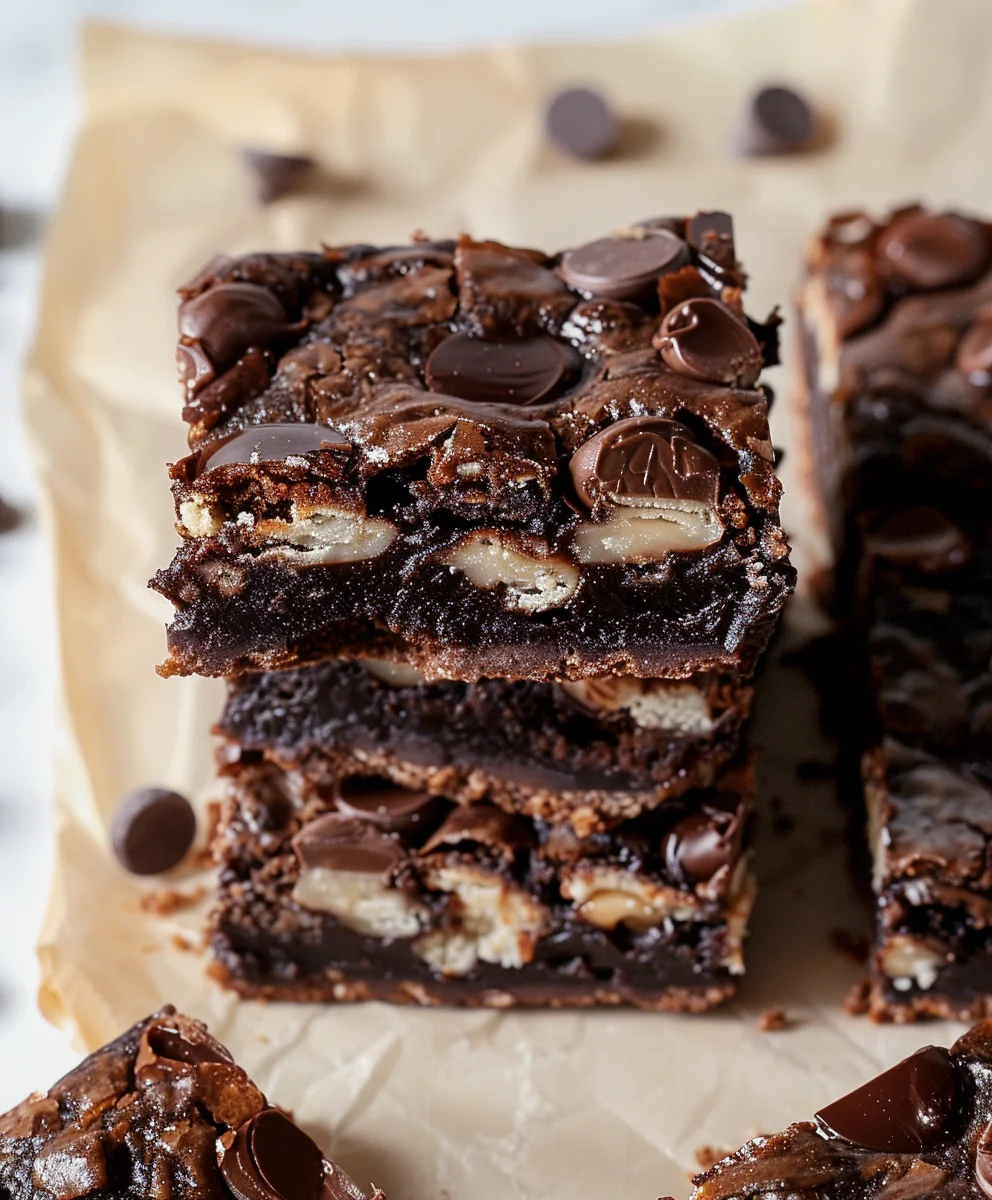
Brownie Bottom Bars – just hearing those words conjures images of pure dessert bliss, doesn’t it? As someone who cherishes the art of baking, I’ve always found immense joy in recipes that combine the best of both worlds. This particular creation, a genius fusion of a deeply fudgy brownie base and a delightful, contrasting top layer, is a testament to culinary creativity. While the humble brownie itself boasts a rich history, evolving from an accidental delight to an American classic in the late 19th and early 20th centuries, the concept of a layered bar takes this beloved treat to new heights. People adore these bars not just for their irresistible taste – that perfect balance of intense chocolate and a complementary, often creamy or crunchy, upper stratum – but also for their incredible texture. Imagine the chewiness of a perfect brownie meeting a soft or crisp companion. They are also wonderfully convenient for gatherings, offering a neater, portioned indulgence that’s always a crowd-pleaser. Truly, these Brownie Bottom Bars represent the ultimate in handheld dessert satisfaction, making every bite a memorable experience.
Ingredients:
-
For the Decadent Brownie Layer:
- 1 cup (2 sticks or 226g) unsalted butter, cut into 1-inch pieces
- 8 ounces (226g) high-quality semi-sweet chocolate, finely chopped or in chips
- 1 ¾ cups (350g) granulated sugar
- 4 large eggs, at room temperature
- 1 teaspoon pure vanilla extract
- 1 cup (125g) all-purpose flour, spooned and leveled
- ½ cup (45g) unsweetened cocoa powder, sifted
- ½ teaspoon baking powder
- ¼ teaspoon salt
-
For the Creamy Peanut Butter Fudge Layer:
- ½ cup (1 stick or 113g) unsalted butter
- 1 cup (250g) creamy peanut butter (not natural style, for best texture)
- 3-4 cups (360-480g) powdered sugar, sifted (adjust to desired sweetness and thickness)
- 2 tablespoons milk (whole milk works best) or heavy cream
- 1 teaspoon pure vanilla extract
- Pinch of salt
-
Optional Chocolate Ganache Drizzle (for garnish):
- ½ cup (120ml) heavy cream
- 4 ounces (113g) semi-sweet chocolate, finely chopped
- Optional: Flaky sea salt for sprinkling
- Optional: Chopped roasted peanuts for sprinkling
Preparing the Decadent Brownie Layer
Oh, these Brownie Bottom Bars are truly a dream come true, and it all starts with an incredible brownie base. Let’s get baking!
- Preheat and Prepare Your Pan: First things first, preheat your oven to 350°F (175°C). Then, grab a 9×13-inch baking pan. To ensure your beautiful Brownie Bottom Bars come out easily and look perfect, lightly grease the pan, then line it with parchment paper, leaving an overhang on the two longer sides. This parchment “sling” will be your best friend when it’s time to lift the cooled bars out. Grease the parchment paper lightly as well. This double layer of protection makes for effortless removal.
- Melt the Chocolate and Butter: In a large, microwave-safe bowl, combine your 1 cup (2 sticks) of unsalted butter, cut into pieces, with the 8 ounces of finely chopped semi-sweet chocolate. You can melt this mixture gently in the microwave in 30-second intervals, stirring well after each, until smooth and fully melted. Alternatively, you can use a double boiler: place the butter and chocolate in a heatproof bowl set over a saucepan of simmering water (making sure the water doesn’t touch the bottom of the bowl). Stir constantly until melted and glossy. It’s crucial not to overheat the chocolate, as this can cause it to seize or burn, affecting the final texture of your brownie layer. Once melted, set this rich chocolate mixture aside to cool slightly while you work on the next steps.
- Whip Eggs and Sugar: In a separate large bowl, combine the 1 ¾ cups of granulated sugar with the 4 large eggs. Using an electric mixer (either a stand mixer with the whisk attachment or a handheld mixer), beat these together on medium-high speed for about 5-7 minutes. You’ll notice a magical transformation: the mixture will become incredibly pale, thick, and almost ribbony, doubling or even tripling in volume. This step is vital because it incorporates a lot of air into the batter, which contributes to the brownies’ incredible chewy yet light texture. Don’t skip this!
- Combine Wet Ingredients: Once your egg and sugar mixture is light and fluffy, slowly pour the slightly cooled melted chocolate and butter mixture into it. Continue mixing on low speed until just combined. Be careful not to deflate all that beautiful air you just whipped in. Next, add the 1 teaspoon of pure vanilla extract and mix until fully incorporated. The aroma alone at this stage is absolutely heavenly!
- Fold in Dry Ingredients: In a medium bowl, whisk together the 1 cup of all-purpose flour, ½ cup of sifted unsweetened cocoa powder, ½ teaspoon of baking powder, and ¼ teaspoon of salt. Sifting the cocoa powder prevents lumps and ensures a smooth batter. Gradually add these dry ingredients to your wet mixture, folding gently with a rubber spatula until just combined. The key here is not to overmix! Overmixing develops gluten, which can lead to tough, dry brownies – and we want moist, fudgy Brownie Bottom Bars, right? A few streaks of flour are perfectly fine; they’ll disappear during baking.
- Bake the Brownie Base: Pour the luscious brownie batter evenly into your prepared 9×13-inch pan. Spread it out gently with your spatula to reach all corners. Pop it into your preheated oven and bake for 25-30 minutes. You’ll know it’s done when a toothpick inserted into the center comes out with moist crumbs, but not wet batter. The edges will be set, but the center might have a slight wobble, which is perfect for fudgy brownies. Once baked, remove the pan from the oven and let the brownie layer cool completely in the pan on a wire rack. Resist the urge to rush this step! A fully cooled brownie is essential before adding our next fantastic layer. This might take 1-2 hours.
Crafting the Creamy Peanut Butter Fudge Layer
Now for the star of these Brownie Bottom Bars: that incredibly smooth, rich, and utterly irresistible peanut butter fudge layer! It perfectly complements the dense brownie base.
- Melt Butter and Peanut Butter: In a large, microwave-safe bowl or a medium saucepan over low heat, combine the ½ cup (1 stick) of unsalted butter and 1 cup of creamy peanut butter. If using the microwave, heat in 30-second intervals, stirring until smooth and completely melted. If using the stovetop, stir constantly to prevent scorching. The goal is a uniform, pourable consistency. Remove from heat if using a saucepan.
- Add Powdered Sugar and Liquids: Add 2 tablespoons of milk or heavy cream, 1 teaspoon of pure vanilla extract, and a pinch of salt to the melted peanut butter mixture. Begin adding the sifted powdered sugar, starting with 3 cups, mixing with an electric mixer on low speed, or vigorously by hand with a sturdy spoon or spatula. The mixture will start thick, but keep going!
- Achieve Perfect Fudge Consistency: Continue adding the remaining 1 cup of powdered sugar gradually, only if needed, until you reach a thick, spreadable fudge consistency. You’re looking for something that holds its shape but is still easy to spread without tearing the brownie beneath. The amount of powdered sugar can vary slightly depending on your peanut butter and desired sweetness. Taste it to make sure it’s just right for your Brownie Bottom Bars! This layer should be rich and creamy, not too stiff.
Assembling and Chilling Your Brownie Bottom Bars
This is where our two incredible layers come together to form the ultimate Brownie Bottom Bars! Patience is a virtue, especially when chilling.
- Layer the Fudge: Once your brownie layer is completely cool (this is critical!), pour the warm, creamy peanut butter fudge mixture evenly over the top. Use an offset spatula or the back of a spoon to spread it out smoothly to all edges. Aim for a consistent thickness. This creates that iconic, beautiful middle layer that defines our Brownie Bottom Bars.
- Chill for Setting: Place the pan with both layers into the refrigerator to chill for at least 2-3 hours, or even better, overnight. This chilling time is absolutely essential for the peanut butter fudge layer to set firmly. Without adequate chilling, your bars will be too soft to cut cleanly. Don’t rush this step for perfect Brownie Bottom Bars! The colder they are, the cleaner your cuts will be.
- Prepare Optional Chocolate Ganache (if using): If you’re going for that extra touch of elegance and flavor, let’s make a simple chocolate ganache. Heat the ½ cup of heavy cream in a small saucepan over medium heat until it just begins to simmer around the edges. Alternatively, heat it in a microwave-safe bowl until very hot but not boiling. Remove from heat and pour it over the 4 ounces of finely chopped semi-sweet chocolate in a heatproof bowl. Let it sit undisturbed for 5 minutes. Then, whisk gently from the center outwards until the mixture is completely smooth, glossy, and uniform. Allow the ganache to cool for about 10-15 minutes, stirring occasionally, until it thickens slightly and is pourable but not too runny.
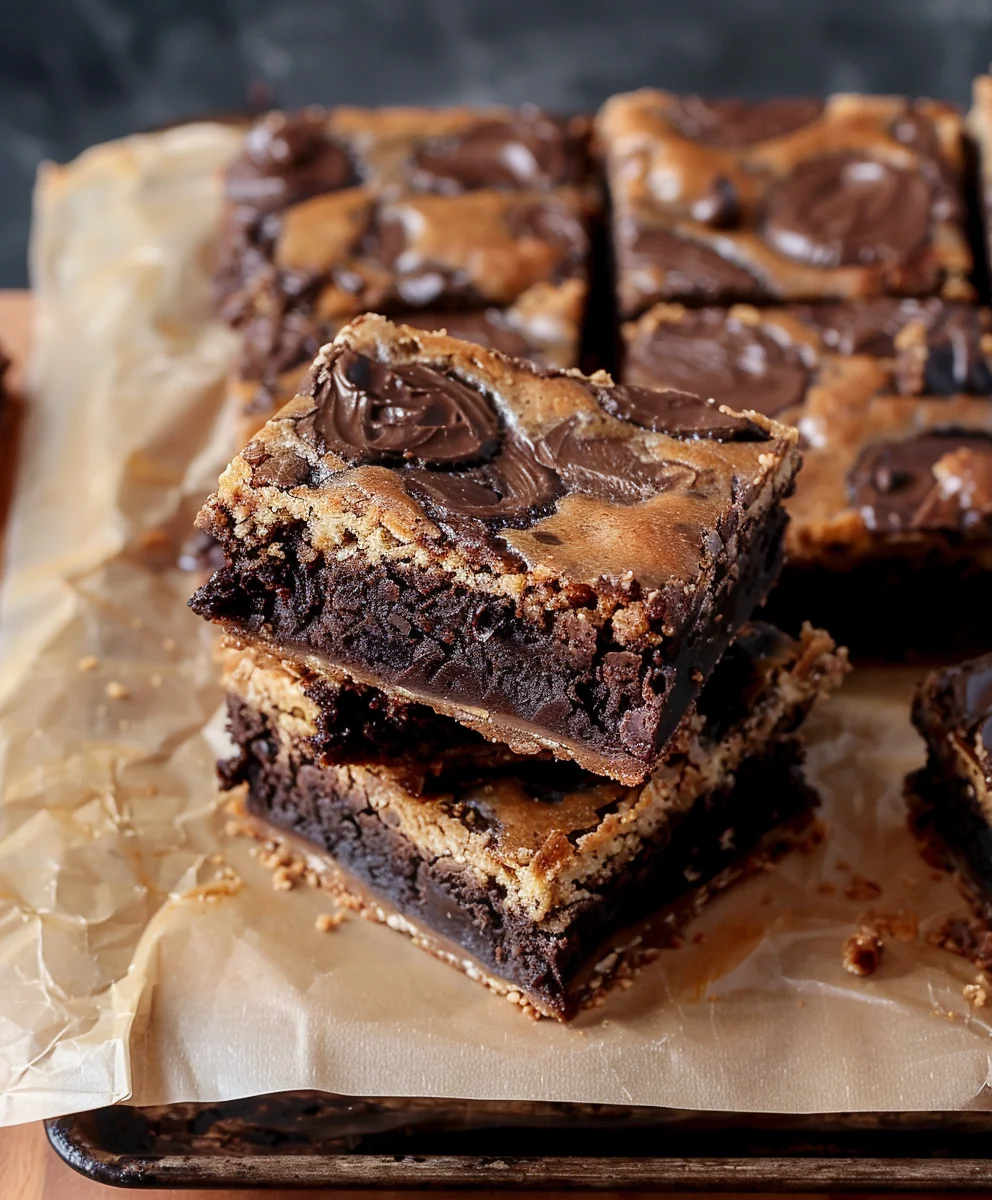
- Drizzle and Garnish (Optional): Once the Brownie Bottom Bars are well chilled and firm, lift them out of the pan using the parchment paper sling. Place them on a cutting board. If using, drizzle the slightly cooled chocolate ganache artistically over the top of the peanut butter fudge layer. You can make zig-zags, swirls, or just a simple even coat. If desired, sprinkle with flaky sea salt and/or chopped roasted peanuts immediately after drizzling the ganache, before it sets. These garnishes add not only visual appeal but also wonderful textural and flavor contrasts to your Brownie Bottom Bars.
Serving and Storing Your Delicious Brownie Bottom Bars
You’ve done the hard work, now it’s time for the delicious reward! Here’s how to serve and store your magnificent Brownie Bottom Bars.
- Achieving Perfect Cuts: For the cleanest, most professional-looking slices of your Brownie Bottom Bars, here’s a pro tip: use a large, sharp knife. Before each cut, dip the knife in hot water and wipe it clean with a paper towel. The warm, clean blade will glide through the dense layers without dragging, giving you beautifully defined edges. Cut the large slab into desired bar sizes – typically 12-24 bars, depending on how generous you want each serving to be.
- Serving Temperature: While these Brownie Bottom Bars are wonderful chilled, letting them sit at room temperature for about 15-20 minutes before serving can enhance their flavors and soften the fudge layer to a perfect creamy consistency. The chocolate in the brownie layer will also be more supple. This slight warming really allows the individual notes of chocolate and peanut butter to shine through.
- Storage Instructions: These Brownie Bottom Bars are best stored in an airtight container in the refrigerator for up to 5-7 days. The cool environment keeps the fudge layer firm and prevents it from becoming too soft or oily.
- Freezing for Longer Enjoyment: If you want to savor your Brownie Bottom Bars for longer, they freeze beautifully! Once cut into individual portions, place them in a single layer on a baking sheet and freeze until solid (about 1-2 hours). Then, transfer the frozen bars to a freezer-safe airtight container or heavy-duty freezer bag, separating layers with parchment paper to prevent sticking. They can be frozen for up to 2-3 months. To enjoy, simply thaw individual bars in the refrigerator overnight or at room temperature for about an hour. These Brownie Bottom Bars are fantastic to have on hand for unexpected guests or a quick treat!
Conclusion:
So, there you have it – my absolute favorite recipe for these incredible Brownie Bottom Bars. Why are these a must-try, you ask? Because they’re not just a dessert; they’re an experience, a delightful fusion of two beloved classics that come together in perfect harmony. Imagine that deep, rich, fudgy brownie base, intensely chocolatey and satisfyingly chewy, providing the perfect foundation. Then, picture the golden, buttery, and slightly crisp bar topping, often studded with delightful additions, creating a textural contrast that is simply irresistible. This isn’t just about combining two sweets; it’s about crafting a symphony of textures and flavors that will undoubtedly leave you, and anyone lucky enough to share them, reaching for more.
I find immense joy in how straightforward yet profoundly rewarding this recipe is. It defies the myth that show-stopping desserts must be overly complicated. With my guidance, you’ve unlocked the secret to creating a treat that looks impressive, tastes divine, and comes together with surprising ease. It’s the kind of dessert that elicits gasps of delight and requests for the recipe, making you feel like a true culinary maestro without having spent hours slaving away in the kitchen. Whether you’re a seasoned baker or someone just starting to explore the joys of homemade treats, these bars offer a gratifying journey from mixing bowl to blissful bite.
Serving Suggestions to Elevate Your Experience
Now that you’ve mastered these magnificent bars, how should you enjoy them? While they are undeniably perfect straight from the pan, still slightly warm with that gooey center and crisp top, don’t stop there! For an extra touch of indulgence, I highly recommend serving a warm square of your Brownie Bottom Bars alongside a scoop of premium vanilla bean ice cream. The cold, creamy ice cream melting into the warm brownie and bar layers creates a truly divine sensation. A delicate dusting of powdered sugar adds an elegant finish, making them perfect for a dinner party or a special occasion. Alternatively, a dollop of freshly whipped cream, perhaps infused with a hint of vanilla or a touch of coffee liqueur, can add a luxurious lightness that beautifully complements the richness of the bars. For a simple, comforting treat, a tall glass of cold milk or a steaming cup of coffee makes for a classic pairing that never disappoints.
Consider cutting them into smaller, bite-sized squares for a party platter, making them easy to pick up and enjoy. You could even arrange them artfully on a dessert board with fresh berries, chocolate-dipped strawberries, and a few artisanal cheeses for a truly gourmet presentation. For a little added flair, a drizzle of warm caramel sauce or a sprinkle of sea salt flakes over the top just before serving can elevate the flavor profile, adding that professional touch that makes all the difference. Remember, presentation is half the experience, and these beautiful bars are already halfway there!
Unleash Your Creativity with Variations
But the true magic of these bars lies in their versatility. Think of this recipe as a launchpad for your own culinary adventures. Want to elevate the brownie base itself? Try stirring in a tablespoon of espresso powder to deepen the chocolate flavor and create a mocha-like richness. Or perhaps a handful of mini marshmallows or peanut butter chips for an extra layer of texture and taste. For a citrusy twist, adding a teaspoon of orange zest to the brownie batter can create a delightful contrast that brightens the entire dessert. Don’t be afraid to experiment!
Or perhaps you’re feeling adventurous with the top layer? Instead of just a plain bar, consider adding different mix-ins. Swirl in a spoonful of creamy peanut butter for a nutty ribbon through the top layer, or fold in white chocolate chips and toasted pecans for a sophisticated crunch. A sprinkle of flaky sea salt on top of the bars before baking can provide a wonderful counterpoint to the sweetness. For seasonal celebrations, imagine adding a hint of peppermint extract and crushed candy canes during the holidays, or pumpkin spice and a swirl of cream cheese frosting during autumn. The possibilities are truly endless, limited only by your imagination!
I genuinely believe that once you try this recipe, it will quickly become a cherished favorite in your kitchen. There’s something so satisfying about baking something utterly delicious from scratch, and even more so when it brings smiles to the faces of those you share it with. So, what are you waiting for? Gather your ingredients, preheat your oven, and prepare to embark on a delightful baking journey. I truly hope you give these Brownie Bottom Bars a try. When you do, please don’t keep your experience a secret! I absolutely love hearing about your baking adventures. Share your triumphs, your creative variations, and your delicious photos. Your kitchen is about to become the happiest place on earth, and I can’t wait to hear all about it!
Brownie Bottom Bars
Irresistible Brownie Bottom Bars: An easy dessert recipe featuring a fudgy brownie base, a creamy filling, and a chocolate topping, offering ultimate handheld dessert satisfaction.
Ingredients
-
1 box brownie mix for 9×13 pan
-
22 Oreos, divided
-
8 ounces cream cheese, softened
-
1 large egg
-
1 teaspoon vanilla extract
-
1/4 cup granulated sugar
-
2 Tablespoons sour cream
-
1/4 cup chocolate chips
-
1/4 cup heavy whipping cream
Instructions
-
Step 1
Preheat oven to 350°F (175°C). Line a 9×13-inch pan with parchment paper. -
Step 2
Crush 18 Oreos. Prepare brownie mix according to package directions; stir in crushed Oreos. -
Step 3
Arrange half of the remaining 4 Oreos on the pan bottom. Pour brownie batter over them. Bake according to brownie mix package instructions, then cool completely. -
Step 4
In a bowl, beat softened cream cheese, 1/4 cup granulated sugar, 1 large egg, 1 teaspoon vanilla extract, and 2 Tablespoons sour cream until smooth. Spread this mixture over the cooled brownie layer. -
Step 5
Crush and sprinkle the other half of the remaining Oreos over the cream cheese layer. -
Step 6
Bake for 25-30 minutes, or until the cream cheese layer is set. Let cool completely. -
Step 7
Heat 1/4 cup heavy whipping cream until simmering. Pour over 1/4 cup chocolate chips; let sit 5 minutes, then whisk until smooth to make ganache. -
Step 8
Drizzle ganache over cooled bars. Chill in the refrigerator for at least 2-3 hours or overnight until firm. -
Step 9
Using a warm, clean knife, cut the chilled slab into desired bar sizes. Store in an airtight container in the refrigerator.
Important Information
Nutrition Facts (Per Serving)
It is important to consider this information as approximate and not to use it as definitive health advice.
Allergy Information
Please check ingredients for potential allergens and consult a health professional if in doubt.

Leave a Comment