
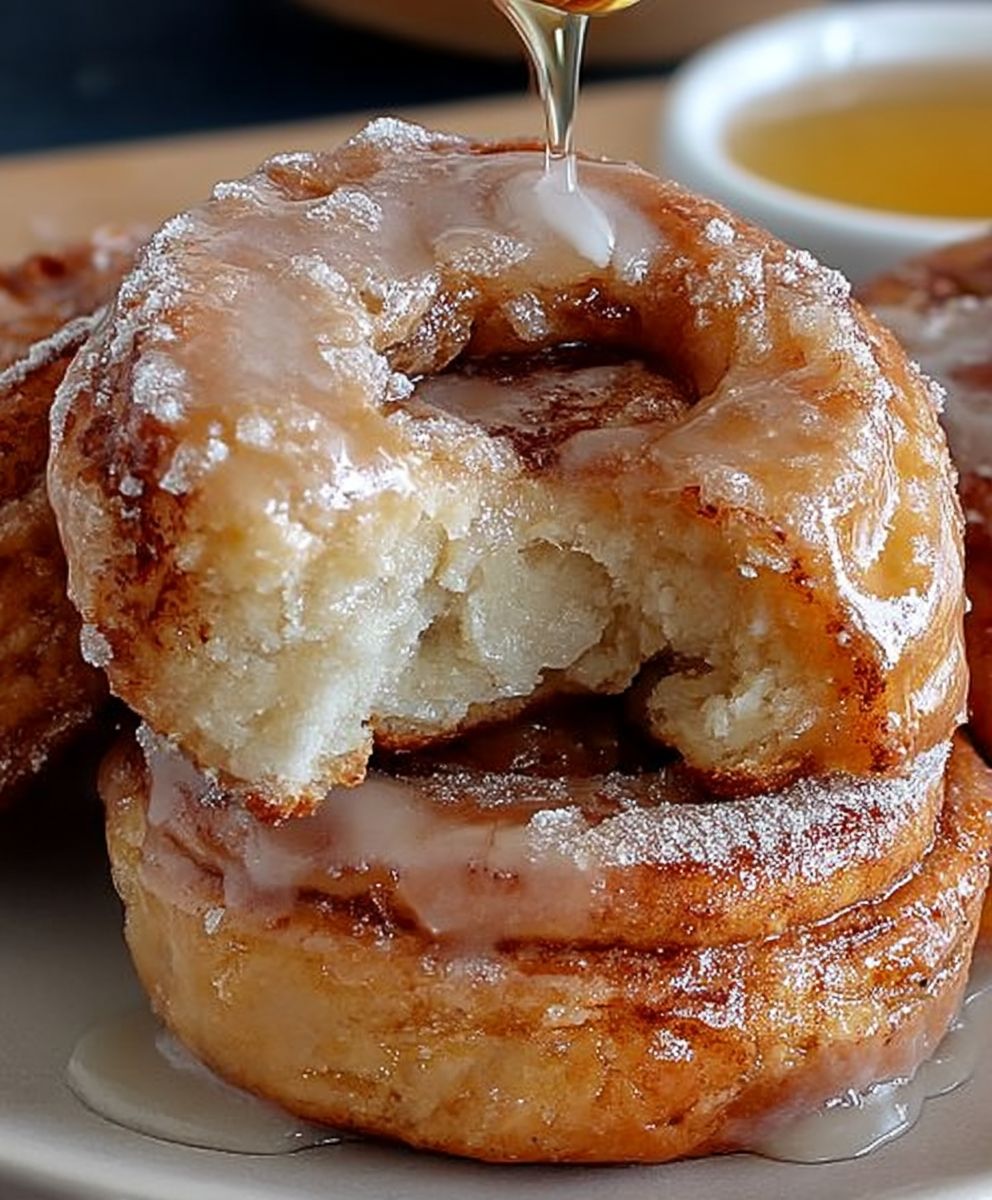
Homemade Honey Buns, warm from the oven, are a taste of pure nostalgia. Remember those sweet, sticky, pull-apart pastries that were a childhood treat? Now you can recreate that magic in your own kitchen! Forget the store-bought versions that are often dry and disappointing; this recipe delivers unbelievably soft, gooey, and utterly irresistible honey buns that will have everyone begging for more.
While the exact origins of honey buns are debated, similar sweet rolls have been enjoyed for centuries across various cultures. The concept of enriched dough, swirled with sweet fillings and topped with a glaze, is a culinary tradition found in many forms. What makes the honey bun so uniquely appealing is its simple yet satisfying combination of flavors and textures. The slightly chewy, yeasty dough, the rich, buttery honey filling, and the decadent glaze create a symphony of sweetness that’s hard to resist.
People adore homemade honey buns for several reasons. First, the taste is simply divine. The warm honey and cinnamon filling melts into the dough, creating a caramelized, sticky goodness that’s impossible to replicate with pre-packaged options. Second, the texture is heavenly – soft, fluffy, and slightly chewy all at once. Finally, while they might seem intimidating, these honey buns are surprisingly easy to make at home with this recipe. So, gather your ingredients, and let’s embark on a baking adventure that will fill your home with the comforting aroma of warm honey and cinnamon!
Ingredients:
- For the Dough:
- 3 ½ cups all-purpose flour, plus more for dusting
- ¼ cup granulated sugar
- 1 teaspoon salt
- 1 package (2 ¼ teaspoons) active dry yeast
- ¾ cup warm milk (110-115°F)
- ¼ cup unsalted butter, melted
- 2 large eggs, lightly beaten
- For the Filling:
- ½ cup unsalted butter, softened
- ½ cup packed light brown sugar
- 2 tablespoons ground cinnamon
- For the Honey Glaze:
- ½ cup unsalted butter
- ½ cup honey
- ¼ cup packed light brown sugar
- ¼ cup heavy cream
- ¼ teaspoon salt
Making the Dough
- Combine Dry Ingredients: In a large bowl, whisk together the flour, sugar, and salt. This ensures the salt and sugar are evenly distributed throughout the flour, which is crucial for proper yeast activation and flavor.
- Activate the Yeast: In a separate small bowl, dissolve the yeast in the warm milk. Make sure the milk is not too hot, as this can kill the yeast. Let it stand for 5-10 minutes, or until foamy. This indicates that the yeast is active and ready to use. If it doesn’t foam, your yeast might be old and you’ll need to get a fresh batch.
- Combine Wet and Dry Ingredients: Add the melted butter and beaten eggs to the yeast mixture. Whisk to combine. Pour the wet ingredients into the dry ingredients and stir with a wooden spoon or spatula until a shaggy dough forms.
- Knead the Dough: Turn the dough out onto a lightly floured surface. Knead for 8-10 minutes, or until the dough is smooth and elastic. If the dough is too sticky, add a little more flour, one tablespoon at a time. Be careful not to add too much flour, as this can make the buns tough. You can also use a stand mixer with a dough hook attachment to knead the dough. Knead on medium speed for 6-8 minutes.
- First Rise: Place the dough in a lightly oiled bowl, turning to coat. Cover with plastic wrap or a clean kitchen towel and let rise in a warm place for 1-1.5 hours, or until doubled in size. The rising time will depend on the temperature of your kitchen. A warm environment will speed up the process.
Preparing the Filling and Assembling the Buns
- Prepare the Filling: While the dough is rising, prepare the filling. In a medium bowl, cream together the softened butter, brown sugar, and cinnamon until smooth and well combined. Make sure your butter is truly softened, not melted, for the best consistency.
- Roll Out the Dough: Once the dough has doubled in size, punch it down to release the air. Turn it out onto a lightly floured surface and roll it into a large rectangle, about 12×18 inches.
- Spread the Filling: Spread the prepared filling evenly over the entire surface of the dough. Make sure to get the filling all the way to the edges for maximum flavor in every bite.
- Roll Up the Dough: Starting from one of the long edges, tightly roll up the dough into a log. Pinch the seam to seal it closed.
- Cut the Buns: Using a sharp serrated knife or unflavored dental floss, cut the log into 12 equal slices. Dental floss is a great way to get clean cuts without squishing the dough.
Making the Honey Glaze and Baking
- Prepare the Honey Glaze: In a medium saucepan, combine the butter, honey, brown sugar, heavy cream, and salt. Cook over medium heat, stirring constantly, until the butter is melted and the sugar is dissolved. Bring to a simmer and cook for 1-2 minutes, or until slightly thickened. Be careful not to burn the glaze.
- Pour Glaze into Baking Dish: Pour the honey glaze into a 9×13 inch baking dish. Make sure the bottom of the dish is evenly coated.
- Arrange the Buns: Place the cut buns in the baking dish, cut-side up, on top of the honey glaze. Arrange them evenly, leaving a little space between each bun.
- Second Rise: Cover the baking dish with plastic wrap or a clean kitchen towel and let rise in a warm place for 30-45 minutes, or until the buns have puffed up slightly.
- Bake the Buns: Preheat oven to 350°F (175°C). Bake for 25-30 minutes, or until the buns are golden brown and the glaze is bubbly. Keep an eye on them towards the end of the baking time to prevent them from burning.
- Invert and Serve: Let the buns cool in the baking dish for 5-10 minutes before inverting them onto a serving platter. This allows the glaze to soak into the buns. Serve warm and enjoy! Be careful when inverting, as the glaze will be very hot.
Tips for Success
- Use Fresh Yeast: Make sure your yeast is fresh for the best results. If you’re unsure, test it by dissolving a small amount in warm water with a pinch of sugar. If it doesn’t foam within 5-10 minutes, it’s likely dead.
- Don’t Overheat the Milk: The milk should be warm to the touch, but not hot. Overheating the milk can kill the yeast.
- Knead the Dough Well: Kneading the dough properly is essential for developing the gluten, which gives the buns their structure and chewiness.
- Let the Dough Rise Properly: Give the dough enough time to rise in a warm place. This will result in light and fluffy buns.
- Don’t Overbake: Overbaking the buns can make them dry and tough. Bake until they are golden brown and the glaze is bubbly.
- Adjust Sweetness: If you prefer a less sweet glaze, reduce the amount of honey or brown sugar.
- Add Nuts: For extra flavor and texture, add chopped pecans or walnuts to the filling or sprinkle them on top of the glaze before baking.
- Make Ahead: You can prepare the dough and filling ahead of time. After cutting the buns, place them in the baking dish, cover, and refrigerate overnight. Let them come to room temperature for about 30 minutes before baking.
Variations
- Caramel Honey Buns: Substitute the brown sugar in the glaze with granulated sugar for a caramel-like flavor.
- Maple Honey Buns: Replace the honey in the glaze with maple syrup for a delicious maple flavor.
- Orange Honey Buns: Add orange zest to the filling and glaze for a citrusy twist.
- Chocolate Honey Buns: Add cocoa powder to the filling for a chocolatey treat. You can also drizzle melted chocolate over the baked buns.
Serving Suggestions
- Serve warm with a scoop of vanilla ice cream.
- Enjoy with a cup of coffee or tea.
- Make them for brunch or a special occasion.
- They are also great as a dessert after dinner.
Storage Instructions
- Store leftover honey buns in an airtight container at room temperature for up to 2 days.
- For longer storage, wrap them individually in plastic wrap and freeze for up to 2 months. Thaw at room temperature before serving.
- To reheat, warm them in the oven at 350°F (175°C) for 5-10 minutes, or microwave for 20-30 seconds.
Why This Recipe Works
This recipe is a tried-and-true method for creating incredibly soft, gooey, and flavorful honey buns. The key is in the enriched dough, which uses butter, eggs, and milk to create a tender crumb. The generous filling of butter, brown sugar, and cinnamon ensures that every bite is packed with flavor. And the honey glaze, with its rich combination of butter, honey, brown sugar, and cream, adds the perfect amount of sweetness and stickiness. The double rise allows the dough to develop its flavor and texture, resulting in buns that are light, airy, and melt-in-your-mouth delicious. The detailed instructions and helpful tips ensure that even novice bakers can achieve success with this recipe.
Troubleshooting
- Use fresh yeast for the best results.
- Don’t overheat the milk, it should be warm to the touch, but not hot.
- Knead the dough properly to develop the gluten.
- Give the dough enough time to rise in a warm place.
- Don’t overbake the buns.
- Adjust sweetness by reducing the amount of honey or brown sugar.
- Add chopped pecans or walnuts to the filling or sprinkle them on top of the glaze before baking.
- You can prepare the dough and filling ahead of time. After cutting the buns, place them in the baking dish, cover, and refrigerate overnight. Let them come to room temperature for about 30 minutes before baking.

Conclusion:
And there you have it! These Homemade Honey Buns are more than just a sweet treat; they’re an experience. From the satisfying squish of the dough as you knead it, to the intoxicating aroma that fills your kitchen while they bake, and finally, that first blissful bite of warm, gooey, honey-glazed perfection – it’s a journey worth taking. I truly believe that once you’ve tasted these, you’ll never reach for a store-bought version again. They’re simply that good.
But what makes these honey buns a must-try? It’s the combination of textures and flavors. The soft, pillowy dough, the rich, buttery filling, and that luscious honey glaze create a symphony of deliciousness in every bite. Plus, making them from scratch allows you to control the ingredients, ensuring that you’re using the best quality butter, honey, and flour. You know exactly what’s going into your food, and that peace of mind is priceless.
Beyond the sheer deliciousness, these Homemade Honey Buns are incredibly versatile. Serve them warm with a scoop of vanilla ice cream for an extra decadent dessert. Or, enjoy them with a steaming cup of coffee or tea for a cozy breakfast or brunch. They’re also perfect for sharing with friends and family – trust me, they’ll be begging for the recipe!
Looking for some variations? Get creative! Try adding a sprinkle of chopped pecans or walnuts to the filling for a nutty crunch. Or, incorporate a touch of cinnamon or cardamom for a warm, spiced flavor. For a citrusy twist, add a bit of orange or lemon zest to the dough or glaze. You could even experiment with different types of honey, such as buckwheat or wildflower, to create unique flavor profiles. The possibilities are endless!
Don’t be intimidated by the thought of making these from scratch. I’ve broken down the recipe into easy-to-follow steps, and I’m confident that even beginner bakers can achieve amazing results. Just remember to be patient, have fun, and don’t be afraid to experiment. Baking should be a joyful experience, and these honey buns are the perfect way to embrace that joy.
So, what are you waiting for? Gather your ingredients, preheat your oven, and get ready to embark on a baking adventure. I promise you won’t regret it. These Homemade Honey Buns are a guaranteed crowd-pleaser, and they’re sure to become a new family favorite.
I’m so excited for you to try this recipe! Once you’ve made them, I’d love to hear about your experience. Did you make any variations? What did your family and friends think? Share your photos and stories in the comments below. I can’t wait to see your creations! Happy baking! And remember, the secret ingredient is always love (and maybe a little extra honey!).
Homemade Honey Buns: The Ultimate Recipe for Sweet Success
Soft, gooey homemade honey buns with a rich honey glaze. Perfect for brunch, dessert, or a special treat!
Ingredients
Instructions
Leave a Comment