
Vampire Bread. The name alone conjures images of ancient castles, mysterious nights, and perhaps, a delicious, potent defense against the darkness! Fear not, for while its name is delightfully dramatic, this recipe offers nothing but warmth, comfort, and an explosion of savory flavor that will have even the most discerning palate falling under its spell. I’ve always been captivated by dishes that carry a whimsical or storied name, and this particular bread is no exception, leaning into the delightful folklore surrounding garlic’s legendary protective qualities.
There’s a certain charm in imagining every bite of this fragrant loaf acting as a joyful ward, though its true magic lies purely in its incredible taste and aroma. People adore this dish for its intoxicating scent that fills the kitchen, its perfectly golden, crisp crust, and the soft, pillowy interior infused with an abundance of pungent, roasted garlic and aromatic herbs. It’s a supremely versatile side, perfect for soaking up rich pasta sauces, accompanying a hearty stew, or simply enjoyed on its own as an irresistible snack. This unique take on garlic bread, often affectionately dubbed Vampire Bread, elevates a beloved classic into something truly extraordinary.
Ingredients:
- 3 ½ cups (about 420g) all-purpose flour, plus more for dusting – I often use a good quality bread flour for an even chewier crust, but all-purpose works beautifully here too!
- 2 teaspoons active dry yeast – make sure it’s fresh; an old batch can lead to a sad, flat loaf, and we definitely don’t want that for our majestic Vampire Bread.
- 1 teaspoon granulated sugar – this is just a little treat for our yeast, helping it activate beautifully.
- 1 cup (240ml) warm milk (any kind works, dairy or non-dairy) – aiming for a temperature between 105-115°F (40-46°C). Too hot will kill the yeast, too cold won’t wake it up.
- ½ cup (120ml) warm water – also in that 105-115°F range.
- ½ cup (120ml) extra virgin olive oil – divided; a generous amount for flavor and richness.
- 6-8 large cloves garlic, minced or finely crushed – this is our hero ingredient, the very soul of our “Vampire Bread”! Feel free to add more if you’re a serious garlic lover like me.
- 2 tablespoons fresh rosemary, finely chopped – or 1 tablespoon dried rosemary.
- 1 tablespoon fresh thyme, finely chopped – or ½ tablespoon dried thyme.
- 2 teaspoons fine sea salt – essential for flavor and controlling the yeast’s activity. Don’t skip or skimp on this!
- ½ cup (about 75g) sun-dried tomatoes, oil-packed, drained and finely chopped – these add a wonderful depth of flavor, a touch of savory sweetness, and a subtle reddish hue that hints at its namesake. You can omit them if you prefer a simpler garlic-herb bread, but I highly recommend them!
- For the egg wash: 1 large egg, whisked with 1 tablespoon water.
- For topping: Flaky sea salt, for that perfect textural crunch and burst of salinity on the crust.
Preparing the Garlic-Infused Oil and Base Dough
- Activate the Yeast: In a large mixing bowl, or the bowl of your stand mixer, combine the warm milk, warm water, and granulated sugar. Give it a gentle stir. Sprinkle the active dry yeast over the surface. Let this mixture sit undisturbed for about 5-10 minutes. You’re looking for a lovely, foamy layer to appear on top. This tells you your yeast is alive, happy, and ready to work its magic! If you don’t see any foam, your yeast might be old or your liquids weren’t at the right temperature, and it’s best to start again. It’s a crucial first step for a successful loaf.
- Infuse the Olive Oil: While your yeast is blooming, grab a small saucepan. Pour in ¼ cup (60ml) of the extra virgin olive oil. Add your minced or crushed garlic cloves, along with the chopped fresh rosemary and thyme. Place the saucepan over low heat and gently warm the oil for about 5-7 minutes. The goal here isn’t to fry the garlic, but to slowly coax out all its incredible aroma and flavor into the oil. You’ll notice the garlic softening and becoming fragrant, but it shouldn’t brown. Remove it from the heat and let it cool down slightly while you prepare the dry ingredients. This infused oil is going to give our Vampire Bread its signature, irresistible garlicky punch!
- Combine Wet Ingredients: Once the yeast mixture is actively foamy, pour in the slightly cooled garlic-herb infused oil. You can strain out the garlic and herbs if you prefer a smoother texture, but I love leaving them in for bursts of flavor and rustic charm in the finished bread. Add the remaining ¼ cup (60ml) of plain extra virgin olive oil to the bowl as well. Give everything a good stir to combine all these wonderfully fragrant liquids.
- Prepare Dry Ingredients: In a separate, medium-sized bowl, whisk together the 3 ½ cups of all-purpose flour and the 2 teaspoons of fine sea salt. If you’re using the finely chopped sun-dried tomatoes, now is the time to toss them in with the dry ingredients. This ensures they’re evenly distributed throughout the dough rather than clumping together. Mixing the salt with the flour separately helps ensure even seasoning and prevents the salt from directly interacting with the yeast too early, which can sometimes hinder activation.
- Form the Dough: Gradually add the flour mixture to the wet ingredients in the large bowl, mixing with a wooden spoon or a dough hook on your stand mixer on low speed. Continue to mix until all the flour is incorporated and a shaggy, somewhat sticky dough forms. At this stage, it won’t look particularly pretty or smooth, and that’s perfectly normal! It’s just the beginning of our bread-making adventure.
Developing the Dough and First Rise
-
Kneading for Perfection: Transfer the shaggy dough to a lightly floured surface if kneading by hand, or increase the speed of your stand mixer to medium-low. Kneading is where the magic happens for developing gluten, which gives bread its structure and chewiness.
- By Hand: Knead for a good 8-10 minutes. Push the dough away from you with the heels of your hands, fold it back over, rotate it, and repeat. You might feel like you’re giving it a workout, and you are! The dough will transform from sticky and rough to smooth, elastic, and pliable.
- Stand Mixer: With a dough hook, knead for 7-9 minutes on medium-low speed. Watch as the dough gathers itself around the hook, becoming smooth and pulling away cleanly from the sides of the bowl.
You’ll know it’s properly kneaded when it passes the “windowpane test”: pinch off a small piece of dough and gently stretch it. If you can stretch it thin enough to see light through it without it tearing, your gluten is beautifully developed!
- Adjusting Hydration (if needed): Bread dough can be a bit finicky depending on flour type, humidity, and even the weather. If your dough feels too sticky after several minutes of kneading, add flour one tablespoon at a time until it’s more manageable but still soft. Conversely, if it seems too dry and stiff, add water a teaspoon at a time. Aim for a dough that is soft, slightly tacky to the touch, but not sticky.
- The First Rise (Bulk Fermentation): Lightly grease a large, clean bowl with a little olive oil. Place your beautifully kneaded dough into the bowl, turning it once to coat the top with oil (this prevents it from drying out). Cover the bowl tightly with plastic wrap or a clean kitchen towel. Find a warm, draft-free spot in your kitchen. This could be near a sunny window (but not too hot!), on top of a preheating oven, or even in a turned-off oven with the light on. Let the dough rise for 1 to 1 ½ hours, or until it has visibly doubled in size. The warmth encourages the yeast to produce carbon dioxide, creating those wonderful airy pockets in your bread. Patience is a virtue here!
- Punching Down the Dough: Once the dough has doubled, gently uncover it. Using your fist, gently punch down the dough in the center. This isn’t an aggressive action; rather, it’s a gentle deflation that releases the built-up gases, redistributes the yeast, and evens out the dough’s temperature. It also helps to develop the flavor further. Turn the dough out onto a lightly floured surface.
Shaping the Vampire Loaves
- Prepare for Shaping: Gently stretch the dough into a rough rectangle. This step helps to release any remaining large air bubbles and makes it easier to work with. For this recipe, I find that shaping it into an elongated, rustic batard (a torpedo-like oval) really gives it a dramatic, artisanal look that suits our “Vampire Bread” theme.
-
Shaping a Batard:
- First, fold the top third of the dough down towards the center, pressing firmly to seal.
- Then, fold the bottom third of the dough up and over the first fold, pressing firmly to create a seam.
- Now, rotate the dough 90 degrees. You should have a long, relatively narrow rectangle.
- Starting from one of the short ends, tightly roll the dough towards the other end, making sure to keep the roll as tight as possible. Tight rolling helps create internal tension and a good, even crumb structure.
- Once rolled, pinch the seam firmly along the entire length of the loaf. This seam will be the bottom of your loaf.
- Finally, gently taper the ends of the loaf to create that classic batard shape. You can cup your hands around the ends and gently pull them to create slightly pointed tips, giving it a somewhat “fang-like” or dramatic appearance.
The goal is to create surface tension, so the dough holds its shape well during the second rise and baking.
- Prepare Baking Sheet: Line a large baking sheet with parchment paper. This prevents sticking and makes cleanup a breeze. Carefully transfer your beautifully shaped Vampire Loaf (or loaves, if you divided the dough for smaller ones) to the prepared baking sheet, ensuring there’s enough space between them if you have multiple.
Second Rise and Preparing for Baking
- The Second Rise (Proofing): Loosely cover the shaped loaf on the baking sheet with plastic wrap or a clean kitchen towel. Return it to your warm, draft-free spot for its second rise. This usually takes about 30-60 minutes. During this stage, the dough will become visibly puffy and soft to the touch, though it won’t double in size quite as dramatically as the first rise. It’s ready when it passes the “poke test”: gently press your finger into the dough; if the indentation springs back slowly and not completely, it’s perfectly proofed. If it springs back immediately, it needs a little more time. If it collapses, it’s over-proofed, but don’t fret too much, it will still taste delicious!
- Preheat the Oven: About 20 minutes before your dough finishes its second rise, preheat your oven to 400°F (200°C). A properly preheated oven is crucial for achieving good oven spring and a crisp crust. If you have a baking stone or steel, place it in the oven during preheating for even better results.
- Prepare the Egg Wash: In a small bowl, whisk together the large egg with 1 tablespoon of water until well combined. This is your egg wash.
- Score the Loaf: Just before baking, gently brush the entire surface of your Vampire Bread with the egg wash. This will give it a beautiful golden-brown, shiny crust. Then, using a very sharp knife or a bread lame (a razor blade designed for scoring bread), make 2-3 shallow slashes on the top of the loaf. Scoring isn’t just for aesthetics; it allows the steam to escape in a controlled manner, preventing the crust from cracking unevenly and promoting a lovely “oven spring,” where the bread dramatically expands in the oven. For a “Vampire Bread” touch, you could even try to make scores that resemble “fangs” or interesting patterns!
- Add Topping: Immediately after scoring and applying the egg wash, sprinkle a generous amount of flaky sea salt over the top of the loaf. This adds a fantastic texture, visual appeal, and a delightful savory crunch to every bite.
Baking Your Vampire Bread
- Initial High Heat Bake: Carefully transfer the baking sheet with your prepared Vampire Bread into the preheated 400°F (200°C) oven.
- Creating Steam (Optional but Recommended): For an extra-crispy, professional-looking crust, you can create a steamy environment in your oven. Just as you place the bread in, quickly pour ½ cup of hot water into a shallow, oven-safe pan placed on the bottom rack of your oven (or toss a few ice cubes onto the bottom of the oven if it’s designed for it). Be extremely careful when introducing steam to a hot oven! This steam helps to keep the crust soft for the first few minutes, allowing the bread to expand fully before the crust sets, leading to better oven spring and a thinner, crisper crust. Close the oven door quickly to trap the steam.
- Adjust Temperature and Continue Baking: Bake for 15 minutes at 400°F (200°C). After 15 minutes, if you used steam, carefully remove the pan of water from the oven. Reduce the oven temperature to 375°F (190°C) and continue baking for another 20-30 minutes.
- Rotate and Check Doneness: About halfway through the second baking phase (after reducing the temperature), rotate your baking sheet 180 degrees. This ensures even browning. Your Vampire Bread is fully baked when it has a deep golden-brown crust and sounds hollow when tapped on the bottom. For the most accurate assessment, an instant-read thermometer inserted into the center of the loaf should register between 200-210°F (93-99°C). The aromas filling your kitchen at this point will be absolutely heavenly – a sure sign of a successful bake!
Cooling and Serving Suggestions
- The Crucial Cooling Phase: Once your Vampire Bread is beautifully baked, carefully remove it from the oven. Immediately transfer the loaf from the baking sheet to a wire cooling rack. Resist the urge to slice into it right away! This is perhaps the hardest part, but also one of the most important. Allowing the bread to cool completely on a wire rack for at least 45 minutes to an hour (or even longer for a large loaf) allows the internal structure to set, the steam to escape, and prevents the crumb from becoming gummy or doughy. It also continues a subtle “carry-over cooking” process.
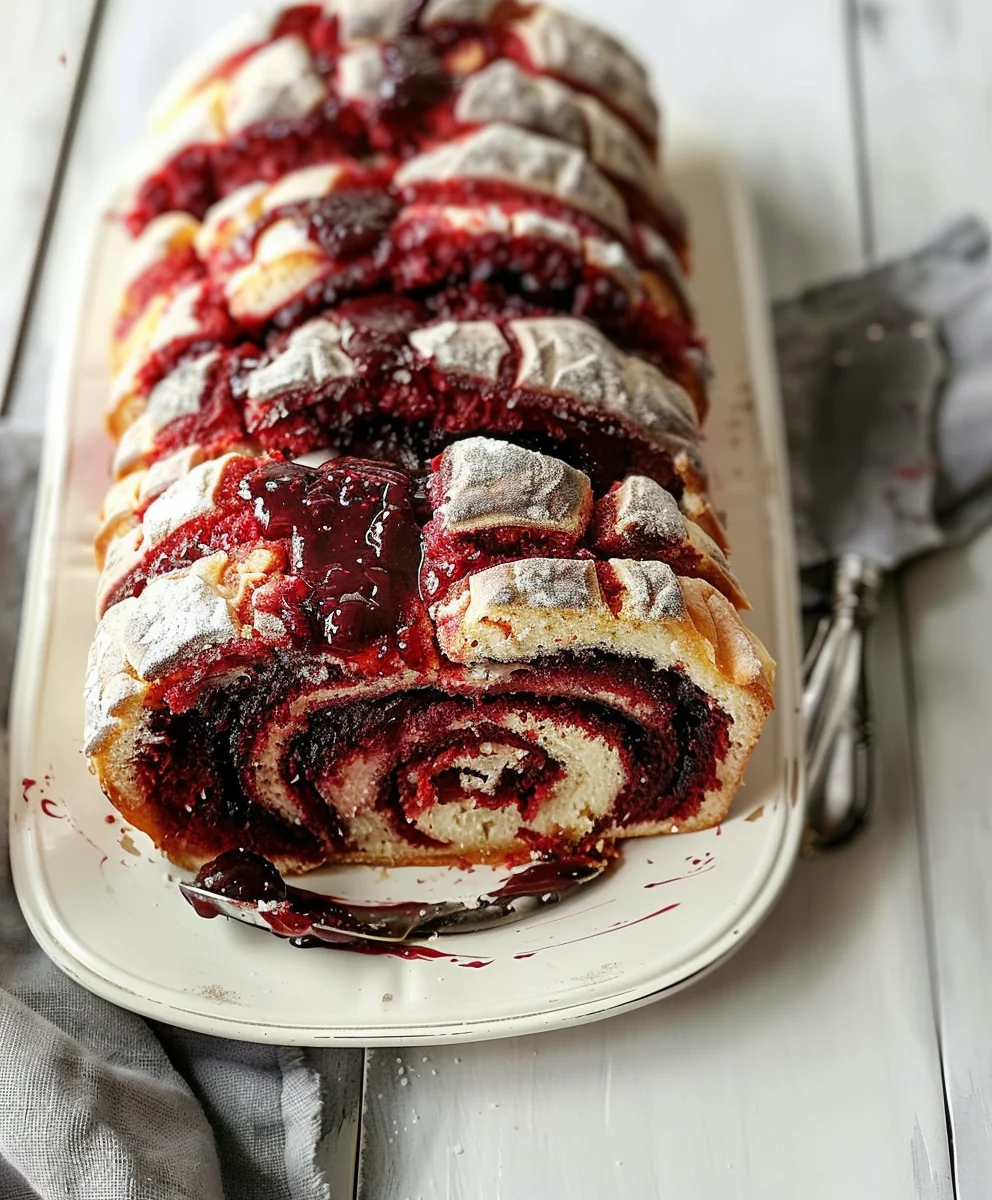
- Slicing for Perfection: Once fully cooled, grab your best bread knife and slice into your magnificent Vampire Bread. You’ll be greeted by a lovely open crumb, infused with those irresistible garlic and herb notes, and perhaps a lovely reddish speckle from the sun-dried tomatoes.
-
Serving Suggestions for Your Sinfully Delicious Loaf: This Vampire Bread is incredibly versatile and utterly delicious on its own, but here are some of my favorite ways to enjoy it:
- With Soups and Stews: It’s the perfect companion to a hearty minestrone, a robust beef stew, or a creamy tomato soup. Its sturdy crust and flavorful crumb are excellent for soaking up every last drop.
- Cheese and Charcuterie Boards: Arrange slices alongside your favorite cheeses, cured meats, olives, and a drizzle of balsamic glaze for an elegant appetizer spread. The garlicky notes really complement a variety of flavors.
- As a Side for Pasta: Instead of plain garlic bread, serve this as an elevated side with your favorite pasta dishes. It’s particularly good with a rich marinara or an aglio e olio.
- With Butter, Simply: Sometimes, the simplest pleasures are the best. A thick slice slathered with good quality unsalted butter, perhaps even a compound butter with extra herbs, is pure bliss.
- Toasted Leftovers: If you have any (which is a big “if”!), slice and toast the leftovers. They make fantastic crostini or a base for bruschetta.
The aroma alone will draw everyone to the kitchen, making this Vampire Bread a truly unforgettable centerpiece for any meal. Enjoy every garlicky, herby, savory bite!

Conclusion:
And there you have it, my friends! We’ve journeyed together through the simple yet profoundly rewarding process of creating something truly special. This isn’t just another bread recipe; it’s an experience, a delightful fusion of tantalizing aromas and an irresistible taste that will undoubtedly earn you rave reviews from anyone lucky enough to try it. I genuinely believe that once you pull that golden-brown loaf from your oven, inhale its incredible fragrance, and take that first heavenly bite, you’ll understand exactly why I’m so passionate about this particular creation. It stands out because it delivers on every front: it’s surprisingly straightforward to make, incredibly versatile, and consistently delicious. The sheer satisfaction of baking something so impressive from scratch is a joy in itself, but the way this bread elevates any meal from ordinary to extraordinary is truly its superpower. It’s the kind of dish that makes people ask for the recipe, every single time.
Elevate Your Dining Experience with Unforgettable Flavor!
What truly makes this recipe a must-try is its unique blend of comforting familiarity and exciting zest. It’s the perfect harmony of textures – a wonderfully crisp crust giving way to a soft, fluffy interior, each bite bursting with savory notes that awaken the palate. It’s not just food; it’s a conversation starter, a centerpiece, and a testament to the fact that home-baked goodness always trumps store-bought alternatives. Imagine the warmth permeating your kitchen as it bakes, filling every corner with an aroma that promises pure delight. This bread isn’t just a side dish; it has the character and charm to be a star in its own right, leaving a lasting impression long after the last crumb is gone. It’s truly a game-changer for your culinary repertoire, offering a gourmet touch without any of the fuss.
Unleash Your Creativity: Serving Suggestions & Variations
Now, let’s talk about how you can truly make this recipe your own and impress your guests! While phenomenal on its own, fresh out of the oven, this bread is incredibly adaptable. For a simple yet elegant appetizer, slice it thickly and serve with a vibrant bruschetta topping or a generous swirl of your favorite olive oil and balsamic vinegar. It’s an absolute dream companion for hearty Italian stews or a robust French onion soup, where its sturdy crust can perfectly soak up every last drop of delicious broth. Consider tearing off chunks to accompany a fresh, crisp salad, adding a delightful textural contrast. For a more substantial offering, turn it into epic open-faced sandwiches by layering with roasted vegetables, creamy cheeses, or thinly sliced cured meats. Think about making mini garlic bread pizzas for a fun party snack by topping slices with marinara, mozzarella, and your favorite pizza toppings before a quick bake!
But don’t stop there! The beauty of baking is in experimentation. For a delightful variation, consider folding in a handful of grated Parmesan cheese or a mix of fresh herbs like rosemary and thyme into the dough before the final rise for an even deeper aromatic profile. If you’re feeling adventurous, a sprinkle of red pepper flakes could add a subtle kick, or perhaps some sun-dried tomatoes for a burst of umami. For those who enjoy a richer flavor, a brush of melted butter infused with roasted garlic after it comes out of the oven will take it to another dimension. This bread is a blank canvas for your culinary imagination, inviting you to play with flavors and textures until you discover your personal favorite iteration. It’s robust enough to handle bold additions and subtle enough to let delicate flavors shine.
Your Culinary Adventure Awaits!
So, my dear readers, I implore you: don’t just read about this incredible bread; go forth and bake it! Clear some space in your schedule, gather your ingredients, and prepare for a truly rewarding baking experience. I promise you, the aroma alone will be worth the effort, and the taste will exceed your highest expectations. This Vampire Bread isn’t just a recipe; it’s an invitation to create, to share, and to savor. Once you’ve experienced the magic of baking and tasting this magnificent loaf, I would absolutely love to hear about it! Did you try any of the suggested variations? Did you come up with a brilliant serving idea of your own? What did your family and friends think? Please, don’t hesitate to share your stories, your triumphs, and even your “lessons learned” in the comments below. Your feedback and creative twists inspire me and the entire community of home bakers. Let’s celebrate the joy of delicious homemade food together! Happy baking!
Easy Vampire Bread Recipe: Spooky Halloween Treat
Vampire Bread. The name alone conjures images of ancient castles, mysterious nights, and perhaps, a delicious, potent defense against the darkness! Fear not, for while its name is delightfully dramatic, this recipe offers nothing but warmth, comfort, and an explosion of savory flavor that will have even the most discerning palate falling under its spell. I’ve always been captivated by dishes that carry a whimsical or storied name, and this particular bread is no exception, leaning into the delightful folklore surrounding garlic’s legendary protective qualities.
There’s a certain charm in imagining every bite of this fragrant loaf acting as a joyful ward, though its true magic lies purely in its incredible taste and aroma. People adore this dish for its intoxicating scent that fills the kitchen, its perfectly golden, crisp crust, and the soft, pillowy interior infused with an abundance of pungent, roasted garlic and aromatic herbs. It’s a supremely versatile side, perfect for soaking up rich pasta sauces, accompanying a hearty stew, or simply enjoyed on its own as an irresistible snack. This unique take on garlic bread, often affectionately dubbed Vampire Bread, elevates a beloved classic into something truly extraordinary.
Ingredients
-
1 cup Reduced Fat Milk, warm (105-115°F)
-
1 large Egg Yolk
-
3 cups All-Purpose Flour
-
2 1/2 tablespoons Granulated Sugar
-
2 1/4 teaspoons Active Dry Yeast
-
1 1/2 tablespoons Butter, melted
-
1 teaspoon Salt
-
Black and Red Food Coloring
Instructions
-
Step 1
In a large mixing bowl, combine warm milk (1 cup), granulated sugar (2 1/2 tbsp), and active dry yeast (2 1/4 tsp). Let sit for 5-10 minutes until foamy. -
Step 2
Stir the melted butter (1 1/2 tbsp) and egg yolk (1) into the activated yeast mixture. Add black and red food coloring to achieve desired ‘spooky’ hue for the dough. -
Step 3
In a separate bowl, whisk together all-purpose flour (3 cups) and salt (1 tsp). Gradually add the flour mixture to the wet ingredients, mixing until a shaggy, somewhat sticky dough forms. -
Step 4
Transfer the dough to a lightly floured surface or use a stand mixer with a dough hook. Knead for 8-10 minutes by hand or 7-9 minutes on medium-low speed until the dough is smooth, elastic, and pliable. Adjust with flour or water if needed to achieve a soft, slightly tacky texture. -
Step 5
Lightly grease a clean bowl with olive oil. Place the dough in the bowl, turning once to coat. Cover tightly and let rise in a warm, draft-free spot for 1 to 1 ½ hours, or until visibly doubled in size. -
Step 6
Once doubled, gently punch down the dough to release gases. Turn it out onto a lightly floured surface and shape into an elongated batard (torpedo-like oval). Tightly roll the dough and pinch the seam firmly along the entire length to create surface tension. Gently taper the ends. -
Step 7
Line a baking sheet with parchment paper. Carefully transfer the shaped loaf to the baking sheet. Loosely cover with plastic wrap or a kitchen towel and let rise in a warm, draft-free spot for 30-60 minutes, until visibly puffy and soft to the touch. -
Step 8
About 20 minutes before the end of the second rise, preheat your oven to 400°F (200°C). Just before baking, use a very sharp knife or bread lame to make 2-3 shallow slashes on the top of the loaf. This allows steam to escape and promotes oven spring. -
Step 9
Carefully transfer the baking sheet to the preheated oven. Bake for 15 minutes at 400°F (200°C). Then, reduce the oven temperature to 375°F (190°C) and continue baking for another 20-30 minutes, rotating the sheet halfway through for even browning. The bread is done when it has a deep golden-brown crust and sounds hollow when tapped on the bottom (internal temperature 200-210°F / 93-99°C). -
Step 10
Remove the bread from the oven and immediately transfer it to a wire cooling rack. Let cool completely for at least 45 minutes to an hour before slicing. This allows the internal structure to set. Slice with a bread knife and serve.
Important Information
Nutrition Facts (Per Serving)
It is important to consider this information as approximate and not to use it as definitive health advice.
Allergy Information
Please check ingredients for potential allergens and consult a health professional if in doubt.


Leave a Comment