
This recipe is more than just a simple dish—it’s a gateway to a culinary experience that captivates the senses and elevates home cooking. I’m thrilled to share a meal that embodies warmth, tradition, and an irresistible flavor profile cherished across cultures and generations. With a rich heritage rooted in ancient cooking methods, lovingly preserved and refined over centuries, it stands as a testament to the power of simple, wholesome ingredients coming together to create something truly extraordinary.
What makes this particular recipe so universally cherished? It’s the sublime combination of tender, slow-cooked ingredients, infused with deeply aromatic spices, that results in an incredibly rich and comforting texture. Whether you are seeking a hearty meal to gather your family around or an elegant dish to impress guests, this recipe offers both convenience and sophistication. Its profound depth of flavor, coupled with the satisfying feeling it leaves you with, ensures it’s not just a meal, but an experience. Prepare to embark on a delightful culinary journey that will leave you wanting more!
Ingredients:
- For the Rich Beef Ragu:
- 2 tablespoons olive oil
- 1 large yellow onion, very finely diced
- 2 medium carrots, very finely diced
- 2 celery stalks, very finely diced
- 4 cloves garlic, minced
- 1.5 lbs (about 680g) ground beef (80/20 lean-to-fat ratio is ideal for flavor)
- 1/2 cup dry red wine (like Chianti or Merlot)
- 1 (28 ounce / 794g) can crushed tomatoes (good quality is key!)
- 1 (14.5 ounce / 411g) can tomato puree or passata
- 2 tablespoons tomato paste
- 1 cup beef broth or water
- 2 bay leaves
- 1 teaspoon dried oregano
- 1/2 teaspoon dried basil
- Salt and freshly ground black pepper to taste
- A pinch of red pepper flakes (optional, for a subtle kick)
- Fresh parsley, chopped, for garnish (optional)
- For the Silky Béchamel Sauce:
- 6 tablespoons unsalted butter
- 6 tablespoons all-purpose flour
- 4 cups whole milk, warmed slightly
- 1/2 teaspoon freshly grated nutmeg
- Salt and white pepper to taste (white pepper keeps the sauce pristine)
- For the Fresh Pasta Sheets (Homemade, if you’re feeling ambitious!):
- 3 cups (about 360g) all-purpose flour or “00” flour, plus more for dusting
- 4 large eggs
- 1 tablespoon olive oil
- 1/2 teaspoon salt
- Alternatively, if using store-bought: 1 (16 ounce / 450g) box no-boil lasagna noodles or traditional lasagna noodles
- For Assembly:
- 1 cup freshly grated Parmesan cheese, plus extra for serving
- 1.5 cups shredded mozzarella cheese (low-moisture, whole milk is best for melting)
- 1/2 cup freshly grated Pecorino Romano cheese (optional, for extra sharp flavor)
- Olive oil, for greasing the baking dish
Preparing the Rich Beef Ragu
Oh, my friends, the ragu is truly the heart and soul of any fantastic lasagna. Don’t rush this step! The longer and slower you cook it, the more depth of flavor you’ll achieve. It’s an act of love, really.
- First things first, let’s grab a large, heavy-bottomed pot or Dutch oven. I find that a good quality pot makes all the difference for even cooking. Place it over medium heat and add your 2 tablespoons of olive oil. Once it’s shimmering, toss in your finely diced onion, carrots, and celery. This trio, often called a soffritto in Italian cuisine, forms the aromatic base of our ragu. Sauté them gently for about 8-10 minutes, stirring occasionally, until they’re softened and translucent. We’re not looking for browning here, just a sweet, mellow aroma filling your kitchen.
- Now, add your minced garlic to the pot. Stir it in and let it cook for just about 1 minute until fragrant. Be careful not to burn it, as burnt garlic can impart a bitter taste to our beautiful sauce.
- Next up, it’s time for the ground beef. Add it to the pot, breaking it up with a wooden spoon as it cooks. We want to brown the beef thoroughly, letting it develop a lovely crust on some pieces. This step is crucial for flavor development, as browning creates those delicious savory notes through the Maillard reaction. Cook for about 8-10 minutes until no pink remains and any rendered fat has been mostly cooked off. If you notice an excessive amount of grease, feel free to carefully drain some of it off.
- Pour in your 1/2 cup of dry red wine. Oh, the sizzle and the aroma! Use your wooden spoon to scrape up any browned bits stuck to the bottom of the pot. These little bits are packed with flavor, and the wine helps to deglaze the pan, incorporating all that goodness back into our sauce. Let the wine simmer and reduce for 2-3 minutes until most of the alcohol has cooked off and the liquid has visibly thickened. This concentrates the wine’s flavor beautifully.
- Now, it’s time for the tomato base. Add the crushed tomatoes, tomato puree, and tomato paste to the pot. Stir everything together until it’s well combined. The tomato paste, in particular, will add a concentrated sweetness and depth that truly elevates the ragu.
- Stir in the beef broth (or water), bay leaves, dried oregano, dried basil, and the pinch of red pepper flakes if you’re using them. Give everything a good stir to ensure all the ingredients are mingling harmoniously.
- Bring the sauce to a gentle simmer, then reduce the heat to low, cover the pot, and let it cook. This is where the magic happens! We’re looking for a low and slow simmer for at least 2 hours, but honestly, 3-4 hours is even better. The longer it simmers, the more tender the beef becomes, and the flavors meld together into something truly spectacular. Stir occasionally to prevent sticking and add a little more broth or water if the sauce becomes too thick.
- Once the ragu has simmered sufficiently, remove the bay leaves. Season the sauce generously with salt and freshly ground black pepper to your taste. Remember, the seasoning is personal, so taste and adjust until it’s perfect for you. You want it to be robust and flavorful, ready to stand up to the pasta and cheeses.
Crafting the Silky Béchamel Sauce
A classic béchamel sauce is the unsung hero of a great lasagna. It adds a creamy richness and helps to bind everything together, creating that luscious texture we all crave. Trust me, making it from scratch is worth every moment!
- In a separate medium saucepan, melt your 6 tablespoons of unsalted butter over medium heat. You want it just melted and bubbly, but not browned.
- Once the butter is fully melted, sprinkle in the 6 tablespoons of all-purpose flour. Immediately whisk vigorously for 1-2 minutes until you form a smooth paste, known as a roux. This is the thickening agent for our béchamel. Cook the roux just until it smells slightly nutty and loses its raw flour taste. We’re aiming for a pale, blonde roux, not a dark one, to keep our sauce white and creamy.
- Now, here’s the key to a lump-free béchamel: gradually add your warmed whole milk, a little bit at a time, while continuously whisking. Pour in about 1/2 cup of milk first, whisking until it’s fully incorporated and smooth before adding more. This slow incorporation prevents lumps and ensures a silky texture. Continue adding the milk in small increments, whisking constantly, until all 4 cups have been added.
- Once all the milk is in, bring the sauce to a gentle simmer, continuing to whisk. The sauce will begin to thicken as it heats. Let it simmer gently for 5-7 minutes, still whisking frequently, until it coats the back of a spoon thickly. You want it to be smooth and luscious, without any floury taste.
- Remove the béchamel from the heat. Stir in the 1/2 teaspoon of freshly grated nutmeg. Nutmeg is a classic pairing with béchamel and adds a wonderful subtle warmth. Season generously with salt and white pepper to taste. I prefer white pepper here because it keeps the sauce looking pristine, without little black flecks, but black pepper works just as well if that’s what you have. Taste and adjust the seasoning as needed. The béchamel should be flavorful enough to stand on its own. Set aside, covering the surface with plastic wrap to prevent a skin from forming.
Preparing the Pasta Sheets (Homemade or Store-Bought)
Ah, the pasta! While store-bought no-boil noodles are a fantastic shortcut, there’s something incredibly satisfying about using fresh, homemade pasta in a lasagna. It really makes a difference in texture and flavor. I’ll give you options!
Option 1: Homemade Fresh Pasta
- Make the dough: On a clean, large work surface or in a large bowl, create a mound with your 3 cups of flour. Make a well in the center of the mound. Crack your 4 large eggs into the well, add the 1 tablespoon of olive oil and 1/2 teaspoon of salt.
- Mix: Using a fork, gently whisk the eggs and oil in the center, gradually incorporating flour from the inner edge of the well. Continue until the mixture becomes too thick for the fork. At this point, use your hands to bring the dough together, kneading it until it forms a cohesive ball.
- Knead: Now for the fun part! Knead the dough vigorously for about 8-10 minutes. This develops the gluten, making the pasta strong and elastic. The dough should become smooth, firm, and springy. If it feels too sticky, add a tiny bit more flour; if it’s too dry, a few drops of water.
- Rest: Wrap the dough tightly in plastic wrap and let it rest at room temperature for at least 30 minutes, or up to an hour. This resting period allows the gluten to relax, making the dough much easier to roll.
- Roll the sheets: Divide the dough into 3-4 manageable pieces. Working with one piece at a time, keep the others covered. Lightly flour your work surface and the dough. Use a pasta machine (my preferred method for even sheets!) or a long rolling pin. If using a machine, roll the dough through the widest setting a few times, folding and pressing it occasionally, until it’s smooth. Then, gradually pass it through narrower settings, reducing the thickness notch by notch, until you reach your desired lasagna noodle thickness (usually setting 5 or 6 on most machines). You want it thin enough to be delicate but strong enough to hold up. If rolling by hand, be prepared for a workout! Roll as thinly as possible into large rectangles, aiming for sheets roughly the size of your baking dish.
- Prepare for layering: Lay the rolled pasta sheets on a lightly floured surface or hang them to dry slightly. If your fresh pasta is very thin, you might not need to pre-cook it. However, if you prefer, you can quickly blanch the sheets in a large pot of salted boiling water for just 30-60 seconds, then immediately transfer them to an ice bath to stop cooking, then drain thoroughly and lay flat on parchment paper or clean kitchen towels. This ensures they are perfectly tender.
Option 2: Store-Bought Lasagna Noodles
If you’re using store-bought noodles, you have two main choices:
- No-boil lasagna noodles: These are a lifesaver for convenience! Simply follow the package instructions, but generally, you can layer them directly into the lasagna without pre-cooking. Ensure there’s enough sauce to hydrate them during baking.
- Traditional lasagna noodles: You’ll need to boil these. Bring a large pot of salted water to a rolling boil. Cook the noodles in batches according to package directions until they are al dente (slightly firm). Immediately drain them and lay them flat on parchment paper or clean kitchen towels to prevent sticking. A little olive oil brushed between layers of noodles can also help. Make sure they are fully cooled before assembling.
Whichever option you choose, just ensure you have enough pasta to create 3-4 layers in your baking dish.
Assembling Your Magnificent Lasagna
Now, this is where it all comes together! The layering process is fun and creates the beautiful cross-section we all love. Have all your components ready to go: warm ragu, warm béchamel, cooked pasta, and both cheeses.
- Preheat your oven to 375°F (190°C). Lightly grease a 9×13-inch (23x33cm) baking dish with olive oil. This prevents sticking and helps with easy serving.
- First layer of sauce: Spread a thin layer of béchamel sauce (about 1/2 cup) evenly over the bottom of the prepared baking dish. This prevents the pasta from sticking and provides a creamy base.
- First layer of pasta: Arrange a single layer of pasta sheets over the béchamel. If using homemade or traditional boiled noodles, overlap them slightly if needed to cover the entire bottom. If using no-boil noodles, they typically fit snugly. You might need to trim some sheets to fit.
- First layer of ragu: Spoon about 1.5 to 2 cups of the rich beef ragu over the pasta, spreading it evenly to cover the noodles completely. Ensure a good, generous layer of meat sauce.
- First layer of béchamel and cheese: Drizzle or spread about 1 cup of béchamel sauce over the ragu layer. Then, sprinkle generously with about 1/2 cup of Parmesan cheese and about 1/2 cup of mozzarella cheese. If using Pecorino Romano, add a sprinkle here too.
- Repeat the layers: Now, you’ll repeat this layering process two more times:
- Pasta layer
- Ragu layer
- Béchamel and cheese layer
- Pasta layer
- Ragu layer
- Béchamel and cheese layer
I usually aim for three full layers of ragu and pasta, but if your dish is deeper or your noodles thinner, you might get four. Just ensure your top layer is always a pasta layer.
- The grand finale layer: For the very top layer, after your final pasta layer, you’ll want a generous coating. Spread any remaining béchamel sauce evenly over the top pasta sheet. Then, generously sprinkle with the remaining mozzarella cheese and Parmesan cheese. This will create that gorgeous, bubbling, golden-brown crust we all adore.
- Cover and prepare for baking: Tightly cover the baking dish with aluminum foil. You can lightly spray the underside of the foil with cooking spray to prevent the cheese from sticking. This covering helps the lasagna cook evenly and prevents the top from browning too quickly, especially important if you’re using no-boil noodles that need to absorb moisture.
Baking to Golden Perfection
The moment of truth! Baking transforms all these wonderful individual components into one cohesive, comforting masterpiece. Patience is key for that perfect bubbly, cheesy top.
- Place the covered lasagna in your preheated oven (375°F / 190°C) on a baking sheet to catch any potential drips. Bake for 25 minutes. This initial covered bake allows the flavors to meld, the pasta to cook thoroughly, and the internal temperature to rise.
- After 25 minutes, carefully remove the foil. Be cautious of the steam! Increase the oven temperature to 400°F (200°C).
- Return the uncovered lasagna to the oven and continue baking for another 20-30 minutes, or until the top is beautifully golden brown, bubbly, and the cheese is melted and slightly caramelized in spots. The edges should be set, and a knife inserted into the center should meet little resistance.
- The crucial resting period: This step is often overlooked, but it’s absolutely vital for perfect lasagna! Once baked, remove the lasagna from the oven and let it rest on a wire rack for at least 15-20 minutes, or even up to 30 minutes, before slicing and serving. This resting time allows the layers to set, preventing a runny, messy lasagna. The sauces will firm up, and the slices will hold their shape beautifully.
Serving Your Masterpiece:
When you’re ready to serve, cut the lasagna into generous squares. Use a wide spatula to carefully lift each piece onto a plate. I love to garnish mine with a sprinkle of fresh chopped parsley and a little extra grated Parmesan cheese. This lasagna is a complete meal in itself, but it pairs wonderfully with a simple green salad dressed with a light vinaigrette and some crusty bread for soaking up any extra sauce. It’s a dish that truly shines as a centerpiece for any family meal or gathering. Enjoy the fruits of your labor!
Conclusion:
And there you have it, my friends! We’ve reached the delicious finale of our culinary journey with what I genuinely believe is a recipe destined to become a staple in your kitchen. This isn’t just another dish; it’s an experience. It’s a harmonious blend of flavors that dance on your palate, a texture that’s simultaneously comforting and exciting, and an aroma that will undoubtedly draw everyone to the table with eager anticipation. What makes this recipe an absolute must-try isn’t just its incredible taste, though that alone is reason enough. It’s the surprising ease with which such a gourmet-level dish comes together, proving that you don’t need hours of toil or an extensive culinary background to create something truly spectacular. I’ve refined this over countless iterations, ensuring that every step is clear, every ingredient plays its part, and the end result is consistently phenomenal. It’s the kind of meal that elicits genuine “oohs” and “aahs,” making you feel like a master chef without the associated stress. Trust me when I say, once you taste this, you’ll understand why it holds such a special place in my heart, and soon, I hope, in yours too.
Serving Suggestions & Creative Variations:
Now, while this recipe shines brightly all on its own, a little creativity can elevate it even further, making it versatile enough for any occasion. For a classic presentation, I love serving it alongside a vibrant, crisp green salad dressed with a light vinaigrette – the freshness provides a wonderful counterpoint to its richness. A side of perfectly roasted root vegetables, perhaps parsnips and carrots caramelized with a hint of maple syrup, also complements the flavors beautifully, adding an earthy sweetness. If you’re looking for something a bit more substantial, a creamy polenta or fluffy couscous makes an excellent bed for soaking up all the delectable juices, ensuring not a single drop of flavor is left behind. And for those cozy, comforting nights, a scoop of mashed potatoes, whether buttery and smooth or rustic with skins on, is always a winning combination.
But let’s not stop there! The beauty of a truly great recipe lies in its adaptability. Don’t hesitate to play around with variations based on your pantry and preferences. Feeling adventurous? Try incorporating a pinch of smoked paprika or a dash of cayenne pepper for a subtle kick, adding another layer of complexity. If you’re a herb enthusiast, experiment with different fresh herbs; a sprinkle of fresh rosemary or thyme could introduce a lovely aromatic twist. For a seasonal touch, consider adding some sautéed mushrooms or caramelized onions during the cooking process to deepen the umami notes. And for those who enjoy a bit of tangy brightness, a squeeze of fresh lemon juice or a shower of lemon zest just before serving can truly make the flavors sing, lifting the entire dish and adding a delightful zing. The core of this recipe is so robust and forgiving, it encourages you to make it your own, to infuse it with your personal culinary signature.
Your Culinary Adventure Awaits!
I am genuinely excited for you to embark on this culinary adventure. This recipe truly is a game-changer, and I wholeheartedly encourage you to roll up your sleeves, gather your ingredients, and give it a try. There’s an immense satisfaction that comes from creating something so utterly delicious from scratch, and I promise you, the effort (minimal as it is!) will be richly rewarded with every single bite. This is a dish designed to impress, to comfort, and to bring joy to your table, whether it’s a quiet weeknight dinner or a bustling gathering with loved ones. It’s a recipe that, for me, holds a very special place, so much so that when I think of this specific, perfect rendition, I often mentally tag it with a unique identifier, something like ‘?p=22506’, just to distinguish it from any other iteration I’ve encountered. That’s how much I adore this particular preparation, and I truly believe you will too.
Once you’ve experienced the magic of this dish, I would absolutely love to hear about it! Your experiences, your triumphs, and even your clever variations are invaluable to me and to our shared community of food lovers. Don’t be shy! Please, come back and share your thoughts in the comments below. Did you try a unique serving suggestion? Did you add a special ingredient that elevated it even further? What was your favorite part of making and enjoying this meal? Your feedback fuels my passion and helps us all discover new and exciting ways to enjoy food. Happy cooking, my friends, and may your kitchen be filled with wonderful aromas and even better memories!
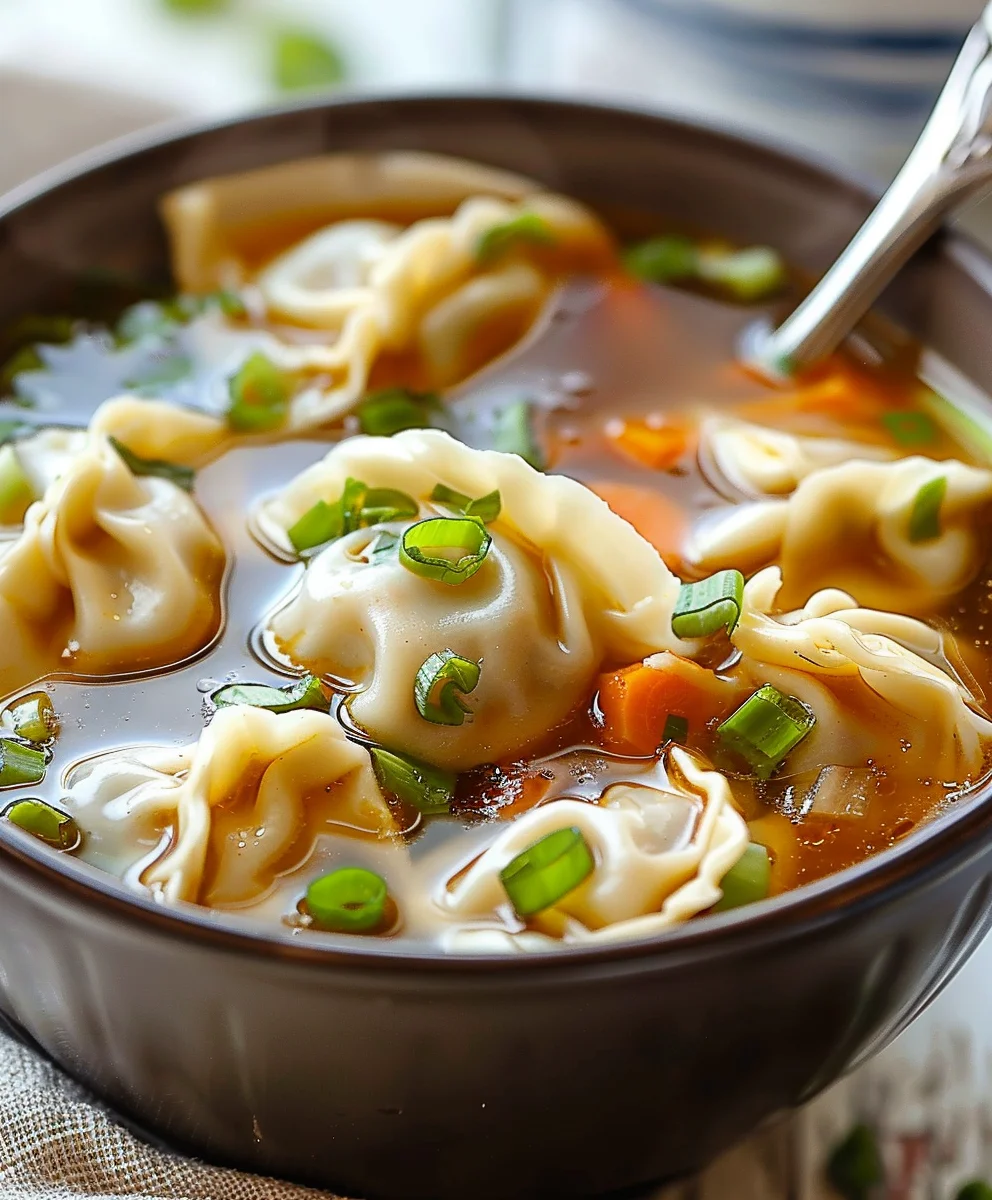
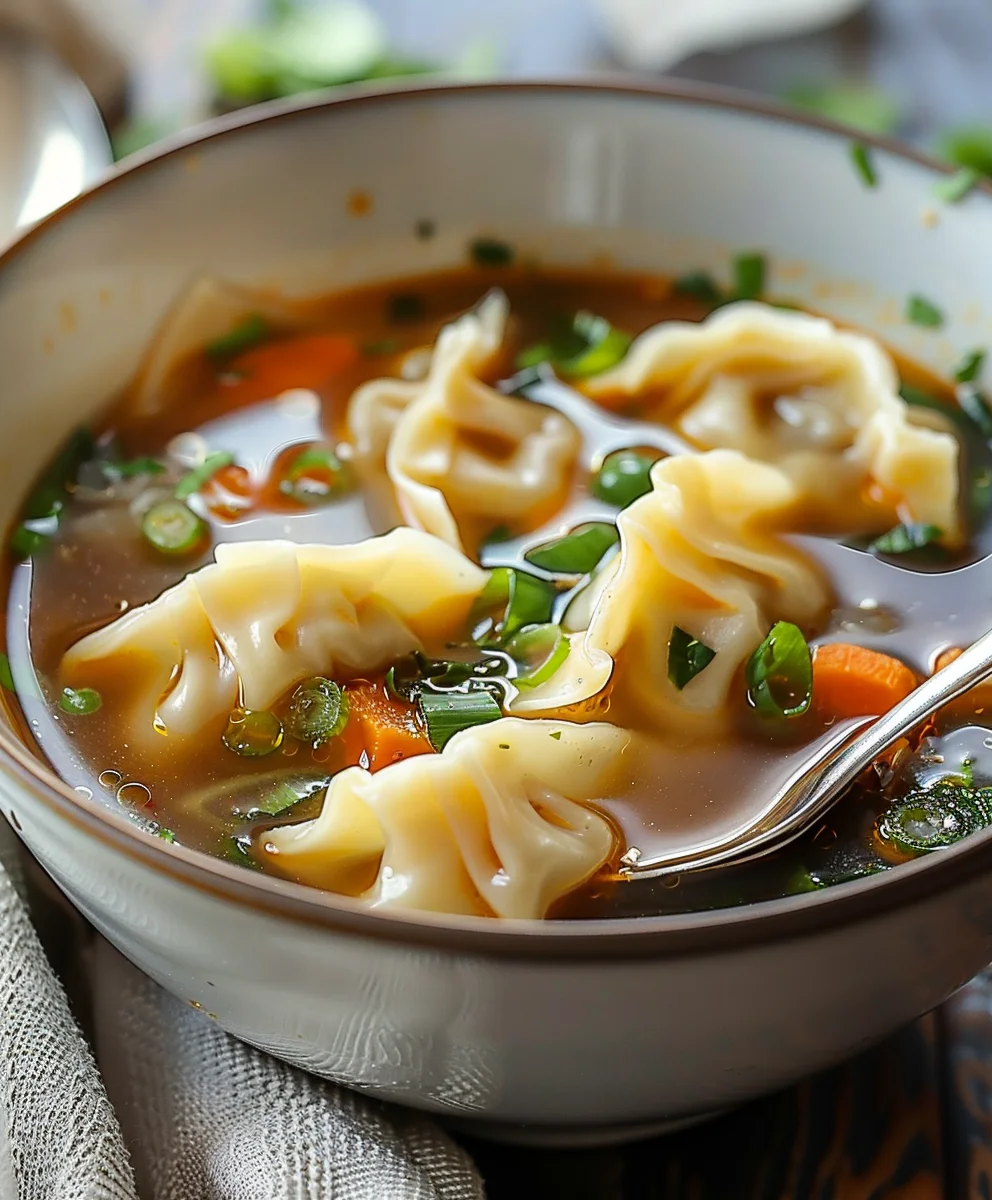
Easy Potsticker Soup: Comfort Food Recipe for Cozy Nights
Easy Potsticker Soup: Comfort Food Recipe for Cozy Nights is a true culinary experience, embodying warmth and irresistible taste. It demonstrates how simple, wholesome ingredients can come together to create a deeply comforting and universally loved meal. This recipe features tender beef dumplings simmered in an aromatic broth—perfect for a quick, hearty, and satisfying dinner.
Ingredients
-
1 package (12 oz) beef or chicken dumplings
-
4 cups low-sodium chicken broth
-
1 tbsp fresh ginger, grated
-
3 garlic cloves, minced
-
2 green onions, chopped (for garnish)
-
2 cups fresh spinach or bok choy
-
2 tbsp soy sauce
-
1 tsp sesame oil
Instructions
- Step 1
In a large pot, bring chicken broth to a gentle simmer over medium heat. Add grated fresh ginger and minced garlic. - Step 2
Carefully add beef or chicken dumplings to the simmering broth. Cook according to package directions (typically 5-8 minutes) until tender and cooked through. - Step 3
Stir in fresh spinach or bok choy, soy sauce, and sesame oil. Cook for 1-2 minutes until greens are wilted. - Step 4
Ladle the hot soup into bowls. Garnish generously with chopped green onions before serving warm.
Important Information
Nutrition Facts (Per Serving)
It is important to consider this information as approximate and not to use it as definitive health advice.
Allergy Information
Please check ingredients for potential allergens and consult a health professional if in doubt.

Leave a Comment