
Crescent Pumpkins With Cream Cheese And Pumpkin Pie Filling – what a delightful name, and an even more delightful treat to savor! As the leaves begin to turn and the crisp autumn air whispers promises of cozy evenings, my thoughts invariably drift to the comforting flavors of pumpkin and warm spices. This recipe is a true celebration of the season, offering all the beloved essence of fall in an incredibly charming and convenient package.
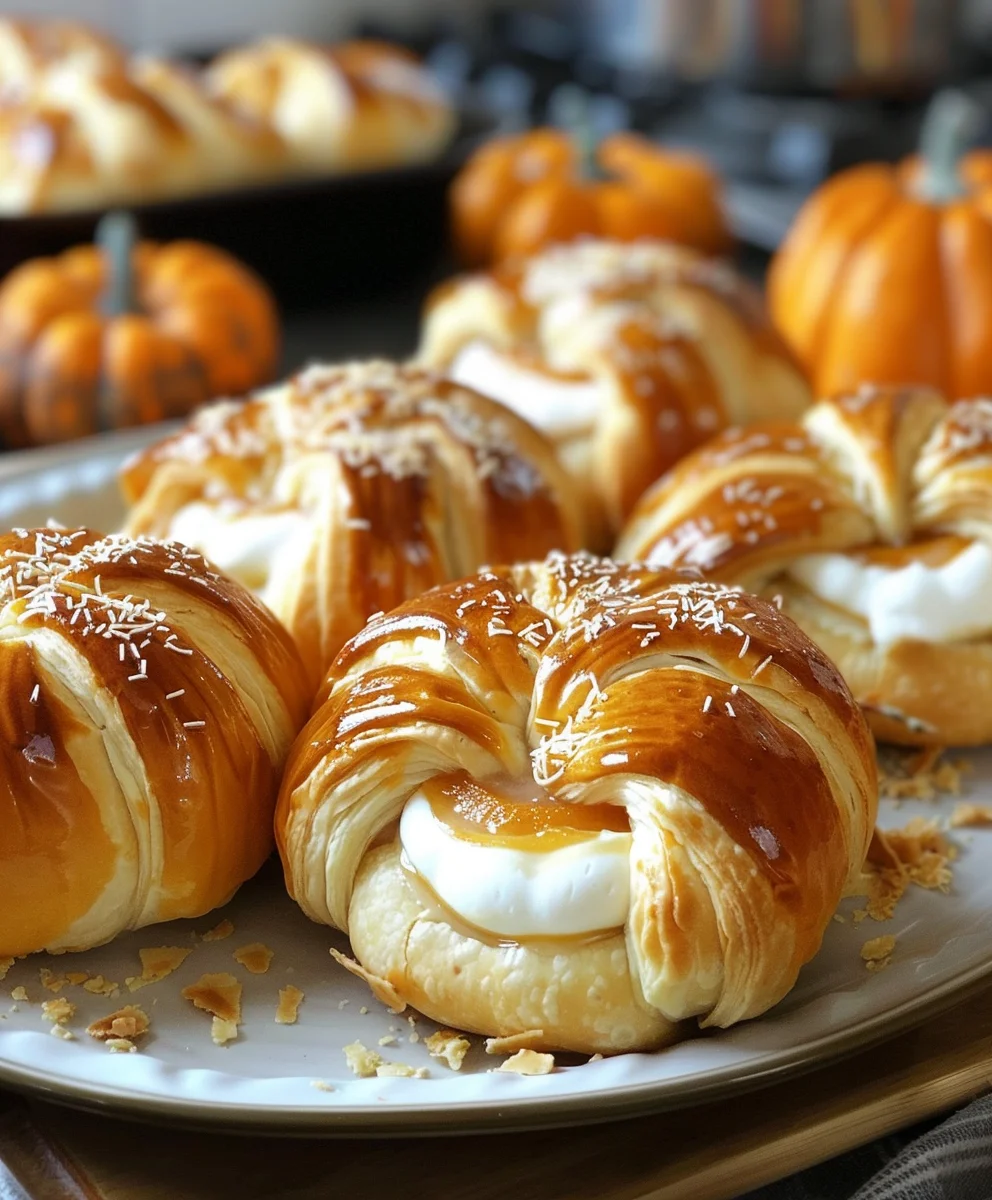
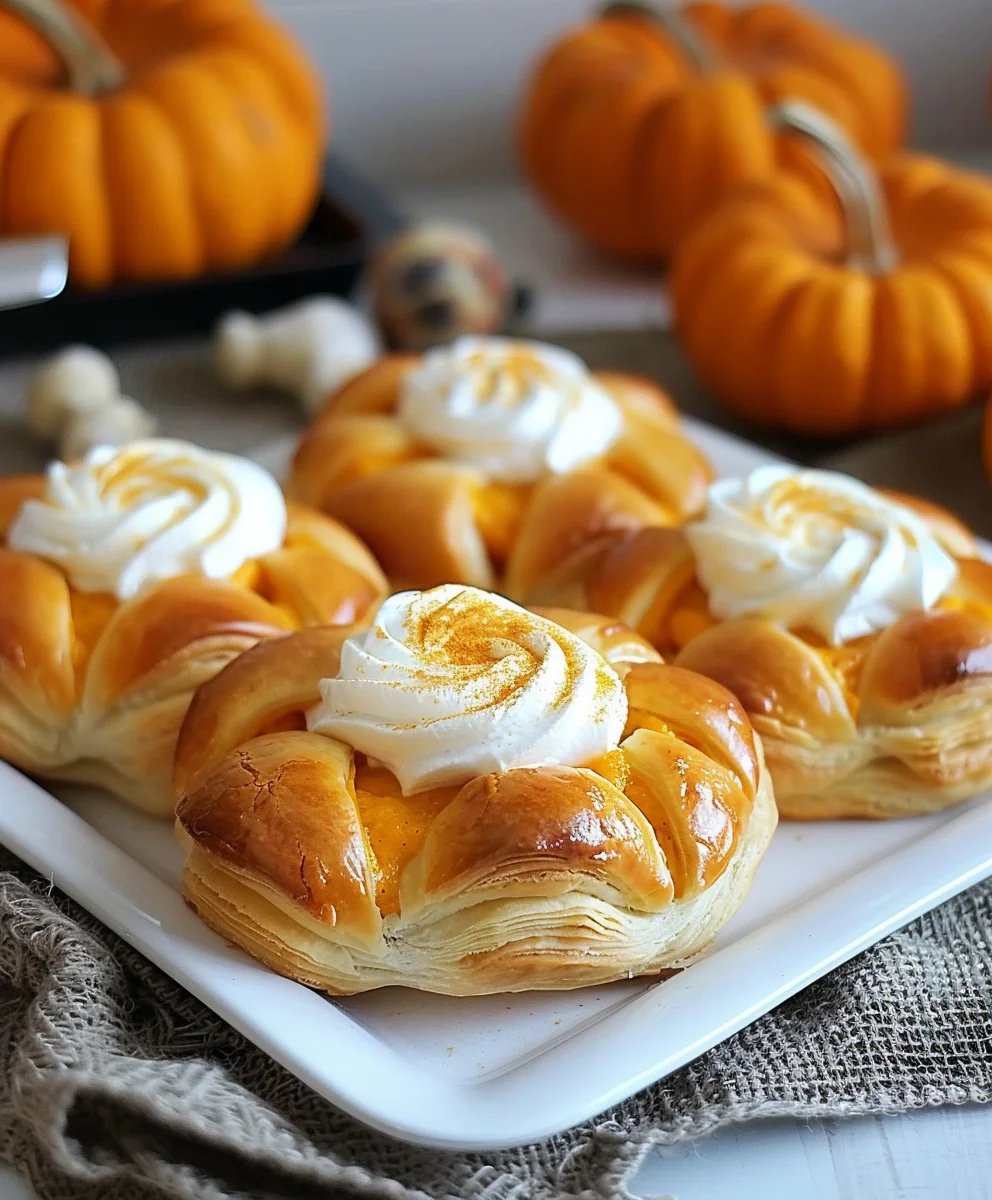
Imagine sinking your teeth into a flaky, golden-brown crescent roll, artfully shaped like a miniature pumpkin.
Inside, you’ll discover a luscious filling where the rich, tangy notes of cream cheese perfectly complement the sweet, spiced warmth of pumpkin pie filling. It’s a combination that truly sings on the palate, delivering that quintessential autumn comfort without the extensive effort usually associated with traditional pumpkin pies. While these particular “Crescent Pumpkins” may not boast centuries of history, they embody the joyful, family-focused spirit of modern fall celebrations, making an appearance at everything from Halloween gatherings to Thanksgiving breakfasts.
People adore this dish for countless reasons: the irresistible contrast of a buttery, tender crust with a creamy, flavorful center, the delightful visual appeal that instantly brightens any seasonal spread, and perhaps most importantly, its remarkable ease of preparation. It’s a wonderful way to introduce the classic flavors of autumn to both young and old. Get ready to create some truly memorable moments and indulge in the pure bliss of these enchanting Crescent Pumpkins With Cream Cheese And Pumpkin Pie Filling. I promise, they’re destined to become a cherished part of your fall baking traditions!
Ingredients:
- Two (2) cans (8 oz each) refrigerated crescent roll dough: I find that using two cans gives us a generous batch, perfect for sharing or ensuring you have enough for those inevitable second servings. Make sure they’re fresh and chilled.
- One (1) block (8 oz) cream cheese, softened: This is absolutely crucial for a smooth and lump-free filling. I always recommend taking it out of the refrigerator at least an hour before you plan to start, or even gently warming it in the microwave for 15-20 seconds if you’re short on time.
- One-half (1/2) cup powdered sugar (confectioners’ sugar): This gives our cream cheese filling the perfect amount of sweetness and a velvety texture. You might want to sift it if your powdered sugar tends to clump.
- One (1) teaspoon pure vanilla extract: A good quality vanilla extract really elevates the flavor profile of the cream cheese, adding a warm, aromatic note.
- One (1) can (15 oz) pumpkin pie filling: Now, this is important – we’re looking for pumpkin pie filling, not plain pumpkin puree. The pie filling is already spiced and sweetened, saving us a few steps and ensuring that signature autumn flavor.
- One (1) teaspoon pumpkin pie spice: While the pumpkin pie filling is already spiced, I always add an extra teaspoon of pumpkin pie spice. This intensifies those cozy fall flavors and makes our “Crescent Pumpkins” truly irresistible.
- One (1) large egg: This will be used for an egg wash, giving our baked crescents a beautiful golden-brown sheen and a slightly crispy exterior.
- One (1) tablespoon water or milk: To mix with our egg for the perfect egg wash consistency.
- Optional: Two (2) tablespoons turbinado sugar or sanding sugar: For sprinkling on top before baking. It adds a lovely sparkle and a pleasant crunch.
- Optional: Whipped cream or a dusting of powdered sugar: For serving, if you’re feeling extra indulgent.
Preparing Our Delicious Fillings
Alright, my friends, let’s get down to business and prepare the heart of our “Crescent Pumpkins With Cream Cheese And Pumpkin Pie Filling.” This recipe truly shines because of its two distinct, yet complementary, layers of flavor. We’ll start with the luscious cream cheese filling, ensuring it’s perfectly smooth and sweet, and then move on to enhancing our ready-to-go pumpkin pie filling. Precision here pays off big time in the final taste and texture!
- Cream Cheese Filling Creation: In a medium-sized mixing bowl, I like to combine our softened cream cheese with the powdered sugar and vanilla extract. This step is where the magic of a smooth filling begins. If your cream cheese isn’t soft enough, you’ll end up with little lumps, which, while not a deal-breaker, certainly don’t lend themselves to the silkiest filling. I usually start mixing these ingredients on low speed with an electric mixer, gradually increasing to medium speed. You’ll want to beat it until the mixture is incredibly light, fluffy, and completely smooth. Scrape down the sides of the bowl frequently to ensure everything is fully incorporated. This usually takes me about 2-3 minutes. What we’re aiming for is a spreadable consistency that isn’t too runny, so it stays neatly tucked inside our crescent dough.
- Pumpkin Pie Filling Enhancement: Next up, let’s prepare our spiced pumpkin layer. In a separate small bowl, gently spoon out the entire can of pumpkin pie filling. To truly bring out those autumnal notes, I always add an extra teaspoon of pumpkin pie spice directly into the can of filling. While the canned filling is already seasoned, I find this extra boost makes a huge difference, intensifying the warmth and aroma. Give it a good stir with a spoon or a small whisk until the spice is evenly distributed throughout the rich orange filling. We’re not looking to aerate it, just to incorporate that lovely spice. This simple step ensures every bite of your “Crescent Pumpkins” sings with the quintessential flavors of fall. You’ll notice the aroma immediately – that’s when you know you’re doing it right!
Assembling Our “Crescent Pumpkins”
Now comes the fun part – the assembly! This is where our plain crescent roll dough transforms into delightful little “Crescent Pumpkins” brimming with creamy and spiced fillings. I find that working on a clean, lightly floured surface or a silicone baking mat makes this process much easier and prevents sticking. Take your time with each crescent; a little care in the assembly stage goes a long way towards beautiful, well-filled pastries.
- Unrolling the Dough: Carefully unroll the first can of crescent roll dough onto your prepared surface. The dough comes in a long rectangle, usually with perforations. I like to keep it as one large rectangle for a moment, gently pressing along any perforated seams to seal them together, creating a more cohesive surface. This isn’t strictly necessary if you prefer smaller “pumpkins,” but I find it helps manage the fillings better. You’ll have eight triangles usually, but for a more robust “Crescent Pumpkin,” pressing the seams together to form four larger rectangles (two from each can, if you split the dough) or even one large rectangle from the entire can, then cutting, can be effective. For simplicity and following the traditional crescent shape, let’s stick to the individual triangles. Gently separate the dough into the eight individual triangles along the perforations. Repeat this process with the second can of crescent rolls, giving us a total of sixteen triangles.
- Spreading the Cream Cheese Layer: Take one crescent triangle and lay it flat. Using a small offset spatula or the back of a spoon, carefully spread about one generous teaspoon of our prepared cream cheese mixture evenly over the wider end of the dough triangle. I usually aim to cover about two-thirds of the triangle, leaving the narrow tip bare. The key here is not to overfill, as we still need to add our pumpkin mixture and roll it up. A nice, thin, even layer is what we’re after, ensuring the cream cheese goodness is present in every bite without causing spillage during baking.
- Layering the Pumpkin Pie Filling: Now, on top of the cream cheese layer, gently spoon about one generous teaspoon of our spiced pumpkin pie filling. Again, spread it evenly over the cream cheese, leaving the narrow tip of the crescent dough clear. This layering creates an incredible burst of flavor and texture. You’ll notice the beautiful contrast between the pale cream cheese and the vibrant orange pumpkin filling. It’s a visually appealing step that promises a delicious experience!
- Rolling Our “Crescent Pumpkins”: Starting from the wider end of the triangle (the end with both fillings), carefully and snugly roll the dough towards the narrow tip. Take your time here. I like to roll it up tightly but gently, ensuring the filling is enclosed without squeezing it all out. Once rolled, if you want to give them a bit more of a “pumpkin” appearance, you can gently curve the ends inward slightly, forming a more rounded shape, or simply leave them in their classic crescent form. They’ll be just as delicious either way!
- Arranging on Baking Sheets: As you finish rolling each “Crescent Pumpkin,” carefully place it seam-side down on a baking sheet lined with parchment paper. Parchment paper is your best friend here; it prevents sticking and makes cleanup a breeze. Make sure to leave about an inch or two of space between each crescent, as they will puff up and spread a bit during baking. I usually need two standard baking sheets for all sixteen “Crescent Pumpkins.”
Baking Our Golden Delights
We’re on the home stretch now, and the anticipation builds! This baking phase is crucial for achieving that beautiful golden-brown exterior and ensuring our fillings are perfectly warmed and gooey. Always preheat your oven adequately; consistency in temperature is key to evenly baked goods. Before they hit the heat, we’ll give them a little something extra to truly make them shine.
- Preheating the Oven: First things first, preheat your oven to a good, steady 375°F (190°C). It’s essential that the oven is fully preheated before you put your “Crescent Pumpkins” in. I usually give it at least 15-20 minutes after the oven indicates it’s reached the set temperature, just to ensure the internal elements and air are truly at the correct heat. This helps the crescent dough bake up perfectly and achieve that desirable golden crust.
- Preparing the Egg Wash: In a small bowl, whisk together the large egg with one tablespoon of water or milk until well combined. This is our magical egg wash! It’s what gives our “Crescent Pumpkins” that professional-looking, glossy, golden-brown finish. The egg wash also helps any sprinkled sugar adhere beautifully.
- Applying Egg Wash and Optional Sugar: Using a pastry brush, gently brush the tops of each rolled “Crescent Pumpkin” with the egg wash. Be thorough but don’t drench them; a thin, even coat is all you need. If you’re using turbinado sugar or sanding sugar, now is the time to sprinkle a light dusting over each crescent. I love the extra sparkle and subtle crunch this adds; it really makes them look even more festive and inviting.
- Baking to Perfection: Carefully transfer your baking sheets to the preheated oven. Bake for approximately 12-15 minutes, or until the “Crescent Pumpkins” are beautifully puffed up, golden brown, and the filling is bubbly and fragrant. Keep a close eye on them, especially during the last few minutes, as oven temperatures can vary, and crescent rolls can go from perfectly golden to over-baked quite quickly. You’ll know they’re ready when they have that irresistible golden hue and fill your kitchen with the most amazing aroma of pumpkin and warm pastry.
Cooling, Finishing Touches, and Serving
The hard work is done, and now comes the glorious reward! Cooling these delights properly is important for the fillings to set slightly, preventing them from oozing too much when you take that first glorious bite. And, of course, a few optional finishing touches can elevate these “Crescent Pumpkins With Cream Cheese And Pumpkin Pie Filling” from delicious to absolutely unforgettable.
- Cooling Time: Once they emerge from the oven, resplendent in their golden glory, gently transfer the “Crescent Pumpkins” (still on their parchment paper) to a wire rack to cool. I usually let them sit on the baking sheet for a minute or two first, just to firm up slightly before moving them. It’s tempting to dive right in, I know, but trust me on this: letting them cool for at least 10-15 minutes allows the warm cream cheese and pumpkin filling to set a bit, making them much easier and cleaner to handle, and preventing any scalding hot filling surprises. The pastry will also crisp up a little more as it cools, giving you that delightful flaky texture.
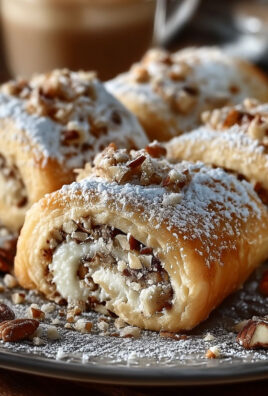
- Optional Powdered Sugar Dusting: If you skipped the turbinado sugar before baking, or simply want an extra touch of elegance, you can dust the cooled “Crescent Pumpkins” with a light coating of powdered sugar. I use a small sieve for this, gently tapping it over the pastries to create a delicate, snow-like finish. This adds another layer of visual appeal and a touch more sweetness.
- Serving Suggestions: These “Crescent Pumpkins With Cream Cheese And Pumpkin Pie Filling” are absolutely wonderful served warm, straight from the cooling rack. They make a fantastic breakfast treat, a delightful dessert, or a cozy snack with your afternoon coffee or tea. For an extra special indulgence, I love to serve them alongside a dollop of freshly whipped cream. The cool, airy cream perfectly complements the warm, spiced filling. A sprinkle of extra pumpkin pie spice on the whipped cream can be a nice touch as well! They are also surprisingly good at room temperature, though I find their peak deliciousness is when they’re still slightly warm.
Storage Tips:
If by some miracle you have any leftovers (which is a rare occurrence in my house!), you can store them in an airtight container at room temperature for up to two days, or in the refrigerator for up to five days. A quick reheat in a toaster oven or microwave can bring back some of that freshly baked magic. Just be mindful not to overheat them in the microwave, or the pastry might become a little chewy rather than flaky. A gentle warm-up is all they need.
There you have it! A truly delightful and surprisingly simple treat that captures the essence of autumn in every single bite. I promise you, making these “Crescent Pumpkins With Cream Cheese And Pumpkin Pie Filling” will fill your home with the most incredible aromas and your loved ones with pure joy. Happy baking!
Conclusion:
Well, friends, we’ve reached the delicious culmination of our culinary journey, and I genuinely hope you’re feeling as inspired as I am to whip up a batch of these incredible treats. If there’s one recipe you absolutely must add to your fall baking repertoire, it’s this one for our delightful Crescent Pumpkins With Cream Cheese And Pumpkin Pie Filling. It’s more than just a simple pastry; it’s a warm hug, a comforting memory waiting to be made, and a surefire way to bring smiles to everyone’s faces. I promise you, the effort is minimal, but the reward is immense – a symphony of textures and flavors that truly embodies the spirit of the season.
What makes this recipe a true game-changer? It’s the perfect harmony of ingredients, masterfully coming together to create something utterly irresistible. Imagine the golden-brown, flaky perfection of crescent roll dough, baked to a tender crispness. Now, envision that delicate crust cradling a luscious, tangy cream cheese layer, which provides a wonderful counterpoint to the star of the show: a spiced, velvety pumpkin pie filling. Each bite is a delightful explosion, offering that comforting taste of pumpkin spice without being overwhelmingly sweet, all balanced by the rich cream cheese and the buttery crunch of the pastry. It’s an elegant yet approachable dessert, a testament to how simple ingredients can create profound culinary experiences. This isn’t just a fleeting trend; it’s a timeless treat that will have everyone asking for the recipe, making you the undisputed star of any gathering.
Elevating Your Crescent Pumpkins: Serving Suggestions and Creative Variations
Once your kitchen is filled with the intoxicating aroma of freshly baked pumpkin, the possibilities for enjoyment are endless! These Crescent Pumpkins are wonderfully versatile. I love serving them slightly warm, perhaps with a dusting of powdered sugar – a classic touch that never fails to impress. They make for an absolutely splendid breakfast pastry, especially when paired with a steaming cup of coffee or a fragrant chai tea on a crisp autumn morning. Imagine a lazy Sunday brunch where these take center stage, nestled among fresh fruit and perhaps a dollop of Greek yogurt for a lighter touch. For a more decadent dessert experience, try drizzling them with a warm caramel sauce just before serving, or even a simple maple glaze for an extra layer of fall flavor. A generous swirl of homemade whipped cream, perhaps infused with a hint of vanilla or a touch of bourbon, also takes these from great to absolutely extraordinary.
But don’t stop there! I always encourage you to get creative in your own kitchen. While the classic Crescent Pumpkins With Cream Cheese And Pumpkin Pie Filling are perfect as is, there are so many ways to personalize them. Want to add a nutty crunch? Fold in some finely chopped pecans or walnuts into the pumpkin filling. Feeling adventurous? A tiny sprinkle of mini chocolate chips mixed into the cream cheese layer before baking can add an unexpected and delightful burst of sweetness. You could also experiment with additional spices – a pinch of ground ginger, allspice, or even a tiny grating of fresh nutmeg can deepen the flavor profile of the pumpkin filling. For those who love a zesty kick, a touch of orange zest, either mixed into the cream cheese or sprinkled over the finished pastries, provides a wonderful brightness that cuts through the richness. Think about making them into mini bite-sized portions for a party platter, or even larger, more substantial pieces for a hearty breakfast. The beauty of this recipe lies in its adaptability, inviting you to put your own unique spin on it.
Your Turn: Bake, Savor, and Share!
Now that you have all the tips and tricks, it’s your turn to experience the magic. I truly believe this recipe for Crescent Pumpkins With Cream Cheese And Pumpkin Pie Filling is a must-try for anyone who loves the cozy, comforting flavors of autumn. Don’t be shy – gather your ingredients, preheat your oven, and prepare to fill your home with the most wonderful aromas imaginable. Baking is not just about the food; it’s about the joy of creation, the shared experience, and the simple pleasure of indulging in something homemade and delicious. I’m so excited for you to discover how easy and rewarding this recipe truly is.
Once you’ve baked your batch, please, please, please come back and tell me all about it! Did you try any of my suggestions? Did you come up with your own brilliant variation? I would absolutely love to hear about your baking adventures. Share your photos on social media, tag me, or simply drop a comment below. Your experiences and insights are invaluable and inspire not only me but also our entire community of fellow food enthusiasts. Let’s celebrate the joy of fall baking together! Happy baking, my friends!
Crescent Pumpkins With Cream Cheese And Pumpkin Pie Filling
As the leaves begin to turn, savor this delightful treat: flaky, golden-brown crescent rolls, artfully shaped like miniature pumpkins, filled with a luscious cream cheese and a sweet, spiced pumpkin puree. It’s an easy, charming, and utterly comforting celebration of autumn, delivering quintessential fall flavors without the extensive effort of traditional pies.
Ingredients
-
8 oz refrigerated crescent rolls
-
5 oz softened cream cheese
-
2 tbsp sugar
-
1 tsp vanilla extract
-
¾ cup pumpkin puree
-
1 tbsp corn starch
-
2 tbsp packed light-brown sugar
-
2 tbsp granulated sugar
-
¾ tsp ground cinnamon
-
¼ tsp ground ginger
-
¼ tsp nutmeg
-
1/8 tsp allspice
-
1 egg yolk
-
½ tsp vanilla extract
-
2 ½ tbsp melted butter
Instructions
-
Step 1
In a medium mixing bowl, beat softened cream cheese with 2 tablespoons sugar and 1 teaspoon vanilla extract until the mixture is light, fluffy, and completely smooth. Scrape down the sides of the bowl frequently. -
Step 2
In a separate small bowl, combine ¾ cup pumpkin puree, 1 tablespoon corn starch, 2 tablespoons packed light-brown sugar, 2 tablespoons granulated sugar, ¾ teaspoon ground cinnamon, ¼ teaspoon ground ginger, ¼ teaspoon nutmeg, 1/8 teaspoon allspice, 1 egg yolk, ½ teaspoon vanilla extract, and 2 ½ tablespoons melted butter. Stir well until all ingredients are evenly distributed. -
Step 3
Preheat your oven to 375°F (190°C). Line a baking sheet with parchment paper. Carefully unroll the 8 oz can of crescent roll dough and separate it into 8 individual triangles along the perforations. -
Step 4
Take one crescent triangle and lay it flat. Spread about 1 generous teaspoon of the prepared cream cheese mixture evenly over the wider end of the dough, leaving the narrow tip bare. On top of the cream cheese layer, gently spoon about 1 generous teaspoon of the spiced pumpkin filling, spreading it evenly. -
Step 5
Starting from the wider, filled end of the triangle, carefully and snugly roll the dough towards the narrow tip, ensuring the filling is enclosed. Place each rolled crescent seam-side down on the prepared baking sheet, leaving about an inch of space between each. -
Step 6
Bake for approximately 12-15 minutes, or until the ‘Crescent Pumpkins’ are beautifully puffed up, golden brown, and the filling is bubbly and fragrant. Keep a close eye on them during the last few minutes. -
Step 7
Once baked, gently transfer the ‘Crescent Pumpkins’ (still on parchment paper) to a wire rack to cool for at least 10-15 minutes. This allows the filling to set. Serve warm, optionally dusted with powdered sugar or alongside freshly whipped cream. -
Step 8
Store any leftovers in an airtight container at room temperature for up to two days, or in the refrigerator for up to five days. Reheat gently in a toaster oven or microwave if desired for that freshly baked magic.
Important Information
Nutrition Facts (Per Serving)
It is important to consider this information as approximate and not to use it as definitive health advice.
Allergy Information
Please check ingredients for potential allergens and consult a health professional if in doubt.


Leave a Comment