
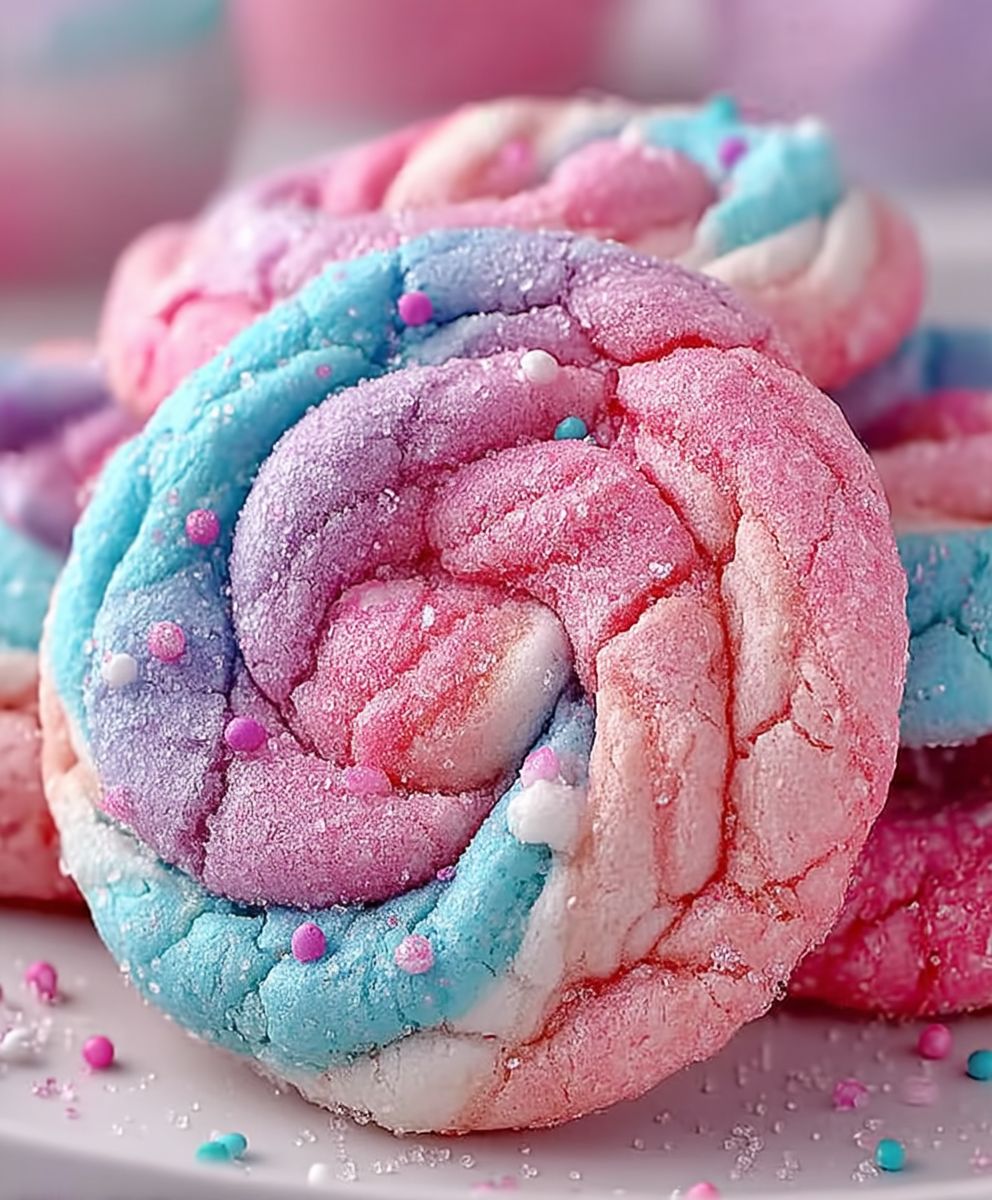
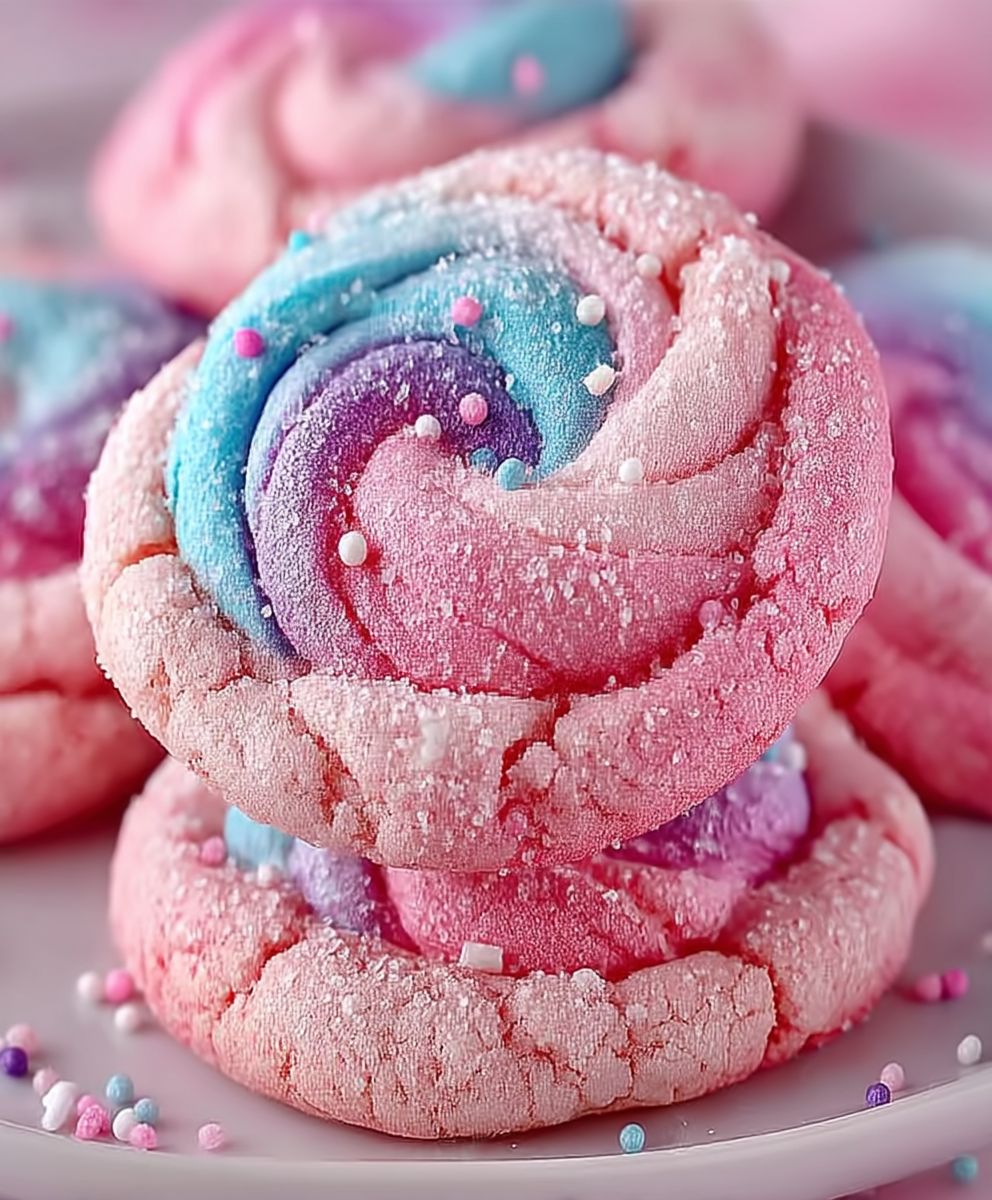
Cotton Candy Cookies: Prepare to be transported back to your childhood with every single bite! Imagine the fluffy, melt-in-your-mouth sweetness of cotton candy, but in the form of a perfectly baked cookie. These aren’t just cookies; they’re a nostalgic trip to the carnival, a burst of pure, sugary joy that will delight both young and old.
While cotton candy itself has a fascinating history, dating back to 15th-century Italy where spun sugar was a delicacy for the wealthy, these Cotton Candy Cookies are a modern twist on a classic treat. They capture the essence of that whimsical confection in a convenient and utterly irresistible form.
What makes these cookies so beloved? It’s the unique combination of textures – a slightly crisp edge giving way to a soft, chewy center. And, of course, the flavor! The unmistakable sweetness of cotton candy, often enhanced with a touch of vanilla or other complementary flavors, creates a taste sensation that’s simply addictive. Plus, they are incredibly fun to make and decorate, making them perfect for parties, holidays, or simply a sweet afternoon treat. Get ready to bake up some happiness!
Ingredients:
- 1 cup (2 sticks) unsalted butter, softened
- 1 ½ cups granulated sugar
- 2 large eggs
- 1 teaspoon vanilla extract
- ½ teaspoon almond extract
- 3 cups all-purpose flour
- 1 teaspoon baking powder
- ½ teaspoon baking soda
- ¼ teaspoon salt
- ½ cup cotton candy flavoring oil (or extract, adjust amount to taste)
- Pink gel food coloring
- Blue gel food coloring
- Cotton candy, for topping (optional, but highly recommended!)
Preparing the Cookie Dough:
Alright, let’s get started on these whimsical Cotton Candy Cookies! The first step is creating the perfect dough, which is surprisingly easy. Trust me, even if you’re not a seasoned baker, you can nail this.
- Cream the Butter and Sugar: In a large bowl (or the bowl of your stand mixer), cream together the softened butter and granulated sugar until light and fluffy. This usually takes about 3-5 minutes. You want it to be nice and airy, so don’t rush this step. The lighter the mixture, the better the texture of your cookies.
- Add the Eggs and Extracts: Beat in the eggs one at a time, making sure each egg is fully incorporated before adding the next. Then, stir in the vanilla extract and almond extract. The almond extract really enhances the cotton candy flavor, but if you’re not a fan, you can skip it or substitute with more vanilla.
- Combine Dry Ingredients: In a separate medium bowl, whisk together the all-purpose flour, baking powder, baking soda, and salt. Whisking ensures that the baking powder and baking soda are evenly distributed, which is crucial for a good rise.
- Gradually Add Dry Ingredients to Wet Ingredients: Gradually add the dry ingredients to the wet ingredients, mixing on low speed until just combined. Be careful not to overmix! Overmixing develops the gluten in the flour, which can result in tough cookies. Mix until you see no more streaks of flour.
- Incorporate Cotton Candy Flavoring and Food Coloring: Now for the fun part! Stir in the cotton candy flavoring oil (or extract). Start with ½ cup and taste the dough. You can add a little more if you want a stronger cotton candy flavor, but be careful not to add too much liquid, as it can affect the consistency of the dough. Next, divide the dough in half. Add pink gel food coloring to one half and blue gel food coloring to the other half. Mix each half until the color is evenly distributed. I recommend using gel food coloring because it’s more concentrated and won’t add extra liquid to the dough.
- Chill the Dough: Wrap each half of the dough in plastic wrap and chill in the refrigerator for at least 1 hour, or preferably 2 hours. This chilling time is essential! It allows the gluten to relax, which prevents the cookies from spreading too much in the oven. It also makes the dough easier to handle.
Baking the Cookies:
Once your dough is properly chilled, it’s time to bake these beauties! This is where the magic really happens, and you’ll start to see those cotton candy colors come to life.
- Preheat Oven and Prepare Baking Sheets: Preheat your oven to 350°F (175°C). Line baking sheets with parchment paper or silicone baking mats. Parchment paper prevents the cookies from sticking and makes cleanup a breeze.
- Shape the Cookies: Take a small amount of pink dough and a small amount of blue dough. Gently roll them together in your hands to create a marbled effect. Don’t overmix, or the colors will blend together too much. Roll the dough into 1-inch balls and place them on the prepared baking sheets, leaving about 2 inches between each cookie.
- Bake the Cookies: Bake for 8-10 minutes, or until the edges are lightly golden brown. Keep a close eye on them, as they can burn easily. The baking time will depend on your oven, so start checking them at 8 minutes.
- Cool the Cookies: Remove the baking sheets from the oven and let the cookies cool on the baking sheets for a few minutes before transferring them to a wire rack to cool completely. This prevents them from breaking while they’re still soft.
Adding the Finishing Touches:
Now for the final flourish! This is where we really bring the cotton candy theme home. This step is optional, but it adds so much to the overall look and taste of the cookies.
- Prepare the Cotton Candy: Gently pull apart small pieces of cotton candy. Be careful not to compress it too much, as you want it to stay light and fluffy.
- Top the Cookies (Optional): Once the cookies are completely cool, gently press a small piece of cotton candy onto the top of each cookie. The cotton candy will start to dissolve slightly, creating a sticky, sweet topping. Serve immediately for the best texture. The cotton candy will dissolve over time, so these cookies are best enjoyed the same day they are topped.
Tips and Tricks for Perfect Cotton Candy Cookies:
- Don’t Overmix the Dough: Overmixing develops the gluten in the flour, which can result in tough cookies. Mix until just combined.
- Chill the Dough: Chilling the dough is essential for preventing the cookies from spreading too much in the oven.
- Use Gel Food Coloring: Gel food coloring is more concentrated and won’t add extra liquid to the dough.
- Don’t Overbake: Overbaked cookies will be dry and crumbly. Bake until the edges are lightly golden brown.
- Store Properly: Store the cookies in an airtight container at room temperature. If you top them with cotton candy, they are best enjoyed the same day.
- Experiment with Flavors: Feel free to experiment with different cotton candy flavoring oils or extracts. You can also add other extracts, such as lemon or orange, to complement the cotton candy flavor.
- Get Creative with Decorations: You can also decorate the cookies with sprinkles, edible glitter, or frosting.
Troubleshooting:
- Cookies are spreading too much: Make sure you chilled the dough for at least 1 hour. You can also try adding a tablespoon or two of flour to the dough.
- Cookies are too dry: Don’t overbake the cookies. Also, make sure you’re using the correct amount of butter and sugar.
- Cookies are too tough: Don’t overmix the dough.
- Cotton candy is dissolving too quickly: This is normal! Cotton candy is very sensitive to moisture. To minimize dissolving, top the cookies with cotton candy just before serving.
Enjoy your delicious and whimsical Cotton Candy Cookies! They’re perfect for parties, holidays, or just a fun treat any day of the week. I hope you have as much fun making them as I do!
Conclusion:
And there you have it! These Cotton Candy Cookies are more than just a treat; they’re a whimsical journey back to childhood, a burst of sugary happiness in every bite, and a guaranteed conversation starter. I truly believe this recipe is a must-try for anyone looking to add a little magic to their baking repertoire. The unique flavor profile, the vibrant colors, and the surprisingly simple process make these cookies an absolute winner.
But why are they a must-try, you ask? Well, beyond the sheer novelty, these cookies offer a delightful textural contrast. The crisp edges give way to a soft, chewy center that practically melts in your mouth. The cotton candy flavoring, subtle yet undeniably present, dances on your taste buds, leaving you wanting more. And let’s be honest, who can resist that gorgeous pastel swirl? They’re visually stunning, making them perfect for parties, bake sales, or simply brightening up a gloomy day.
Now, let’s talk serving suggestions and variations! While these cookies are absolutely divine on their own, warm from the oven with a cold glass of milk, there are plenty of ways to elevate the experience. Imagine crumbling them over vanilla ice cream for a cotton candy sundae explosion. Or, use them as the base for mini ice cream sandwiches, filling them with strawberry or bubblegum ice cream for an extra dose of fun.
For a more sophisticated twist, try dipping half of each cookie in melted white chocolate and then sprinkling them with edible glitter. This adds a touch of elegance and sparkle, making them perfect for special occasions. You could also experiment with different food colorings to create unique and eye-catching designs. Think rainbow swirls, ombre effects, or even tie-dye patterns!
If you’re feeling adventurous, consider adding a pinch of sea salt to the dough. The saltiness will enhance the sweetness of the cotton candy flavoring and create a more complex and balanced flavor profile. Another fun variation is to incorporate mini marshmallows into the dough for an extra chewy and gooey texture.
Don’t be afraid to get creative and experiment with different flavors and textures. The possibilities are endless! The key is to have fun and enjoy the process. Baking should be a joyful experience, and these Cotton Candy Cookies are guaranteed to bring a smile to your face.
I’m so excited for you to try this recipe and experience the magic of these cookies for yourself. I poured my heart into perfecting this recipe, and I truly believe you’ll love them as much as I do.
So, what are you waiting for? Gather your ingredients, preheat your oven, and get ready to embark on a baking adventure! I promise you won’t be disappointed.
And most importantly, please share your experience with me! I would absolutely love to see your creations and hear your feedback. Did you try any of the variations I suggested? Did you come up with your own unique twist? Let me know in the comments below! Your feedback is invaluable, and it helps me to continue creating delicious and inspiring recipes for you. Happy baking!
Cotton Candy Cookies: A Dreamy Recipe You'll Love
Whimsical cotton candy cookies with marbled pink and blue dough, topped with fluffy cotton candy for a sweet treat.
Ingredients
- 1 cup (2 sticks) unsalted butter, softened
- 1 ½ cups granulated sugar
- 2 large eggs
- 1 teaspoon vanilla extract
- ½ teaspoon almond extract
- 3 cups all-purpose flour
- 1 teaspoon baking powder
- ½ teaspoon baking soda
- ¼ teaspoon salt
- ½ cup cotton candy flavoring oil (or extract, adjust amount to taste)
- Pink gel food coloring
- Blue gel food coloring
- Cotton candy, for topping (optional, but highly recommended!)
Instructions
- Cream the Butter and Sugar: In a large bowl (or the bowl of your stand mixer), cream together the softened butter and granulated sugar until light and fluffy. This usually takes about 3-5 minutes.
- Add the Eggs and Extracts: Beat in the eggs one at a time, making sure each egg is fully incorporated before adding the next. Then, stir in the vanilla extract and almond extract.
- Combine Dry Ingredients: In a separate medium bowl, whisk together the all-purpose flour, baking powder, baking soda, and salt.
- Gradually Add Dry Ingredients to Wet Ingredients: Gradually add the dry ingredients to the wet ingredients, mixing on low speed until just combined. Be careful not to overmix!
- Incorporate Cotton Candy Flavoring and Food Coloring: Stir in the cotton candy flavoring oil (or extract). Start with ½ cup and taste the dough. Divide the dough in half. Add pink gel food coloring to one half and blue gel food coloring to the other half. Mix each half until the color is evenly distributed.
- Chill the Dough: Wrap each half of the dough in plastic wrap and chill in the refrigerator for at least 1 hour, or preferably 2 hours.
- Preheat Oven and Prepare Baking Sheets: Preheat your oven to 350°F (175°C). Line baking sheets with parchment paper or silicone baking mats.
- Shape the Cookies: Take a small amount of pink dough and a small amount of blue dough. Gently roll them together in your hands to create a marbled effect. Roll the dough into 1-inch balls and place them on the prepared baking sheets, leaving about 2 inches between each cookie.
- Bake the Cookies: Bake for 8-10 minutes, or until the edges are lightly golden brown.
- Cool the Cookies: Remove the baking sheets from the oven and let the cookies cool on the baking sheets for a few minutes before transferring them to a wire rack to cool completely.
- Prepare the Cotton Candy (Optional): Gently pull apart small pieces of cotton candy.
- Top the Cookies (Optional): Once the cookies are completely cool, gently press a small piece of cotton candy onto the top of each cookie. Serve immediately for the best texture.
Notes
- Don’t overmix the dough.
- Chilling the dough is essential.
- Use gel food coloring for best results.
- Don’t overbake the cookies.
- Store cookies in an airtight container. If topped with cotton candy, enjoy the same day.
- Experiment with different cotton candy flavorings.
- Get creative with decorations like sprinkles or edible glitter.
- If cookies spread too much, chill dough longer or add a tablespoon or two of flour.
- If cookies are too dry, don’t overbake and ensure correct butter/sugar amounts.
- If cotton candy dissolves quickly, top cookies just before serving.


Leave a Comment