
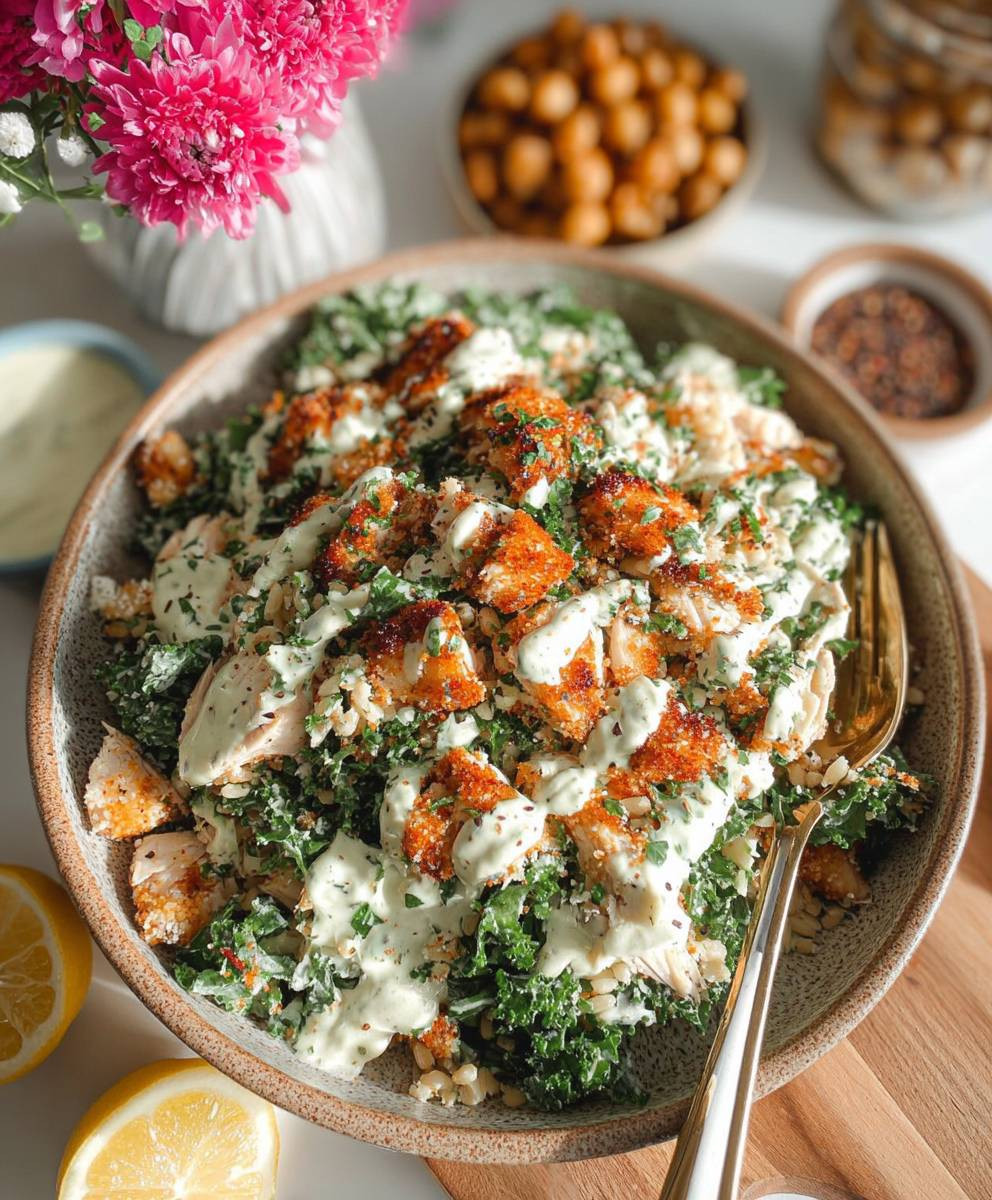
Chicken Caesar Crispy Rice Salad: Prepare to experience a flavor explosion that will redefine your salad expectations! Imagine the creamy, tangy deliciousness of a classic Caesar salad, elevated with the satisfying crunch of perfectly crisped rice. This isn’t just a salad; it’s a textural masterpiece that will have everyone begging for seconds.
While the Caesar salad itself boasts a debated history, with some attributing its creation to Caesar Cardini in Tijuana, Mexico, in the 1920s, our Chicken Caesar Crispy Rice Salad takes that familiar foundation and gives it a modern, playful twist. The addition of crispy rice adds an element of fun and surprise, transforming a traditionally leafy dish into something truly special.
People adore Caesar salad for its bold flavors – the sharp Parmesan, the garlicky dressing, and the salty anchovies (if you’re a fan!). But what truly sets this version apart is the delightful contrast between the creamy dressing, tender chicken, and the irresistible crunch of the rice. It’s a symphony of textures and tastes that’s both comforting and exciting. Plus, it’s incredibly versatile! Perfect as a light lunch, a satisfying side dish, or even a unique appetizer, this Chicken Caesar Crispy Rice Salad is guaranteed to become a new family favorite. Get ready to ditch the boring salads and embrace this crunchy, creamy, and utterly delicious creation!
Ingredients:
- For the Crispy Rice:
- 2 cups cooked sushi rice (short-grain rice), cooled
- 2 tablespoons olive oil
- 1 tablespoon soy sauce
- 1 teaspoon sesame oil
- 1/2 teaspoon garlic powder
- 1/4 teaspoon black pepper
- For the Chicken:
- 1.5 lbs boneless, skinless chicken breasts
- 1 tablespoon olive oil
- 1 teaspoon garlic powder
- 1 teaspoon onion powder
- 1/2 teaspoon paprika
- 1/4 teaspoon cayenne pepper (optional, for a little heat)
- Salt and pepper to taste
- For the Caesar Dressing:
- 1/2 cup mayonnaise
- 2 tablespoons grated Parmesan cheese
- 1 tablespoon lemon juice
- 1 teaspoon Dijon mustard
- 1 clove garlic, minced
- 1/4 teaspoon Worcestershire sauce
- 1 tablespoon olive oil
- Salt and pepper to taste
- 2 tablespoons milk or water (to thin, if needed)
- For the Salad:
- 6 cups chopped romaine lettuce
- 1/2 cup shaved Parmesan cheese
- 1/2 cup croutons (homemade or store-bought)
- 1/4 cup chopped fresh parsley (optional, for garnish)
Preparing the Crispy Rice
Okay, let’s get started with the foundation of our salad – the crispy rice! This is where the magic happens, and it’s surprisingly easy to do.
- Combine the Rice and Seasonings: In a large bowl, gently combine the cooked and cooled sushi rice with olive oil, soy sauce, sesame oil, garlic powder, and black pepper. Make sure everything is evenly distributed. I like to use my hands to gently mix it, but a spatula works just fine too. The goal is to coat each grain of rice without mashing it.
- Press the Rice into a Pan: Lightly grease a 9×13 inch baking pan with cooking spray or a little bit of olive oil. Pour the seasoned rice into the pan and use a spatula or your hands to evenly spread it out. Press down firmly to create a compact layer. This is important for getting that nice crispy texture. The tighter the rice is packed, the better it will hold together when you cut it later.
- Bake the Rice: Preheat your oven to 375°F (190°C). Bake the rice for 30-40 minutes, or until it’s golden brown and crispy around the edges. Keep an eye on it, as ovens can vary. You want it to be nice and golden, but not burnt. The edges should be noticeably crisp.
- Cool and Cut: Once the rice is baked, remove it from the oven and let it cool completely in the pan. This is crucial! If you try to cut it while it’s still warm, it will fall apart. Once cooled, use a sharp knife to cut the rice into small squares or rectangles. I usually aim for about 1-inch squares, but you can make them whatever size you prefer.
Cooking the Chicken
Now, let’s move on to the protein of our salad – the chicken. We want it to be flavorful and juicy, so here’s how I like to do it.
- Prepare the Chicken: If your chicken breasts are very thick, you can pound them to an even thickness (about 1/2 inch) using a meat mallet. This will help them cook evenly. Pat the chicken breasts dry with paper towels. This is important for getting a good sear.
- Season the Chicken: In a small bowl, combine the olive oil, garlic powder, onion powder, paprika, cayenne pepper (if using), salt, and pepper. Rub this mixture all over the chicken breasts, making sure they are evenly coated.
- Cook the Chicken: You have a few options for cooking the chicken:
- Pan-Seared: Heat a tablespoon of olive oil in a large skillet over medium-high heat. Once the oil is hot, add the chicken breasts to the skillet and cook for 5-7 minutes per side, or until they are cooked through and the internal temperature reaches 165°F (74°C).
- Baked: Preheat your oven to 375°F (190°C). Place the seasoned chicken breasts on a baking sheet lined with parchment paper. Bake for 20-25 minutes, or until they are cooked through and the internal temperature reaches 165°F (74°C).
- Grilled: Preheat your grill to medium-high heat. Grill the chicken breasts for 5-7 minutes per side, or until they are cooked through and the internal temperature reaches 165°F (74°C).
- Rest and Slice: Once the chicken is cooked, remove it from the heat and let it rest for 5-10 minutes before slicing. This allows the juices to redistribute, resulting in more tender and flavorful chicken. Slice the chicken into bite-sized pieces.
Making the Caesar Dressing
No Caesar salad is complete without a delicious Caesar dressing! This homemade version is so much better than store-bought, and it’s super easy to make.
- Combine the Ingredients: In a medium bowl, whisk together the mayonnaise, grated Parmesan cheese, lemon juice, Dijon mustard, minced garlic, Worcestershire sauce, and olive oil.
- Season to Taste: Season the dressing with salt and pepper to taste.
- Adjust the Consistency: If the dressing is too thick, add milk or water, one tablespoon at a time, until it reaches your desired consistency. I prefer mine to be slightly thinner so it coats the salad nicely.
- Chill (Optional): For the best flavor, cover the dressing and refrigerate it for at least 30 minutes before serving. This allows the flavors to meld together.
Assembling the Chicken Caesar Crispy Rice Salad
Alright, we’ve got all our components ready to go! Now it’s time to assemble our masterpiece.
- Prepare the Salad Base: In a large bowl, combine the chopped romaine lettuce, shaved Parmesan cheese, and croutons.
- Add the Chicken and Crispy Rice: Add the sliced chicken and crispy rice to the bowl.
- Dress the Salad: Pour the Caesar dressing over the salad and toss gently to combine. Be careful not to overdress the salad, as it can become soggy. I usually start with about half of the dressing and add more as needed.
- Garnish and Serve: Garnish with chopped fresh parsley (if using) and serve immediately. This salad is best enjoyed fresh, as the crispy rice can lose its crispness over time.
Tips and Variations:
- Spice it up: Add a pinch of red pepper flakes to the Caesar dressing for a little kick.
- Add some veggies: Cherry tomatoes, cucumbers, or red onions would be great additions to this salad.
- Make it vegetarian: Substitute the chicken with grilled tofu or chickpeas.
- Use different rice: While sushi rice works best for the crispy texture, you can experiment with other types of rice, such as jasmine rice or brown rice. Just keep in mind that the texture will be different.
- Air Fryer Crispy Rice: For an even quicker method, you can air fry the rice squares after cutting them. Spray them lightly with oil and air fry at 375°F (190°C) for 5-7 minutes, or until golden brown and crispy.
- Make Ahead: You can prepare the crispy rice and Caesar dressing ahead of time. Store them separately in the refrigerator until ready to assemble the salad. The chicken can also be cooked ahead of time and stored in the refrigerator.
Enjoy!
I hope you enjoy this Chicken Caesar Crispy Rice Salad as much as I do! It’s a fun and delicious twist on a classic Caesar salad, and it’s perfect for a light lunch or dinner. Let me know what you think in the comments below!

Conclusion:
This Chicken Caesar Crispy Rice Salad isn’t just another salad; it’s a flavor explosion waiting to happen! The combination of creamy Caesar dressing, savory chicken, and the satisfying crunch of perfectly crisped rice creates a textural and taste sensation that will leave you wanting more. Trust me, once you try it, you’ll be adding it to your regular rotation. It’s the perfect way to elevate your lunch, impress at a potluck, or simply enjoy a light yet satisfying dinner.
But why is this recipe a must-try? It’s all about the balance. The richness of the Caesar dressing is perfectly offset by the lightness of the lettuce and the delightful crunch of the rice. The chicken adds a protein punch, making it a complete and fulfilling meal. Plus, it’s surprisingly easy to make! You can even prep the components ahead of time and assemble it just before serving, making it ideal for busy weeknights.
Looking for serving suggestions? This salad is fantastic on its own, but it also pairs beautifully with grilled vegetables, a crusty baguette, or even a simple bowl of tomato soup. For a heartier meal, consider adding some grilled shrimp or steak.
And the variations are endless! Feel free to experiment with different types of lettuce, such as romaine, butter lettuce, or even a spring mix. If you’re not a fan of chicken, you can easily substitute it with chickpeas for a vegetarian option. Want to add a little heat? A pinch of red pepper flakes or a drizzle of sriracha will do the trick. You could also try using different types of cheese, like Parmesan or Asiago, for a unique flavor twist. For a different take on the crispy rice, consider using brown rice for a nuttier flavor and added fiber. Another fun variation is to add some chopped bacon for an extra layer of smoky goodness. Don’t be afraid to get creative and make it your own!
I’m confident that this Chicken Caesar Crispy Rice Salad will become a new favorite in your household. It’s a crowd-pleaser, a flavor adventure, and a guaranteed way to brighten up any meal. The crispy rice element really elevates this salad beyond the ordinary, providing a satisfying crunch that you won’t find anywhere else.
So, what are you waiting for? Grab your ingredients, follow the simple steps, and prepare to be amazed. I’m so excited for you to experience the deliciousness of this salad.
Once you’ve tried it, I’d love to hear about your experience! Did you make any variations? What did you think of the crispy rice? Share your photos and comments below – I can’t wait to see your creations and hear your feedback. Happy cooking, and enjoy every bite of this incredible salad! Let me know if you have any questions, and I’ll do my best to help. I’m always looking for new ways to improve my recipes, so your feedback is invaluable. Now go forth and conquer that kitchen!
Chicken Caesar Crispy Rice Salad: A Delicious & Easy Recipe
Crispy baked sushi rice squares, juicy seasoned chicken, and creamy homemade Caesar dressing elevate this unique and satisfying salad with romaine lettuce, Parmesan, and croutons.
Ingredients
Instructions
Recipe Notes
- Spice it up: Add a pinch of red pepper flakes to the Caesar dressing for a little kick.
- Add some veggies: Cherry tomatoes, cucumbers, or red onions would be great additions to this salad.
- Make it vegetarian: Substitute the chicken with grilled tofu or chickpeas.
- Use different rice: While sushi rice works best for the crispy texture, you can experiment with other types of rice, such as jasmine rice or brown rice. Just keep in mind that the texture will be different.
- Air Fryer Crispy Rice: For an even quicker method, you can air fry the rice squares after cutting them. Spray them lightly with oil and air fry at 375°F (190°C) for 5-7 minutes, or until golden brown and crispy.
- Make Ahead: You can prepare the crispy rice and Caesar dressing ahead of time. Store them separately in the refrigerator until ready to assemble the salad. The chicken can also be cooked ahead of time and stored in the refrigerator.


Leave a Comment