
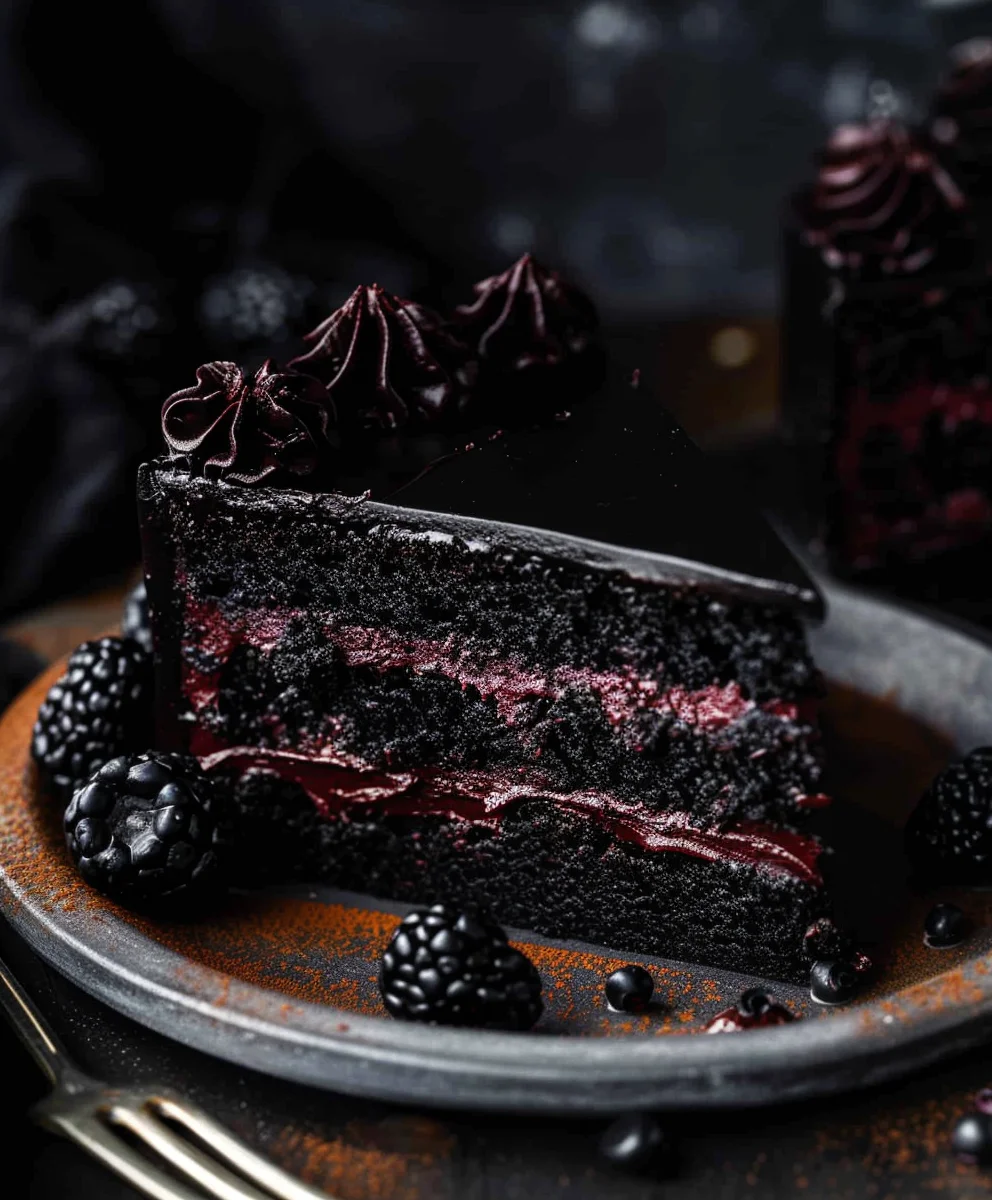
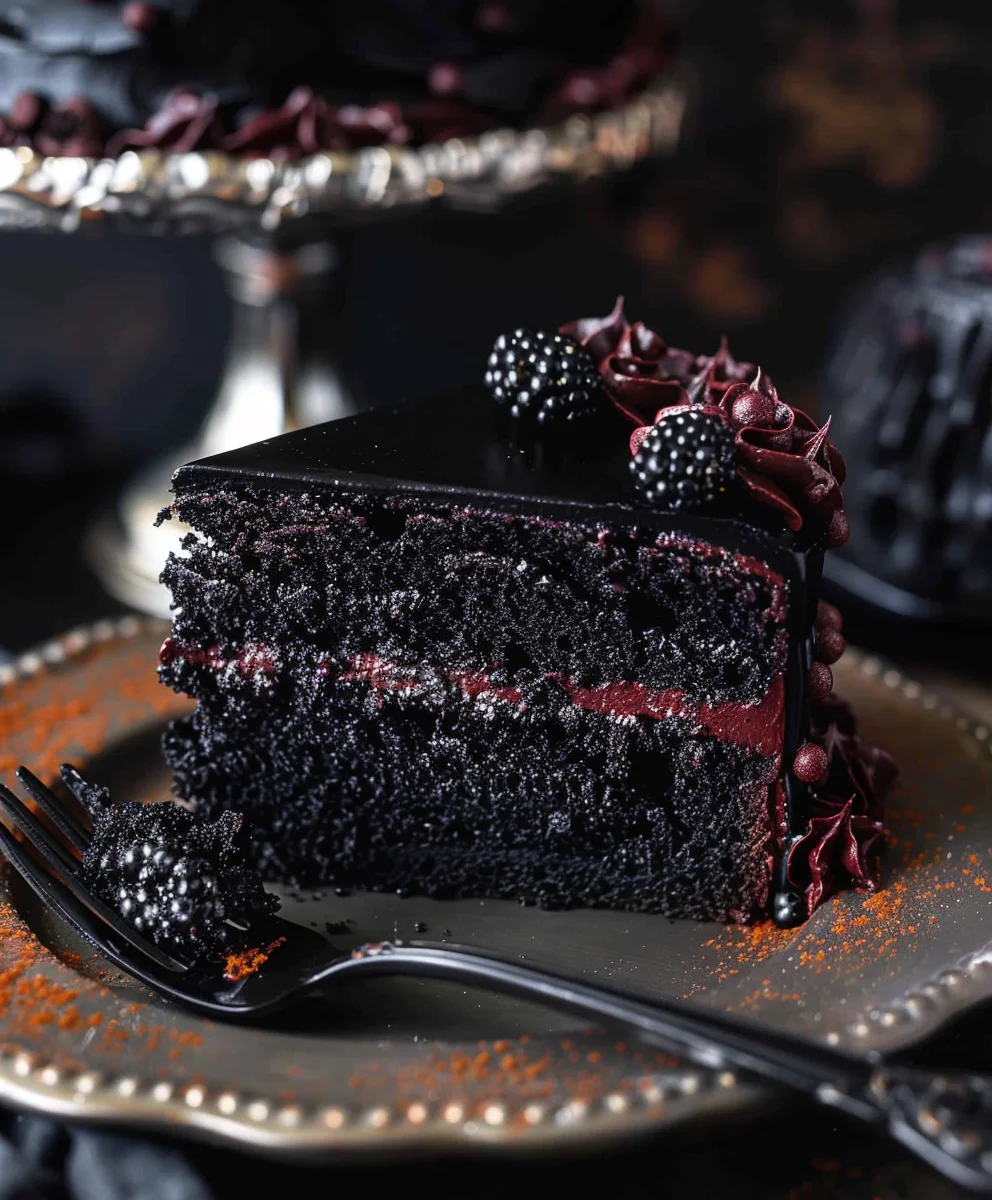
Black Velvet Halloween Cake is more than just a dessert; it’s a dramatic centerpiece designed to enchant and mystify your Halloween festivities. Imagine a cake so profoundly dark, it looks like a slice of the midnight sky, yet upon tasting, reveals an unexpectedly tender and rich flavor profile. This stunning confection takes the beloved tradition of velvet cakes and imbues it with a captivating, ghoulish charm, perfectly suited for the spookiest night of the year.
Historically, velvet cakes, known for their distinctively moist and smooth crumb, have always held a special place in celebratory baking. Our Black Velvet Halloween Cake builds on this legacy, transforming the familiar into something truly extraordinary for the season. People adore this dish not only for its breathtaking visual impact but also for its delightful taste and texture. It offers a subtle, sophisticated cocoa flavor, combined with an unparalleled velvety softness that simply melts in your mouth.
Why This Black Velvet Halloween Cake Will Be Your New Favorite
Its striking appearance makes it an instant showstopper, ensuring it will be the talk of any Halloween gathering. Beyond the visual appeal, the intricate balance of flavors—a hint of chocolate, a touch of tang from buttermilk, and a rich, creamy frosting—creates an irresistible culinary experience. I promise, once you experience the magic of this unique Black Velvet Halloween Cake, it will undoubtedly become a cherished tradition in your autumnal baking repertoire, bringing both elegance and a touch of eerie fun to your table.
Ingredients:
-
For the Black Velvet Cake:
- 2 ½ cups (300g) all-purpose flour, sifted
- 1 cup (95g) unsweetened black cocoa powder (or regular unsweetened cocoa powder for a deep red base if you prefer)
- 1 ½ teaspoons baking soda
- 1 teaspoon salt
- 1 cup (226g) unsalted butter, softened
- 2 cups (400g) granulated sugar
- 2 large eggs, at room temperature
- 1 teaspoon vanilla extract
- 1 ½ cups (360ml) buttermilk, at room temperature
- 1 tablespoon distilled white vinegar
- 2-3 tablespoons black gel food coloring (I highly recommend a high-quality brand like Americolor Super Black or Chefmaster Coal Black for the best results)
-
For the Black Cream Cheese Frosting:
- 1 cup (226g) unsalted butter, softened
- 16 ounces (452g) full-fat cream cheese, chilled
- 8 cups (960g) powdered sugar, sifted
- 2 teaspoons vanilla extract
- ½ teaspoon salt
- 3-5 tablespoons heavy cream or milk, as needed
- 3-4 tablespoons black gel food coloring (again, a high-quality gel is crucial here)
-
For Decoration (Optional but highly recommended for a Halloween vibe!):
- Halloween sprinkles
- Plastic spiders or bats
- Melted white chocolate (for spiderwebs)
- Black sanding sugar
For the Black Velvet Cake:
-
Preheat and Prepare:
Let’s get our workspace ready! Preheat your oven to 350°F (175°C). Generously grease and flour two 9-inch round cake pans or three 8-inch round cake pans. I like to line the bottoms with parchment paper circles for an extra layer of non-stick insurance. This ensures your beautiful Black Velvet Halloween Cake layers will release perfectly.
-
Whisk the Dry Ingredients:
In a medium bowl, whisk together the sifted all-purpose flour, black cocoa powder, baking soda, and salt. Sifting the flour and cocoa is a really important step here; it helps to prevent lumps and ensures a smoother, more even cake texture. Set this aside for a moment.
-
Cream Butter and Sugar:
In a large bowl, using an electric mixer (either a stand mixer with a paddle attachment or a hand mixer), cream together the softened unsalted butter and granulated sugar on medium-high speed. You’re aiming for a mixture that’s light, fluffy, and pale yellow, which usually takes about 3-5 minutes. This step incorporates air into the batter, contributing to a tender crumb for your Black Velvet Halloween Cake.
-
Add Eggs and Vanilla:
Reduce the mixer speed to medium and add the eggs one at a time, beating well after each addition until fully incorporated. Scrape down the sides of the bowl as needed to make sure everything is getting mixed evenly. Then, stir in the vanilla extract. The vanilla will add a lovely depth of flavor that complements the cocoa beautifully.
-
Combine Buttermilk and Vinegar:
In a small bowl, whisk together the buttermilk and distilled white vinegar. This combination creates a mild acidity that reacts with the baking soda, giving our Black Velvet Halloween Cake its signature tender texture and helping to set the beautiful black color.
-
Introduce the Black Gel Food Coloring:
Now for the magic that makes this a true “Black Velvet Halloween Cake!” Add the black gel food coloring directly into the buttermilk mixture and whisk thoroughly until the color is completely uniform. Using gel food coloring is key because it’s highly concentrated and won’t thin out your batter as much as liquid food coloring. Don’t be shy; we want a deep, intense black!
-
Alternate Dry and Wet Ingredients:
With the mixer on low speed, gradually add the dry ingredients to the wet ingredients in three additions, alternating with the buttermilk mixture in two additions. Begin and end with the dry ingredients. For example, add about a third of the dry mix, then half of the buttermilk, then another third of the dry mix, the remaining buttermilk, and finally the last third of the dry mix. Mix until just combined after each addition. Be careful not to overmix, as overmixing can lead to a tough cake. We want our Black Velvet Halloween Cake to be wonderfully tender!
-
Final Mix and Divide:
Give the batter a final gentle stir with a rubber spatula to ensure everything is fully incorporated and there are no dry pockets at the bottom of the bowl. Evenly divide the intensely black batter among your prepared cake pans. You can use a kitchen scale to ensure even layers for a professionally stacked Black Velvet Halloween Cake.
-
Bake:
Bake for 30-35 minutes for 9-inch pans or 25-30 minutes for 8-inch pans, or until a wooden skewer or toothpick inserted into the center of the cakes comes out clean. The baking time can vary slightly depending on your oven, so keep an eye on them!
-
Cool:
Once baked, remove the cakes from the oven and let them cool in their pans on a wire rack for about 10-15 minutes. This allows them to set up slightly and prevents them from breaking when you unmold them. After this initial cooling, carefully invert the cakes onto the wire rack, remove the parchment paper, and let them cool completely before frosting. Cooling completely is absolutely crucial; if you try to frost warm cakes, your frosting will melt and slide right off, creating a mess instead of a beautiful Black Velvet Halloween Cake.
For the Black Cream Cheese Frosting:
-
Cream Butter:
In a large bowl, using your electric mixer with the paddle attachment, beat the softened unsalted butter on medium speed until it’s very light and fluffy, about 2-3 minutes. This aerates the butter, which is key for a light and airy frosting for your Black Velvet Halloween Cake.
-
Add Chilled Cream Cheese:
Add the chilled cream cheese to the butter. Using chilled cream cheese is a pro tip here! It helps the frosting maintain its structure and prevents it from becoming too runny. Beat on medium speed until just combined and smooth. Be careful not to overmix the cream cheese, as it can cause the frosting to become too soft.
-
Gradually Add Powdered Sugar:
With the mixer on low speed, gradually add the sifted powdered sugar, about 1-2 cups at a time, beating until fully incorporated after each addition. Once all the sugar is added, increase the speed to medium-high and beat for another 2-3 minutes until the frosting is smooth and creamy.
-
Stir in Flavorings:
Add the vanilla extract and salt, and beat until combined. These simple additions really enhance the flavor profile of the frosting, making it the perfect complement to your Black Velvet Halloween Cake.
-
Color the Frosting:
Now for the dramatic transformation! Add the black gel food coloring, starting with 3 tablespoons, and beat on medium speed until the frosting is a uniform, deep black. If you want an even darker, more intense black (which I highly recommend for a truly spooky Black Velvet Halloween Cake!), add another tablespoon or two of coloring until you achieve your desired shade. Remember, gel coloring is best for avoiding a watery frosting.
-
Adjust Consistency:
If the frosting seems too thick, add heavy cream or milk one tablespoon at a time until you reach your desired consistency. If it’s too thin, you can add a bit more sifted powdered sugar. You’re looking for a frosting that’s spreadable but firm enough to hold its shape. This black cream cheese frosting is going to make your Black Velvet Halloween Cake absolutely striking!
Assembling and Decorating Your Black Velvet Halloween Cake:
-
Level the Cake Layers:
Once your cake layers are completely cool, it’s time to prepare them for stacking. If your cakes have domed tops, use a serrated knife or a cake leveler to carefully trim the tops to create flat, even surfaces. This will ensure your Black Velvet Halloween Cake stands straight and looks professionally made.
-
The Crumb Coat:
Place one cake layer on your serving platter or cake stand. Spread a generous layer (about ½ to ¾ cup) of black cream cheese frosting evenly over the top. Place the second cake layer on top, pressing gently to secure. Repeat the frosting process, then add the final cake layer. Now, apply a very thin layer of frosting all over the entire cake – top and sides. This is called a “crumb coat,” and its purpose is to trap any loose crumbs, preventing them from mixing into your final, beautiful layer of frosting.
-
Chill the Cake:
Transfer the crumb-coated cake to the refrigerator and chill for at least 20-30 minutes, or until the crumb coat is firm to the touch. This step is absolutely essential for a clean and smooth final frosting layer for your Black Velvet Halloween Cake. Don’t skip it!
-
The Final Frosting Layer:
Once the crumb coat is firm, remove the cake from the refrigerator. Apply the remaining black cream cheese frosting to the top and sides of the cake, using an offset spatula or bench scraper to create a smooth, even finish. Take your time with this step; a smooth surface is key to showcasing the dramatic black color of your Black Velvet Halloween Cake. You can create smooth sides or make a rustic swirl pattern on top with your spatula – both look fantastic!
-
Decorate for Halloween:
Now for the fun part – turning your stunning black cake into a truly spooky Black Velvet Halloween Cake!
- Sprinkles: Immediately after frosting, before it sets too much, press Halloween-themed sprinkles around the base or on top of the cake.
- Plastic Spiders/Bats: Arrange plastic spiders or bats creatively on the cake, perhaps crawling up the sides or gathered on top.
- Spiderwebs (Optional): For a truly professional touch, you can melt a small amount of white chocolate. Drizzle it in concentric circles on top of the cake, then drag a toothpick from the center outwards to create a spiderweb effect. You can even pipe small dots on the side and drag a toothpick through them for a hanging web look.
- Black Sanding Sugar: For extra sparkle and texture, sprinkle black sanding sugar over the top or around the edges. It catches the light beautifully and enhances the “velvet” appearance.
- Consider a Drip: If you’re feeling adventurous, you could even make a ganache (using black cocoa and black food coloring for an ultra-black drip) and let it drip dramatically down the sides of the cake before adding other decorations.
Remember, the deep black canvas of this Black Velvet Halloween Cake makes any bright or spooky decoration really pop!
-
Serve and Store:
Your magnificent Black Velvet Halloween Cake is ready to be the star of any Halloween gathering! Slice with a sharp, warm knife for clean cuts. Store any leftovers loosely covered in the refrigerator for up to 3-4 days. Allow it to come to room temperature for about 30 minutes before serving for the best flavor and texture experience. Enjoy the rich, spooky deliciousness!
Conclusion:
So, there you have it – my personal journey and incredible recipe for what I truly believe is a show-stopping dessert that promises to captivate and delight anyone who takes a bite. This isn’t just another cake; it’s an experience, a piece of edible art that brings a touch of dramatic flair to your table. I’ve poured my heart into perfecting this particular creation, ensuring that every step, from selecting the finest cocoa to achieving that perfectly moist crumb, is designed for success in your kitchen. This isn’t just about baking; it’s about crafting memories, about creating something truly special that sparks conversations and leaves a lasting impression. I promise you, the effort, which is surprisingly minimal for such a grand result, will be immensely rewarding when you present your stunning creation. Its deep, enigmatic hue and luxurious texture are what set it apart, making it an absolute must-try for any occasion that calls for a touch of edible magic.
What truly makes this recipe a must-try in my book is its unique combination of visual drama and incredible flavor. The subtle notes of cocoa are perfectly balanced, creating a depth that is both comforting and sophisticated, without being overly sweet. The texture, as the name suggests, is like velvet – smooth, incredibly moist, and utterly melt-in-your-mouth. It’s a cake that commands attention, making it the perfect centerpiece for celebrations, especially when you want to impress without spending hours slaving away. The way it looks almost defies expectation, presenting a rich, dark allure that hints at the deliciousness within. I truly believe that once you experience the joy of baking and serving this cake, it will secure a permanent spot in your repertoire of beloved recipes, becoming a go-to for those moments when only something truly extraordinary will do.
Elevating Your Experience: Serving Suggestions
While the cake is magnificent on its own, I love exploring ways to elevate the serving experience. For a truly decadent treat, I highly recommend pairing a slice with a generous scoop of high-quality vanilla bean ice cream, allowing its cool creaminess to contrast beautifully with the cake’s richness. A dollop of freshly whipped cream, perhaps infused with a hint of orange zest or a splash of coffee liqueur, also adds an exquisite touch. For an elegant presentation, consider garnishing with a few fresh raspberries or blackberries; their tartness provides a wonderful counterpoint to the cake’s sweetness. If you’re feeling particularly festive, a light dusting of edible silver or gold glitter can add an extra layer of spooky sparkle, especially if you’re making the Black Velvet Halloween Cake for a themed party. For adult gatherings, a small glass of rich port wine or a strong, dark coffee makes for a sophisticated accompaniment, enhancing the deep flavors of the cake.
Making It Your Own: Creative Variations
One of the things I love most about baking is the freedom to personalize a recipe, and this cake is wonderfully adaptable. While my cream cheese frosting is a classic, don’t hesitate to experiment. A dark chocolate ganache poured over the top would make for an even more intense chocolate experience, or a blood-orange buttercream could add a bright, citrusy twist. For those who enjoy a bit of warmth, a splash of coffee liqueur or even a hint of almond extract in the cake batter can deepen its complexity. You can also play with presentation beyond the traditional round cake; consider baking it in a bundt pan for an elegant fluted shape, or creating individual cupcakes for easy serving at a party. For a really grand statement, try making a two-tiered version. If you have dietary considerations, many gluten-free flour blends or vegan substitutions for dairy and eggs can be explored, though I always recommend testing small batches first to ensure the texture remains perfect. The possibilities are truly endless, limited only by your imagination!
Now that you have all my secrets and suggestions, I wholeheartedly encourage you to roll up your sleeves and give this incredible recipe a try. Trust me when I say that the moment you pull this beautiful cake from your oven, you’ll feel a surge of pride and accomplishment. It’s more than just a dessert; it’s an invitation to unleash your inner baker and create something truly memorable. I am so excited for you to experience the joy of making, serving, and most importantly, tasting this truly unique creation. Don’t be shy – dive in, have fun with the process, and let your kitchen be filled with the wonderful aroma of baking. Once you’ve had a chance to bake and savor it, I would absolutely love to hear about your experience! Please share your thoughts, your photos, and any creative variations you came up with. Your feedback and beautiful baking adventures inspire not just me, but our entire community of food lovers. Happy baking!
Black Velvet Halloween Cake
A dramatic centerpiece designed to enchant and mystify your Halloween festivities, this Black Velvet Halloween Cake features profoundly dark, tender, and rich cake layers. Taking the beloved tradition of velvet cakes, it’s imbued with a captivating, ghoulish charm, perfectly suited for the spookiest night of the year, complemented by a tangy blackberry filling.
Ingredients
-
2 cups White granulated sugar
-
2 cups All purpose flour, sifted
-
¾ cup Black cocoa powder, sifted
-
2 teaspoon Baking soda
-
1 teaspoon Baking powder
-
1 teaspoon Salt
-
2 Eggs, room temperature
-
1 cup Buttermilk, room temperature
-
1 cup Hot coffee
-
½ cup Canola oil
-
2 teaspoon Vanilla extract
-
2 cups Fresh blackberries
-
2 tablespoon White granulated sugar
-
1 tablespoon Fresh lemon juice
-
1 teaspoon Lemon zest
Instructions
-
Step 1
Preheat oven to 350°F (175°C). Generously grease and flour two 9-inch or three 8-inch round cake pans, lining bottoms with parchment paper. -
Step 2
In a medium bowl, whisk together the sifted all-purpose flour, black cocoa powder, baking soda, baking powder, and salt. Set aside. -
Step 3
In a large bowl, whisk together 2 cups granulated sugar, eggs, buttermilk, hot coffee, canola oil, and vanilla extract until well combined and smooth. -
Step 4
Gradually add the dry ingredient mixture to the wet ingredients, mixing on low speed until just combined. Be careful not to overmix; overmixing can lead to a tough cake. -
Step 5
Evenly divide the batter among your prepared cake pans. Bake for 30-35 minutes for 9-inch pans or 25-30 minutes for 8-inch pans, or until a wooden skewer inserted into the center of the cakes comes out clean. -
Step 6
Remove cakes from the oven and let them cool in their pans on a wire rack for 10-15 minutes. Carefully invert cakes onto the wire rack, remove parchment paper, and let them cool completely before assembling. Cooling completely is crucial. -
Step 7
While cakes cool, combine fresh blackberries, 2 tablespoons granulated sugar, fresh lemon juice, and lemon zest in a small saucepan. Cook over medium heat for 5-7 minutes, stirring occasionally, until berries soften and the sauce thickens slightly. Remove from heat and let cool completely. -
Step 8
Once cake layers are completely cool, level any domed tops using a serrated knife. Place one cake layer on your serving platter. Spread a generous layer of the cooled blackberry filling over the top. Repeat with the second cake layer and filling, then top with the final cake layer. Serve immediately or store in the refrigerator.
Important Information
Nutrition Facts (Per Serving)
It is important to consider this information as approximate and not to use it as definitive health advice.
Allergy Information
Please check ingredients for potential allergens and consult a health professional if in doubt.

Leave a Comment