
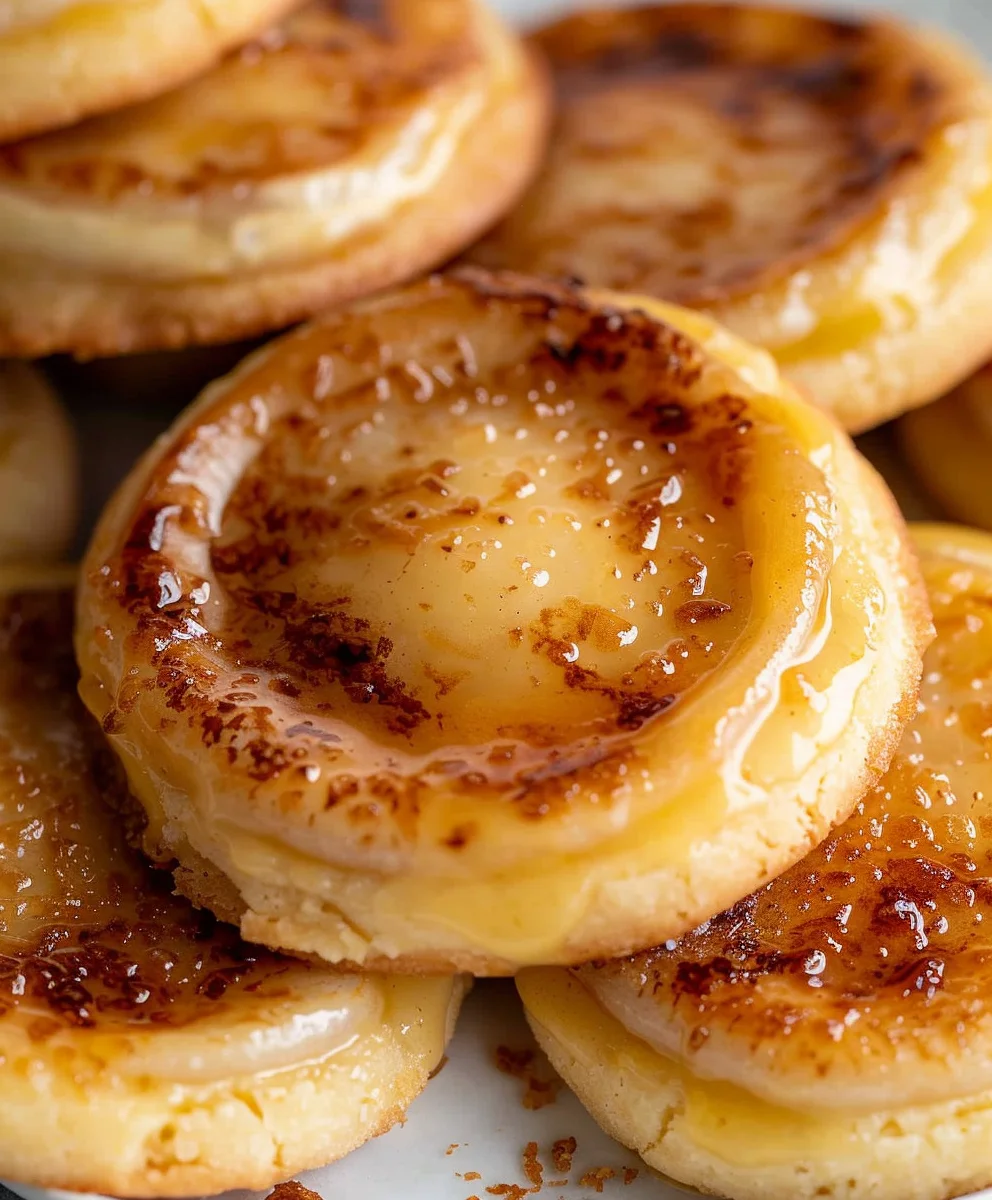
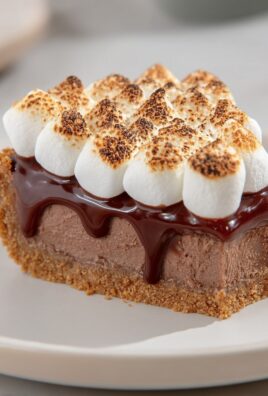
Creme Brulee Cookies. Imagine the delicate crunch of caramelized sugar giving way to a rich, custardy vanilla cookie – all without a torch or ramekins in sight! I’ve always been captivated by the elegant simplicity of a classic crème brûlée, a dessert with a rich French heritage, celebrated for its luxurious texture and iconic crackling sugar crust. But what if we could capture that magic in a portable, delightful form? That’s precisely what these incredible Creme Brulee Cookies achieve, bringing the sophisticated charm of a renowned dessert right into your cookie jar.
People adore crème brûlée for its captivating contrast: the satisfying shatter of burnt sugar against the silky smooth, sweet custard. My goal was to translate that beloved experience into a cookie that offers the same thrilling textures and exquisite flavors. Each bite delivers a chewy, vanilla-infused cookie base, reminiscent of the creamiest custard, topped with a glorious, crunchy sugar layer that mimics that unmistakable caramelized finish. It’s not just a cookie; it’s an experience, offering a touch of gourmet elegance with the comforting familiarity of your favorite baked treat. I am confident that once you try these Creme Brulee Cookies, you’ll understand why this ingenious creation quickly becomes a cherished favorite in any home.
Ingredients:
Gathering all your ingredients before you start is my favorite secret weapon for a smooth and enjoyable baking experience. Trust me, it makes all the difference when you’re in the rhythm of creating these delightful Creme Brulee Cookies!
- For the Creme Brulee Cookies:
- 2 ½ cups (300g) all-purpose flour: I always make sure to spoon and level my flour to avoid a dense cookie.
- 1 teaspoon baking soda: This will give our cookies a lovely lift.
- ½ teaspoon salt: Just a pinch to balance the sweetness and enhance all the other flavors.
- 1 cup (226g) unsalted butter: Make sure this is softened to room temperature. This is absolutely crucial for proper creaming and achieving that perfect cookie texture.
- ¾ cup (150g) granulated sugar: For the primary sweetness in our cookie dough.
- ½ cup (110g) light brown sugar: Packed firmly, this adds moisture and a wonderful depth of flavor, giving our Creme Brulee Cookies that comforting chewiness.
- 2 large eggs: Also at room temperature, as this helps them emulsify better with the butter and sugar mixture.
- 2 teaspoons pure vanilla extract: Don’t skimp on the good stuff here; it makes a huge difference in the overall aroma and taste of your Creme Brulee Cookies.
- For the Creme Brulee Filling:
- ¾ cup (180ml) heavy cream: The base for our rich, velvety custard filling.
- ¼ cup (60ml) whole milk: Adding a little lightness to the cream.
- ½ vanilla bean: Split lengthwise and scraped, for an authentic, intense vanilla flavor that really makes this a Creme Brulee cookie. If you can’t find a vanilla bean, you can use 1 teaspoon of vanilla bean paste or an additional 1 teaspoon of pure vanilla extract.
- 3 large egg yolks: These are the magic behind the custard’s thickness and golden hue.
- ¼ cup (50g) granulated sugar: To sweeten our decadent filling.
- 1 tablespoon cornstarch: This acts as a stabilizer and thickener, ensuring our filling sets beautifully.
- ¼ teaspoon salt: Again, just a touch to highlight the creamy flavors.
- 1 tablespoon unsalted butter: Cut into small pieces, to be stirred in at the end for extra richness and a silky smooth finish.
- For the Caramelized Topping:
- ½ cup (100g) granulated sugar: This is what we’ll be torching to create that signature crackly, golden crust on your Creme Brulee Cookies.
Making the Creme Brulee Cookie Dough
This is where the magic begins for our delightful Creme Brulee Cookies! Taking your time with each step here ensures a beautifully textured cookie.
- Prepare Your Dry Ingredients: In a medium bowl, whisk together the all-purpose flour, baking soda, and salt. Make sure these are thoroughly combined. I like to use a whisk to really aerate the flour mixture, which also helps prevent lumps later on. Set this aside for a moment.
- Cream the Wet Ingredients: In a large bowl, using an electric mixer on medium speed, beat the softened unsalted butter with the granulated sugar and light brown sugar until the mixture is light, fluffy, and pale in color. This creaming process is absolutely crucial for incorporating air into your cookie dough, which contributes to a tender crumb and helps prevent your cookies from becoming too dense. Make sure to scrape down the sides of the bowl frequently with a rubber spatula to ensure everything is thoroughly combined. You’ll notice the mixture transforming from a dense, yellowish mass into a much lighter, almost cloud-like consistency. This usually takes about 3-5 minutes, so don’t rush it!
- Incorporate Eggs and Vanilla: Reduce the mixer speed to low. Add the eggs, one at a time, beating well after each addition until just combined. Be careful not to overmix here. After the eggs, stir in the pure vanilla extract. The mixture might look a little curdled after adding the eggs, but don’t worry, it will come together once the dry ingredients are added.
- Add Dry to Wet: Gradually add the dry ingredient mixture to the wet ingredients, mixing on low speed until just combined. It is so important not to overmix the dough once the flour is added! Overmixing develops the gluten in the flour, which can lead to tough, dense cookies. Stop mixing as soon as you no longer see streaks of dry flour. A few small flour patches are fine; they’ll get incorporated when you chill and roll the dough.
- Chill the Dough: Cover the bowl with plastic wrap and refrigerate the cookie dough for at least 1 hour, or up to 24 hours. Chilling the dough isn’t just about making it easier to handle; it also allows the flavors to meld and prevents the cookies from spreading too much during baking. This is a critical step for achieving the perfect Creme Brulee Cookies texture.
Crafting the Velvety Creme Brulee Filling
The heart of our Creme Brulee Cookies lies in this rich, vanilla-infused custard filling. It’s surprisingly easy to make, and the aroma alone is divine!
- Infuse the Cream: In a medium saucepan, combine the heavy cream, whole milk, and the scraped vanilla bean seeds (along with the pod if you’re using one). Heat this mixture over medium heat until it just begins to simmer around the edges. Do not let it come to a rolling boil. Once it reaches this point, remove it from the heat, cover the saucepan, and let it steep for about 15-20 minutes. This allows the vanilla flavor to truly infuse into the cream. If using vanilla bean paste or extract, you’ll add it later.
- Prepare the Egg Yolk Mixture: While the cream is steeping, in a separate medium heatproof bowl, whisk together the egg yolks, granulated sugar, cornstarch, and salt until the mixture is pale yellow and smooth. The cornstarch is our secret weapon here; it helps thicken the custard and stabilize the egg yolks, preventing them from curdling when we temper them.
- Temper the Egg Yolks: Remove the vanilla bean pod from the cream mixture (if used). Gradually, and slowly, ladle about ½ cup of the warm cream into the egg yolk mixture, whisking constantly. This process, called tempering, gently raises the temperature of the egg yolks, preventing them from scrambling when they hit the hot cream. Once ½ cup is incorporated, slowly pour the tempered egg yolk mixture back into the saucepan with the remaining warm cream, whisking continuously.
- Cook the Custard: Return the saucepan to medium-low heat. Cook, stirring constantly with a whisk or a rubber spatula, scraping the bottom and sides of the pan, until the mixture thickens significantly. It should be thick enough to coat the back of a spoon, and when you run your finger across the spoon, it should leave a clear path. This usually takes about 5-8 minutes. Do not let it boil vigorously, as this can cause the custard to curdle. If you added vanilla bean paste or extract, stir it in now.
- Achieve Silky Smoothness: Remove the custard from the heat. Stir in the small pieces of unsalted butter until fully melted and incorporated, creating a luxurious, glossy finish. For an extra smooth custard, you can strain it through a fine-mesh sieve into a clean bowl, though I often find this isn’t necessary if I’ve been diligent with my whisking.
- Chill the Filling: Press a piece of plastic wrap directly onto the surface of the custard to prevent a skin from forming. Refrigerate for at least 2 hours, or until completely chilled and firm enough to spoon. This chilling time is vital for the filling to set properly for our Creme Brulee Cookies.
Assembling and Baking Your Exquisite Creme Brulee Cookies
Now for the exciting part – bringing together all our hard work to create these show-stopping Creme Brulee Cookies!
- Preheat Oven and Prep Pans: Preheat your oven to 350°F (175°C). Line two large baking sheets with parchment paper or silicone baking mats. This ensures even baking and easy removal of your precious cookies.
- Portion the Cookie Dough: Remove the chilled cookie dough from the refrigerator. Using a 2-tablespoon cookie scoop (or about 1.5-inch balls), scoop out portions of dough. Roll each portion gently between your palms to form a smooth ball.
- Create the Indentation: Place the cookie dough balls about 2 inches apart on your prepared baking sheets. Using your thumb or the back of a ½ teaspoon measuring spoon, create a deep indentation in the center of each cookie dough ball. Make sure the well is deep enough to hold a good amount of filling but also leaves a sturdy wall around the edge to prevent the filling from spilling out during baking.
- Fill the Cookies: Retrieve your chilled creme brulee filling. Spoon about 1-2 teaspoons of the cold filling into the center of each cookie dough indentation. Don’t overfill, as the filling will expand slightly while baking. If your filling is too firm to spoon, you can gently whisk it a few times to loosen it up, but it should still be quite thick.
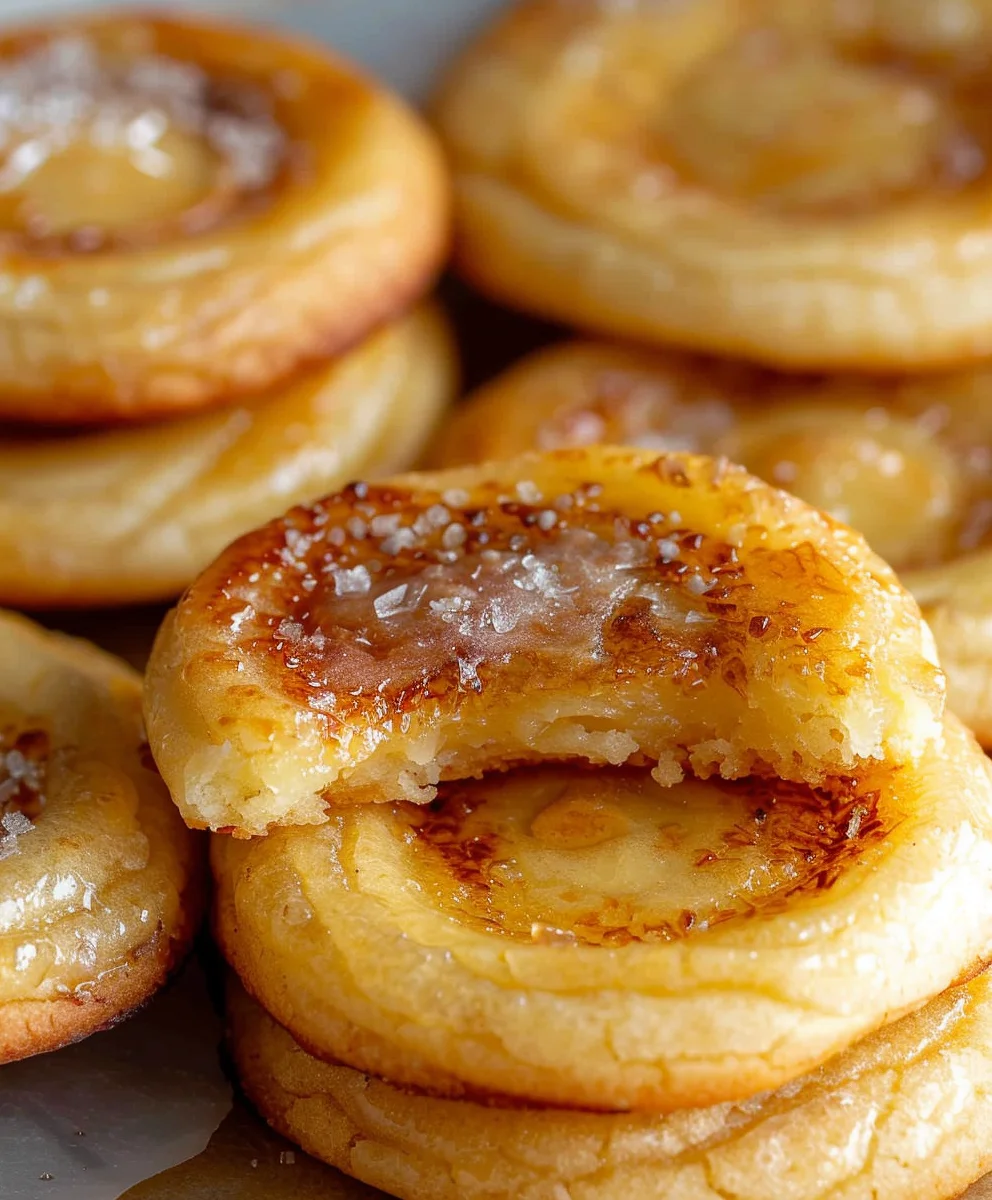
- Bake to Golden Perfection: Bake the cookies for 12-15 minutes, or until the edges are lightly golden brown and the centers are just set. The filling might still look a little wobbly in the middle, but it will firm up as it cools. Overbaking will dry out your cookies, so keep a close eye on them! I always recommend rotating the baking sheets halfway through for more even baking.
- Cool Completely: Allow the Creme Brulee Cookies to cool on the baking sheets for 5 minutes before carefully transferring them to a wire rack to cool completely. It’s crucial that the cookies are completely cool before moving on to the caramelizing step; otherwise, the heat from the cookie can melt your freshly torched sugar too quickly, or prevent a crisp shell from forming.
The Grand Finale: Caramelizing the Sugar Topping
This is the moment we’ve all been waiting for – creating that iconic crackly sugar crust that defines Creme Brulee Cookies! This step adds a satisfying crunch and a hint of bittersweet caramel to every bite.
- Prepare for Caramelization: Once your Creme Brulee Cookies are completely cool, arrange them on a heatproof surface. I like to place them back on the parchment-lined baking sheet or directly onto a cutting board.
- Sprinkle with Sugar: Sprinkle approximately ½ to 1 teaspoon of granulated sugar evenly over the creme brulee filling in the center of each cookie. You want a thin, even layer that covers the entire surface of the custard. Don’t pile it too high, as a thick layer will be harder to caramelize evenly.
- Torch the Sugar: Using a kitchen torch, carefully caramelize the sugar. Hold the torch a few inches above the sugar, moving it in a circular motion until the sugar melts, bubbles, and turns a beautiful golden amber color. Be patient and keep the torch moving to prevent burning. You’ll hear delightful crackling sounds as the sugar transforms! The aroma of the caramelizing sugar is truly intoxicating.
- Alternative Method (Broiler): If you don’t have a kitchen torch, you can use your oven’s broiler. Place the sugared cookies on a baking sheet on the top rack of your oven, about 4-6 inches from the broiler element. Broil for 1-3 minutes, watching them constantly and carefully, until the sugar melts and caramelizes. Broilers can be very aggressive, and sugar burns quickly, so do not walk away for even a second! This method is a little trickier to get an even caramelization, but it absolutely works in a pinch.
- Allow to Set: Let the caramelized sugar cool for a few minutes until it hardens and forms a crisp, brittle shell. This is the hallmark of a perfect Creme Brulee Cookie.
- Serve and Enjoy: Serve your magnificent Creme Brulee Cookies immediately to enjoy the satisfying crack of the caramelized sugar. While they are best enjoyed fresh, you can store them in an airtight container at room temperature for up to 2 days, though the sugar crust may soften slightly over time. If you want to re-crisp the topping, you can give it a quick torch again right before serving.
There you have it! A truly exquisite treat that combines the comforting chewiness of a perfect cookie with the luxurious richness and signature crunch of a classic creme brulee. Enjoy every single glorious bite of these Creme Brulee Cookies!
Conclusion:
As we reach the sweet culmination of our culinary journey together, I truly hope you’re feeling inspired to roll up your sleeves and dive into the delightful world of these treats. I genuinely believe this recipe isn’t just another cookie; it’s an experience, a miniature masterpiece that brings the sophistication of a classic dessert into a convenient, handheld form. Imagine the delicate crunch of a caramelized sugar top, yielding to a soft, chewy cookie base, all infused with that unmistakable custardy richness. It’s an elegant dance of textures and flavors that captivates from the very first bite. This isn’t just about baking; it’s about creating moments of pure, unadulterated joy, and I promise you, these Creme Brulee Cookies deliver on that promise with every single morsel. They stand out in a crowd of ordinary cookies, offering a unique blend of familiar comfort and gourmet flair that makes them truly unforgettable. If you’ve been searching for that special treat that impresses without overwhelming, that satisfies your sweet tooth in the most elegant way, then your search ends here. They are, in essence, a culinary hug, a warm invitation to indulge in something truly extraordinary.
Now, let’s talk about how you can elevate your enjoyment even further, or perhaps put your own creative spin on these already incredible cookies. While they are absolutely divine on their own, served simply with a piping hot cup of coffee or a fragrant tea, I have a few suggestions that might just blow your mind. For an ultimate dessert experience, try serving them slightly warm, perhaps alongside a scoop of vanilla bean ice cream or a dollop of freshly whipped cream. The contrast between the warm, soft cookie and the cool, creamy ice cream is simply out of this world. Consider arranging them on a dessert platter for your next gathering; their unique appearance and irresistible aroma are guaranteed to be conversation starters. For those who love to experiment, imagine sprinkling a pinch of sea salt on top before torching for a delightful sweet and savory note, or perhaps adding a whisper of almond extract to the cookie dough for an added layer of complexity. You could even play with different flavored sugars for the torching – a brown sugar top might offer a deeper, molasses-like crunch, or a finely ground espresso sugar could give them a coffee-shop inspired twist. Don’t be afraid to think outside the box; a tiny drizzle of dark chocolate or a dusting of cocoa powder after they’ve cooled could also add a beautiful aesthetic and flavor complement. The beauty of these cookies lies not only in their exquisite taste but also in their versatility, allowing you to tailor them to your personal preferences and occasions.
I truly cannot wait for you to experience the magic of baking these cookies yourself. The aroma that will fill your kitchen as they bake is a treat in itself, a prelude to the deliciousness to come. The moment you pull out your kitchen torch and caramelize that sugar top, watching it bubble and brown, is incredibly satisfying – a true showstopper! Don’t be intimidated by the torching step; it’s easier than it looks and so much fun. I encourage you to embrace the process, savor each step, and most importantly, enjoy the fruits of your labor. Once you’ve baked your batch, taken that first glorious bite, and perhaps shared them with loved ones, I would be absolutely thrilled to hear all about your experience. Did you add a special twist? What was your favorite part of making them? Did they disappear as quickly as they did in my house? Please, don’t keep your culinary triumphs to yourself! I warmly invite you to share your thoughts, your photos, and your personalized variations. Your insights and creativity inspire me and our entire community of enthusiastic bakers. So, go ahead, gather your ingredients, fire up your oven, and prepare to create something truly special. Happy baking, my friends, and may your kitchens always be filled with the sweet scent of success!
Best Creme Brulee Cookies Ever: Crunchy Top, Chewy Middle
Capture the essence of classic crème brûlée in a portable cookie! These delightful Creme Brulee Cookies feature a chewy, vanilla-infused base, a smooth custard-like filling, and the signature crunchy caramelized sugar topping.
Ingredients
-
2 1/4 cups (540 ml) whole milk
-
6 egg yolks
-
1 cup + 2 tbsp (225 g) granulated white sugar (for filling)
-
1/8 tsp salt (for filling)
-
1 1/2 tbsp vanilla bean paste (for filling)
-
3 1/2 tbsp (28 g) cornstarch (for filling)
-
3 tbsp (42 g) unsalted butter, cut in cubes (for filling)
-
2 1/2 cups (313 g) all-purpose flour, spooned and leveled
-
1/2 tsp baking powder
-
1/2 tsp salt (for cookie dough)
-
1 1/4 cup (250 g) granulated white sugar (for cookie dough)
-
1 cup (224 g) unsalted butter, softened
-
1 egg
-
1 tbsp vanilla bean paste (for cookie dough)
-
1/2 cup (100 g) granulated white sugar (for rolling dough)
-
1/2 cup (100 g) granulated sugar (for caramelized topping)
Instructions
-
Step 1
In a medium bowl, whisk together all-purpose flour, baking powder, and 1/2 tsp salt. Set aside. -
Step 2
In a large bowl, cream softened unsalted butter with 1 1/4 cup granulated white sugar until light and fluffy (3-5 minutes). Scrape bowl sides frequently. -
Step 3
Reduce mixer speed to low. Add the egg, beating until just combined. Stir in 1 tbsp vanilla bean paste. Gradually add dry ingredients to wet, mixing until just combined. Cover dough and refrigerate for at least 1 hour (up to 24 hours). -
Step 4
In a medium saucepan, combine whole milk and 1 1/2 tbsp vanilla bean paste. Heat over medium heat until it just simmers at the edges. Remove from heat. -
Step 5
In a separate heatproof bowl, whisk together egg yolks, 1 cup + 2 tbsp granulated white sugar, 3 1/2 tbsp cornstarch, and 1/8 tsp salt until smooth. Gradually ladle about 1/2 cup of warm milk into egg yolk mixture, whisking constantly. Slowly pour tempered egg mixture back into saucepan with remaining warm milk, whisking continuously. Return to medium-low heat, stirring constantly, until mixture thickens significantly (5-8 minutes). Do not boil vigorously. -
Step 6
Remove custard from heat. Stir in 3 tbsp unsalted butter until melted. Press plastic wrap directly onto surface and refrigerate for at least 2 hours, or until completely chilled and firm. -
Step 7
Preheat oven to 350°F (175°C). Line baking sheets with parchment. Scoop 2-tablespoon portions of chilled cookie dough and roll into smooth balls. Roll each ball in 1/2 cup granulated white sugar (for rolling dough). Place on baking sheets. Create a deep indentation in the center of each ball. Spoon 1-2 teaspoons of chilled creme brulee filling into each indentation. -
Step 8
Bake for 12-15 minutes, until edges are lightly golden and centers are just set. Rotate baking sheets halfway. Cool on sheets for 5 minutes, then transfer to a wire rack to cool completely. Cookies must be completely cool before caramelizing. -
Step 9
Arrange cooled cookies on a heatproof surface. Sprinkle 1/2 to 1 tsp granulated sugar (for topping) evenly over the creme brulee filling of each cookie. Using a kitchen torch, caramelize sugar until melted, bubbling, and golden amber. Alternatively, broil cookies on a baking sheet on the top rack for 1-3 minutes, watching constantly. -
Step 10
Allow caramelized sugar to harden into a crisp shell. Serve immediately. Store in an airtight container at room temperature for up to 2 days; re-torch to re-crisp if desired.
Important Information
Nutrition Facts (Per Serving)
It is important to consider this information as approximate and not to use it as definitive health advice.
Allergy Information
Please check ingredients for potential allergens and consult a health professional if in doubt.
Leave a Comment