
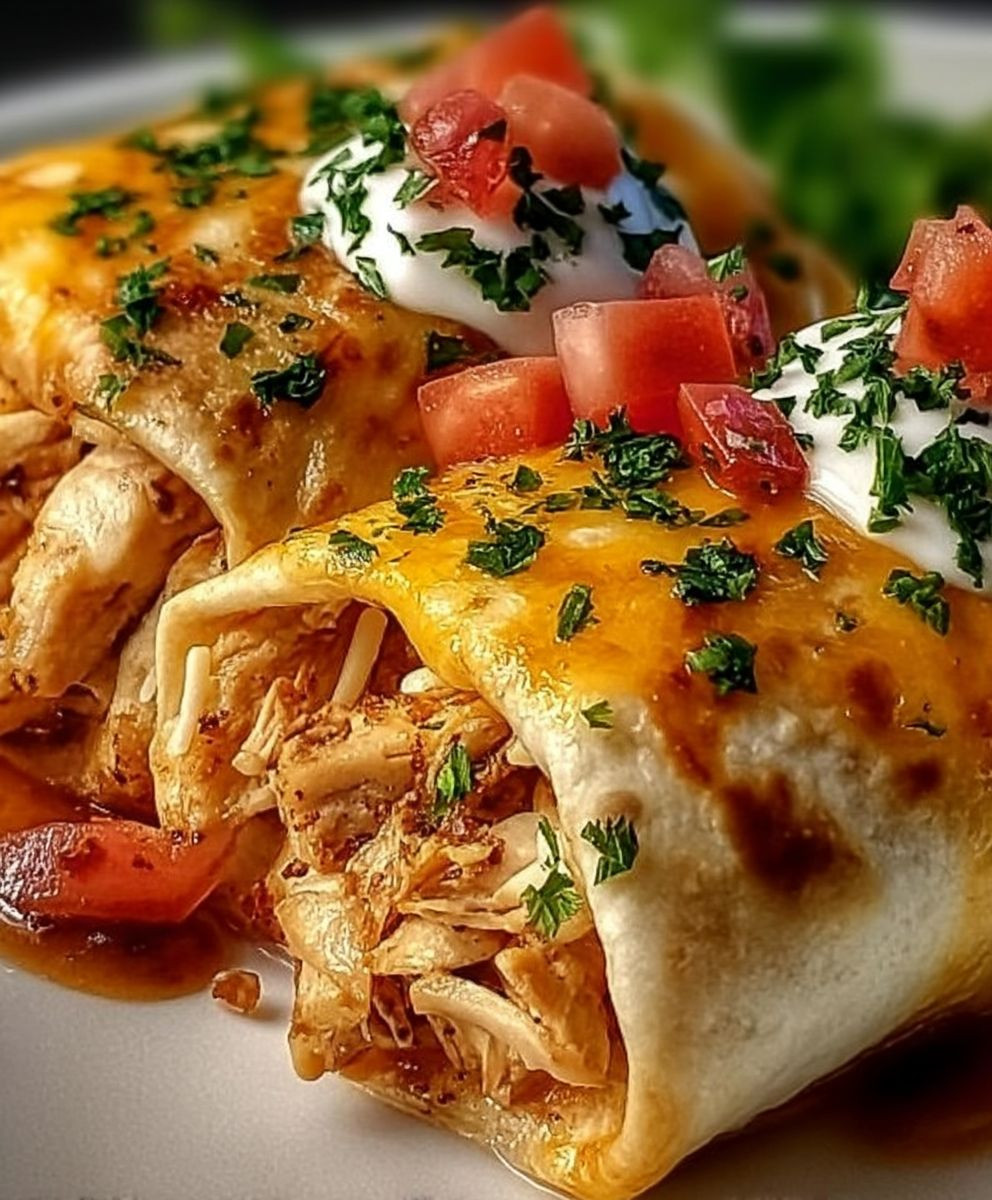
Baked Chicken Chimichangas: Forget the deep fryer! Craving that crispy, cheesy, utterly satisfying Mexican comfort food without the guilt? Then you’ve come to the right place. We’re about to embark on a culinary adventure that delivers all the flavor of traditional chimichangas, but with a healthier, baked twist.
Chimichangas, those delightful deep-fried burritos, have a somewhat debated origin story. Some say they were born from a happy accident in Tucson, Arizona, when a chef accidentally dropped a burrito into a fryer. Others claim they were a deliberate creation, a delicious evolution of the classic burrito. Regardless of their precise beginnings, chimichangas quickly became a beloved staple of Southwestern cuisine, offering a satisfying combination of textures and tastes.
What’s not to love? The crispy, golden-brown tortilla gives way to a warm, flavorful filling, typically a savory mix of meat, beans, cheese, and spices. The contrast between the crunchy exterior and the soft, melty interior is simply irresistible. But let’s be honest, the deep-frying process can be a bit much. That’s where our Baked Chicken Chimichangas recipe shines. We’re keeping all the deliciousness, but swapping the fryer for the oven, resulting in a lighter, healthier, and equally satisfying meal. Get ready to experience the magic of Baked Chicken Chimichangas – your taste buds will thank you!
Ingredients:
- 1 tablespoon olive oil
- 1 medium onion, chopped
- 1 green bell pepper, chopped
- 1 red bell pepper, chopped
- 1 pound boneless, skinless chicken breasts, cooked and shredded (about 3 cups)
- 1 (15 ounce) can black beans, rinsed and drained
- 1 (15 ounce) can corn, drained
- 1 (10 ounce) can diced tomatoes and green chilies (like Rotel), undrained
- 1 packet taco seasoning (about 1 ounce)
- 1/2 cup shredded cheddar cheese
- 1/2 cup shredded Monterey Jack cheese
- 1/4 cup chopped fresh cilantro
- 10 large flour tortillas (10-12 inch)
- 1/4 cup melted butter, for brushing
- Optional toppings: sour cream, guacamole, salsa, shredded lettuce, chopped tomatoes
Preparing the Chicken Filling
Okay, let’s get started with the heart of our chimichangas – the delicious chicken filling! This is where all the flavor comes together, so take your time and enjoy the process.
- Sauté the Vegetables: Heat the olive oil in a large skillet over medium heat. Add the chopped onion, green bell pepper, and red bell pepper. Cook, stirring occasionally, until the vegetables are softened and slightly caramelized, about 8-10 minutes. This step is crucial for building a flavorful base. Don’t rush it! You want those veggies nice and tender.
- Add the Chicken and Beans: Now, add the shredded cooked chicken, black beans, corn, and diced tomatoes and green chilies (Rotel) to the skillet. Stir well to combine all the ingredients.
- Season Generously: Sprinkle the taco seasoning over the mixture. Stir well to ensure the seasoning is evenly distributed. Cook for another 5-7 minutes, stirring occasionally, allowing the flavors to meld together beautifully. This is where the magic happens! The taco seasoning will infuse everything with that classic chimichanga taste.
- Incorporate the Cheese and Cilantro: Remove the skillet from the heat. Add the shredded cheddar cheese, shredded Monterey Jack cheese, and chopped fresh cilantro. Stir until the cheese is melted and everything is well combined. The cheese adds a creamy richness, and the cilantro brings a fresh, vibrant note.
- Taste and Adjust: Give the filling a taste and adjust the seasoning as needed. You might want to add a pinch of salt, pepper, or a little extra taco seasoning depending on your preference. Remember, this is your chimichanga, so make it exactly how you like it!
Assembling the Chimichangas
Now for the fun part – assembling our chimichangas! This is where we transform our delicious filling into those perfectly rolled and ready-to-bake bundles of joy.
- Warm the Tortillas: Gently warm the flour tortillas in the microwave for about 15-20 seconds each. This will make them more pliable and easier to roll without tearing. You can also warm them in a dry skillet over medium heat for a few seconds per side. Warm tortillas are key to a successful roll!
- Fill the Tortillas: Lay a warmed tortilla flat on a clean surface. Spoon about 1/2 cup of the chicken filling into the center of the tortilla. Be careful not to overfill, or the chimichanga will be difficult to roll and may burst open during baking.
- Fold the Sides: Fold in the sides of the tortilla over the filling, tucking them in snugly. This will help to keep the filling contained and create a nice, neat package.
- Roll it Up: Starting from the bottom edge closest to you, tightly roll up the tortilla, like you’re rolling a burrito. Make sure the seam is facing down to help it stay closed during baking.
- Repeat: Repeat steps 2-4 with the remaining tortillas and filling.
Baking the Chimichangas
Almost there! Now it’s time to bake our chimichangas to golden-brown perfection. This baking method gives us that crispy exterior without all the extra oil of frying.
- Preheat the Oven: Preheat your oven to 375°F (190°C).
- Prepare the Baking Sheet: Lightly grease a baking sheet with cooking spray or line it with parchment paper. This will prevent the chimichangas from sticking.
- Brush with Butter: Place the assembled chimichangas seam-side down on the prepared baking sheet. Brush the tops of the chimichangas with melted butter. This will help them to brown beautifully and get nice and crispy.
- Bake to Golden Perfection: Bake in the preheated oven for 20-25 minutes, or until the chimichangas are golden brown and crispy. Keep an eye on them, as baking times may vary depending on your oven.
- Let Cool Slightly: Remove the chimichangas from the oven and let them cool for a few minutes before serving. This will allow the filling to set slightly and prevent you from burning your mouth!
Serving Suggestions
The best part – enjoying your homemade baked chicken chimichangas! Here are some ideas to make them even more delicious:
- Toppings Galore: Serve the chimichangas with your favorite toppings, such as sour cream, guacamole, salsa, shredded lettuce, and chopped tomatoes. Let everyone customize their own!
- Side Dishes: Pair the chimichangas with a side of Mexican rice, refried beans, or a simple salad for a complete and satisfying meal.
- Presentation Matters: Garnish the plate with a sprig of cilantro or a lime wedge for a pop of color and freshness.
- Spice it Up: If you like a little extra heat, add a dash of hot sauce or a sprinkle of red pepper flakes to your chimichangas.
- Enjoy Immediately: These chimichangas are best enjoyed fresh out of the oven, while they’re still warm and crispy.
Tips and Tricks for Perfect Chimichangas
Here are a few extra tips to ensure your chimichangas are a smashing success:
- Don’t Overfill: Resist the urge to overfill the tortillas. Too much filling will make them difficult to roll and prone to bursting.
- Warm Tortillas are Key: Warming the tortillas is essential for preventing them from tearing.
- Seal the Seam: Placing the chimichangas seam-side down on the baking sheet will help to keep them closed during baking.
- Get Creative with Fillings: Feel free to experiment with different fillings. You can use ground beef, pork, or even vegetarian options like sweet potatoes and black beans.
- Make Ahead: You can assemble the chimichangas ahead of time and store them in the refrigerator for up to 24 hours before baking. Just add a few extra minutes to the baking time.
- Freezing for Later: These chimichangas freeze beautifully! Assemble them, but don’t bake. Wrap each chimichanga individually in plastic wrap, then place them in a freezer bag. They can be frozen for up to 3 months. When ready to bake, thaw them in the refrigerator overnight, then bake as directed.
Variations to Try
Want to mix things up? Here are some fun variations on the classic baked chicken chimichanga:
- Spicy Chimichangas: Add a chopped jalapeño pepper or a pinch of cayenne pepper to the filling for an extra kick.
- Creamy Chimichangas: Stir in a dollop of cream cheese or sour cream to the filling for a richer, creamier texture.
- Vegetarian Chimichangas: Substitute the chicken with cooked sweet potatoes, black beans, and corn for a delicious vegetarian option.
- Breakfast Chimichangas: Fill the tortillas with scrambled eggs, sausage, cheese, and your favorite breakfast toppings for a hearty breakfast chimichanga.
- Enchilada Style: After baking, top the chimichangas with enchilada sauce and shredded cheese, then bake for a few more minutes until the cheese is melted and bubbly.
Troubleshooting
Sometimes things don’t go exactly as planned. Here are some common issues and how to fix them:
- Tortillas Tearing: If your tortillas are tearing, they are likely too cold. Make sure to warm them properly before rolling.
- Filling Leaking: If the filling is leaking out, you may have overfilled the tortillas. Use less filling next time.
- Chimichangas Not Crispy: If the chimichangas are not crispy enough, try brushing them with more melted butter or baking them for a few more minutes.
- Chim

Conclusion:
So there you have it! These Baked Chicken Chimichangas are truly a game-changer for weeknight dinners, weekend gatherings, or honestly, any time you’re craving something satisfying and flavorful without spending hours in the kitchen. I know, I know, there are a million recipes out there, but trust me on this one. The combination of tender, seasoned chicken, melty cheese, and that perfectly crispy, golden-brown tortilla is simply irresistible. It’s the kind of dish that disappears in minutes, leaving everyone wanting more.
What makes these chimichangas a must-try? First, the baking method. Forget the greasy, deep-fried versions! Baking gives you all the satisfying crunch without the extra calories and mess. Plus, it’s so much easier to manage. Second, the flavor profile is spot on. The blend of spices in the chicken filling creates a depth of flavor that’s both comforting and exciting. And finally, the versatility! You can easily customize these chimichangas to suit your own tastes and dietary needs.
Speaking of variations, let’s talk serving suggestions and ways to make this recipe your own. For a classic presentation, serve these Baked Chicken Chimichangas with a dollop of sour cream or Greek yogurt, a generous spoonful of guacamole, and a sprinkle of fresh cilantro. A side of Mexican rice and refried beans completes the meal perfectly.
But don’t stop there! Feel free to experiment with different fillings. Try adding black beans, corn, or diced tomatoes to the chicken mixture. You could even swap out the chicken for shredded beef or pork. For a vegetarian option, use seasoned black beans and roasted vegetables.
Want to kick up the heat? Add a pinch of cayenne pepper to the chicken seasoning or serve with your favorite hot sauce. For a milder flavor, omit the chili powder altogether.
And here’s a tip: prepare the chicken filling ahead of time and store it in the refrigerator. That way, when you’re ready to make the chimichangas, all you have to do is assemble and bake. This is a lifesaver on busy weeknights!
Another great serving suggestion is to cut the baked chimichangas into smaller pieces and serve them as appetizers. They’re perfect for parties and game day gatherings. Just arrange them on a platter with your favorite dips and watch them disappear.
Don’t be afraid to get creative with the toppings, too. Instead of sour cream, try a drizzle of creamy cilantro-lime dressing. Or, add a sprinkle of crumbled cotija cheese for a salty, tangy flavor.
I truly believe that this recipe for Baked Chicken Chimichangas will become a staple in your kitchen. It’s easy, delicious, and endlessly customizable. It’s the perfect way to satisfy your cravings for Mexican food without sacrificing your health or spending hours in the kitchen.
So, what are you waiting for? Grab your ingredients and get cooking! I’m confident that you’ll love these chimichangas as much as I do. And when you do, please, please, please come back and let me know what you think! Share your photos, your variations, and your serving suggestions in the comments below. I can’t wait to hear about your experience and see how you make this recipe your own. Happy cooking! I am sure you will love this recipe for Baked Chicken Chimichangas.
Baked Chicken Chimichangas: The Ultimate Recipe Guide
Easy baked chicken chimichangas filled with flavorful chicken, beans, corn, and cheese. A healthier alternative to fried chimichangas, perfect for a weeknight meal!
By: Bluebella JuneCategory: DinnerDifficulty: EasyCuisine: AmericanYield: 10 chimichangasDietary: VegetarianIngredients
Instructions
Recipe Notes
- Don’t Overfill: Avoid overfilling the tortillas to prevent tearing.
- Warm Tortillas: Warming the tortillas is crucial for easy rolling.
- Seam Down: Place chimichangas seam-side down to keep them closed during baking.
- Make Ahead: Assemble chimichangas ahead of time and refrigerate for up to 24 hours before baking. Add a few extra minutes to the baking time.
- Freezing: Assemble, but don’t bake. Wrap individually in plastic wrap, then place in a freezer bag. Freeze for up to 3 months. Thaw overnight in the refrigerator before baking.
- Variations: Add jalapeño for spice, cream cheese for creaminess, or substitute chicken with sweet potatoes and black beans for a vegetarian option.
Frequently Asked Questions
→ How do I ensure the bread stays moist?Use fresh, ripe ingredients and avoid overmixing the batter. Store in an airtight container.→ Can I substitute ingredients?Yes, you can substitute similar ingredients while maintaining the basic ratios for best results.→ How long does this bread keep?Store tightly wrapped at room temperature for 2-3 days, or refrigerate for up to a week.→ What if I don't have all the spices?You can adjust spices to taste or substitute with similar warming spices.→ Can I freeze this bread?Yes, wrap individual slices and freeze for up to 3 months. Thaw at room temperature before serving.


Leave a Comment