
Apple Crisp Mini Cheesecakes are here to revolutionize your dessert table, offering a delightful fusion of two beloved classics that truly captures the essence of comfort and sophistication in every bite. I’m absolutely thrilled to share with you a recipe that perfectly marries the creamy, tangy indulgence of a cheesecake with the warm, spiced, crunchy goodness of a classic apple crisp. While cheesecakes boast a long and storied history, evolving from ancient Greek delicacies to modern-day delights, the concept of combining them with the rustic charm of an apple crisp, especially in convenient mini form, speaks to our contemporary desire for both gourmet taste and effortless enjoyment.
Why You’ll Love These Individual Treats
You’ll discover why these particular treats earn rave reviews. People adore these Apple Crisp Mini Cheesecakes not only for their utterly irresistible taste – the luscious cream cheese filling beautifully complemented by tender, cinnamon-spiced apples and a buttery oat crisp topping – but also for their perfect individual portions. This means no more messy slicing, just grab-and-go deliciousness that’s ideal for entertaining, intimate gatherings, or simply treating yourself to a perfectly portioned dessert. The blend of smooth, rich creaminess with the satisfying crunch of the topping creates an exquisite textural experience that is both comforting and exciting. Prepare to impress everyone with these innovative and incredibly delicious mini wonders!
Ingredients:
These Apple Crisp Mini Cheesecakes are truly a labor of love, but every single ingredient plays a crucial role in creating their irresistible magic. I always make sure I have everything prepped and at room temperature where specified, as it makes a huge difference in the final texture.
For the Graham Cracker Crust:
- 1 ½ cups (about 18 full sheets) Graham cracker crumbs, finely crushed. I usually just pulse these in a food processor until they’re like fine sand.
- ¼ cup (50g) Granulated sugar, to give our crust a lovely subtle sweetness.
- 6 tablespoons (85g) Unsalted butter, melted. This binds everything together beautifully.
For the Creamy Cheesecake Filling:
- 24 ounces (three 8-ounce blocks) Full-fat cream cheese, softened to room temperature. This is absolutely essential for a smooth, lump-free cheesecake. I usually take it out of the fridge at least an hour or two before I start.
- ¾ cup (150g) Granulated sugar.
- 2 large Eggs, at room temperature. Again, crucial for emulsification.
- ¼ cup (60ml) Sour cream, at room temperature. This adds a lovely tang and moisture to the filling.
- 1 teaspoon Pure vanilla extract. Don’t skimp on the good stuff here!
- 1 tablespoon All-purpose flour. This helps prevent cracks in the cheesecake and adds a little stability.
- Pinch of salt, just to enhance all those wonderful flavors.
For the Spiced Apple Topping:
- 3 medium Baking apples, such as Granny Smith, Honeycrisp, or Fuji. I love Granny Smiths for their tartness which balances the sweetness, or Honeycrisps for a great balance of sweet and crisp texture. You’ll want to peel, core, and dice them into ¼ to ½-inch pieces.
- 2 tablespoons (28g) Unsalted butter.
- ¼ cup (50g) Packed light brown sugar.
- ½ teaspoon Ground cinnamon.
- ¼ teaspoon Ground nutmeg.
- Pinch of ground cloves (optional), if you really love that warm spice aroma.
- 1 tablespoon Lemon juice, freshly squeezed. This prevents browning and brightens the flavor.
- 1 tablespoon Cornstarch, mixed with 2 tablespoons of cold water (a slurry). This will thicken our apple topping.
For the Crunchy Crisp Topping:
- ½ cup (60g) All-purpose flour.
- ½ cup (100g) Packed light brown sugar.
- ¼ cup (25g) Rolled oats (old-fashioned oats), not instant. These give us that signature texture.
- ½ teaspoon Ground cinnamon.
- Pinch of salt.
- ¼ cup (57g) Unsalted butter, very cold and cut into small cubes. This is key for that crumbly texture!
Optional Garnish:
- Caramel sauce, for drizzling.
- Whipped cream or a dollop of vanilla ice cream.
Equipment You’ll Need:
Before we dive into creating these delightful Apple Crisp Mini Cheesecakes, it’s a good idea to gather all your tools. This makes the process much smoother and more enjoyable. You’ll need a 12-cup standard muffin tin (or two 6-cup muffin tins if you only have those, you’ll just bake in batches), paper cupcake liners (essential for easy removal!), a large mixing bowl for the cheesecake batter, a medium saucepan for the apple topping, and a separate bowl for the crisp topping. I also recommend a food processor for making graham cracker crumbs and a hand mixer or stand mixer for the cheesecake filling. A whisk, rubber spatulas, measuring cups and spoons, and a small offset spatula or spoon for spreading the crust will also come in handy. And, of course, your oven!
Prepare the Crust:
The foundation of our Apple Crisp Mini Cheesecakes is a perfectly buttery graham cracker crust. This step is super simple but sets the stage for everything else!
- First things first, preheat your oven to 350°F (175°C). While that’s heating up, line your 12-cup standard muffin tin with paper cupcake liners. I find that using two liners per cup sometimes helps with easier removal and prevents butter leakage, though one good quality liner is usually enough.
- In a medium-sized mixing bowl, combine the finely crushed graham cracker crumbs and the granulated sugar. Give them a quick stir with a spoon or a whisk to make sure they’re well mixed. You want that sugar evenly distributed.
- Pour the melted unsalted butter over the crumb mixture. Now, with a fork or your clean fingertips, mix everything together until the crumbs are evenly moistened and resemble wet sand. It should hold together when you pinch it. If it seems too dry, you can add another half tablespoon of melted butter, but usually, 6 tablespoons is just right.
- Spoon about 1 ½ to 2 tablespoons of the crumb mixture into the bottom of each prepared cupcake liner. I like to use the back of a small spoon or a tart tamper to firmly press the crumbs down into an even layer. Pressing firmly is key – this prevents the crust from crumbling apart when you remove the cheesecakes later.
- Place the muffin tin in the preheated oven and bake for 5-7 minutes. This brief bake helps to set the crust, making it sturdy and preventing it from becoming soggy once we add the cheesecake filling. While they’re baking, the kitchen starts to smell wonderfully of butter and graham crackers!
- Once baked, remove the muffin tin from the oven and let the crusts cool completely on a wire rack while you prepare the cheesecake filling. It’s important they are cool before the filling goes in.
Whip Up the Cheesecake Filling:
This is where the magic really happens for our Apple Crisp Mini Cheesecakes. A smooth, creamy, and lump-free cheesecake filling is what we’re aiming for, and using room temperature ingredients is your secret weapon.
- In a large mixing bowl, using an electric hand mixer or a stand mixer fitted with the paddle attachment, beat the softened cream cheese on medium speed for about 2-3 minutes, until it is completely smooth and fluffy. There should be no lumps whatsoever at this stage. I often stop the mixer and scrape down the sides and bottom of the bowl a couple of times to ensure every bit of cream cheese is incorporated and lump-free.
- Add the granulated sugar to the cream cheese and beat on medium-low speed for another 1-2 minutes, until just combined and smooth. Again, stop and scrape down the bowl. You don’t want to overmix once the sugar is in, as it can introduce too much air.
- One at a time, beat in the eggs on low speed, mixing just until each egg is incorporated. After each egg, remember to scrape down the sides of the bowl. Overmixing eggs can lead to cracks in your cheesecake, so be gentle here. We just want them to disappear into the mixture.
- Stir in the room temperature sour cream and pure vanilla extract. Mix on low speed until they are fully incorporated and the batter is homogeneous. Sour cream adds a lovely tang and extra creaminess that I absolutely adore in a cheesecake.
- Finally, sprinkle the all-purpose flour and a pinch of salt over the batter. Mix on the lowest speed just until no streaks of flour remain. The flour helps to stabilize the cheesecake and prevent cracking. Again, do not overmix. We’re looking for a smooth, thick, and consistent batter.
- Once your cheesecake batter is ready, set it aside briefly.
Bake the Mini Cheesecakes:
Getting the bake just right for these Apple Crisp Mini Cheesecakes is a crucial step for a perfect texture. We’re going to use a mini water bath technique to ensure they bake evenly and stay wonderfully creamy.
- Reduce your oven temperature to 325°F (160°C). This lower temperature is ideal for cheesecake, helping to prevent cracks and promote even baking.
- Carefully spoon or pour the cheesecake batter evenly over the cooled graham cracker crusts in the prepared muffin tin. Fill each liner about ¾ full. I find using a small ladle or a large cookie scoop helps with even distribution.
- To create a humid environment, which is excellent for cheesecakes, you can place the muffin tin inside a larger roasting pan. Then, carefully pour hot water into the roasting pan until it comes about halfway up the sides of the muffin tin. This “water bath” technique helps regulate the temperature and keeps the cheesecakes moist. If you’re cautious about a full water bath, simply placing a separate pan of hot water on the bottom rack of your oven can also help create humidity.
- Carefully transfer the roasting pan (with the muffin tin inside) to your preheated oven. Bake for approximately 20-25 minutes, or until the edges are set and lightly golden, but the centers still have a slight jiggle when you gently shake the pan. This jiggle is a good sign that they are perfectly baked, as they will continue to set as they cool.
- Once baked, turn off the oven and prop the oven door open slightly with a wooden spoon. Let the cheesecakes cool inside the oven for another 15 minutes. This gradual cooling prevents drastic temperature changes that can lead to cracks.
- Remove the cheesecakes from the oven and the water bath. Let them cool completely on a wire rack at room temperature. This can take about 1-2 hours.
- Once cooled to room temperature, transfer the muffin tin to the refrigerator and chill the Apple Crisp Mini Cheesecakes for at least 4 hours, or preferably overnight. Chilling is absolutely essential for the cheesecake to firm up properly and develop its full flavor and texture. Don’t skip this step!
Craft the Apple Topping:
The spiced apple topping is what truly elevates these to “Apple Crisp Mini Cheesecakes” status. The aroma filling your kitchen will be divine!
- In a medium saucepan, melt the 2 tablespoons of unsalted butter over medium heat.
- Add the diced apples, packed light brown sugar, ground cinnamon, ground nutmeg, and optional ground cloves to the saucepan. Stir everything together until the apples are well coated with the spices and sugar.
- Cook, stirring occasionally, for about 8-10 minutes, or until the apples have softened but still retain a slight bite. You don’t want them to turn into mush; we’re looking for tender but not falling apart.
- Pour in the fresh lemon juice. This not only brightens the flavor but also prevents the apples from browning too much. Give it another quick stir.
- Now, add the cornstarch slurry (1 tablespoon cornstarch mixed with 2 tablespoons cold water). Stir constantly as you pour it in. Continue to cook for another 1-2 minutes, or until the mixture thickens to a glossy, syrupy consistency. It should coat the back of a spoon.
- Remove the apple topping from the heat and transfer it to a separate bowl. Allow it to cool completely to room temperature before adding it to the cheesecakes. This prevents the warm apples from melting the chilled cheesecake. I sometimes even pop it in the fridge for a bit to speed up cooling.
Assemble the Apple Crisp Topping:
This crisp topping is the “crisp” in our Apple Crisp Mini Cheesecakes! It provides that wonderful textural contrast to the creamy cheesecake and soft apples.
- In a medium bowl, combine the all-purpose flour, packed light brown sugar, rolled oats, ground cinnamon, and a pinch of salt. Whisk these dry ingredients together thoroughly to ensure all the spices and sugar are evenly distributed.
- Add the very cold, cubed unsalted butter to the dry mixture. Now, using a pastry blender, two knives, or your fingertips, cut the butter into the flour mixture until it resembles coarse crumbs with some pea-sized pieces of butter remaining. The colder the butter, the better, as it helps create that distinct crumbly texture when baked. Avoid overworking the dough, as we want a crisp crumble, not a paste.
- Spread the crisp topping mixture evenly on a baking sheet lined with parchment paper.
- Bake in your preheated 350°F (175°C) oven for about 10-15 minutes, or until golden brown and toasted. Keep an eye on it, as it can brown quickly. Stir it once or twice during baking to ensure even toasting.
- Once baked, remove the crisp topping from the oven and let it cool completely on the baking sheet. It will crisp up further as it cools. Once cool, you can gently break up any larger clumps with your fingers.
Final Assembly and Serving:
The moment has arrived to bring all the delicious components of our Apple Crisp Mini Cheesecakes together! This is where they truly shine.
- Once your mini cheesecakes are fully chilled and firm (after at least 4 hours in the refrigerator), carefully remove them from the muffin tin by gently lifting the paper liners. If you used two liners, you can peel away the outer one, leaving the cheesecake nestled in the inner liner for easy handling, or remove both if serving directly on a plate.
- Place each chilled mini cheesecake on a serving plate or arrange them on a platter.
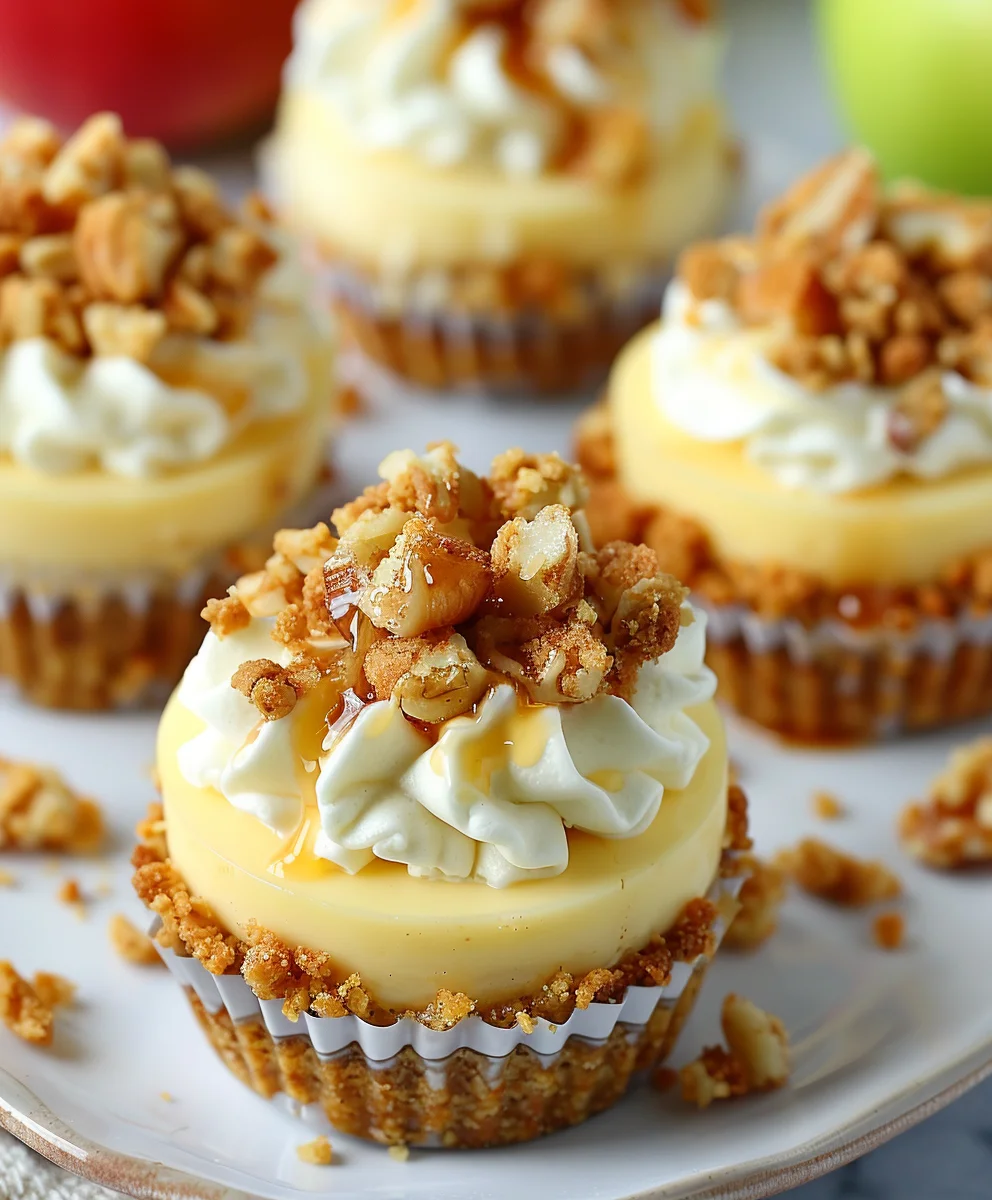
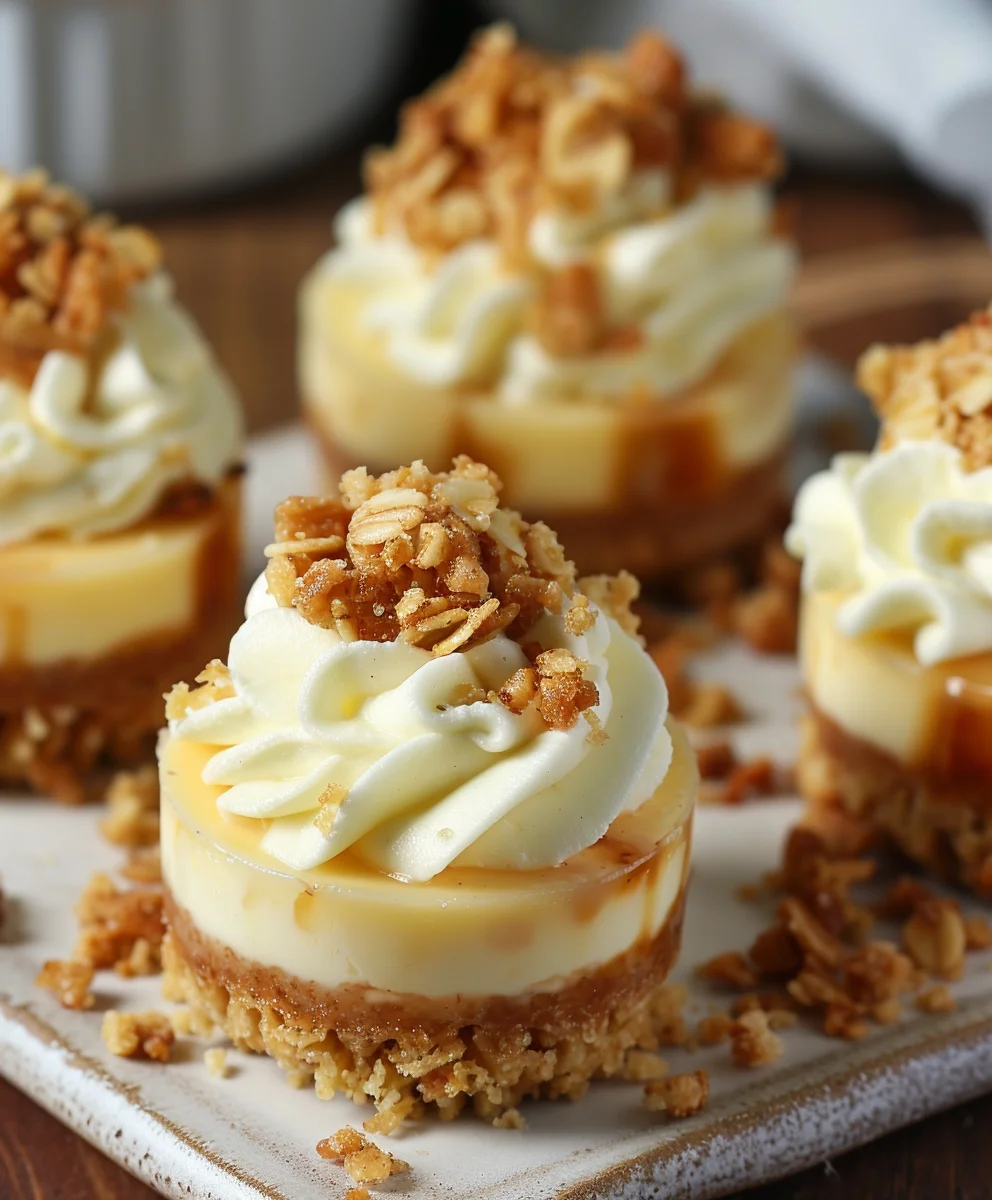
- Spoon a generous dollop of the completely cooled spiced apple topping over the top of each cheesecake. I usually aim for about 1-2 tablespoons per cheesecake, making sure to get some of that delicious syrup.
- Sprinkle a good amount of the crunchy crisp topping over the apples. You want enough to get that wonderful texture in every bite!
- If desired, drizzle with caramel sauce and add a small dollop of whipped cream for an extra touch of indulgence. These Apple Crisp Mini Cheesecakes are amazing on their own, but these garnishes take them to the next level.
- Serving: These Apple Crisp Mini Cheesecakes are best served chilled. The cold, creamy cheesecake against the spiced apples and crunchy topping is an incredible combination.
- Storage: Store any leftover Apple Crisp Mini Cheesecakes in an airtight container in the refrigerator for up to 3-4 days. While the crisp topping might soften slightly over time, the flavors will still be absolutely fantastic. I sometimes store the crisp topping separately in an airtight container at room temperature and add it right before serving for maximum crunch! This way, your Apple Crisp Mini Cheesecakes stay perfect for longer.
Conclusion:
As we wrap up our delightful journey with this recipe, I truly hope you’re feeling inspired to get into your kitchen and create something truly special. These aren’t just any ordinary desserts; they are a harmonious blend of comforting flavors and exquisite textures, designed to impress and satisfy in equal measure. I find myself constantly drawn back to this recipe because it strikes such a perfect balance between sophisticated elegance and heartwarming familiarity. The creamy, rich cheesecake base provides a luxurious canvas for the spiced, tender apples, while the crisp, buttery topping adds that irresistible crunch and a hint of warm oats. It’s a symphony of sensations in every single bite, making it an undeniable showstopper for any gathering, or even just a well-deserved treat for yourself after a long week.
What makes this recipe a true gem is its ability to deliver an immensely rewarding culinary experience without demanding hours of intricate work. It’s accessible for bakers of all skill levels, and the individual portions make serving a breeze, eliminating the fuss of slicing and plating a large cheesecake. Imagine the joy on your guests’ faces as they each receive their own perfectly portioned, miniature masterpiece! The aroma alone, as these beauties bake, is enough to fill your home with an inviting, cozy atmosphere that just screams “comfort.” It’s truly a dessert that brings people together, sparking conversations and creating lasting memories around the table.
Serving Suggestions & Creative Variations:
Once your creations are cooled and ready, the fun doesn’t have to stop there! While these mini cheesecakes are absolutely divine on their own, a few simple additions can elevate them even further. I highly recommend serving them either chilled for a refreshing treat, or gently warmed for a more indulgent, “straight-out-of-the-oven” experience. A dollop of freshly whipped cream, perhaps infused with a hint of vanilla or a whisper of cinnamon, makes for a cloud-like complement. For those with a sweeter tooth, a drizzle of warm caramel sauce or a scoop of premium vanilla bean ice cream turning into a luxurious melt is simply heavenly. A tiny sprinkle of toasted pecans or walnuts over the top just before serving adds an extra layer of texture and a nutty depth that I personally adore.
But don’t stop at just these suggestions; this recipe is wonderfully versatile, inviting you to put your own creative spin on it. Consider swapping out the apples for other seasonal fruits like pears, peaches, or even a mix of berries for a summer twist. You could experiment with different crusts – ginger snaps for a spicier kick, or shortbread cookies for a buttery, delicate base. For a truly autumnal vibe, a pinch of allspice or nutmeg in the apple filling can deepen the flavor profile. And if you’re feeling particularly adventurous, a very tiny splash of bourbon or rum in the apple mixture can add a sophisticated, warm note that will truly surprise and delight your palate. The possibilities are genuinely endless, allowing you to tailor this dessert to your exact preferences and the occasion.
Your Culinary Adventure Awaits!
Now, it’s your turn! I genuinely hope you’re feeling inspired to try your hand at these magnificent Apple Crisp Mini Cheesecakes. Trust me when I say, the effort is minimal, but the reward is immense. There’s a profound satisfaction that comes from creating something so utterly delicious and beautiful with your own hands. Don’t be afraid to experiment, to tweak, and to make this recipe truly your own. Whether you’re baking for a special celebration, a casual get-together, or just because you deserve a delightful treat, these individual cheesecakes are guaranteed to bring smiles.
After you’ve baked your batch, I would absolutely love to hear about your experience! Did you stick to the recipe, or did you venture into some exciting variations? What was your favorite part of making them? And, most importantly, how did they taste? Please feel free to share your thoughts, your photos, and your triumphs in the comments section below. Your feedback and creativity not only inspire me but also help our wonderful community of home bakers. Let’s spread the joy of baking and celebrate the irresistible charm of these Apple Crisp Mini Cheesecakes together! I can’t wait to see what you create!
Apple Crisp Mini Cheesecakes
These Apple Crisp Mini Cheesecakes offer a delightful fusion of creamy cheesecake and warm, spiced apple topping, perfectly portioned for individual enjoyment. An easy, sweet fall dessert that combines luscious cream cheese filling, tender cinnamon-spiced apples, and a crisp graham cracker crust.
Ingredients
-
3/4 cup graham cracker crumbs
-
1 1/2 tablespoons sugar
-
1/2 teaspoon cinnamon
-
3 tablespoons unsalted butter, melted
-
10 oz cream cheese, softened
-
6 tablespoons sugar
-
1 1/2 teaspoons vanilla
-
2 teaspoons all-purpose flour
-
1 egg
-
2 medium-small apples, peeled and chopped finely
-
2 teaspoons freshly squeezed lemon juice
-
1 1/2 teaspoons cinnamon
-
1/4 teaspoon nutmeg
-
2 tablespoons light brown sugar
-
1 1/2 teaspoons cornstarch
Instructions
-
Step 1
Preheat oven to 350°F (175°C). Line a muffin tin with paper liners. Combine 3/4 cup graham cracker crumbs, 1.5 tablespoons sugar, 1/2 teaspoon cinnamon, and 3 tablespoons melted butter. Press 1-1.5 tablespoons of mixture firmly into the bottom of each liner. Bake for 5-7 minutes. Let cool completely. -
Step 2
In a mixing bowl, beat 10 oz softened cream cheese until smooth. Add 6 tablespoons sugar and beat until just combined. Beat in 1 egg, then 1.5 teaspoons vanilla and 2 teaspoons all-purpose flour until the batter is smooth. Do not overmix. -
Step 3
Reduce oven temperature to 325°F (160°C). Spoon filling over cooled crusts, about 3/4 full. Place muffin tin in a larger pan with hot water (water bath). Bake 20-25 minutes, until edges are set with a slight jiggle. Turn off oven, prop door open, and cool 15 minutes in oven. Remove from oven and water bath, cool completely on a wire rack, then chill in refrigerator for at least 4 hours or overnight. -
Step 4
In a medium saucepan, combine 2 chopped apples, 2 tablespoons light brown sugar, 1.5 teaspoons cinnamon, 1/4 teaspoon nutmeg, and 2 teaspoons freshly squeezed lemon juice. Cook over medium heat for 8-10 minutes until tender. Mix 1.5 teaspoons cornstarch with 2 tablespoons cold water to form a slurry; stir into apples and cook 1-2 minutes until thickened. Cool completely. -
Step 5
Once cheesecakes are chilled, carefully remove from liners. Spoon cooled apple topping onto each cheesecake. Serve immediately or store leftovers in an airtight container in the refrigerator for up to 3-4 days.
Important Information
Nutrition Facts (Per Serving)
It is important to consider this information as approximate and not to use it as definitive health advice.
Allergy Information
Please check ingredients for potential allergens and consult a health professional if in doubt.

Leave a Comment