
Chili Cheese Dogs: the ultimate comfort food, a symphony of flavors that explodes in your mouth with every single bite! I don’t know about you, but just the thought of a perfectly grilled hot dog nestled in a soft bun, smothered in rich, meaty chili and topped with gooey, melted cheese makes my mouth water. This isn’t just a meal; it’s an experience, a nostalgic trip back to summer barbecues and carefree days.
While the exact origins of the Chili Cheese Dog are debated, its roots are firmly planted in American culinary history. Hot dogs themselves have been a beloved street food staple since the late 19th century, and the addition of chili, likely inspired by Tex-Mex cuisine, elevated them to a whole new level. The cheese, of course, is the crowning glory, adding a creamy, decadent touch that perfectly complements the savory chili and snappy hot dog.
What’s not to love? The combination of textures – the soft bun, the firm hot dog, the chunky chili, and the melted cheese – is simply irresistible. The taste is a delightful blend of savory, spicy, and cheesy goodness. Plus, let’s be honest, Chili Cheese Dogs are incredibly convenient. They’re quick to make, easy to eat on the go, and perfect for casual gatherings. Whether you’re tailgating, hosting a backyard party, or simply craving a satisfying and delicious meal, this recipe is guaranteed to be a crowd-pleaser. So, let’s dive in and learn how to make the best Chili Cheese Dogs you’ve ever tasted!

Ingredients:
- 1 pound all-beef hot dogs
- 8 hot dog buns, preferably top-split
- 1 tablespoon olive oil
- 1 medium yellow onion, finely chopped
- 2 cloves garlic, minced
- 1 green bell pepper, finely chopped
- 1 (15 ounce) can tomato sauce
- 1 (15 ounce) can kidney beans, drained and rinsed
- 1 (15 ounce) can pinto beans, drained and rinsed
- 1 tablespoon chili powder
- 1 teaspoon cumin
- 1/2 teaspoon smoked paprika
- 1/4 teaspoon cayenne pepper (or more, to taste)
- 1/2 teaspoon dried oregano
- 1/4 teaspoon salt (or more, to taste)
- 1/4 teaspoon black pepper (or more, to taste)
- 1 cup shredded cheddar cheese
- Optional toppings: diced onions, mustard, relish, jalapenos, sour cream
Preparing the Chili:
Okay, let’s get started with the heart of our chili cheese dogs – the chili! This is where we build all that amazing flavor. Don’t be intimidated; it’s easier than you think!
- Sauté the Aromatics: Heat the olive oil in a large saucepan or Dutch oven over medium heat. Add the chopped onion and cook until softened and translucent, about 5-7 minutes. Stir occasionally to prevent burning. We want those onions nice and sweet to form the base of our chili.
- Add the Garlic and Bell Pepper: Add the minced garlic and chopped green bell pepper to the saucepan. Cook for another 2-3 minutes, stirring frequently, until the garlic is fragrant and the bell pepper is slightly softened. Be careful not to burn the garlic, as it can become bitter.
- Introduce the Tomato Sauce and Beans: Pour in the tomato sauce, kidney beans, and pinto beans. Stir well to combine all the ingredients. Make sure everything is nicely mixed together.
- Spice it Up!: Add the chili powder, cumin, smoked paprika, cayenne pepper, dried oregano, salt, and black pepper. Stir well to incorporate the spices evenly. This is where you can really customize the flavor to your liking. If you like it spicier, add more cayenne pepper!
- Simmer for Flavor: Bring the chili to a simmer, then reduce the heat to low, cover, and cook for at least 30 minutes, or up to an hour, stirring occasionally. The longer it simmers, the more the flavors will meld together and deepen. This is crucial for a really rich and flavorful chili. If the chili becomes too thick, add a little water or beef broth to thin it out.
- Taste and Adjust: After simmering, taste the chili and adjust the seasonings as needed. You might want to add more salt, pepper, chili powder, or cayenne pepper to achieve your desired flavor profile. Remember, you can always add more, but you can’t take it away!
Cooking the Hot Dogs:
Now that our chili is simmering away, let’s focus on the stars of the show – the hot dogs! There are several ways to cook them, so choose your favorite method.
- Grilling (Recommended): Preheat your grill to medium heat. Grill the hot dogs for about 5-7 minutes, turning occasionally, until they are heated through and have grill marks. Grilling gives them a nice smoky flavor and a slightly crispy exterior.
- Boiling: Bring a pot of water to a boil. Add the hot dogs and cook for about 5-7 minutes, until they are heated through. Boiling is a quick and easy method, but it doesn’t add any extra flavor.
- Pan-Frying: Heat a skillet over medium heat. Add the hot dogs and cook for about 5-7 minutes, turning occasionally, until they are heated through and browned on all sides. Pan-frying gives them a slightly crispy exterior.
- Microwaving (Quickest): Place the hot dogs on a microwave-safe plate and microwave on high for about 30-60 seconds, or until they are heated through. Microwaving is the fastest method, but it can make the hot dogs rubbery.
Assembling the Chili Cheese Dogs:
Alright, we’re in the home stretch! The chili is ready, the hot dogs are cooked, and now it’s time to assemble our delicious chili cheese dogs. This is the fun part!
- Prepare the Buns: If desired, you can lightly toast the hot dog buns. This will help them hold up better to the chili and toppings. You can toast them in a toaster, under the broiler, or on the grill.
- Place the Hot Dogs in the Buns: Place one hot dog in each bun. Make sure the hot dog fits snugly in the bun.
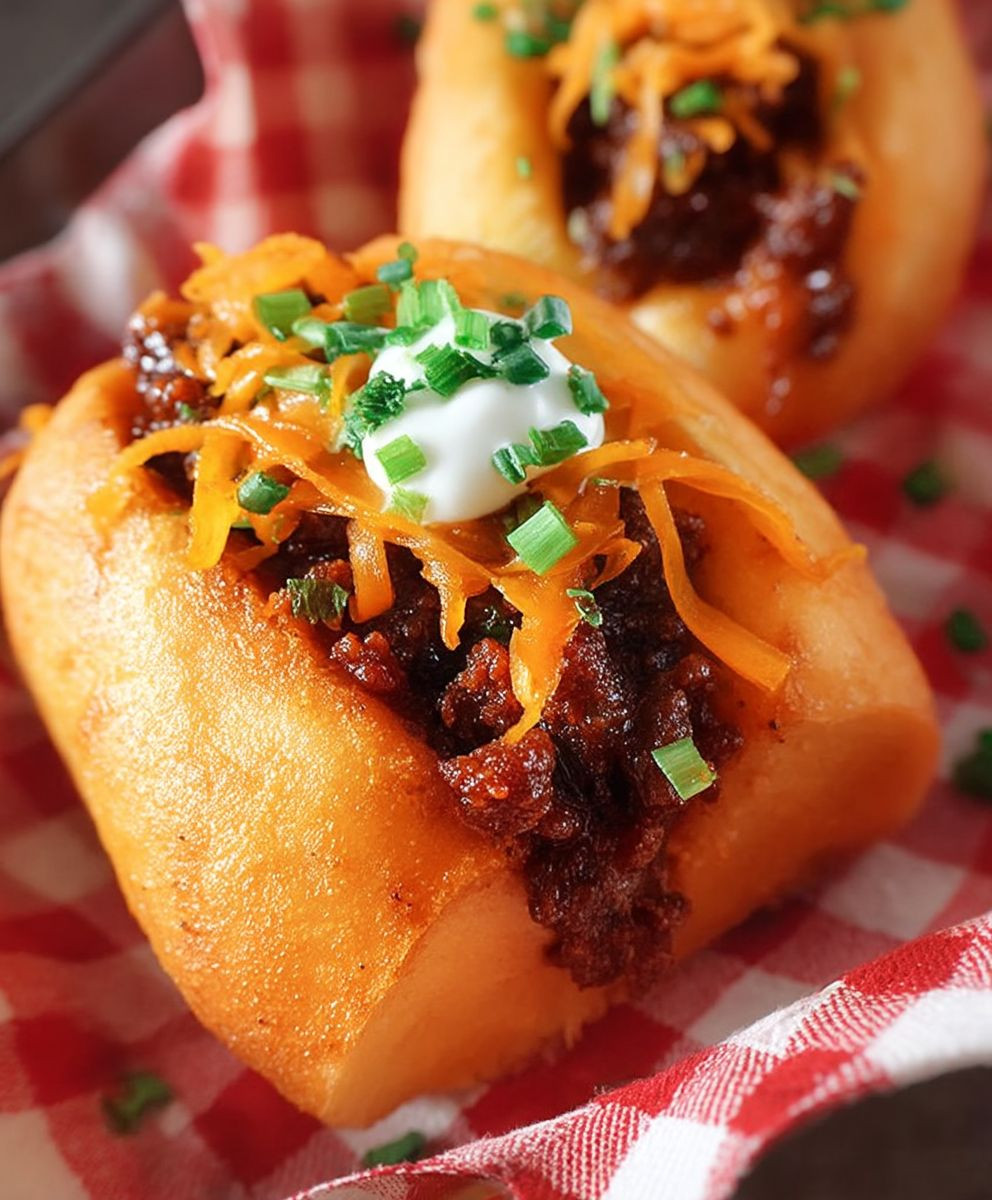
- Top with Chili: Spoon a generous amount of chili over each hot dog. Don’t be shy! We want plenty of chili to make these dogs extra flavorful.
- Add the Cheese: Sprinkle shredded cheddar cheese over the chili. The cheese will melt slightly from the heat of the chili, creating a gooey and delicious topping.
- Add Optional Toppings: Add any desired toppings, such as diced onions, mustard, relish, jalapenos, or sour cream. Get creative and customize your chili cheese dogs to your liking!
- Serve Immediately: Serve the chili cheese dogs immediately while they are hot and the cheese is melted. Enjoy!
Tips and Variations:
Here are a few extra tips and ideas to make your chili cheese dogs even better:
- Use High-Quality Hot Dogs: The quality of the hot dogs will greatly affect the overall taste of the chili cheese dogs. I highly recommend using all-beef hot dogs for the best flavor.
- Toast the Buns: Toasting the buns will prevent them from getting soggy from the chili.
- Make the Chili Ahead of Time: The chili can be made ahead of time and stored in the refrigerator for up to 3 days. This is a great way to save time on the day you plan to serve the chili cheese dogs.
- Use Different Types of Cheese: Experiment with different types of cheese, such as Monterey Jack, pepper jack, or even a cheese sauce.
- Add Different Toppings: Get creative with your toppings! Try adding coleslaw, sauerkraut, or even a fried egg.
- Make it Vegetarian: Substitute the hot dogs with vegetarian sausages or plant-based hot dogs. You can also use vegetarian chili.
- Spicy Chili: For a spicier chili, add more cayenne pepper or a pinch of red pepper flakes. You can also use a spicier chili powder.
- Sweet Chili: For a sweeter chili, add a tablespoon of brown sugar or molasses.
- Smoky Chili: For a smokier chili, add a teaspoon of liquid smoke.
Serving Suggestions:
Chili cheese dogs are a complete meal on their own, but here are a few side dishes that would pair well with them:
- Coleslaw
- Potato Salad
- Corn on the Cob
- French Fries
- Onion Rings
- Macaroni and Cheese
- Side Salad
Storage Instructions:
If you have any leftover chili cheese dogs, store them in the refrigerator in an airtight container. They will keep for up to 2 days. Reheat them in the microwave or oven until heated through. The buns may become a bit soggy, but they will still be delicious!
The chili can be stored separately in the refrigerator for up to 3 days or in the freezer for up to 3 months. Thaw the chili in the refrigerator overnight before reheating.
Enjoy your homemade chili cheese dogs! I hope you love them as much as I do!
Conclusion:
Okay, friends, let’s be honest – after reading through this, you’re probably already halfway to the grocery store, right? And you should be! These Chili Cheese Dogs are more than just a quick meal; they’re a flavor explosion, a nostalgic trip back to summer barbecues, and a guaranteed crowd-pleaser. I truly believe this is a must-try recipe for anyone who loves a good, comforting, and utterly delicious dish.
What makes these Chili Cheese Dogs so special? It’s the perfect balance of textures and tastes. The snap of the perfectly grilled (or pan-fried, or even boiled – no judgment here!) hot dog, the rich and savory chili, the creamy, melty cheese, and the soft, pillowy bun all come together in a symphony of deliciousness. And the best part? It’s incredibly easy to make! Even if you’re a beginner cook, you can absolutely nail this recipe.
But don’t just take my word for it. You absolutely have to experience the joy of biting into one of these bad boys for yourself. Imagine sinking your teeth into that warm, cheesy, chili-laden goodness. Can you taste it already?
Now, let’s talk about serving suggestions and variations because, let’s face it, we all like to put our own spin on things. For a classic experience, serve these Chili Cheese Dogs with a side of crispy french fries or some crunchy coleslaw. If you’re feeling a bit adventurous, try adding some diced onions, pickled jalapeños, or a dollop of sour cream for an extra kick.
Want to take things to the next level? Consider these variations:
* Spicy Chili Cheese Dogs: Add a pinch of cayenne pepper or some chopped chili peppers to your chili for an extra fiery flavor.
* Bacon-Wrapped Chili Cheese Dogs: Wrap your hot dogs in bacon before grilling or pan-frying for a smoky and savory twist.
* Vegetarian Chili Cheese Dogs: Use vegetarian hot dogs and a vegetarian chili recipe for a plant-based version that’s just as delicious.
* Gourmet Chili Cheese Dogs: Use high-quality hot dogs, artisanal buns, and a homemade chili recipe for a truly elevated experience.
* Chili Cheese Tots: If you’re looking for a fun twist, skip the hot dog altogether and load up some tater tots with chili and cheese!
The possibilities are endless! Don’t be afraid to experiment and find your own perfect combination.
I’m so confident that you’ll love this recipe that I’m practically begging you to try it. Seriously, make these Chili Cheese Dogs this weekend. You won’t regret it. And when you do, please, please, please share your experience with me! I want to hear all about your creations, your variations, and your family’s reactions. Did you add any special ingredients? Did you make them for a party? Did you devour them all by yourself (no shame in that!)?
Tag me in your photos on social media, leave a comment below, or send me an email. I can’t wait to see what you come up with! Happy cooking (and eating)! I hope this recipe becomes a staple in your household, bringing joy and deliciousness to your table for years to come. Now go forth and create some amazing Chili Cheese Dog magic!
Chili Cheese Dogs: The Ultimate Guide to Making Them at Home
Classic chili cheese dogs with homemade chili, juicy hot dogs, and your favorite toppings! A perfect crowd-pleasing meal.
Ingredients
- 1 pound all-beef hot dogs
- 8 hot dog buns, preferably top-split
- 1 tablespoon olive oil
- 1 medium yellow onion, finely chopped
- 2 cloves garlic, minced
- 1 green bell pepper, finely chopped
- 1 (15 ounce) can tomato sauce
- 1 (15 ounce) can kidney beans, drained and rinsed
- 1 (15 ounce) can pinto beans, drained and rinsed
- 1 tablespoon chili powder
- 1 teaspoon cumin
- 1/2 teaspoon smoked paprika
- 1/4 teaspoon cayenne pepper (or more, to taste)
- 1/2 teaspoon dried oregano
- 1/4 teaspoon salt (or more, to taste)
- 1/4 teaspoon black pepper (or more, to taste)
- 1 cup shredded cheddar cheese
- Optional toppings: diced onions, mustard, relish, jalapenos, sour cream
Instructions
- Heat the olive oil in a large saucepan or Dutch oven over medium heat. Add the chopped onion and cook until softened and translucent, about 5-7 minutes, stirring occasionally.
- Add the minced garlic and chopped green bell pepper to the saucepan. Cook for another 2-3 minutes, stirring frequently, until the garlic is fragrant and the bell pepper is slightly softened.
- Pour in the tomato sauce, kidney beans, and pinto beans. Stir well to combine all the ingredients.
- Add the chili powder, cumin, smoked paprika, cayenne pepper, dried oregano, salt, and black pepper. Stir well to incorporate the spices evenly.
- Bring the chili to a simmer, then reduce the heat to low, cover, and cook for at least 30 minutes, or up to an hour, stirring occasionally. If the chili becomes too thick, add a little water or beef broth to thin it out.
- After simmering, taste the chili and adjust the seasonings as needed.
- Preheat your grill to medium heat. Grill the hot dogs for about 5-7 minutes, turning occasionally, until they are heated through and have grill marks.
- Bring a pot of water to a boil. Add the hot dogs and cook for about 5-7 minutes, until they are heated through.
- Heat a skillet over medium heat. Add the hot dogs and cook for about 5-7 minutes, turning occasionally, until they are heated through and browned on all sides.
- Place the hot dogs on a microwave-safe plate and microwave on high for about 30-60 seconds, or until they are heated through.
- If desired, you can lightly toast the hot dog buns.
- Place one hot dog in each bun.
- Spoon a generous amount of chili over each hot dog.
- Sprinkle shredded cheddar cheese over the chili.
- Add any desired toppings, such as diced onions, mustard, relish, jalapenos, or sour cream.
- Serve the chili cheese dogs immediately while they are hot and the cheese is melted.
Notes
- Use high-quality, all-beef hot dogs for the best flavor.
- Toast the buns to prevent them from getting soggy.
- The chili can be made ahead of time and stored in the refrigerator for up to 3 days.
- Experiment with different types of cheese and toppings.
- For a spicier chili, add more cayenne pepper or red pepper flakes.
- For a sweeter chili, add a tablespoon of brown sugar or molasses.
- For a smokier chili, add a teaspoon of liquid smoke.
- To make it vegetarian, substitute the hot dogs with vegetarian sausages or plant-based hot dogs and use vegetarian chili.
Leave a Comment