
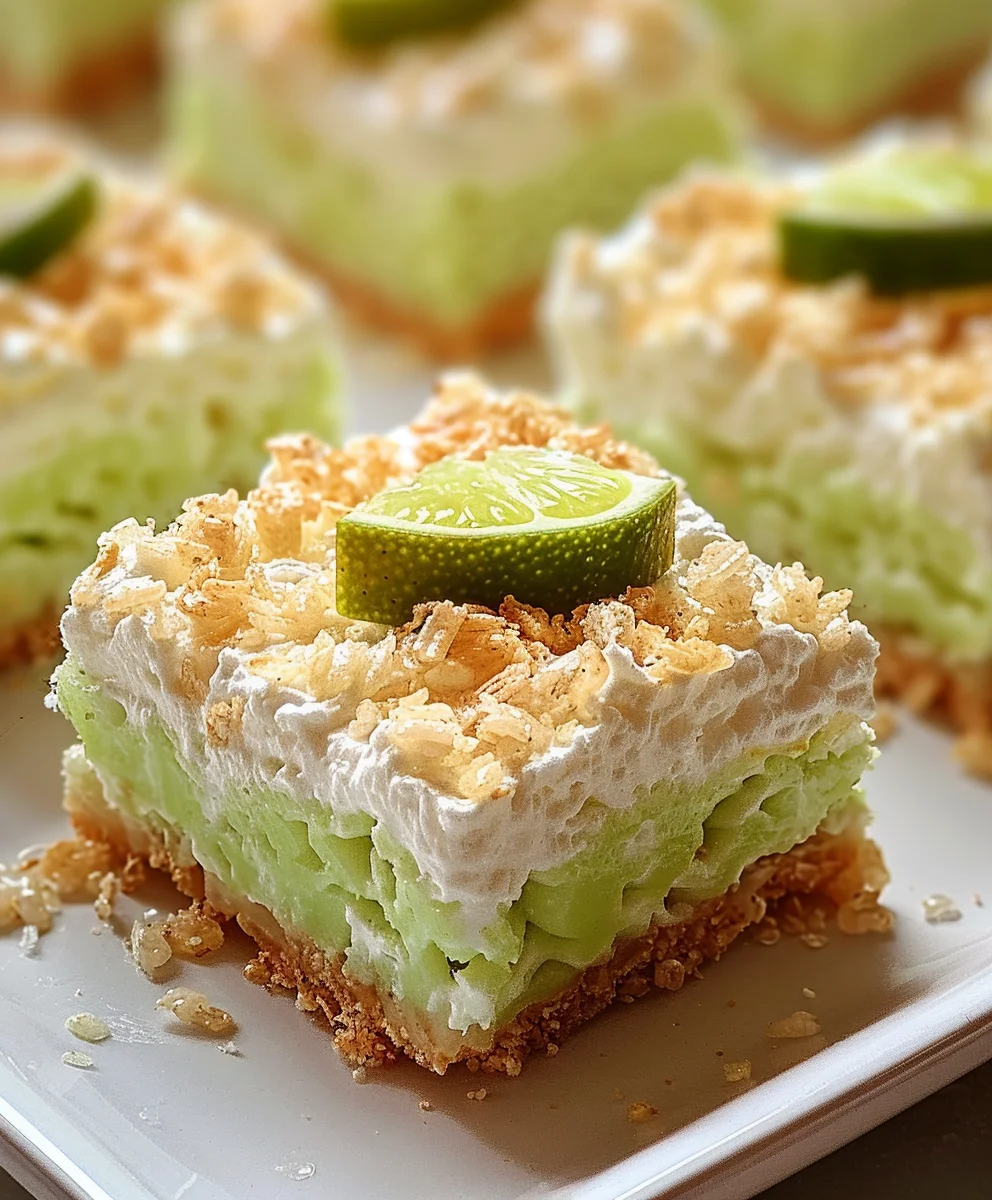
Key Lime Pie Rice Krispie Treats are not merely a dessert; they are a brilliant culinary fusion, a delightful testament to combining two cherished American classics into one utterly irresistible package. Imagine the bright, zesty tang of a traditional Key Lime Pie, renowned for its refreshing Florida origins and creamy texture, meeting the satisfyingly gooey and crisp embrace of a homemade Rice Krispie Treat, a no-bake staple that has brought joy and simplicity to countless kitchens since its creation. This innovative recipe takes the best elements of both worlds, offering an exciting twist on familiar comforts.
I find that what makes these Key Lime Pie Rice Krispie Treats truly special is their remarkable balance of flavors and textures. The vibrant citrus notes, often achieved with fresh key lime juice and zest, cut through the sweetness of the marshmallow, creating a sophisticated yet playful profile. You get the nostalgic crunch, the satisfying chew, and then that surprising burst of tartness that awakens the palate. People absolutely adore this dish not just for its unique taste, but also for its incredible convenience; it’s a no-bake wonder, perfect for busy schedules, potlucks, or simply when you crave something extraordinary without the fuss. It’s a dessert that promises to captivate everyone, leaving them wondering why they hadn’t tried this ingenious combination sooner.
Ingredients:
- For the Graham Cracker Crust:
- 1 ½ cups finely crushed graham cracker crumbs: This usually translates to about 10-12 full graham cracker sheets. You can crush them in a food processor for a fine, uniform crumb, or place them in a zip-top bag and use a rolling pin for a more rustic texture. The finer the crumb, the more cohesive your crust will be.
- ½ cup unsalted butter, melted: This binds the crumbs together, creating that classic sturdy base for our Key Lime Pie Rice Krispie Treats. Make sure it’s fully melted but not boiling hot.
- 2 tablespoons granulated sugar (optional, but recommended): A little extra sweetness enhances the crust, balancing the tartness of the key lime filling beautifully.
- Pinch of salt: Just a tiny bit helps to bring out the flavors in the graham crackers and prevents the crust from tasting flat.
- For the Key Lime Rice Krispie Treat Layer:
- 6 tablespoons unsalted butter: This will be melted down to create the rich, buttery base for our marshmallow mixture, ensuring a smooth, pliable texture for your Key Lime Pie Rice Krispie Treats.
- 1 (10-ounce) bag mini marshmallows (about 5 ½ cups): Mini marshmallows melt more quickly and evenly than larger ones, which is ideal for achieving that perfect gooey consistency without overcooking. Using fresh marshmallows is key here for the best stretch and texture.
- ½ cup fresh key lime juice: This is the star of the show for our Key Lime Pie Rice Krispie Treats! Freshly squeezed key lime juice is non-negotiable for authentic flavor. Its intense tartness and unique aroma are what elevate these treats from ordinary to extraordinary. Bottled lime juice simply won’t achieve the same bright, complex taste.
- 2 tablespoons key lime zest: The zest carries the bulk of the key lime oil and fragrance, providing an incredibly aromatic punch that complements the juice beautifully. Use a microplane to get very fine zest, avoiding the bitter white pith.
- 6 cups crisp rice cereal (e.g., Rice Krispies): The iconic crunch that defines these treats! Ensure your cereal is fresh and crispy for the best texture. Stale cereal will result in a less satisfying bite.
- ¼ teaspoon green food coloring (optional): While not essential for flavor, a tiny drop of green food coloring can give your Key Lime Pie Rice Krispie Treats that characteristic subtle green hue, making them even more visually appealing and reminiscent of a classic key lime pie.
- Pinch of salt: A small amount of salt helps to balance the sweetness of the marshmallows and enhance the tartness of the key lime, bringing all the flavors into perfect harmony.
- Optional Toppings/Garnish:
- ¼ cup white chocolate chips, melted: For a decorative drizzle that adds a touch of sweetness and visual contrast. You can use melting wafers or high-quality white chocolate.
- Extra key lime zest or a few extra crushed graham cracker crumbs: For a final flourish and to highlight the flavors.
Preparing Your Workspace and the Graham Cracker Base
- Prepare your baking pan: Before you even think about melting butter or marshmallows, it’s crucial to prepare your pan. I always use a 9×13-inch baking pan for this recipe, as it provides a good surface area for pressing the treats evenly. Line the pan with parchment paper, leaving an overhang on the longer sides. This overhang acts as handles, making it incredibly easy to lift the entire slab of Key Lime Pie Rice Krispie Treats out of the pan once they’ve set. Lightly grease the parchment paper with butter or non-stick cooking spray as well. This double layer of protection ensures absolutely no sticking, which is a lifesaver when you’re trying to achieve perfectly clean cuts.
Trust me, you don’t want to fight with sticky treats later!
- Make the graham cracker crumbs: If you haven’t already, take your graham crackers and crush them until they resemble fine crumbs. A food processor is your best friend here, quickly achieving a uniform texture. If you don’t have one, placing the crackers in a sturdy zip-top bag and using a rolling pin or the bottom of a heavy pan works just as well – it’s a bit more effort, but also a great stress reliever!
- Combine crust ingredients: In a medium bowl, combine your finely crushed graham cracker crumbs, the two tablespoons of granulated sugar (if using), and that tiny pinch of salt. Give them a good stir with a fork or whisk to ensure everything is evenly distributed. Then, pour in your ½ cup of melted unsalted butter. Mix thoroughly until all the graham cracker crumbs are moistened and resemble wet sand.
This ensures your crust will hold together beautifully.
- Press the crust into the pan: Now, transfer this butter-graham cracker mixture into your prepared 9×13-inch pan. Using the bottom of a flat glass, a measuring cup, or even your hands (lightly greased, of course!), press the mixture firmly and evenly into the bottom of the pan. The key here is evenness and firmness. A well-compacted crust provides a stable and delicious foundation for our Key Lime Pie Rice Krispie Treats. Make sure there are no gaps or loose crumbs.
- Chill the crust: Pop the pan with the pressed graham cracker crust into the refrigerator for at least 15-20 minutes while you prepare the Key Lime Rice Krispie layer. This chilling time allows the butter to solidify, setting the crust and making it less likely to crumble when you add the warm marshmallow mixture later. It’s a small step that makes a big difference in the final structure of your treats.
Crafting the Key Lime Marshmallow Base
- Melt the butter: In a very large non-stick pot or Dutch oven (you’ll need plenty of room for the cereal later), melt the 6 tablespoons of unsalted butter over medium-low heat.
Patience is a virtue here!
You want the butter to melt slowly and completely without browning. Browning butter, while delicious in some recipes, would alter the delicate key lime flavor we’re aiming for in these Key Lime Pie Rice Krispie Treats. Stir occasionally to help it along.
- Add the marshmallows: Once the butter is fully melted, immediately add the entire 10-ounce bag of mini marshmallows to the pot. Reduce the heat to low. It’s crucial to keep the heat low to prevent the marshmallows from burning or becoming hard once cooled. Continue stirring constantly with a rubber spatula or wooden spoon. The marshmallows will slowly start to melt, becoming gooey and sticky. Keep stirring until they are about 90-95% melted and smooth. A few small lumps are perfectly fine and will melt as you continue to stir in the next steps.
- Infuse with key lime flavor: As soon as the marshmallows are mostly melted and smooth, remove the pot from the heat. This is a critical step to preserve the fresh key lime flavor. Stir in the ½ cup of fresh key lime juice and the 2 tablespoons of key lime zest, along with the pinch of salt. Stir vigorously until everything is fully combined and smooth.
You’ll notice the mixture becoming a bit thinner and more fluid due to the added liquid, but it will still be wonderfully gooey.
The aroma that fills your kitchen at this point is absolutely divine and truly hints at the delicious Key Lime Pie Rice Krispie Treats you’re creating.
- Add optional green food coloring: If you’re going for that classic key lime pie aesthetic, now is the time to add a tiny drop or two of green food coloring. Start with just one drop, stir well, and assess the color. You want a very subtle, pale green, not an intense, artificial shade. Remember, you can always add more, but you can’t take it away! Stir until the color is evenly distributed throughout the marshmallow mixture. This step really makes these Key Lime Pie Rice Krispie Treats look the part.
Folding in the Rice Krispies for the Signature Crunch
- Add the crisp rice cereal: Immediately pour all 6 cups of crisp rice cereal into the pot with the warm key lime marshmallow mixture.
Working quickly is key here
before the marshmallow mixture cools and becomes too stiff. Using your rubber spatula or a large wooden spoon, gently but efficiently fold the cereal into the marshmallow mixture. The goal is to coat every single piece of cereal evenly without crushing them too much. Be thorough but gentle. You’ll want to scrape down the sides and bottom of the pot to ensure all the sticky goodness is incorporated. This step requires a bit of muscle and speed, but it’s incredibly satisfying as you see your Key Lime Pie Rice Krispie Treats come to life.
Assembling and Chilling Your Key Lime Pie Rice Krispie Treats
- Transfer to the prepared pan: Retrieve your pan with the chilled graham cracker crust from the refrigerator. Carefully transfer the entire batch of key lime rice krispie mixture on top of the crust. It will be very sticky, but don’t worry!
- Press into the pan: Now, it’s time to gently press the mixture into an even layer over the graham cracker crust. I find the best way to do this is to either lightly grease your hands with butter or non-stick spray, or dampen your hands with a little water. Alternatively, you can place a piece of waxed paper or parchment paper on top of the mixture and press down with your hands or the bottom of a greased measuring cup or spatula. The trick is to press firmly enough to compact the treats, but not so hard that you crush all the lovely air out of the cereal. You want that perfect balance of chewy and crunchy for your Key Lime Pie Rice Krispie Treats. Ensure it’s evenly distributed across the entire pan, right up to the edges.
An even layer means even treats when you cut them!
- Chill to set: Once you’ve pressed the mixture perfectly, place the pan back into the refrigerator. Allow the Key Lime Pie Rice Krispie Treats to chill for at least 1 to 2 hours, or until they are completely firm and set. This chilling time is essential, as it allows the marshmallow mixture to firm up, making the treats easy to cut and handle without falling apart. You want them to be nicely solid, just like a slice of pie.
Adding the Finishing Touches and Optional Toppings
- Prepare for cutting: Once your Key Lime Pie Rice Krispie Treats are thoroughly chilled and firm, use the parchment paper overhang to carefully lift the entire slab out of the baking pan and onto a large cutting board. This makes cutting so much easier and prevents any damage to your pan.
- Add optional white chocolate drizzle: If you’re opting for the white chocolate drizzle, now is the time to prepare it. Melt your ¼ cup of white chocolate chips in a microwave-safe bowl in 20-30 second intervals, stirring well after each, until smooth and creamy. Alternatively, you can use a double boiler method. Once melted, you can drizzle it decoratively over the top of your Key Lime Pie Rice Krispie Treats. A simple zigzag pattern looks lovely, or get creative! Let the white chocolate set for a few minutes before cutting. This adds another layer of sweetness and a beautiful visual appeal, making them look even more professional and appealing.
- Slice and serve: Using a large, sharp knife (you might want to lightly grease it or warm it under hot water and dry it between cuts for extra clean slices), cut the slab into your desired size. I typically go for 2×2-inch squares, but you could make smaller bite-sized pieces or larger bars.
Each cut should be decisive and clean.
Once cut, you can garnish individual Key Lime Pie Rice Krispie Treats with a little extra key lime zest or a sprinkle of crushed graham cracker crumbs to really highlight those amazing flavors and textures. The vibrant zest makes them pop and reinforces that delightful citrus note.
- Storage instructions: These delightful Key Lime Pie Rice Krispie Treats are best enjoyed within 2-3 days for optimal freshness and crunch. Store them in an airtight container at room temperature if your kitchen isn’t too warm, or in the refrigerator if you prefer them firmer or live in a humid climate. If refrigerating, let them sit at room temperature for 10-15 minutes before serving to allow them to soften slightly for the best texture. They maintain their fantastic flavor and satisfying chewiness for a few days, making them perfect for meal prep or taking to a gathering.
- Melt the butter: In a very large non-stick pot or Dutch oven (you’ll need plenty of room for the cereal later), melt the 6 tablespoons of unsalted butter over medium-low heat.
Conclusion:
And there you have it, my friends! After whisking, melting, and stirring our way to perfection, we’ve arrived at the end of our journey, but truly, it’s just the beginning of a delightful culinary adventure for you. I genuinely believe this recipe for our extraordinary Key Lime Pie Rice Krispie Treats isn’t just another dessert; it’s a revelation. Think about it: the nostalgic comfort of a classic Rice Krispie Treat, elevated to an entirely new stratosphere of flavor with the bright, zesty, and utterly irresistible tang of key lime pie. It’s the kind of treat that makes people stop, take another bite, and then ask, “What is that incredible flavor?” It’s simple enough for a weeknight whim but impressive enough to be the star of any potluck or celebration. The combination of the chewy, crispy texture with that vibrant, sweet-tart key lime punch is simply unparalleled. It’s a guaranteed crowd-pleaser that offers a burst of sunshine in every bite, making it an absolute must-try for anyone who appreciates both ingenuity and deliciousness in their sweets. I promise, once you experience that first bite, you’ll understand exactly why I’m so excited about this creation.
Serving Suggestions & Creative Variations:
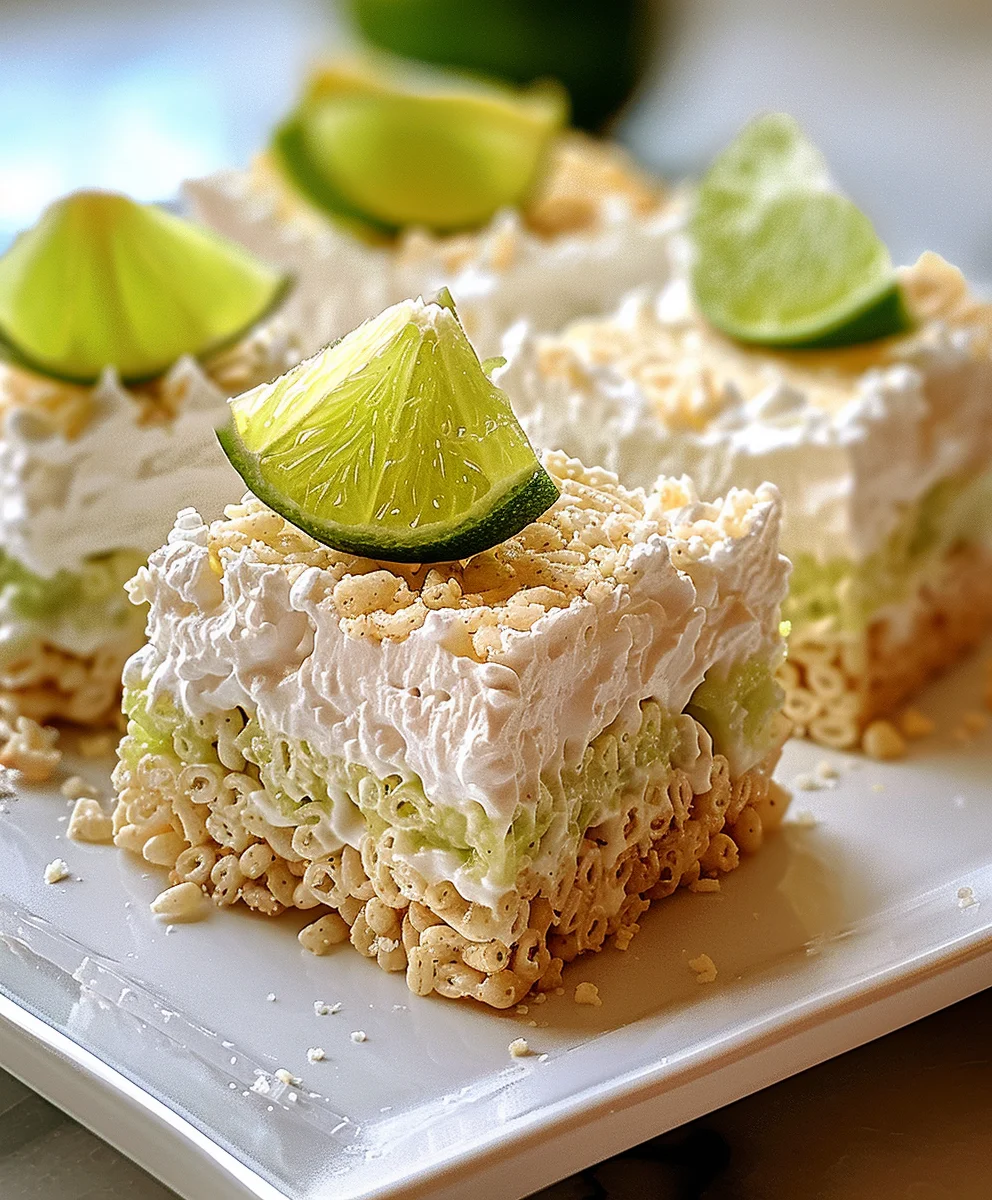
Now that you’ve mastered the basic recipe, let’s talk about how to truly make these treats shine, whether for a special occasion or just to treat yourself. Firstly, while they’re utterly fantastic on their own, consider serving them chilled for an even more refreshing experience, especially on a warm day. They make a fantastic light dessert after a heavy meal, a delightful accompaniment to your afternoon coffee or tea, or the perfect grab-and-go snack when you need a little something sweet. For a touch of elegance, you could arrange them artfully on a dessert platter, perhaps with a few extra lime wedges for garnish, emphasizing that fresh citrus theme. They’re also wonderfully portable, making them ideal for picnics, school events, or as a thoughtful homemade gift for friends and family.
But why stop there? The beauty of a recipe like this lies in its versatility. You can absolutely get creative with variations! Here are a few ideas I’ve played with to take these treats to the next level:
Toasted Coconut Crunch: For a delightful tropical twist, sprinkle some lightly toasted coconut flakes over the top of the treats just after you’ve pressed them into the pan, before they have a chance to fully set. The golden-brown coconut adds a wonderful nutty flavor and a pleasing textural contrast that pairs beautifully with the tangy key lime. It’s a simple addition that makes a big impact.
Elegant White Chocolate Drizzle: If you’re looking to add a touch of sophistication and an extra layer of sweetness, a delicate drizzle of melted white chocolate across the cooled treats is absolutely divine. The creamy richness of the white chocolate complements the tartness of the key lime wonderfully and adds a beautiful visual appeal, making them even more enticing.
Graham Cracker Crumb Topping: To lean even more into the classic key lime pie experience, consider sprinkling a light, even layer of finely crushed graham cracker crumbs over the top of your treats. This not only mimics the iconic pie crust but also introduces a lovely subtle spice and an additional layer of texture that enhances the overall “pie” feel.
Intensify with Extra Zest: For those who truly adore the bright, aromatic essence of lime, a final flourish of fresh lime zest right before serving can make all the difference. This simple garnish not only adds a pop of vibrant color but also significantly boosts the fresh citrus aroma and brightens the overall flavor profile, making each bite even more invigorating.
Perfectly Portioned Individuals: Instead of the traditional cutting into squares, try pressing the warm treat mixture into greased mini muffin tins or small silicone molds. This creates perfectly portioned, individual treats that are not only charming for parties but also incredibly easy for guests to grab and enjoy without any fuss.
The Ultimate Flavor Boost: For the truly adventurous key lime aficionado, you could experiment with adding a tiny, tiny drop (and I mean truly minuscule!) of food-grade key lime oil to the melted marshmallow mixture. This will deliver an even more intense and concentrated citrus kick. Exercise caution, however, as key lime oil is incredibly potent, and a little goes an extremely long way!
These small tweaks and creative serving suggestions can truly transform your treats and cater to different preferences or occasions, allowing you to personalize them and make them your own signature dessert that will surely impress.
Now, Go Forth and Bake! (And Share!)
My hope is that this recipe inspires you to get into the kitchen and create something truly special. There’s an immense satisfaction that comes from making something delicious from scratch, and even more so when it’s as unique and crowd-pleasing as these Key Lime Pie Rice Krispie Treats. I’m confident that once you whip up a batch, you’ll be utterly charmed by their irresistible flavor and ease. Don’t just take my word for it – experience the magic yourself! I absolutely adore hearing from you, so please, when you make these, come back and share your thoughts! Did you try a fun variation? What was your favorite part? Did they disappear in minutes at your gathering? Take a photo, tag me if you share it on social media, or drop a comment below. Your experiences and creative ideas are what make this culinary community so vibrant and exciting. Happy baking, and get ready to enjoy the most delightful, tangy, and chewy treats you’ve ever made!
Key Lime Pie Rice Krispie Treats: Easy, Zesty, No-Bake Fun!
Key Lime Pie Rice Krispie Treats are a brilliant culinary fusion, combining two cherished American classics into one utterly irresistible package. This innovative recipe takes the best elements of both worlds, offering an exciting twist on familiar comforts with vibrant citrus notes and satisfying crunch.
Ingredients
-
1 cup finely crushed graham cracker crumbs
-
2 tablespoons granulated sugar
-
Pinch of salt (for crust)
-
5 tablespoons unsalted butter
-
10 cups mini marshmallows
-
1/2 cup fresh key lime juice
-
2 tablespoons key lime zest
-
Pinch of salt (for marshmallow mixture)
-
Few drops green food coloring (optional)
-
5 cups crisp rice cereal
-
1 cup white chocolate chips
-
1/2 teaspoon coconut oil
-
1/2 cup coconut flakes (optional)
-
1/4 cup crushed nuts (optional)
Instructions
- Step 1
Prepare Pan: Line a 9×13-inch baking pan with parchment paper, leaving an overhang. Lightly grease the parchment. - Step 2
Make Crust: In a medium bowl, combine graham cracker crumbs, 2 tablespoons granulated sugar, and a pinch of salt. Melt 2 tablespoons of unsalted butter and mix into crumbs until moistened. Press firmly and evenly into the prepared pan. Chill for 15-20 minutes. - Step 3
Melt Marshmallows: In a very large non-stick pot, melt the remaining 3 tablespoons of unsalted butter over medium-low heat. Add mini marshmallows and reduce heat to low. Stir constantly until 90-95% melted and smooth. - Step 4
Infuse Flavor: Remove pot from heat. Stir in key lime juice, key lime zest, and a pinch of salt until fully combined. If desired, stir in a few drops of green food coloring for a subtle hue. - Step 5
Add Cereal: Immediately pour crisp rice cereal into the pot. Fold gently but quickly until all cereal is evenly coated with the marshmallow mixture. - Step 6
Assemble Treats: Transfer the key lime rice krispie mixture over the chilled graham cracker crust in the pan. Lightly grease hands or a spatula, then gently press the mixture evenly into the pan. - Step 7
Chill to Set: Refrigerate for at least 1-2 hours, or until completely firm and set. - Step 8
Finish & Serve: Lift the slab from the pan onto a cutting board. Melt white chocolate chips with coconut oil until smooth; drizzle decoratively over the treats. Let set. Cut into desired squares. Garnish with optional coconut flakes, crushed nuts, or extra key lime zest. - Step 9
Storage: Store in an airtight container at room temperature for 2-3 days, or in the refrigerator. If refrigerated, let sit at room temperature for 10-15 minutes before serving for best texture.
Important Information
Nutrition Facts (Per Serving)
It is important to consider this information as approximate and not to use it as definitive health advice.
Allergy Information
Please check ingredients for potential allergens and consult a health professional if in doubt.
Leave a Comment