
Tuna Melt Patties Recipe is a revelation, transforming a beloved classic into an exciting new form that’s both deeply comforting and surprisingly elegant. I’ve always found a special joy in the familiar crunch and savory goodness of a classic tuna melt, but this innovative patty version elevates that experience entirely. Imagine a crispy, golden-brown exterior giving way to a warm, flaky, and perfectly seasoned tuna mixture, often studded with creamy cheese and vibrant seasonings. It’s an ideal solution for a quick weeknight dinner or a delightful lunch, offering all the beloved flavors of its sandwich predecessor without the bread, making it a fantastic gluten-free option as well.
While the traditional tuna melt sandwich holds a cherished spot in American diner culture, celebrated for its simplicity and satisfying taste, this patty rendition offers a fresh perspective. It respects the heritage of that iconic comfort food while presenting it in a more refined, perhaps even more versatile, format. People adore this dish not just for its incredible taste—the perfect blend of savory tuna, tangy add-ins, and perfectly melted cheese—but also for its incredible texture and convenience. Preparing a batch of this Tuna Melt Patties Recipe means you have a versatile base for salads, sides, or even a clever burger alternative, making meal prep a breeze. I am thrilled to share my approach to crafting these delightful patties, promising a delicious and hassle-free addition to your culinary repertoire.

Ingredients:
- For the Tuna Patties:
- 3 cans (5 oz each) albacore tuna, packed in water, thoroughly drained – This step is crucial for non-soggy, firm patties!
- 1/2 cup finely diced celery (about 2 stalks) – I adore the fresh crunch and subtle earthy notes this adds.
- 1/4 cup finely diced red onion (or yellow onion), for a gentle bite and aromatic foundation.
- 1/4 cup finely diced red bell pepper, entirely optional but it brings a lovely color and a touch of sweetness.
- 1/2 cup plain breadcrumbs (Panko breadcrumbs are my go-to for an extra-crispy exterior!).
- 1 large egg, lightly beaten – our essential binder to keep everything beautifully together.
- 1/4 cup mayonnaise (full-fat for ultimate richness, or light if you prefer a lighter touch).
- 1 tablespoon Dijon mustard – this is my secret weapon for brightening the flavor profile and adding a sophisticated tang.
- 1 tablespoon fresh lemon juice, to cut through the richness and provide a zesty lift.
- 2 tablespoons chopped fresh parsley, for herbaceous freshness and a visual pop of green.
- 1/2 teaspoon garlic powder (or 1 clove minced fresh garlic, if you’re a garlic enthusiast like me!).
- 1/4 teaspoon black pepper, freshly ground is always superior for maximum aroma.
- 1/2 teaspoon salt, or to taste – remember, canned tuna can already be a bit salty, so adjust carefully.
- For the “Melt” Factor:
- 4 oz cheddar cheese, sharp or mild, shredded – because what’s a tuna melt without that irresistibly gooey, melted cheese? Monterey Jack, Swiss, or even a provolone work wonderfully too.
- For Cooking:
- 2-3 tablespoons olive oil or vegetable oil, for pan-frying these beauties to a perfect golden-brown crisp.
- Optional Garnishes and Serving Suggestions:
- Fresh dill sprigs, for an additional aromatic touch.
- Lemon wedges, perfect for a final squeeze of brightness.
- A side of homemade tartar sauce, spicy aioli, or a simple crisp green salad.
Preparing the Tuna Mixture for Your Tuna Melt Patties
- Thoroughly Drain the Tuna: This is arguably the most critical first step for achieving perfectly textured tuna melt patties. Open your three cans of albacore tuna. Using a fine-mesh sieve or colander, press down firmly on the tuna to extract as much liquid as possible. I often use the back of a spoon or even my impeccably clean hands to squeeze out every last drop. Excess moisture is the sworn enemy of a firm patty, so take your time here. You want the tuna to be as dry and flaky as possible. Once drained to your satisfaction, transfer the tuna to a large mixing bowl.
- Flake the Tuna: With a fork, gently flake the thoroughly drained tuna until it’s separated into small, even pieces. While you don’t want it to be a complete paste – a bit of texture is nice – you also don’t want large, unwieldy chunks that will make it difficult to form cohesive patties. Aim for a nice, crumbly yet substantial texture.
- Add the Fresh Vegetables: To the bowl with the flaked tuna, add your finely diced celery, red onion, and the optional red bell pepper. These ingredients contribute not only vibrant color but also a wonderful crunch and fresh aromatic notes that truly elevate the flavor beyond a simple tuna salad. The key here is “finely diced” – small, uniform pieces integrate better into the patty mixture and cook more evenly, ensuring every bite is balanced.
- Introduce Binders and Flavor Enhancers: Now, we’re going to bring in the elements that both bind our patties together and infuse them with incredible, layered flavor. Add the plain breadcrumbs, the lightly beaten egg, mayonnaise, Dijon mustard, fresh lemon juice, chopped fresh parsley, garlic powder, black pepper, and salt to the bowl. The egg and breadcrumbs are our primary binders, ensuring our tuna melt patties hold their shape beautifully through the cooking process. The mayonnaise adds a lovely richness and essential moisture, while the Dijon mustard and fresh lemon juice provide that crucial tang and brightness that cuts through the tuna’s inherent richness. Fresh parsley, of course, adds a delightful herbaceous note that complements the seafood perfectly.
- Mix Until Just Combined: Using a spoon, a sturdy spatula, or even your clean hands (which I find is often the best tool for this job!), gently mix all the ingredients together. Be careful not to overmix, as this can lead to a tougher, less desirable patty texture. Mix just until all the ingredients are evenly distributed and everything appears well combined. You should have a mixture that is moist enough to hold together when pressed firmly, but critically, it should not be soggy or wet.
- Taste and Adjust Seasoning: This is your moment to be a true kitchen maestro! Before forming the patties, take a small spoonful of the mixture and give it a taste. Does it need a little more salt to bring out the flavors? A pinch more pepper for a subtle warmth? Perhaps a touch more lemon juice for an extra burst of brightness? Adjust the seasonings according to your personal preference. Remember, you can always add more, but you can’t take it away! Trust your palate here.
- Chill the Mixture (Optional but Highly Recommended): For the very best results and significantly easier handling, I highly recommend covering the bowl with plastic wrap and refrigerating the tuna mixture for at least 30 minutes, or even up to a few hours. This allows the breadcrumbs to fully absorb the moisture, gives all those wonderful flavors a chance to meld and deepen, and firms up the mixture, making the patties much easier to form without crumbling. If you’re truly in a rush, you can skip this step, but trust me, a little chill time makes a significant difference in the final patty’s integrity and texture.
Forming Your Perfect Tuna Melt Patties
- Prepare Your Workspace: Before you dive into shaping, take a moment to set up your area efficiently. Grab a large plate or a sturdy baking sheet and line it with parchment paper. This will be where you gently place your formed patties before cooking, making them incredibly easy to transfer to the hot pan without sticking or losing their shape. Having a small bowl of water nearby can also be incredibly helpful; slightly dampening your hands periodically prevents the tuna mixture from sticking, ensuring a smoother shaping process.
- Determine Patty Size: This Tuna Melt Patties Recipe should yield approximately 6-8 medium-sized patties, depending entirely on how large or small you prefer them. My ideal recommendation is to aim for patties that are about 1-inch thick and roughly 3-4 inches in diameter. This specific size is perfect for ensuring even cooking throughout and for easy manageability in the skillet. If they are too thick, they might struggle to cook through properly in the center, and if they are too thin, they could become fragile and break apart during cooking or flipping. Consistency is key here!
- Scoop and Shape: Begin by taking about 1/3 to 1/2 cup of the chilled tuna mixture for each individual patty. Gently but firmly press and shape the mixture into a round or a slightly oval patty. Use the palms of your hands to compress the mixture quite firmly, paying close attention to ensuring there are no loose edges or crumbly bits. A good, solid compression is absolutely critical to preventing them from falling apart when they hit the hot oil. I personally find it helpful to make them ever so slightly thinner in the very center and a bit thicker at the edges; this subtle shaping trick helps them to cook more evenly without bulging in the middle.
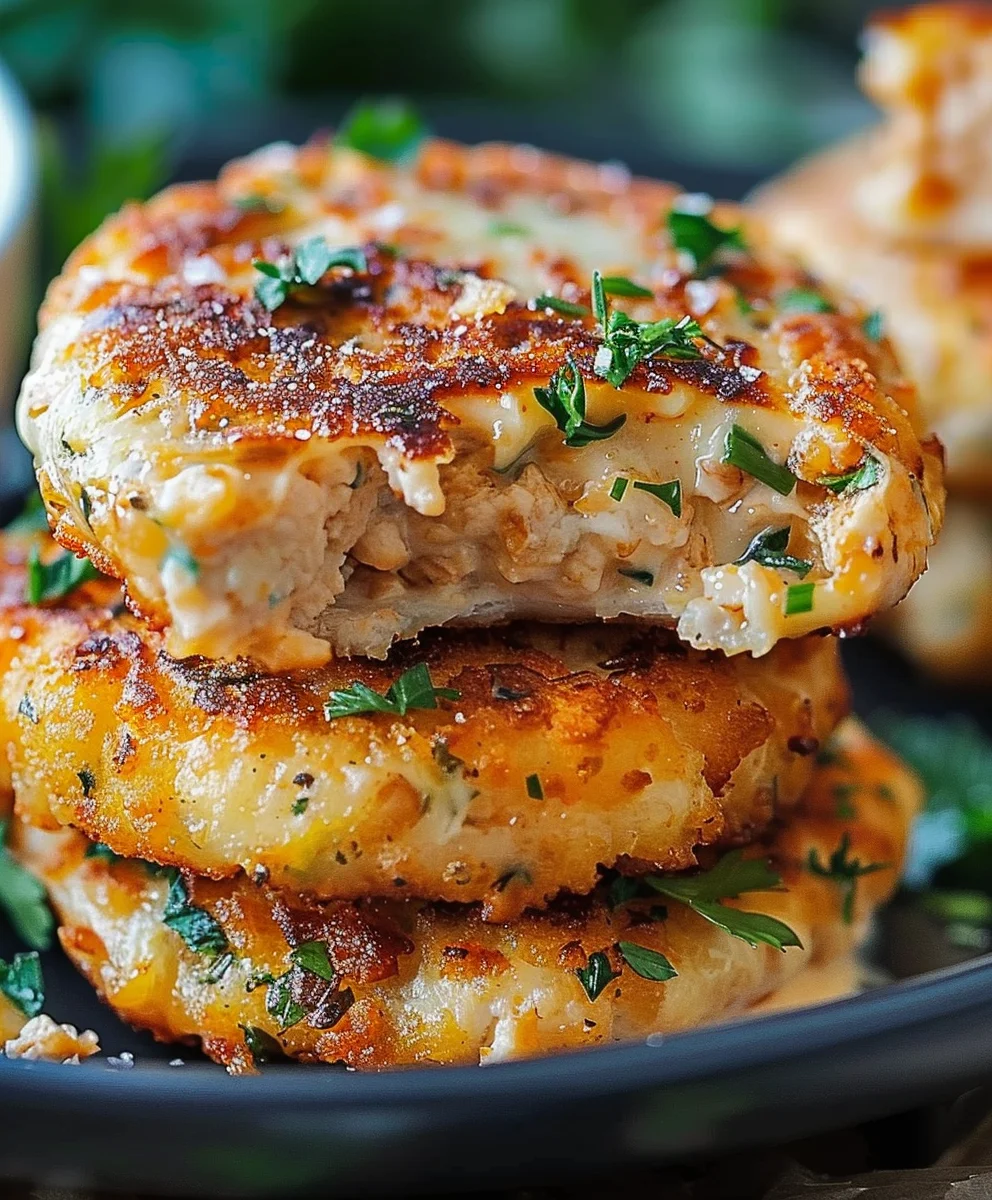
- Create a Cheese Pocket (The “Melt” Factor!): This is truly where the “melt” in our Tuna Melt Patties Recipe comes alive and transforms these from good to absolutely glorious! For each patty you’ve just meticulously formed, gently make a small indentation or a distinct pocket right in the center using your thumb. Then, carefully take about 1 tablespoon of your delicious shredded cheddar cheese (or whichever preferred cheese you’ve chosen for its melting capabilities) and nestle it snugly into this indentation. Following this, meticulously gather the tuna mixture around the cheese, sealing it completely within the patty. You want the cheese to be fully enclosed and hidden from view so it melts into a gloriously gooey, surprise center rather than immediately oozing out into your pan. This technique is what guarantees that irresistible, cheesy core we all adore!
- Refine Patty Shape: Once the precious cheese is tucked away and sealed, gently reshape the patty again, ensuring it’s still consistently about 1-inch thick and that all the edges are smooth, firm, and perfectly sealed. Take your time to make them look uniform and neat. Repeat this entire process with the remaining tuna mixture and cheese until you have all your beautiful, ready-to-cook tuna melt patties eagerly awaiting their turn in the skillet.
- Final Chill (Optional but Very Recommended): If your schedule and patience allow, I often advocate for placing the freshly formed patties back into the refrigerator for another 15-20 minutes. This second chill serves a wonderful purpose: it really helps them firm up even further and ensures they maintain their impeccable shape perfectly when they finally hit the hot oil. It might seem like a small, extra step, but trust me, this little bit of additional chill time pays off big time in the integrity and overall presentation of your end product.
Cooking Your Golden-Brown Tuna Melt Patties to Perfection
- Preheat the Pan: Start by placing a large, heavy-bottomed skillet – a trusty cast iron pan or a good quality non-stick skillet works best for this recipe – over medium heat on your stovetop. Add about 2-3 tablespoons of olive oil or your preferred vegetable oil to the pan. You’re aiming for enough oil to lightly coat the entire bottom surface, providing a consistent medium for even crisping without resorting to deep-frying. Allow the oil to heat up patiently for a few minutes. You’ll know it’s perfectly ready when it shimmers slightly across the surface, or if a tiny droplet of water flicked into it sizzles instantly upon contact (exercise caution with this test!).
- Carefully Place Patties in Pan: Once your oil is adequately hot and shimmering, very gently place the tuna melt patties into the skillet. It is absolutely crucial not to overcrowd the pan; if necessary, cook them in batches to ensure optimal results. Overcrowding will drastically lower the pan temperature, which will cause the patties to steam rather than crisp, utterly preventing that desired beautiful golden-brown crust we’re aiming for. Give each patty a little breathing room to ensure proper heat circulation and even cooking.
- Cook First Side Until Golden and Crispy: Let the patties cook undisturbed for a solid 4-6 minutes on the first side. This is perhaps the most challenging part: resisting the urge to poke, prod, or flip them too early! This undisturbed cooking time is utterly crucial for developing a robust, flavorful, and wonderfully crispy crust. You’ll intuitively know they’re ready to flip when the edges visibly look golden brown and a gentle lift with a thin, wide spatula reveals a deep, appetizing golden-brown color on the bottom. You might even notice the cheese inside starting to get warm and become deliciously melty beneath the surface.
- Flip and Cook Second Side: With the same thin, wide spatula, very carefully and confidently flip each patty over to cook on its second side. Continue to cook for another 4-6 minutes, or until this side is also beautifully golden brown and crispy, and crucially, the cheese inside is gloriously melted and gooey. You might even catch a glimpse of a tiny bit of cheese playfully peeking out from the edges, which is perfectly fine and only adds to the rustic charm and visual appeal! The ultimate goal here is a perfectly cooked, hot interior with a satisfyingly crisp exterior that provides a delightful textural contrast.
- Ensure Even Cooking: During the cooking process, if you happen to notice that some spots in your pan are browning faster than others, don’t hesitate to slightly adjust the heat downward or strategically move the patties around the pan to ensure consistently even cooking across all of them. However, generally speaking, maintaining a steady medium heat should provide wonderfully consistent results for all your tuna melt patties.
- Remove and Drain: Once your tuna melt patties are beautifully golden on both sides, thoroughly cooked through, and exuding that irresistible aroma, carefully remove them from the skillet. Transfer them immediately to a plate that you’ve thoughtfully lined with paper towels. This step is important as it allows any excess oil to drain away, which in turn helps to maintain their precious crispiness and prevents them from becoming greasy.
- Serve Immediately: While these tuna melt patties are undeniably delicious at any temperature, they are truly at their absolute peak when served warm. This allows you and your lucky diners to fully appreciate that irresistible gooey, melted cheese center and the crisp exterior in perfect harmony. Enjoy them fresh from the pan!
Optional Serving Suggestions and Creative Variations for Your Tuna Melt Patties Recipe
Once you’ve mastered the basic Tuna Melt Patties Recipe, the culinary possibilities truly open up before you! Here are some fantastic ideas to inspire you and make each serving experience unique and tailored to your preferences:
- Classic Comfort: For a simple yet utterly satisfying experience, serve your warm tuna melt patties simply with a fresh lemon wedge on the side. A generous squeeze of fresh lemon juice just before eating truly brightens all the flavors beautifully, adding a zesty zing that perfectly complements the tuna.
- Sandwich Style: For a heartier, more substantial meal that evokes a classic diner feel, place a patty (or even two!) lovingly between slices of toasted brioche, sourdough, or your favorite whole wheat bread. Elevate it further by adding a crisp lettuce leaf, a slice of ripe tomato, and perhaps a dollop of a zesty homemade aioli or a classic tartar sauce for the ultimate, indulgent tuna melt sandwich experience.
- Salad Topper: For a lighter yet incredibly satisfying lunch, break up a warm patty into tempting chunks and scatter them generously over a crisp green salad. A vinaigrette dressing with a hint of citrus or a creamy dill dressing would pair wonderfully, transforming a simple salad into a gourmet delight.
- Mini Appetizers: Planning a get-together? Form smaller, bite-sized patties and serve them as delightful appetizers at your next gathering. A decorative toothpick through each, perhaps adorned with a small cherry tomato or a sliver of tangy pickle, makes them easy for guests to grab and enjoy. Offer a variety of complementary dipping sauces such as a fiery sriracha mayo, a refreshing creamy dill sauce, or even a sweet chili sauce for diverse flavor profiles.
- Cheese Variations: Why limit yourself to just cheddar? Feel empowered to experiment boldly with other fantastic melting cheeses! Monterey Jack offers a wonderfully mild, creamy melt. Swiss cheese introduces a distinct nutty dimension. Provolone or a blend of Italian cheeses can lend an entirely different, perhaps more robust, flavor profile. For those who enjoy a little kick, try spicy pepper jack for an exciting twist!
- Herb & Spice Swaps: While fresh parsley is a timeless classic with tuna, consider incorporating other fresh herbs to explore new dimensions of flavor. Fresh dill, for instance, pairs exceptionally well with tuna, adding an elegant, aniselike note. Chopped chives or thinly sliced green onions can add a delicate, fresh oniony flavor without overpowering. For spices, a pinch of smoked paprika could introduce a lovely, earthy depth, or a mere touch of cayenne pepper if you enjoy a subtle, warming heat.
- Binder Alternatives: If you’re seeking different textures or have specific dietary considerations, know that you can absolutely adjust the binder. Crushed crackers (like buttery Ritz or savory saltines) can readily replace some or all of the breadcrumbs for a richer, perhaps saltier, patty. A spoonful of softened cream cheese added directly to the mixture can make for an even creamier, more luxurious interior texture.
- Veggie Boost: Feel completely free to experiment by incorporating other finely diced vegetables into the mixture. Sweet cooked corn kernels, finely grated zucchini (ensuring you squeeze out every bit of excess moisture!), or even a small amount of finely chopped, well-drained spinach can add extra nutrients, fiber, and nuanced flavors. Just remember to keep them finely diced so they integrate seamlessly and don’t compromise the patty’s structural integrity.
- Sauce Pairings: A simple, homemade tartar sauce is an absolutely natural and perfect fit for these patties. You can easily whip one up by mixing mayonnaise with finely chopped pickles (or relish), capers, a squeeze of fresh lemon juice, and plenty of fresh dill. A spicy aioli, made with mayo, sriracha, a dash of lime juice, and a pinch of garlic powder, also provides a fantastic, exciting contrast that will tantalize your taste buds.
- Gluten-Free Option: To effortlessly make this entire recipe gluten-free, simply use your favorite gluten-free breadcrumbs or an equal amount of crushed gluten-free crackers. All other ingredients listed in this Tuna Melt Patties Recipe are naturally gluten-free, making it easy to adapt for those with dietary needs!
Conclusion:
Well, my friends, we’ve reached the end of our culinary journey for today, but the real adventure is just beginning in your kitchen! I truly believe that this recipe for tuna melt patties isn’t just another meal; it’s a game-changer for those busy weeknights or lazy weekend lunches when you crave something utterly delicious, satisfying, and incredibly easy to whip up. These patties strike that perfect balance of crispy exterior and tender, flavorful interior, bursting with savory tuna and gooey, melted cheese. They’re not just food; they’re comfort in patty form, a simple pleasure that reminds you how wonderful home-cooked meals can be without demanding hours of your precious time. Forget complicated ingredients or elaborate techniques; this recipe is all about maximizing flavor with minimal fuss, making it accessible to even the most novice of cooks. It’s affordable, hearty, and universally loved, ticking all the boxes for a truly fantastic meal.
Why This Recipe is a Must-Try for Every Home Cook
What truly sets this dish apart, beyond its sheer deliciousness, is its unparalleled convenience. In a world where time is a precious commodity, having a go-to recipe that delivers gourmet-level satisfaction in under thirty minutes is nothing short of a culinary superpower. Imagine coming home after a long day, knowing that a fulfilling and mouth-watering meal is just minutes away, requiring ingredients you likely already have stocked in your pantry. These tuna melt patties are a testament to the fact that wholesome, flavorful food doesn’t have to be complicated or time-consuming. They offer a brilliant way to transform simple canned tuna into something truly extraordinary, elevating it from a basic sandwich filling to a standalone star. They are perfect for meal prepping too, as they reheat beautifully, making your future self incredibly grateful. Whether you’re feeding a family, cooking for one, or simply looking for a reliable, crowd-pleasing option, this recipe rises to every occasion with grace and flavor.
Creative Serving Suggestions to Elevate Your Meal
Now, let’s talk about how to truly make these delightful patties shine on your plate. While they are absolutely phenomenal on their own, perhaps with a squeeze of fresh lemon, their versatility is one of their greatest strengths. My absolute favorite way to serve them is nestled between two slices of lightly toasted sourdough or rye bread, transforming them into an open-faced sandwich masterpiece. Imagine adding a slice of ripe tomato and a crisp lettuce leaf – pure perfection! For a lighter touch, they are fantastic perched atop a fresh, vibrant green salad with a zesty vinaigrette; the warm patties provide a wonderful contrast to the cool greens. They also make an unexpected, yet incredibly satisfying, addition to a quick soup and sandwich combo, pairing beautifully with a creamy tomato bisque or a hearty lentil soup. Think beyond the traditional burger bun; these patties are fantastic as a protein-packed addition to a wrap with some crunchy veggies and a dollop of sriracha mayo for a kick. Don’t forget the power of simple sides: a classic coleslaw, some baked sweet potato fries, or even just a handful of crunchy pickle spears can elevate your meal dramatically. And for the ultimate crowd-pleaser at your next gathering, consider miniature versions served as appetizers with a simple dipping sauce or a dollop of tartar sauce.
Unleash Your Inner Chef with Easy Variations
But the fun doesn’t stop there! One of the things I adore most about this particular Tuna Melt Patties Recipe is how incredibly adaptable it is to your personal preferences and whatever ingredients you happen to have on hand. Feel free to experiment with different cheeses; a sharp cheddar will give you a bolder flavor, while Monterey Jack offers extra creaminess. Want to sneak in some extra veggies? Finely diced celery, bell peppers, or even grated zucchini can be mixed into the tuna mixture without anyone being the wiser. A dash of hot sauce or a pinch of smoked paprika can add a subtle warmth and complexity. If you’re feeling adventurous, try adding some chopped fresh herbs like parsley or chives for a burst of freshness. For a Mediterranean twist, stir in some crumbled feta and a few chopped black olives. The possibilities are truly endless, allowing you to make this recipe uniquely yours every time you prepare it, ensuring that boredom never enters your kitchen.
So, what are you waiting for? I wholeheartedly encourage you to roll up your sleeves, grab your ingredients, and give this incredible recipe a try this week. I promise you won’t be disappointed! And please, after you’ve savored every delicious bite, come back and share your experience with me. What variations did you try? What did you serve them with? I absolutely love hearing about your kitchen adventures and how you make these recipes your own. Your feedback and creative twists inspire not just me, but our entire community of food lovers. Happy cooking, and bon appétit!
Tuna Melt Patties: Easy, Crispy & Delicious Dinner!
Transform a beloved classic into exciting, crispy, golden-brown tuna melt patties. A quick, comforting, and versatile meal perfect for weeknights, featuring a warm, flaky tuna mixture with creamy, melted cheese inside. Great as a main dish, salad topper, or burger alternative.
Ingredients
-
2 cans (5 oz each) tuna, drained
-
½ cup breadcrumbs
-
¼ cup mayonnaise
-
1 egg
-
1 teaspoon Dijon mustard
-
½ teaspoon garlic powder
-
½ teaspoon onion powder
-
½ teaspoon salt
-
¼ teaspoon black pepper
-
½ cup shredded cheddar cheese (or Swiss)
-
2 tablespoons green onions, chopped
-
1 tablespoon butter (for cooking)
Instructions
- Step 1
Thoroughly drain tuna, pressing out excess liquid. Transfer to a large mixing bowl and flake with a fork. Add green onions, breadcrumbs, egg, mayonnaise, Dijon mustard, garlic powder, onion powder, salt, and black pepper. Gently mix until just combined. Taste and adjust seasoning. - Step 2
Cover and refrigerate the tuna mixture for at least 30 minutes to firm up. - Step 3
Line a plate with parchment paper. Scoop about 1/3 to 1/2 cup of chilled mixture per patty. Firmly press and shape into a round. Make a small indentation in the center, place about 1 tablespoon shredded cheese, and seal the tuna mixture around it. Reshape to about 1-inch thick and 3-4 inches in diameter. Repeat for all patties (yields 6-8). Optionally, refrigerate formed patties for another 15-20 minutes. - Step 4
Heat 1 tablespoon butter in a large skillet over medium heat until shimmering. Gently place patties in the hot skillet, cooking in batches if necessary to avoid overcrowding. - Step 5
Cook for 4-6 minutes per side, until golden brown and crispy, and the cheese inside is gloriously melted. Adjust heat for even browning. - Step 6
Remove patties and place on a paper towel-lined plate to drain excess oil. Serve warm.
Important Information
Nutrition Facts (Per Serving)
It is important to consider this information as approximate and not to use it as definitive health advice.
Allergy Information
Please check ingredients for potential allergens and consult a health professional if in doubt.
Leave a Comment