
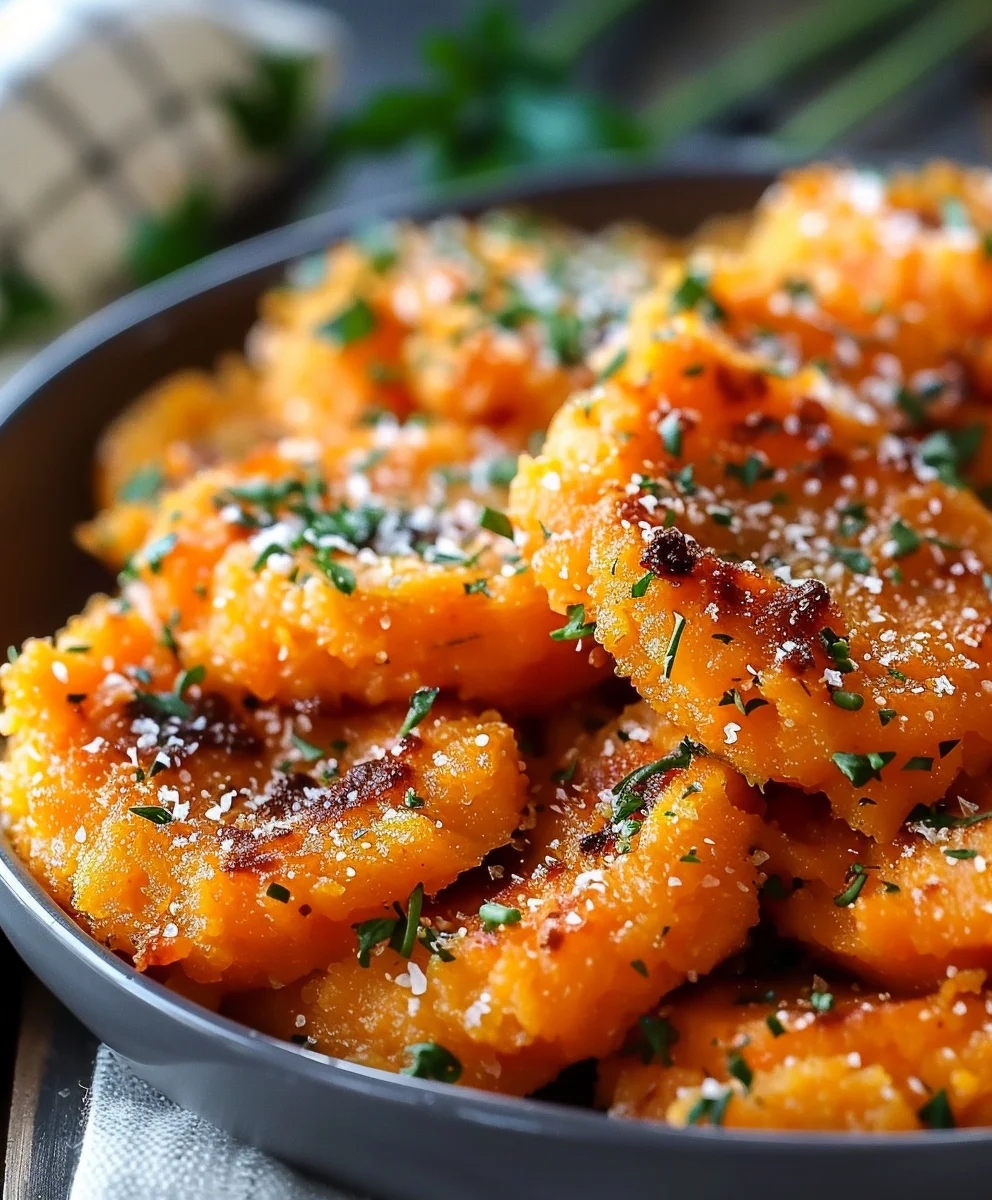
Smashed Carrots – two words that might not immediately ignite culinary excitement, but trust me, prepare to have your perception of a humble root vegetable transformed! Imagine golden-brown edges, delightfully crisp, giving way to an incredibly tender, sweet, and savory interior. This isn’t just a side dish; it’s a revelation that consistently steals the show, even from more elaborate main courses. I’m genuinely thrilled to share a method that elevates simple carrots to an unforgettable culinary experience.
The beauty of the “smashed” technique lies in its simplicity and effectiveness. While the act of smashing vegetables might seem like a modern trend, preparing food in rustic, flavor-enhancing ways dates back centuries. It’s about maximizing surface area for caramelization and absorption of delicious seasonings. For generations, cooks have intuitively understood that a little pressure can unlock immense flavor, and this method truly shines with carrots, bringing out their natural sweetness in an utterly irresistible way.
Why do people fall in love with these Smashed Carrots? It’s the magical interplay of textures – the slight crispness from roasting contrasting with the pillowy softness within. It’s the way their natural sugars caramelize, creating a depth of flavor that’s both comforting and sophisticated. Plus, they are surprisingly easy to prepare, requiring minimal effort for maximum impact. Whether you’re looking for a simple weeknight side or an impressive addition to a holiday feast, this recipe for Smashed Carrots promises to be a new favorite that will have everyone asking for more. I am genuinely thrilled for you to experience this delightful transformation!
Ingredients:
- 2 ½ pounds medium to large carrots, preferably organic, scrubbed clean
- ¼ cup extra virgin olive oil, plus more for drizzling
- ½ cup unsalted butter, softened to room temperature
- 2 cloves garlic, finely minced
- 2 tablespoons fresh thyme leaves, finely chopped
- 1 tablespoon fresh rosemary, finely chopped
- 2 tablespoons fresh parsley, finely chopped, plus more for garnish
- 1 teaspoon sea salt, plus more for seasoning
- ½ teaspoon freshly ground black pepper, plus more for seasoning
- ¼ teaspoon red pepper flakes (optional, for a subtle kick)
- For the Crispy Onion Topping:
- 1 large red onion, peeled and thinly sliced into rings
- ½ cup buttermilk (or regular milk mixed with 1 tablespoon lemon juice, left to sit for 5 minutes)
- ½ cup all-purpose flour
- ¼ cup cornstarch
- ½ teaspoon sea salt
- ¼ teaspoon black pepper
- ¼ teaspoon smoked paprika (optional, for extra flavor)
- 3-4 cups neutral oil for frying (such as vegetable, canola, or grapeseed)
- For the Balsamic Glaze (Optional but highly recommended):
- ½ cup good quality balsamic vinegar
Phase 1: Preparing the Carrots for the Smash
My journey to truly incredible Smashed Carrots always begins with careful preparation of the star ingredient. This initial stage is crucial for achieving that perfect fork-tender interior that will later become gloriously crispy and caramelized on the outside.
- First, take your 2 ½ pounds of carrots. If they’re organic and young, a good scrub under cold running water with a vegetable brush might be all they need, especially if you appreciate a rustic, skin-on feel. However, for a smoother texture, I always recommend peeling them. Use a sharp vegetable peeler to remove the outer skin. This not only ensures a consistently smooth texture but also helps any seasonings really adhere to the carrot flesh.
- Once peeled, you’ll want to cut your carrots. The goal here is to achieve pieces that are roughly uniform in size to ensure they cook evenly. For medium-sized carrots, I typically cut them into 1-inch thick rounds or diagonal pieces. If you have particularly large carrots, you might want to halve them lengthwise before cutting into chunks. Smaller, thinner carrots can be left whole or halved lengthwise. The key is to avoid super thin pieces that will cook too fast and become mushy, and extremely thick pieces that will remain hard.
- Next, it’s time to boil our carrots. Grab a large pot, one spacious enough to comfortably hold all your carrot pieces. Fill it with cold water, making sure there’s enough water to cover the carrots by at least an inch or two. Add a generous pinch of sea salt to the water – just like pasta, salting the cooking water infuses the carrots with flavor from the inside out. Bring the water to a rolling boil over high heat.
- Carefully add your prepared carrot pieces to the boiling water. Reduce the heat slightly to maintain a vigorous simmer. You’ll want to cook these carrots until they are fork-tender but not mushy. This usually takes about 15 to 20 minutes, depending on the thickness of your carrot pieces. Test for doneness by piercing a piece with a fork; it should slide in with minimal resistance but the carrot should still hold its shape. We’re looking for tender, but not falling apart.
- Once cooked to perfection, immediately drain the carrots thoroughly in a colander. I like to give them a good shake to remove any excess water. Then, spread them out in a single layer on a clean kitchen towel or paper towels to allow them to steam dry for a few minutes. This step is vital – any lingering moisture will prevent them from smashing properly and getting truly crispy later.
Phase 2: Crafting the Aromatic Herb Butter
The herb butter is where the magic really happens for our Smashed Carrots, infusing them with incredible depth of flavor. This fragrant, savory butter will cling to every nook and cranny, creating a sublime crust.
- While your carrots are boiling or draining, you can start on this glorious herb butter. Take your ½ cup of unsalted butter and ensure it’s truly softened to room temperature. This is crucial for a smooth, homogenous mixture. If you forgot to take it out ahead of time, a quick 10-15 second zap in the microwave (being very careful not to melt it completely) can work, but room temperature is always best.
- Next, prepare your fresh herbs. Finely chop 2 tablespoons of fresh thyme leaves, ensuring they are small enough to distribute evenly. Do the same with 1 tablespoon of fresh rosemary, chopping it quite finely as rosemary can be a bit woody. Finally, finely chop 2 tablespoons of fresh parsley. Using fresh herbs here is non-negotiable for that vibrant, aromatic punch; dried herbs just won’t give you the same bright flavor profile.
- Peel and finely mince your 2 cloves of garlic. I personally love garlic, so sometimes I’ll even add an extra clove or two! You can use a garlic press for speed or a sharp knife to get a really fine mince, ensuring no large chunks.
- In a medium-sized bowl, combine the softened butter, minced garlic, chopped fresh thyme, chopped fresh rosemary, and chopped fresh parsley. Add 1 teaspoon of sea salt, ½ teaspoon of freshly ground black pepper, and if you’re feeling adventurous and want a tiny hint of warmth, ¼ teaspoon of red pepper flakes.
- Using a fork or a small spatula, thoroughly mix all these ingredients together until everything is well combined and the butter is evenly seasoned and flecked with green. The consistency should be spreadable and fragrant. Set this aside, ready to embrace your perfectly boiled carrots.
Phase 3: The Smashed Carrots – Roasting to Perfection
Now for the main event! This is where our tender carrots transform into irresistibly crispy, flavorful Smashed Carrots. The smashing technique creates more surface area for maximum caramelization and crispiness.
- Preheat your oven to a robust 400°F (200°C). A hot oven is key for getting those gorgeous golden-brown, crispy edges we’re aiming for. Ensure your oven is fully preheated before putting the carrots in.
- Line two large baking sheets with parchment paper. This prevents sticking and makes for easy cleanup – trust me, you’ll thank yourself later! If you only have one baking sheet, you might need to roast in two batches to avoid overcrowding, which can lead to steaming instead of roasting.
- Take your drained, par-cooked carrot pieces. Lay them out in a single layer on your prepared baking sheets, making sure there’s some space between each piece. This is crucial for achieving crispiness.
- Now, for the smashing! Using the bottom of a sturdy drinking glass, a potato masher, or even the back of a large spoon, gently press down on each carrot piece until it flattens to about ¼ to ½ inch thick. You want them “smashed” but still holding together; they shouldn’t disintegrate. Some pieces will naturally break apart a little, and that’s perfectly fine – those little bits will get extra crispy! The goal is to increase the surface area for maximum deliciousness.
- Once all your carrots are beautifully smashed, drizzle them generously with ¼ cup of extra virgin olive oil. This helps with crispiness and flavor. Then, take your prepared herb butter from Phase 2 and dollop small amounts over each smashed carrot. Using your fingers or a small spoon, gently spread the herb butter over the surface of each carrot, ensuring every piece is well-coated. Don’t be shy; this is where the major flavor infusion happens for your Smashed Carrots.
- Season the carrots once more lightly with a little extra sea salt and freshly ground black pepper directly over the herb butter.
- Carefully transfer the baking sheets to your preheated oven. Roast for 25-35 minutes, or until the Smashed Carrots are beautifully golden brown and crispy at the edges. I recommend flipping them halfway through (around 15-20 minutes) to ensure even browning on both sides. If they look a little dry during the second half of cooking, a tiny extra drizzle of olive oil can help. Keep a close eye on them during the last 10 minutes to prevent burning, as ovens can vary. You’re looking for that perfect balance of tender interior and wonderfully crisp, flavorful exterior.
Phase 4: Crafting the Crispy Onion Topping
While your Smashed Carrots are roasting, let’s create an absolutely divine crispy onion topping. This adds a fantastic textural contrast and an extra layer of savory flavor that elevates the entire dish.
- First, prepare your large red onion. Peel it and then slice it as thinly as possible into rings. A mandoline slicer is excellent for achieving uniform, paper-thin slices, but a very sharp knife and a steady hand will also work perfectly. Separate the rings so they are individual strands.
- In a medium bowl, pour in the ½ cup of buttermilk. Add your separated onion rings to the buttermilk, ensuring they are fully submerged. Let them soak for at least 15-20 minutes. This step is a little trick I learned – the acidity in the buttermilk helps tenderize the onions and also gives the flour mixture something to really cling to, resulting in a crispier coating. If you don’t have buttermilk, remember you can use regular milk with a tablespoon of lemon juice, letting it sit for 5 minutes.
- While the onions are soaking, prepare your dredging mixture. In a shallow dish or a pie plate, combine the ½ cup all-purpose flour, ¼ cup cornstarch, ½ teaspoon sea salt, ¼ teaspoon black pepper, and ¼ teaspoon smoked paprika (if using). Whisk these ingredients together thoroughly until well combined. The cornstarch is key here; it helps achieve that extra light, super crispy texture.
- Once the onions have soaked, use a fork or tongs to lift them out of the buttermilk, allowing any excess liquid to drip back into the bowl. Transfer the onions directly into the flour mixture.
- Toss the onions vigorously with your hands, ensuring every single ring is completely coated with the flour mixture. Make sure there are no wet spots. Once coated, lift the onions out and shake off any excess flour. You want a thin, even coating. You can even place them in a sieve and shake gently to remove extra flour.
- Now, get ready for frying. In a large, heavy-bottomed pot or a deep skillet, pour in your 3-4 cups of neutral oil for frying. You want at least 2 inches of oil depth. Heat the oil over medium-high heat until it reaches 350-375°F (175-190°C). If you don’t have a thermometer, you can test it by dropping a tiny pinch of flour into the oil – if it sizzles immediately, it’s ready.
- Carefully add a handful of the dredged onion rings to the hot oil. Do not overcrowd the pan! Fry in small batches to maintain the oil temperature and ensure even cooking and crispiness. Overcrowding will lower the oil temperature and result in greasy, limp onions.
- Fry the onions for 2-4 minutes per batch, turning them occasionally with tongs, until they are beautifully golden brown and wonderfully crispy. Keep a close eye on them, as they can go from perfectly golden to burnt very quickly.
- Using a slotted spoon, transfer the crispy onions from the hot oil to a plate lined with several layers of paper towels to drain any excess oil. While they are still hot, immediately sprinkle them with a little extra pinch of sea salt. This enhances their flavor and is best done right away. Repeat this process with the remaining onion batches.
Phase 5: The Balsamic Glaze (Optional but Highly Recommended)
A balsamic glaze adds a touch of sophisticated sweetness and tang that perfectly complements the savory, crispy Smashed Carrots and onions. It’s a simple addition that makes a huge impact.
- Pour ½ cup of good quality balsamic vinegar into a small saucepan. The quality of your vinegar will directly impact the flavor of your glaze, so choose one you enjoy.
- Place the saucepan over medium-low heat. Bring the vinegar to a gentle simmer. Do not boil vigorously, as you risk burning it and developing an acrid taste.
- Allow the vinegar to simmer, stirring occasionally, for about 10-15 minutes, or until it has reduced by about half and thickened to a syrupy consistency. It should coat the back of a spoon. Remember that it will thicken further as it cools.
- Once reduced, remove the saucepan from the heat and allow the glaze to cool. As it cools, it will become richer and more viscous. If it gets too thick, you can gently warm it with a tiny splash of water to thin it out slightly. This glaze can be made ahead of time and stored in an airtight container in the refrigerator for up to a week.
Phase 6: Assembling and Serving Your Smashed Carrots
The final stage is where all your hard work comes together, creating a truly impressive and incredibly delicious dish of Smashed Carrots.
- Once your Smashed Carrots are roasted to golden perfection, tender on the inside and crispy on the outside, carefully remove them from the oven.
- Arrange the hot Smashed Carrots artfully on a serving platter. I love to make a mound, allowing them to stack slightly.
- Next, generously scatter the crispy fried onions over the top of the hot carrots. You’ve worked hard for these, so don’t be shy! The contrast of textures is one of the best parts of this dish.
- Finally, take your beautifully reduced balsamic glaze (if using) and drizzle it elegantly over the entire platter. The dark, glossy glaze will catch the light and add both visual appeal and a delightful sweet-tart counterpoint.
- For a final flourish, sprinkle a little extra fresh chopped parsley or even some fresh chives over the top. This adds a pop of fresh green color and a little extra herby aroma.
- Serve your glorious Smashed Carrots immediately, while they are still warm and the onions are at their crispiest. They make an excellent side dish to roasted meats, poultry, or fish, or even a delightful vegetarian main course with a hearty grain. Every bite is a testament to the power of simple ingredients transformed into something extraordinary. Enjoy!

Conclusion:
So, there you have it! We’ve journeyed through the simple, yet incredibly rewarding, process of creating a side dish that is bound to become a staple in your culinary repertoire. If you’ve been searching for that perfect accompaniment, something that genuinely elevates a meal from good to absolutely unforgettable, then this recipe is, without a doubt, your answer. I truly believe that once you experience the magical transformation of humble carrots into something so utterly delicious, you’ll understand why I’m so passionate about it. It’s not just another vegetable dish; it’s a revelation, offering a symphony of textures and flavors that will delight even the most discerning palates. The outer edges, beautifully caramelized and slightly crispy, give way to an interior that is incredibly tender and bursting with a natural sweetness, enhanced by the roasting process. This unique preparation method creates an irresistible contrast that is both comforting and exciting, making it far superior to simply boiled or steamed carrots.
Why This Recipe Is an Absolute Must-Try:
What truly sets this recipe apart, and why I consider it an absolute must-try, is its unparalleled ability to deliver maximum flavor with minimal effort. We’re talking about a dish that looks sophisticated and tastes gourmet, yet requires only a handful of ingredients and straightforward steps that anyone, regardless of their cooking prowess, can master. The beauty lies in the simplicity: taking fresh, vibrant carrots, giving them a gentle smash to increase their surface area for caramelization, and then roasting them to perfection. This technique ensures every bite is packed with that deep, sweet, earthy flavor that only perfectly roasted vegetables can achieve. It’s a fantastic way to coax out the best from your produce, transforming an everyday root vegetable into a star. Furthermore, it’s incredibly versatile, acting as a delightful counterpoint to richer main courses or standing proudly on its own as a vibrant vegetarian option. It brings an exciting texture and depth of flavor that can easily become the highlight of any plate, making it a perfect choice for weeknight dinners or special occasions alike. Trust me, once you taste the glorious result, you’ll find yourself craving these unique and flavorful carrots again and again.
Serving Suggestions and Creative Variations:
Now that you’ve perfected this amazing dish, let’s talk about how to serve it and how you can get creative! These delightful carrots are incredibly versatile. They make an absolutely stellar sidekick to almost any protein. Imagine them alongside a succulent roasted chicken, a perfectly seared steak, flaky baked salmon, or even tender lamb chops. For a hearty vegetarian meal, they pair wonderfully with quinoa, lentils, or a robust grain salad. They’re also brilliant for a weekend brunch, served with scrambled eggs and crispy bacon, adding a touch of natural sweetness and vibrant color to your morning spread.
But don’t stop there! The beauty of this recipe is how easily it can be adapted to suit your mood or what you have on hand. For a fresh, herbaceous twist, try tossing the finished carrots with a sprinkle of fresh dill, chopped parsley, or a bit of fragrant rosemary. If you’re looking for a little kick, a pinch of red pepper flakes or smoked paprika added during the roasting process will introduce a delightful warmth. A drizzle of balsamic glaze or a squeeze of fresh lemon juice just before serving can brighten the flavors beautifully. For an extra layer of indulgence, a sprinkle of crumbled feta or goat cheese adds a creamy, tangy dimension that is simply divine. And if you have a sweet tooth, a tiny drizzle of maple syrup or a pinch of brown sugar tossed with the carrots before roasting will enhance their natural sweetness, creating a truly irresistible treat. Don’t be afraid to experiment with different herbs and spices – a touch of cumin, coriander, or even a sprinkle of toasted sesame seeds can completely change the flavor profile, opening up a world of possibilities. You could even make a larger batch and use leftovers in a warm salad the next day, proving their incredible adaptability.
Your Turn: Try the Smashed Carrots and Share Your Magic!
So, what are you waiting for? I wholeheartedly encourage you to roll up your sleeves, grab some beautiful carrots, and give this recipe a try. I promise you won’t be disappointed. There’s a unique satisfaction that comes from transforming simple ingredients into something truly special, and these Smashed Carrots offer that in spades. They’re not just food; they’re an experience – a testament to how incredible vegetables can be when treated with a little love and the right technique.
Once you’ve made them, I would absolutely love to hear about your experience! Did you stick to the recipe, or did you put your own creative spin on it with some of the variations we discussed? What did you serve them with? Please share your thoughts, your successes, and perhaps even a photo or two in the comments section below. Your feedback and stories inspire me and our entire community of home cooks. Let’s celebrate the joy of cooking and the delicious discoveries we make along the way. Happy cooking, and I can’t wait to see what culinary magic you create!
Perfect Smashed Carrots: Crispy, Sweet & Easy Recipe
Crispy, sweet, and savory smashed carrots with an optional crispy onion topping and balsamic glaze. This easy recipe transforms humble carrots into an unforgettable culinary experience.
Ingredients
-
2 ½ lbs carrots
-
¼ cup extra virgin olive oil
-
½ cup unsalted butter, softened
-
2 cloves garlic, minced
-
2 tbsp fresh thyme leaves, chopped
-
1 tbsp fresh rosemary, chopped
-
2 tbsp fresh parsley, chopped
-
1 tsp sea salt
-
½ tsp freshly ground black pepper
-
¼ tsp red pepper flakes (optional)
-
For Crispy Onion Topping:
-
1 large red onion, thinly sliced
-
½ cup buttermilk (or milk + 1 tbsp lemon juice)
-
½ cup all-purpose flour
-
¼ cup cornstarch
-
½ tsp sea salt
-
¼ tsp black pepper
-
¼ tsp smoked paprika (optional)
-
3-4 cups neutral oil for frying
-
For Balsamic Glaze (Optional):
-
½ cup good quality balsamic vinegar
Instructions
-
Step 1
Peel/scrub 2.5 lbs carrots, cut into 1-inch pieces. Boil in salted water for 15-20 mins until fork-tender. Drain and dry thoroughly on paper towels. -
Step 2
Combine softened ½ cup unsalted butter, 2 minced garlic cloves, 2 tbsp chopped fresh thyme, 1 tbsp chopped fresh rosemary, 2 tbsp chopped fresh parsley, 1 tsp sea salt, ½ tsp black pepper, and optional ¼ tsp red pepper flakes. Mix well. -
Step 3
Preheat oven to 400°F (200°C). Line 2 baking sheets with parchment. Arrange dried carrots, then gently smash each to ¼-½ inch thick. Drizzle with ¼ cup olive oil, dollop/spread herb butter over carrots, and season lightly with salt/pepper. Roast for 25-35 mins, flipping halfway, until golden brown and crispy. -
Step 4
Thinly slice 1 large red onion; soak in ½ cup buttermilk for 15-20 mins. Combine ½ cup flour, ¼ cup cornstarch, ½ tsp sea salt, ¼ tsp black pepper, and optional ¼ tsp smoked paprika. Drain onions, toss in flour mixture until coated. Heat 3-4 cups neutral oil to 350-375°F (175-190°C). Fry onions in small batches for 2-4 mins until golden. Drain on paper towels and salt immediately. -
Step 5
Simmer ½ cup balsamic vinegar in a small saucepan over medium-low heat for 10-15 mins until reduced by half and syrupy. Let cool. -
Step 6
Arrange hot roasted smashed carrots on a platter. Generously scatter crispy fried onions over top. Drizzle with balsamic glaze (if using) and garnish with fresh parsley. Serve immediately.
Important Information
Nutrition Facts (Per Serving)
It is important to consider this information as approximate and not to use it as definitive health advice.
Allergy Information
Please check ingredients for potential allergens and consult a health professional if in doubt.
Leave a Comment