
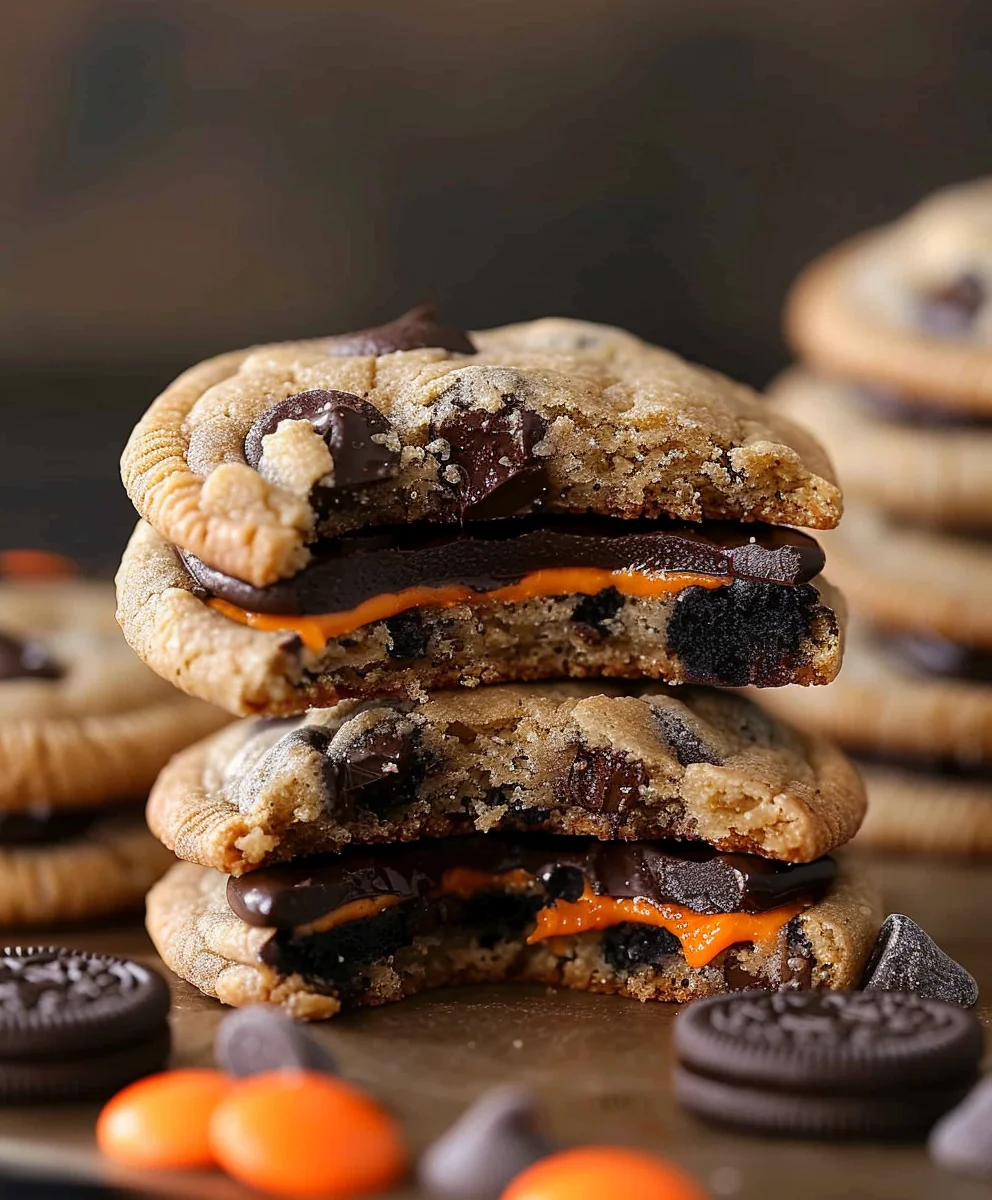
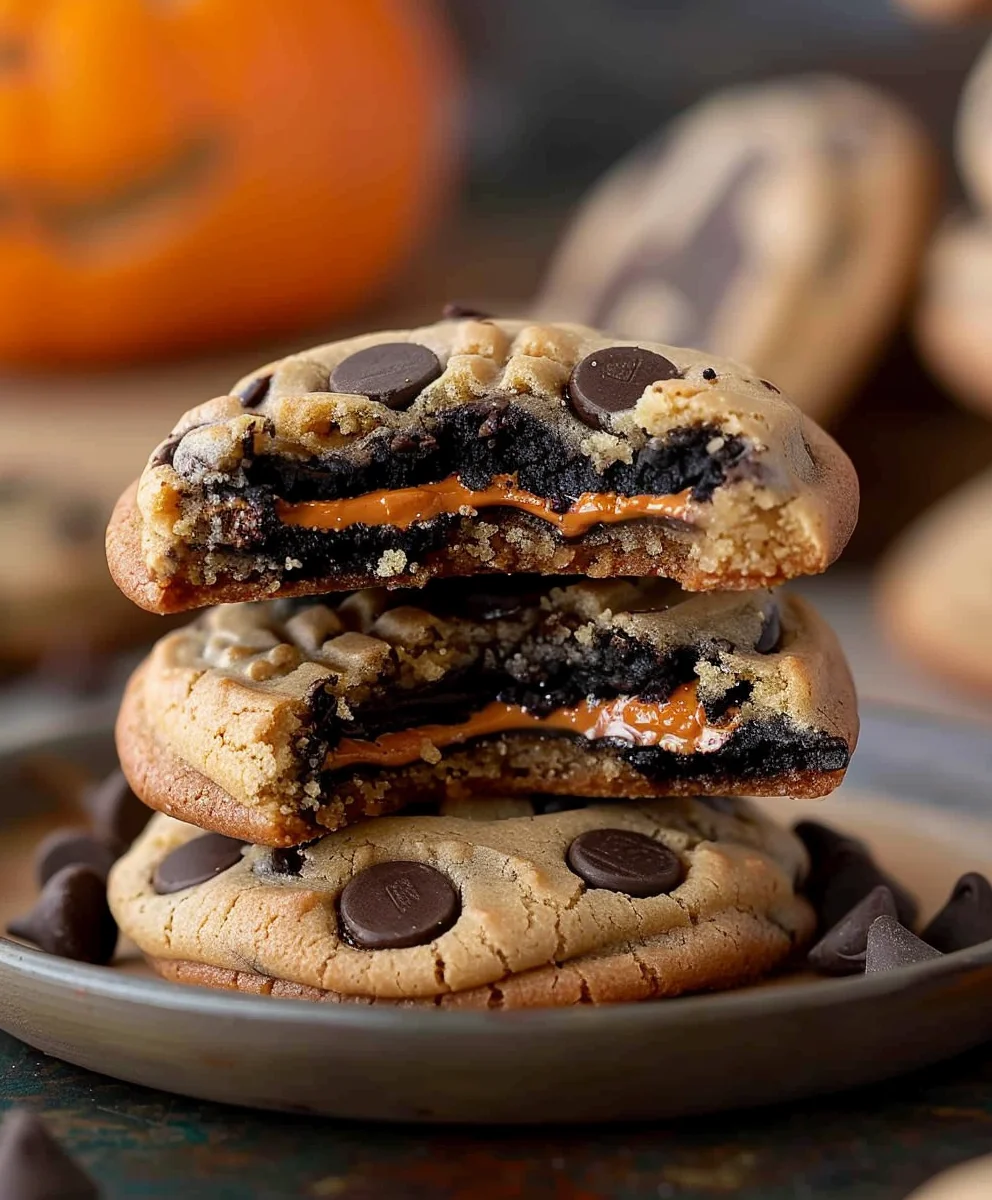
Halloween Oreo Stuffed Chocolate Chip Cookies are, without a doubt, the ultimate festive indulgence for the spooky season. Imagine biting into a perfectly golden, chewy chocolate chip cookie, only to discover a delightful, creamy Halloween-themed Oreo cookie hidden within. It’s a surprise that brings a smile to every face, combining the timeless comfort of a classic chocolate chip cookie with the playful crunch of an Oreo, all dressed up for the most ghoulishly fun holiday of the year.
A Deliciously Creative Twist on Classic Treats
The magic truly lies in this ingenious fusion. Chocolate chip cookies themselves boast a heartwarming history, a beloved American invention that has comforted generations. Oreos, the iconic “milk’s favorite cookie,” have their own storied past, celebrated for their unique cream filling and distinctive chocolate wafers. Bringing these two legendary treats together, especially for Halloween, elevates them beyond a simple dessert; it creates a moment of pure culinary joy. People adore this dish not only for its irresistible combination of rich chocolate, sweet cream, and delightful textures – the soft, chewy exterior yielding to a satisfying crunch – but also for the sheer convenience and incredible visual appeal it offers for any autumn gathering or trick-or-treat party. I believe these Halloween Oreo Stuffed Chocolate Chip Cookies are destined to become a cherished tradition in your household, offering a deliciously creative twist on familiar favorites.
Ingredients:
- Unsalted Butter: 1 cup (2 sticks or 226g), softened to room temperature. I always reach for unsalted butter when baking so I can meticulously control the salt content myself. It’s vital that your butter is truly softened, not melted, for achieving that perfect light and airy texture in our cookies. If it’s too cold, it won’t cream properly; if it’s too warm, your dough might become greasy.
- Granulated Sugar: ¾ cup (150g). This white sugar contributes to the classic crisp edges and beautiful browning of our chocolate chip cookies. It also provides a foundational sweetness that complements the rich flavors of the other ingredients.
- Light Brown Sugar: 1 cup (200g), firmly packed. The molasses in light brown sugar is key for adding moisture, a delightful chewiness, and that signature warm, caramel-like flavor to our cookies. Make sure to pack it tightly into your measuring cup to ensure you have the correct amount.
- Large Eggs: 2, at room temperature. Just like with the butter, room temperature eggs are crucial. They emulsify much better with the creamed butter and sugars, resulting in a smoother, more cohesive dough. This leads to a more uniform crumb and a better overall texture in your finished cookies.
- Pure Vanilla Extract: 2 teaspoons. Please, use a good quality pure vanilla extract here! It truly makes an enormous difference in the depth and aroma of your cookies. Vanilla isn’t just a flavor; it’s a flavor enhancer that brings all the other sweet notes into harmony.
- All-Purpose Flour: 2 ¼ cups (270g), spooned and leveled. Precision is important with flour. If you have a kitchen scale, I highly recommend using it as it’s the most accurate method. Otherwise, remember to spoon your flour gently into the measuring cup and level it off with the back of a knife or a straight edge to avoid packing too much flour in, which can lead to dry, dense cookies.
- Baking Soda: 1 teaspoon. This is our leavening agent that will help our cookies rise beautifully and spread just enough to create that perfect crinkled edge. It reacts with the acidic brown sugar to create those airy pockets.
- Salt: 1 teaspoon. Don’t even think about skipping the salt! It is absolutely essential for balancing the sweetness, enhancing the chocolate and vanilla flavors, and preventing the cookies from tasting overly saccharine. It brings all the elements together.
- Chocolate Chips: 1 ½ cups (about 250g) total. Here, I love to get creative! My go-to is often a mix of semi-sweet chocolate chips and milk chocolate chips for a balanced sweetness and melt. However, feel free to use your absolute favorite – dark chocolate chunks would add a lovely bitterness, or even white chocolate chips for a different visual and flavor profile.
- Halloween Oreos: 1 package (about 36 cookies). Ah, the star of our show! Look specifically for the limited edition Halloween-themed Oreos with their vibrant orange creme filling. They not only provide a fantastic flavor and texture surprise but also bring that undeniable festive spirit to our “Halloween Oreo Stuffed Chocolate Chip Cookies.”
- Optional (but highly recommended!) Halloween Sprinkles: ¼ cup. These are purely for fun and aesthetics, but they add such a fantastic pop of color and an extra playful crunch. Think orange, black, purple, or even green sprinkles to really lean into the Halloween theme.
Phase 1: Preparing the Halloween Oreo Filling and Chilling
- Prepare the Oreos: Our first step is to get our fantastic Halloween Oreos ready for their starring role. Carefully unwrap your package of Halloween Oreos. I usually work with about 36 cookies, which is a standard package size, but you might need a few more or less depending on your desired batch size. Each of our magnificent chocolate chip cookies will encase one whole Oreo, so ensure you have enough on hand for all your planned treats.
- Freeze the Oreos (A Crucial Step!): This particular step is non-negotiable and incredibly important for the success of your Halloween Oreo Stuffed Chocolate Chip Cookies. Freezing the Oreos is essential for preventing the creme filling from completely melting and oozing out during the baking process, which can lead to a less-than-perfect cookie. Arrange your Halloween Oreos in a single layer on a baking sheet. I like to line the sheet with parchment paper or a silicone mat to prevent any sticking. Once they’re neatly arranged, pop the entire tray into your freezer for a minimum of 30 minutes. If you have the time, an hour or even longer is even better. The colder your Oreos are, the more effectively they will maintain their shape and integrity when subjected to the oven’s heat. I often find it convenient to do this step the night before and leave them in the freezer overnight, ensuring they are perfectly solid and ready for assembly. This little bit of foresight makes a huge difference in the final product.
Phase 2: Making the Perfect Chocolate Chip Cookie Dough
- Cream the Butter and Sugars: Now, let’s turn our attention to the heart of our cookie – the dough! In a large mixing bowl, or the bowl of your stand mixer fitted with the paddle attachment, combine your wonderfully softened unsalted butter with both the granulated sugar and the firmly packed light brown sugar. Turn your mixer on medium speed and beat this mixture for a good 2-3 minutes. What we’re looking for is a transformation: the mixture should become noticeably light, fluffy, and visibly pale in color. During this process, be diligent about scraping down the sides of the bowl with a rubber spatula every so often. This ensures that all ingredients are thoroughly incorporated and prevents any unmixed pockets. This creaming process is vital as it incorporates air into the butter, which is the secret to a light, tender, and perfectly textured cookie.
- Add Eggs and Vanilla: Once your butter and sugars are beautifully creamed, reduce your mixer speed to low. Now, add your room temperature large eggs, one at a time. After each egg addition, beat just until it’s combined with the mixture. It’s important to exercise caution here and avoid overmixing. Once both eggs are incorporated, gently stir in the pure vanilla extract. At this stage, you might notice the mixture looking a little bit curdled or separated. Don’t panic! This is completely normal and will rectify itself once we introduce the dry ingredients. Again, give the sides of the bowl another scrape to ensure everything is ready for the next step.
- Combine Dry Ingredients: In a separate, medium-sized bowl, take your all-purpose flour, baking soda, and salt. Give these dry ingredients a good whisk together. The purpose of whisking them separately is to ensure that the leavening agent and salt are perfectly and evenly distributed throughout the flour. This prevents any unpleasant surprises like pockets of unmixed baking soda or overly salty spots in your finished Halloween Oreo Stuffed Chocolate Chip Cookies.
- Gradually Add Dry to Wet: With your mixer still on low speed, begin to gradually add the combined dry ingredient mixture to your wet ingredients. Mix only until the flour is just combined. This is arguably one of the most critical stages in making excellent cookies: it is incredibly important not to overmix the dough. Overmixing develops the gluten in the flour, which can lead to tough, dense, and less-than-chewy cookies – the exact opposite of what we’re striving for. As soon as you no longer see obvious streaks of dry flour, stop mixing immediately. A few tiny streaks are perfectly fine; we’ll finish integrating them by hand.
- Fold in Chocolate Chips and Sprinkles: Remove the bowl from the mixer stand. Grab a sturdy rubber spatula or a wooden spoon. Now, it’s time to gently fold in your chosen chocolate chips. If you’ve opted for the festive Halloween sprinkles (which I highly recommend for that extra celebratory touch!), fold those in now too. Continue folding just until the chocolate chips and sprinkles are evenly distributed throughout the thick, slightly sticky cookie dough. This gentle folding ensures we don’t activate the gluten further.
- Chill the Cookie Dough (Optional but Highly Recommended): For an absolutely unparalleled cookie experience – with even better flavor development, enhanced chewiness, and significantly less spreading during baking – I wholeheartedly recommend chilling your cookie dough. Pop the bowl, covered tightly with plastic wrap, into the refrigerator for at least 30 minutes. You can even chill it for a glorious 24 hours. This chilling period allows the flavors to meld beautifully and the butter to firm up, resulting in a cookie that holds its shape wonderfully and boasts a more complex taste profile. If you’re truly pressed for time, you can technically skip this step, but I promise you, the patience is richly rewarded!
Phase 3: Assembling the Halloween Oreo Stuffed Cookies
- Preheat Oven and Prepare Baking Sheets: As your dough is happily chilling (or if you’ve bravely decided to forgo the chill, do this now), preheat your oven to 375°F (190°C). Then, grab two large baking sheets and line them with either parchment paper or reusable silicone baking mats. This crucial step prevents your precious cookies from sticking to the pan and helps ensure they bake evenly and release easily without breakage.
- Portion the Dough: This is where the magic truly begins to take shape! Retrieve your perfectly chilled cookie dough. For each individual Halloween Oreo Stuffed Chocolate Chip Cookie, you’ll need approximately 2 tablespoons of dough. I find that using a medium-sized cookie scoop (one that holds about 1.5 to 2 ounces) is absolutely ideal for achieving consistent sizing and a professional look. If you don’t have a scoop, aim for a portion of dough roughly the size of a golf ball – it doesn’t have to be perfectly precise, but consistency helps.
- Encase the Oreo: Take one portion of your cookie dough and gently flatten it into a disc in the palm of your hand. You want this disc to be wide enough to comfortably and completely wrap around an Oreo cookie. Now, fetch your diligently frozen Halloween Oreos from the freezer. Place one frozen Oreo squarely in the center of your flattened dough disc. With utmost care, bring the edges of the cookie dough up and around the Oreo, ensuring that it is completely enclosed. This step of fully covering the Oreo with cookie dough is incredibly important. Any exposed part of the Oreo is susceptible to burning or, more commonly, the creme filling melting out during baking, which we definitely want to avoid for a perfect aesthetic and structure. Firmly pinch the seams of the dough together to create a secure seal all around the Oreo.
- Shape and Place: Once the Oreo is fully encased, gently roll the dough-wrapped Oreo between your palms to form a smooth, neat, and round ball. Place these beautifully stuffed cookie dough balls about 2-3 inches apart on your prepared baking sheets. Remember, these cookies will spread a bit in the oven, so giving them ample space prevents them from merging into one giant cookie blob! For an extra touch of visual appeal and festive cheer, you can gently press a few more chocolate chips or some additional Halloween sprinkles onto the very tops of the cookie dough balls before they go into the oven. This little flourish makes them look even more enticing and professionally baked.
Phase 4: Baking and Cooling Your Masterpiece
- Bake the Cookies: Carefully transfer your baking sheets into your preheated oven. I usually recommend baking one sheet at a time for the most consistent results, especially if your oven has uneven heating. However, if your oven is generously sized and you can accommodate two sheets without them crowding or touching the sides, you can bake both. If baking two, make sure to rotate the sheets halfway through the baking time (top to bottom, front to back) to ensure even browning. Bake for 10-14 minutes. You’ll know they’re ready when the edges are beautifully golden brown, but the centers still look slightly soft, puffed, and maybe even a tiny bit underbaked. It’s a golden rule of cookie baking that cookies continue to cook and set for a few minutes after they are removed from the oven, so erring on the side of slightly underbaking will result in a chewier, more delightful cookie.
- Cool on Baking Sheet: Once your Halloween Oreo Stuffed Chocolate Chip Cookies emerge from the oven, remove the baking sheets. Allow the cookies to cool undisturbed on the hot baking sheets for approximately 5-10 minutes. This initial cooling period is critical because the cookies are incredibly delicate and soft when they first come out of the oven. This brief rest on the warm sheet allows them to firm up slightly, making them much easier to handle without falling apart.
- Transfer to Wire Rack: After that essential initial cooling period on the baking sheet, very carefully transfer your still-warm cookies to a wire rack to complete their cooling process. Cooling on a wire rack is important because it allows air to circulate freely all around each cookie. This prevents the bottoms from becoming soggy due to trapped steam and ensures an even, consistent cool throughout. As tempting as it will be, try your best to resist the urge to break one open immediately! While warm cookies are heavenly, these Halloween Oreo Stuffed Chocolate Chip Cookies are truly at their best once they are fully cooled. This allows the Oreo filling to fully set within the cookie, and the cookie itself will have developed its complete flavor and texture profile, offering the most satisfying bite.
Tips for Success and Creative Variations
Crafting the perfect batch of Halloween Oreo Stuffed Chocolate Chip Cookies isn’t just about following steps; it’s about understanding the nuances and embracing opportunities for creativity. Here are my tried-and-true tips for ensuring success and some delightful variations to make your cookies truly unforgettable.
Ensuring Perfect Oreo Placement and Integrity:
- The Freezer is Your Ultimate Ally: I simply cannot overstate the importance of freezing your Oreos beforehand. Skipping this fundamental step almost guarantees that the luscious creme filling will melt excessively and potentially seep out of your cookies during baking, creating a messy situation that diminishes the cookie’s appeal. A thoroughly frozen Oreo provides a stable, solid core for the surrounding cookie dough to bake around, ensuring it stays beautifully intact.
- Achieve Complete Encapsulation: When you’re diligently wrapping the cookie dough around each Oreo, be incredibly meticulous. Your goal is to ensure there are absolutely no gaps, thin spots, or exposed edges where the Oreo might be visible. Any part of the Oreo that isn’t fully covered by the dough is a potential weak point for the creme to escape or for the wafer part to become over-browned or even slightly burnt, which would unfortunately compromise the overall visual appeal and taste of your final cookie.
- Embrace Consistent Dough Portions: Utilizing a cookie scoop is a game-changer for consistency. It helps you measure uniform portions of dough effortlessly. If your dough portions vary significantly in size, some cookies will be larger and require a longer baking time, risking others being smaller and potentially overbaked. Uniformly sized cookies bake more evenly, ensuring every single Halloween Oreo Stuffed Chocolate Chip Cookie is perfect.
Maximizing Flavor and Texture:
- Always Use Room Temperature Ingredients: This seemingly minor detail makes a colossal difference. Both your unsalted butter and large eggs should be at true room temperature. This allows them to cream together beautifully and form a smooth, stable emulsion that effectively traps air. This trapped air is the secret behind a light, fluffy, and uniformly textured cookie. Cold ingredients, in contrast, won’t combine properly, often leading to a denser, potentially greasier, and less appealing cookie.
- The Golden Rule: Do Not Overmix the Dough: Once you’ve added the all-purpose flour to your wet ingredients, switch your mixer to low speed and mix only until the dry ingredients are just incorporated. Overmixing is the arch-nemesis of a tender cookie; it overdevelops the gluten in the flour, resulting in cookies that are tough, chewy in an unpleasant way, and dry. We are aiming for wonderfully tender and chewy cookies, not hard, unyielding hockey pucks!
- Invest in Good Quality Chocolate: The flavor of your chocolate chip cookies is directly proportional to the quality of the chocolate you use. Don’t shy away from investing in good quality chocolate chips or chunks. A thoughtful blend of semi-sweet, milk, and perhaps even some dark chocolate chunks can introduce a wonderful complexity and depth of flavor that elevates the entire cookie. The quality of your chocolate truly shines through in a simple, classic chocolate chip cookie.
- A Touch of Flaky Sea Salt: For an extra gourmet touch, once your cookies have just emerged from the oven and are still warm, lightly sprinkle a tiny pinch of flaky sea salt (like Maldon) over the top of each cookie. This small addition performs wonders by enhancing the chocolate flavor and providing an absolutely delightful salty-sweet contrast that makes these cookies even more irresistible.
Creative Variations to Elevate Your Halloween Treat:
- Explore Different Oreo Flavors: While the Halloween Oreos are perfectly thematic, don’t feel limited! Dare to experiment with other fantastic Oreo flavors to discover new taste sensations. Imagine peanut butter Oreos for a nutty twist, mint Oreos for a refreshing kick, or even golden Oreos for a comforting, vanilla-infused surprise. Each different Oreo will introduce a unique flavor profile to these already spectacular stuffed cookies.
- Introduce Spiced Cookie Dough: For an undeniably autumnal and cozy twist, consider incorporating warming spices into your dry ingredients. Adding ½ teaspoon of ground cinnamon and a ¼ teaspoon of freshly grated nutmeg would infuse the cookie dough with a lovely aromatic warmth that pairs exquisitely with both the rich chocolate and the sweet Oreo filling, perfect for a crisp fall evening.
- Craft Spooky Monster Eye Cookies: To really amp up the Halloween fun, before you bake your cookies, gently press one or two edible candy “eyeballs” onto the top of each cookie dough ball. As the cookies bake and spread, these charming little eyeballs will melt just slightly into the cookie, creating a wonderfully spooky and utterly delightful monster effect that is sure to be a hit with kids and adults alike.
- Drizzle with White Chocolate: Once your Halloween Oreo Stuffed Chocolate Chip Cookies have completely cooled, melt some good quality white chocolate (you can even tint it orange or ghoulish green with a few drops of food coloring for extra Halloween panache!). Drizzle this melted chocolate artfully over the cooled cookies. This addition provides another delightful layer of sweetness and imparts a professional, bakery-worthy finish to your homemade treats.
- Add a Crushed Oreo Topping: For an extra burst of Oreo flavor and a textural contrast, instead of or in addition to sprinkles, crush a few extra Halloween Oreos into coarse crumbs. Sprinkle these delicious crumbs generously over the top of your cookie dough balls just before they go into the oven. This creates a wonderfully crunchy, cookie-on-cookie experience that celebrates the star ingredient even further.
Storage:
To keep your delightful Halloween Oreo Stuffed Chocolate Chip Cookies at their freshest, store them in an airtight container at room temperature. They will remain wonderfully soft and delicious for up to 3-4 days. For longer-term enjoyment, you can easily freeze the baked cookies for up to 2 months. When you’re ready to indulge again, simply thaw them at room temperature or warm them gently in the microwave for a few seconds to recapture that glorious fresh-baked warmth.
These Halloween Oreo Stuffed Chocolate Chip Cookies are so much more than just a dessert; they’re a truly delightful experience that combines the nostalgic comfort of a classic chocolate chip cookie with a fun, festive, and utterly delicious surprise hidden inside. They are absolutely perfect for surprising trick-or-treaters, dazzling guests at a Halloween party, or simply for cozying up with a spooky movie on a crisp autumn evening. I encourage you to savor the process of baking them just as much as you’ll relish every single bite!
Conclusion:
So there you have it, my friends! We’ve journeyed through the delightful process of creating what I honestly believe are some of the most exciting, indulgent, and conversation-starting cookies you’ll ever bake. This isn’t just another cookie recipe; it’s an experience, a delightful surprise waiting in every bite. Imagine the classic comfort of a perfectly baked, chewy chocolate chip cookie – golden at the edges, wonderfully soft in the center – but then, surprise! A whole, crisp, and creamy Oreo awaits inside, adding an unexpected layer of texture and flavor that is simply irresistible. This magical combination elevates a humble treat into something truly extraordinary. It’s the kind of cookie that makes eyes widen and smiles appear, a guaranteed hit at any gathering, especially when you’re looking to add a touch of playful festivity.
What truly makes these cookies a must-try is their unique ability to merge two beloved classics into one magnificent creation. You get the rich, buttery goodness of a chocolate chip cookie alongside the iconic crunch and creamy filling of an Oreo. It’s a textural symphony: the soft, yielding cookie exterior gives way to the firm snap of the Oreo, followed by its smooth, sweet creme. This contrast is what makes every bite so utterly compelling. Plus, let’s be honest, there’s an undeniable ‘wow’ factor when someone bites into what they think is a standard chocolate chip cookie only to discover a full Oreo tucked inside. It’s a delightful culinary secret, and one that is surprisingly simple to achieve, making you look like a baking wizard with minimal effort.
Serving Suggestions for Maximum Enjoyment:
Now, let’s talk about how to best enjoy these edible masterpieces. While they are absolutely divine straight from the oven, still warm and gooey with the chocolate chips delightfully melty, they are equally fantastic cooled. I personally love them with a tall glass of cold milk; because what’s a cookie without its classic companion? For an extra decadent treat, try serving them à la mode with a scoop of vanilla bean ice cream. The warm cookie gently melting the cold ice cream creates a blissful combination of temperatures and textures. They also make an incredible addition to any dessert platter, standing out with their unique profile, or pack perfectly into lunchboxes for a special mid-day treat.
Endless Delicious Variations:
Feeling adventurous? Don’t stop at just the classic Oreos! You could easily experiment with different Oreo flavors – imagine a mint Oreo stuffed cookie for a refreshing twist, or perhaps a peanut butter Oreo for a different kind of rich, nutty delight. Swap out the chocolate chips for white chocolate chips, or even a mix of dark and milk chocolate for varying degrees of sweetness. A sprinkle of flaky sea salt on top before baking can also enhance the chocolate flavors beautifully, adding a sophisticated edge. For an even more festive touch, especially if you’re making these for a specific holiday, consider adding a few drops of food coloring to your cookie dough for vibrant hues, or pressing colorful sprinkles onto the top of the dough balls before baking. Think red and green for Christmas, or pastel colors for Easter. The possibilities are truly endless, allowing you to customize these delightful treats to suit any occasion or personal preference, making them a versatile recipe you’ll return to again and again.
So, my dear readers, I implore you: don’t just read about these amazing cookies; make them! Gather your ingredients, get your hands a little messy, and prepare to be utterly charmed by the process and, most importantly, the incredible results. This recipe is a fantastic way to impress friends and family, bring a unique treat to a potluck, or simply indulge in a moment of pure, unadulterated cookie joy yourself. Baking should be fun, an act of love, and these cookies encapsulate that spirit perfectly. Don’t be intimidated by the ‘stuffed’ aspect; it’s surprisingly simple and incredibly rewarding. The looks on people’s faces when they discover the hidden treasure within are priceless and will make all your efforts worthwhile.
Share Your Stuffed Cookie Creations!
Once you’ve baked your batch of these incredible Halloween Oreo Stuffed Chocolate Chip Cookies, I would absolutely love to hear all about your experience. Did you try a fun variation? What was the reaction of your tasters? Please don’t hesitate to share your thoughts, tips, and triumphs in the comments section below. I love connecting with you all and seeing your delicious creations. Your feedback and personal touches inspire not just me, but other bakers in our community. Happy baking, and get ready to fall in love with your new favorite cookie – one that’s guaranteed to bring smiles and sweet memories!
Halloween Oreo Stuffed Chocolate Chip Cookies
The ultimate festive indulgence for the spooky season. Golden, chewy chocolate chip cookies with a creamy Halloween-themed Oreo hidden within.
Ingredients
-
1/2 cup unsalted butter, softened
-
1/2 cup light brown sugar, firmly packed
-
1/3 cup granulated sugar
-
1 large egg, at room temperature
-
1 tsp pure vanilla extract
-
1 3/4 cup all-purpose flour, spooned and leveled
-
3 tbsp corn starch
-
1/2 tsp baking soda
-
1/4 tsp salt
-
2/3 cup semi-sweet chocolate chips, plus more for topping
-
9 Halloween Oreos
-
1/4 cup Halloween sprinkles
Instructions
-
Step 1
Prepare and Freeze Oreos: Unwrap 9 Halloween Oreos and arrange them in a single layer on a baking sheet lined with parchment paper. Freeze for at least 30 minutes, or up to several hours, to prevent melting during baking. -
Step 2
Cream Butter and Sugars: In a large mixing bowl, cream together the softened unsalted butter, firmly packed light brown sugar, and granulated sugar with a mixer on medium speed for 2-3 minutes until light, fluffy, and pale. Scrape down the sides of the bowl as needed. -
Step 3
Add Wet Ingredients: Reduce mixer speed to low. Beat in the room temperature large egg until just combined, then stir in the pure vanilla extract. Scrape down the bowl. -
Step 4
Combine Dry Ingredients: In a separate medium bowl, whisk together the all-purpose flour, corn starch, baking soda, and salt until evenly distributed. -
Step 5
Gradually Add Dry to Wet: With the mixer still on low speed, gradually add the dry ingredient mixture to the wet ingredients. Mix only until the flour is just combined; do not overmix. Stop mixing as soon as no obvious streaks of dry flour remain. -
Step 6
Fold in Chocolate Chips and Sprinkles: Remove the bowl from the mixer. Gently fold in the semi-sweet chocolate chips and Halloween sprinkles using a sturdy rubber spatula or wooden spoon until evenly distributed throughout the dough. -
Step 7
Chill Dough (Optional but Recommended): Cover the bowl tightly with plastic wrap and refrigerate the cookie dough for at least 30 minutes, or up to 24 hours, for improved flavor, texture, and reduced spreading. -
Step 8
Preheat Oven and Prepare Sheets: Preheat your oven to 375°F (190°C). Line two large baking sheets with parchment paper or reusable silicone baking mats. -
Step 9
Assemble Cookies: Take about 2 tablespoons of chilled cookie dough and gently flatten it into a disc in your palm. Place one diligently frozen Halloween Oreo squarely in the center of the dough disc. Carefully bring the edges of the cookie dough up and around the Oreo, ensuring it is completely enclosed. Pinch the seams of the dough together to create a secure seal. Gently roll the dough-wrapped Oreo between your palms to form a smooth, neat, and round ball. -
Step 10
Bake Cookies: Place the beautifully stuffed cookie dough balls about 2-3 inches apart on your prepared baking sheets. For an extra festive touch, gently press a few more chocolate chips or some additional Halloween sprinkles onto the very tops of the cookie dough balls before baking. Bake for 10-14 minutes, until the edges are beautifully golden brown but the centers still look slightly soft, puffed, and perhaps a tiny bit underbaked. -
Step 11
Cool: Carefully remove the baking sheets from the oven and allow the cookies to cool undisturbed on the hot baking sheets for approximately 5-10 minutes. This initial cooling period allows them to firm up slightly. After this, very carefully transfer your still-warm cookies to a wire rack to complete their cooling process, which prevents sogginess and ensures full flavor and texture development. Resist the urge to break one open immediately until fully cooled.
Important Information
Nutrition Facts (Per Serving)
It is important to consider this information as approximate and not to use it as definitive health advice.
Allergy Information
Please check ingredients for potential allergens and consult a health professional if in doubt.
Leave a Comment