
Mummy Brownies are an absolute delight, especially when Halloween approaches, transforming a classic dessert into a charmingly spooky treat that captures hearts and taste buds alike. We find that the true magic of these festive confections lies not just in their incredible taste, but in the joyous spirit they bring to autumnal gatherings. While the tradition of decorating desserts for holidays spans centuries, the ‘mummy’ rendition specifically for Halloween adds a wonderfully whimsical and creative twist that makes them instantly recognizable and beloved by all ages.
Why We Adore These Spooktacular Treats
Beyond their adorably ghoulish appearance, what truly makes these brownies irresistible is the foundation: the promise of a fudgy, rich, and intensely chocolatey brownie. The combination of that dense, chocolatey goodness with the sweet, often vanilla-flavored, ‘bandages’ of frosting creates a textural and flavor harmony that is simply divine. They are surprisingly simple to prepare, making them a fantastic activity for families looking for a fun culinary project, or a stress-free dessert option for any Halloween party. The joy of seeing smiles light up as guests discover these delightful Mummy Brownies is truly unmatched, making them a must-have for your seasonal celebrations.
Ingredients:
- For the Fudgy Brownie Base:
- 1 cup (2 sticks / 226g) unsalted butter, softened and cut into pieces
- 1 cup (170g) good quality dark chocolate (60-70% cacao), finely chopped or in chips
- 1 ¾ cups (350g) granulated sugar
- 4 large eggs, at room temperature
- 1 teaspoon pure vanilla extract
- 1 cup (125g) all-purpose flour
- ½ cup (45g) unsweetened cocoa powder (Dutch-processed for a darker, less acidic brownie)
- ½ teaspoon salt
- ½ cup (85g) chocolate chips or chunks (optional, for extra fudginess)
- For the “Mummy” Decoration:
- 12 ounces (340g) white chocolate, finely chopped, or white candy melts
- 1-2 tablespoons (15-30ml) neutral oil (like coconut oil or vegetable oil, optional, for thinning if needed)
- 1 package (approx. 0.6 oz / 17g) candy eyeballs (about 48-60 pairs, depending on brownie size)
- Equipment You’ll Need:
- 9×13 inch baking pan
- Parchment paper
- Large heatproof bowl
- Saucepan (for double boiler)
- Whisk
- Rubber spatula
- Stand mixer with paddle attachment or electric hand mixer (optional, but recommended)
- Piping bag with a small round tip (or a Ziploc bag with a corner snipped)
- Wire rack for cooling
Preparing the Fudgy Brownie Base
Creating the perfect fudgy brownie is the foundation for our spooky and delightful Mummy Brownies. This isn’t just any brownie; we’re aiming for rich, dense, and deeply chocolatey perfection that will hold up beautifully to our festive decorations. Taking the time to properly melt the chocolate and combine the ingredients will make all the difference in the final texture and flavor of your Mummy Brownies.
- Preheat and Prepare Your Pan: First things first, let’s get our oven ready. Preheat your oven to 350°F (175°C). While the oven heats, prepare your 9×13 inch baking pan. Line it with parchment paper, leaving an overhang on the two longer sides. This parchment “sling” will make it incredibly easy to lift the cooled brownies out of the pan later, ensuring clean cuts for your Mummy Brownies. You can lightly grease the pan first to help the parchment stick, if you like.
- Melt Chocolate and Butter: In a large heatproof bowl, combine the unsalted butter pieces and the finely chopped dark chocolate. You have a couple of options here:
- Double Boiler Method (Recommended for best results): Set the bowl over a saucepan filled with about an inch or two of simmering water, making sure the bottom of the bowl does not touch the water. Stir occasionally until the butter and chocolate are completely melted and smooth. The gentle, indirect heat of a double boiler prevents the chocolate from seizing or burning, which is crucial for a smooth brownie batter.
- Microwave Method (If you’re in a hurry): Alternatively, you can melt the chocolate and butter in the microwave. Heat in 30-second intervals, stirring well after each interval, until smooth. Be very careful not to overheat the chocolate, as this can cause it to seize and become grainy.
Once melted, remove the bowl from the heat (or microwave) and set aside to cool slightly for about 5-10 minutes. This prevents the mixture from scrambling the eggs when we add them later.
- Whisk Wet Ingredients: In a separate large bowl, or the bowl of your stand mixer, whisk together the granulated sugar and the slightly cooled chocolate-butter mixture until well combined. The mixture should be glossy and homogenous.
- Add Eggs and Vanilla: One at a time, beat in the four large eggs. Make sure each egg is fully incorporated before adding the next. This step is important for building the structure and achieving that signature crackly top on your Mummy Brownies. After all eggs are mixed in, stir in the pure vanilla extract. Continue to beat the mixture for another 1-2 minutes on medium speed if using a mixer, or vigorously by hand, until it becomes light in color and slightly thickened. This aeration helps create that desirable fudgy texture and shiny crust.
- Combine Dry Ingredients: In a medium bowl, whisk together the all-purpose flour, unsweetened cocoa powder, and salt. Whisking ensures there are no lumps and that the ingredients are evenly distributed.
- Gently Fold Dry into Wet: Gradually add the dry ingredient mixture to the wet mixture, a third at a time. Using a rubber spatula, gently fold until just combined. Be careful not to overmix! Overmixing can develop the gluten in the flour, leading to tough, cake-like brownies rather than the fudgy Mummy Brownies we’re aiming for. A few streaks of flour are perfectly fine; they will disappear during baking. If you’re using extra chocolate chips or chunks, fold them in now.
- Pour into Pan: Pour the brownie batter into your prepared 9×13 inch baking pan. Spread it evenly with your rubber spatula.
Baking the Brownies to Perfection
Baking brownies correctly is an art. Overbaked brownies are dry and crumbly, while underbaked brownies are gooey (sometimes desirable, but not ideal for cutting into neat Mummy Brownies). We want that sweet spot in the middle: fudgy, moist, and perfectly set.
- Bake Until Set: Place the pan in your preheated oven. Bake for 25-30 minutes. Baking times can vary depending on your oven, so it’s always good to keep an eye on them.
How to Know When Your Mummy Brownies are Done:
You’ll know your Mummy Brownies are perfectly baked when the edges look set and a wooden skewer or toothpick inserted into the center comes out with moist crumbs attached, but not wet batter. If it comes out completely clean, your brownies are likely overbaked. If it comes out with raw batter, they need more time. The center should still look a little gooey and slightly undercooked; this is the secret to fudgy brownies!
- Cool Completely: This step is arguably the most important for perfect Mummy Brownies. Once baked, remove the pan from the oven and place it on a wire rack to cool completely in the pan. Do not skip this step! The brownies will continue to cook slightly from residual heat, and cooling them slowly allows them to set properly and become wonderfully fudgy. This can take anywhere from 2 to 3 hours, or even longer. For the neatest cuts for our Mummy Brownies, you can even chill them in the refrigerator for an hour or two once they’ve reached room temperature.
- Cut into Squares: Once the brownies are completely cool (and ideally chilled), use the parchment paper overhangs to carefully lift the entire slab of brownies out of the pan and onto a cutting board. Use a large, sharp knife to cut the brownies into individual squares or rectangles. A good size for Mummy Brownies is about 2×3 inches, or you can go for traditional 2×2 inch squares. For extra clean cuts, wipe your knife clean with a damp cloth after each slice.
Preparing the “Mummy” Decoration
Now for the fun part! This is where our delicious brownies transform into adorable, slightly spooky Mummy Brownies. The key here is working with melted white chocolate or candy melts to create smooth, even “bandages.”
- Melt White Chocolate/Candy Melts: Place the finely chopped white chocolate or white candy melts in a clean, dry heatproof bowl. Again, you have a couple of methods:
- Double Boiler Method (Recommended): Set the bowl over a saucepan of barely simmering water, ensuring the bottom of the bowl does not touch the water. Stir gently and continuously until the chocolate is completely melted and smooth. This method provides the most controlled heat and yields the smoothest chocolate, perfect for piping.
- Microwave Method: Heat the chocolate in 20-30 second intervals, stirring thoroughly after each interval, until melted and smooth. Be extremely cautious as white chocolate can seize and burn easily. If your chocolate seems too thick to pipe easily, you can stir in 1-2 tablespoons of neutral oil, one teaspoon at a time, until it reaches your desired consistency.
Once melted, remove from heat.
- Prepare for Piping: Transfer the melted white chocolate to a piping bag fitted with a small round tip (like an Ateco #3 or #4). If you don’t have a piping tip, you can simply snip a tiny corner off a Ziploc bag. A small opening is key to creating thin, bandage-like strips for our Mummy Brownies.
Assembling Your Mummy Brownies
This is where the magic happens! We’ll bring together our fudgy brownie base and the smooth white chocolate to create delightful and visually appealing Mummy Brownies.
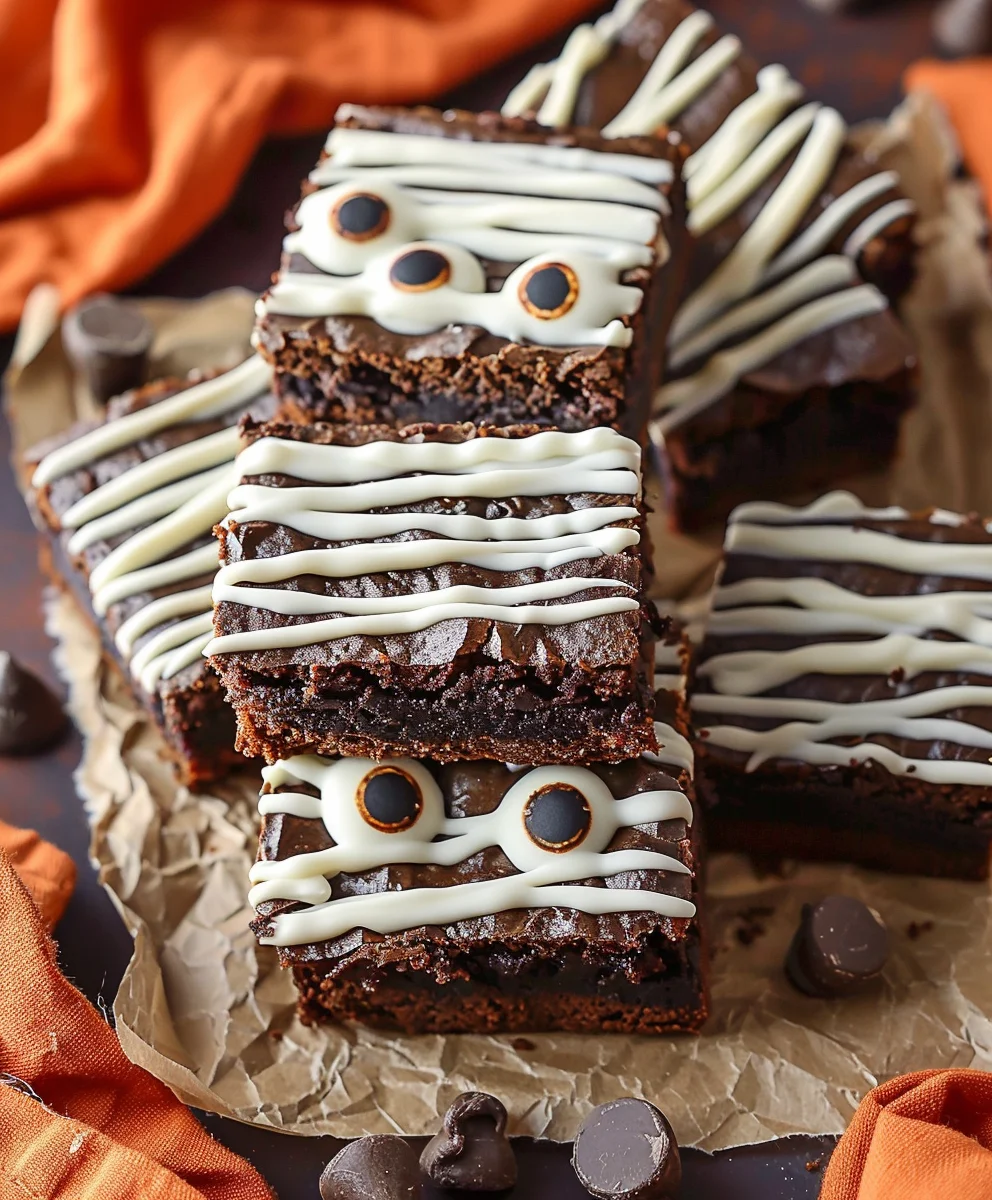
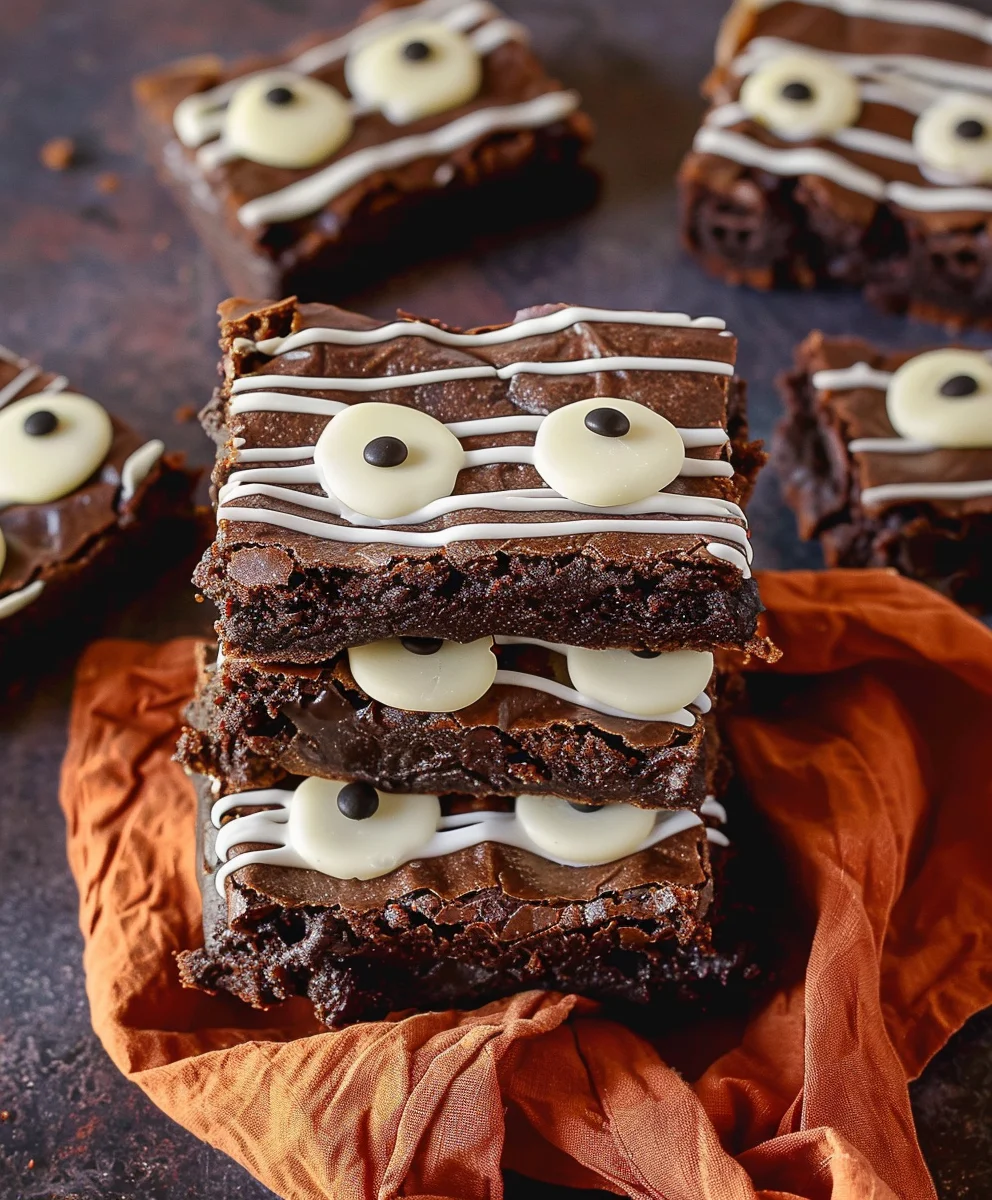
- Create the Mummy Bandages: Take one of your cooled, cut brownie squares. Hold it gently. Starting at one end of the brownie, pipe irregular lines of melted white chocolate back and forth across the top, creating the appearance of mummy bandages. Don’t worry about making them perfectly straight; the slightly uneven lines add to the charming, wrapped look of our Mummy Brownies. Leave a small gap (an “eye socket”) near the top third of the brownie where you will place the candy eyeballs.
- Add the Eyes: While the white chocolate is still wet, carefully place two candy eyeballs in the gap you left. The melted chocolate will act as an adhesive, securing the eyes in place.
Pro Tip for Placing Eyes:
If your chocolate has set too quickly, you can dab a tiny bit of fresh melted chocolate onto the back of the candy eyeballs before placing them. This ensures they stick well.
- Repeat for All Brownies: Continue this process for all of your cut brownie squares, turning each one into an adorable Mummy Brownie.
- Allow to Set: Once all your Mummy Brownies are decorated, let them sit at room temperature for about 30-60 minutes, or place them in the refrigerator for 15-20 minutes, until the white chocolate has fully set and hardened. This ensures that the decorations are firm and won’t smudge when handled.
Tips for Perfect Mummy Brownies
Achieving bakery-worthy Mummy Brownies is all about paying attention to details. Here are some extra tips to ensure your batch is absolutely outstanding, making them the star of any Halloween gathering or treat table.
- Quality Ingredients Matter: Since chocolate is the star here, invest in good quality dark chocolate and cocoa powder. This will significantly impact the depth of flavor in your fudgy brownie base. For the white chocolate, choose a good melting chocolate or actual white candy melts for the smoothest piping and best results for your mummy bandages.
- Don’t Overmix: I can’t stress this enough for the brownie batter. Overmixing develops gluten, which can lead to a tougher, more cake-like brownie. We want fudgy and dense Mummy Brownies, so stop mixing as soon as the flour streaks disappear.
- The Importance of Cooling: Patience is a virtue, especially when it comes to cooling brownies. Cutting warm brownies leads to messy, crumbly edges. Letting them cool completely (and even chilling them) ensures clean, precise cuts, which are essential for the neat appearance of your Mummy Brownies.
- Piping Bag Alternatives: No piping bag? No problem! A sturdy Ziploc bag with a tiny corner snipped off works just as well for creating the “mummy” strips. You can also drizzle the chocolate with a spoon, though this gives a less controlled and perhaps more rustic look.
- Consistency of White Chocolate: If your melted white chocolate is too thick, it will be hard to pipe. If it’s too thin, it will run off the brownies. Adjust with a small amount of neutral oil (for thinning) or let it cool slightly (for thickening) until it’s the consistency of thick, pourable frosting. This ensures your Mummy Brownies have perfectly formed bandages.
- Storing Candy Eyeballs: Candy eyeballs tend to melt if they get too warm. Keep them in a cool, dry place and only open the package when you’re ready to use them for your Mummy Brownies.
- Get Creative: While the classic mummy look is fantastic, don’t hesitate to get creative. You could add a tiny dot of black icing for pupils if your candy eyes lack them, or even pipe a small “scar” with a different colored icing for a zombie mummy look!
Storage and Serving Your Mummy Brownies
Once your Mummy Brownies are complete and the chocolate has set, proper storage will keep them fresh and delicious for days. They are a fantastic make-ahead treat!
- Storing at Room Temperature: Store your Mummy Brownies in an airtight container at room temperature for up to 3-4 days. While the white chocolate decoration might be a little fragile, the brownies themselves will remain delightfully fudgy.
- Refrigeration: If you prefer a firmer brownie or live in a very warm climate, you can store the Mummy Brownies in an airtight container in the refrigerator for up to a week. Just be aware that refrigeration can slightly alter the texture of brownies, making them a bit chewier. If refrigerating, I recommend letting them come to room temperature for about 15-30 minutes before serving for the best texture.
- Freezing: For longer storage, you can freeze undecorated brownie squares for up to 3 months. Wrap them tightly in plastic wrap and then foil. When you’re ready to enjoy, thaw them at room temperature and then proceed with the “mummy” decoration steps. Freezing the decorated Mummy Brownies isn’t recommended as the candy eyeballs might become brittle or the white chocolate might bloom (develop a white film) upon thawing.
- Serving Suggestions: These delightful Mummy Brownies are perfect on their own, but they also pair wonderfully with a scoop of vanilla ice cream, a dollop of whipped cream, or a glass of cold milk. They are an absolute showstopper for any festive occasion, especially during Halloween!
Conclusion:
And there you have it, my friends! We’ve reached the sweet finale of our journey with what I truly believe are some of the most delightful and undeniably fun treats you’ll ever bake. After following these steps, you’ll discover firsthand why this recipe isn’t just another dessert; it’s an experience, a little piece of edible joy that brings smiles to every face it graces. I’m confident that once you take that first decadent bite, you’ll understand exactly what I mean.
What makes these brownies a true must-try? Well, it’s a harmonious blend of several irresistible factors. First and foremost, it’s the intense, deep chocolate flavor that permeates every single crumb. We’re talking about a richness that satisfies even the most fervent chocolate cravings, a velvety smooth texture that’s wonderfully fudgy on the inside with just the right amount of a delicate, slightly chewy crust on top. They strike that perfect balance between gooey indulgence and structural integrity, ensuring each piece is a glorious mouthful. Beyond the superb taste and texture, there’s the sheer enjoyment of creating them. The process is straightforward enough for even novice bakers to master, yet it yields results that look and taste like they came straight from a gourmet bakery. And let’s not forget the playful, imaginative element we incorporated, transforming a classic treat into something truly memorable. That’s precisely what makes our Mummy Brownies so incredibly special. They are not merely a feast for your taste buds but also a whimsical treat for your eyes, making them an instant favorite for gatherings, celebrations, or just a delightful afternoon pick-me-up. The simple act of decorating them adds an extra layer of creative fun, making the entire baking process a truly rewarding activity for everyone involved.
Elevate Your Mummy Brownie Experience: Serving Suggestions & Creative Variations
While these delightful brownies are absolutely perfect enjoyed on their own, perhaps with a tall glass of cold milk or a steaming mug of coffee, their versatility truly shines when you start exploring serving suggestions and variations. For an ultimate dessert experience, imagine a warm Mummy Brownie, fresh from the oven, topped with a generous scoop of artisanal vanilla bean ice cream. The contrast between the warm, rich chocolate and the cool, creamy ice cream is simply divine. A drizzle of homemade caramel sauce or a sprinkle of flaky sea salt could take this pairing to an even more sophisticated level. You could also serve them alongside a dollop of freshly whipped cream and a scattering of fresh berries – raspberries or strawberries provide a lovely tart counterpoint to the sweetness. For a more decadent touch, consider adding a scoop of espresso ice cream to really amplify the chocolate notes, or even a mint chocolate chip ice cream for a refreshing twist. They also make fantastic additions to a dessert platter, cut into smaller squares, perhaps alongside some fruit tarts or cookies, offering a different texture and flavor profile.
Feeling adventurous? Don’t hesitate to experiment with the recipe itself! You could fold in a handful of chopped nuts like walnuts or pecans for added crunch and earthy flavor. White chocolate chips or peanut butter chips could be stirred into the batter for an extra layer of indulgence. For a seasonal twist, consider adding a pinch of cinnamon or a dash of chili powder to the batter to create a more complex, warming spice profile, especially wonderful during cooler months. And regarding their distinctive appearance, feel free to get even more creative with your “bandages”! Instead of just white frosting, you could use a light green tinted cream cheese frosting for a Frankenstein-esque vibe, or even a dark chocolate ganache for a more rustic, spooky appearance. Different types of candies or edible googly eyes can also be added to customize your creations, ensuring each batch is uniquely yours. The possibilities are truly endless, limited only by your imagination, making each baking session an exciting new adventure in flavor and design. These brownies are truly a blank canvas for your culinary creativity.
Your Turn to Bake & Share!
Now that you’re armed with all the knowledge and inspiration, it’s your turn! I wholeheartedly encourage you to roll up your sleeves, gather your ingredients, and dive into making these incredible brownies. Trust me, the aroma alone as they bake will be enough to get your mouth watering, and the first bite will confirm that every moment spent was utterly worth it. Baking should be a joyful, rewarding process, and I promise you, this recipe delivers on that promise. Don’t be shy about making them your own – add your unique flair, experiment with the toppings, and most importantly, have fun with it! Once you’ve created your masterpiece, I would absolutely love to hear about your experience. What variations did you try? How did your family and friends react? Did you find a new favorite serving suggestion? Please share your baking triumphs, your photos, and your feedback. Your stories inspire me and our entire baking community. Happy baking, and get ready to enjoy some truly extraordinary brownies!
Mummy Brownies
Charming and spooky, Mummy Brownies transform a classic dessert into a delightful Halloween treat, beloved for their fudgy taste and festive appearance. They are surprisingly simple to prepare, making them a fantastic activity for families or a stress-free dessert option for any Halloween party.
Ingredients
-
½ cup unsalted butter
-
1 cup semi-sweet chocolate chips
-
¾ cup granulated sugar
-
1 teaspoon vanilla extract
-
1 teaspoon instant espresso
-
2 large eggs
-
¼ cup all-purpose flour
-
¼ cup unsweetened cocoa powder
-
½ teaspoon baking powder
-
¼ teaspoon salt
-
½ cup unsalted butter, at room temperature (1 stick)
-
1 ½ cups powdered sugar
-
1 teaspoon vanilla extract
-
1 tablespoon milk
-
Candy eyes
Instructions
-
Step 1
Preheat oven to 350°F (175°C). Line a 9×13 inch baking pan with parchment paper, leaving an overhang. -
Step 2
In a heatproof bowl, melt ½ cup unsalted butter and 1 cup semi-sweet chocolate chips using a double boiler or microwave until smooth. Let cool slightly for 5-10 minutes. -
Step 3
Whisk the cooled chocolate mixture with ¾ cup granulated sugar until glossy. Beat in 2 large eggs, 1 teaspoon vanilla extract, and 1 teaspoon instant espresso until the mixture is light in color and slightly thickened. -
Step 4
In a separate medium bowl, whisk together ¼ cup all-purpose flour, ¼ cup unsweetened cocoa powder, ½ teaspoon baking powder, and ¼ teaspoon salt. Gently fold the dry ingredients into the wet mixture until just combined; do not overmix. -
Step 5
Pour the brownie batter into the prepared pan and spread evenly. Bake for 25-30 minutes, or until the edges are set and a wooden skewer inserted into the center comes out with moist crumbs (not wet batter). -
Step 6
Remove brownies from oven and cool completely in the pan on a wire rack (2-3 hours). For easier cutting, chill in the refrigerator for an additional hour. Once cool, use the parchment overhangs to lift the brownies onto a cutting board and cut into squares. -
Step 7
Prepare the buttercream for decoration: In a bowl, beat ½ cup room temperature unsalted butter until creamy. Gradually add 1 ½ cups powdered sugar, 1 teaspoon vanilla extract, and 1 tablespoon milk. Beat until smooth and fluffy. -
Step 8
Transfer the buttercream to a piping bag fitted with a small round tip (or a Ziploc bag with a snipped corner). Pipe irregular lines back and forth across each brownie square to create “mummy bandages,” leaving a small gap near the top for eyes. -
Step 9
While the buttercream is still wet, carefully place two candy eyeballs in the gap on each brownie. Allow the decorations to set at room temperature for 30-60 minutes, or in the refrigerator for 15-20 minutes, until the buttercream is firm.
Important Information
Nutrition Facts (Per Serving)
It is important to consider this information as approximate and not to use it as definitive health advice.
Allergy Information
Please check ingredients for potential allergens and consult a health professional if in doubt.
Leave a Comment