
Muffin Halloween – the very words themselves spark joy and conjure images of playful ghosts, grinning pumpkins, and delightfully spooky treats. What if I told you that you could capture the magic and mystery of this beloved holiday in a single, irresistible bite? Halloween, a celebration deeply rooted in ancient traditions and evolving into modern-day fun, is synonymous with costumes, community, and, undoubtedly, delicious food. These aren’t just any ordinary baked goods; they are a delightful embodiment of the season, perfectly crafted to add a touch of festive cheer to any gathering. I’ve found that people absolutely adore a good Muffin Halloween for its incredible versatility and universal appeal. The tender, moist crumb provides the perfect canvas for endless creative decorations, from vibrant orange and black sprinkles to whimsical edible googly eyes or intricate spiderweb designs. They are incredibly convenient, easy to transport for parties, and a guaranteed hit with both children and adults.
They represent the ultimate grab-and-go treat, blending a delightful taste experience with the playful spirit of the spooky season.
Ingredients:
-
For the Spooky Chocolate Muffins:
- 2 cups (240g) all-purpose flour
- ¾ cup (75g) unsweetened cocoa powder, preferably Dutch-processed for a richer color
- 1 ¾ cups (350g) granulated sugar
- 2 teaspoons baking soda
- 1 teaspoon baking powder
- 1 teaspoon salt
- 2 large eggs, at room temperature
- 1 cup (240ml) whole milk, at room temperature
- ½ cup (120ml) vegetable oil or melted unsalted butter (cooled slightly)
- 2 teaspoons pure vanilla extract
- 1 cup (170g) semi-sweet chocolate chips, optional (but highly recommended for extra chocolatey goodness!)
- ½ cup (120ml) hot water or hot coffee (enhances chocolate flavor)
-
For the Eerie Orange Cream Cheese Frosting:
- 8 ounces (226g) full-fat cream cheese, softened to room temperature
- ½ cup (113g) unsalted butter, softened to room temperature
- 4 cups (480g) powdered sugar (confectioners’ sugar), sifted
- 1 teaspoon pure vanilla extract
- Pinch of salt
- Orange gel food coloring (gel works best for vibrant color without thinning)
- 1-2 tablespoons milk or cream, if needed for consistency
-
For the Ghoulish Garnishes:
- Halloween sprinkles (ghosts, pumpkins, bats)
- Candy eyeballs
- Mini chocolate chips (for spider bodies, if desired)
- Edible glitter, for a mystical shimmer
Preparing Your Spooky Chocolate Muffins:
- Preheat and Prep Your Muffin Tins: Before we dive into mixing, let’s get our oven ready. Preheat your oven to 400°F (200°C). This slightly higher initial temperature helps create that lovely dome on top of our muffins. Line a 12-cup muffin tin with paper liners. I always recommend using good quality liners to prevent sticking and make for easy cleanup. If you don’t have liners, you can lightly grease and flour the muffin cavities, but liners are definitely the easiest route for “Muffin Halloween” perfection. Having everything ready before you start mixing ensures a smooth process.
- Combine Your Dry Ingredients: In a large mixing bowl, I like to whisk together all the dry ingredients for the muffins. This includes the 2 cups of all-purpose flour, ¾ cup of unsweetened cocoa powder, 1 ¾ cups of granulated sugar, 2 teaspoons of baking soda, 1 teaspoon of baking powder, and 1 teaspoon of salt. Whisking them thoroughly for about 1-2 minutes ensures that the leavening agents (baking soda and baking powder) are evenly distributed throughout the flour mixture. This step is crucial for an even rise and consistent texture in every single muffin. Nobody wants a flat muffin, especially a Halloween one!
- Whisk Together the Wet Ingredients: In a separate, medium-sized bowl, let’s combine our wet ingredients. Crack in the 2 large eggs, making sure they are at room temperature – this helps them emulsify better with the other liquids. Add the 1 cup of whole milk (also at room temperature), ½ cup of vegetable oil (or your slightly cooled melted butter), and 2 teaspoons of pure vanilla extract. Whisk these together until they are well combined and smooth, about a minute or so. Room temperature ingredients are truly a baker’s best friend; they mix more uniformly and contribute to a much better final texture.
- Gently Combine Wet and Dry: Now for the magic! Pour the wet ingredient mixture into the bowl with your dry ingredients. Using a rubber spatula or a wooden spoon, gently fold everything together. This is where you need to be careful not to overmix. Mix just until the flour streaks have mostly disappeared. A few small lumps are perfectly fine and even desirable; overmixing will develop the gluten in the flour too much, leading to tough, chewy muffins instead of light, tender ones. This is a very common pitfall, so resist the urge to keep stirring! If you’re adding the optional 1 cup of semi-sweet chocolate chips, fold them in now until they are evenly distributed.
- The Secret Ingredient – Hot Liquid: Here’s a little trick I love for extra moist and intensely chocolatey muffins: slowly pour in the ½ cup of hot water or hot coffee into your batter. Coffee, surprisingly, doesn’t make your muffins taste like coffee; it simply deepens and enhances the chocolate flavor dramatically. Gently fold this hot liquid into the batter until just combined. The batter will be quite thin, but don’t worry, this is exactly what we’re looking for! It contributes to the beautiful moist crumb.
- Fill Your Muffin Liners: With a large spoon or an ice cream scoop, carefully divide the batter evenly among the 12 prepared muffin cups. I like to fill them about two-thirds to three-quarters full. This ensures they have plenty of room to rise and create those lovely domed tops we talked about earlier. Filling them too high might cause them to overflow, and too little might result in smaller, less impressive muffins.
- Bake to Perfection: Place your muffin tin into the preheated 400°F (200°C) oven. Bake for an initial 5 minutes at this higher temperature. Then, without opening the oven door, reduce the oven temperature to 350°F (175°C) and continue baking for another 15-18 minutes, or until a wooden skewer or toothpick inserted into the center of a muffin comes out with only moist crumbs attached, or completely clean. The initial high heat gives them a quick boost for that nice dome, and then the lower heat allows them to cook through without burning.
- Cooling Your Creations: Once baked, remove the muffin tin from the oven. Let the muffins cool in the tin for about 5 minutes. This allows them to set up slightly and prevents them from falling apart when you remove them. After 5 minutes, carefully transfer the muffins to a wire rack to cool completely. It’s really important that your muffins are absolutely, completely cool before you even think about frosting them. Warm muffins will melt your beautiful frosting into a gooey mess, and we definitely want our “Muffin Halloween” masterpieces to hold their shape! This might take an hour or two, so patience is key here.
Crafting Your Eerie Orange Cream Cheese Frosting:
- Cream the Cream Cheese and Butter: In a large mixing bowl, ideally using an electric mixer with a paddle attachment, beat the softened 8 ounces of full-fat cream cheese and ½ cup of softened unsalted butter together. Start on low speed to combine, then increase to medium-high speed and beat for 2-3 minutes until the mixture is incredibly light, fluffy, and smooth. The consistency of your cream cheese and butter is vital here; they must be truly at room temperature. If they are too cold, your frosting will be lumpy; if too warm, it might be too thin. Scrape down the sides of the bowl frequently to ensure everything is incorporated evenly.
- Gradually Add Powdered Sugar: With the mixer on low speed, gradually add the 4 cups of sifted powdered sugar, one cup at a time. Sifting the powdered sugar beforehand prevents lumps in your frosting, ensuring a perfectly smooth texture. If you add it all at once, you’ll end up in a cloud of sugar dust! Once all the sugar is added, increase the speed to medium and beat for another 2-3 minutes. The frosting should be thick and creamy.
- Flavor and Color Your Frosting: Now for the finishing touches! Add 1 teaspoon of pure vanilla extract and a tiny pinch of salt (this helps balance the sweetness). Then, add your orange gel food coloring a little bit at a time. Gel coloring is fantastic because it’s highly concentrated, so you need very little to achieve a vibrant hue without adding excess liquid that could thin out your frosting. Mix until your desired shade of eerie orange is reached. Start with just a tiny drop and add more if you want a deeper, more vibrant Halloween orange.
- Adjust Consistency (if needed): If your frosting seems too thick for piping, you can add milk or cream, one teaspoon at a time, beating after each addition, until you reach your desired consistency. For piping, you want a frosting that holds its shape well but is still soft enough to pipe smoothly. If it somehow becomes too thin, you can add a little more sifted powdered sugar, a tablespoon at a time, until it thickens up.
- Prepare for Piping: Transfer your vibrant orange frosting into a piping bag fitted with your favorite decorative tip (I often use a large star tip for a beautiful swirl). If you don’t have a piping bag, a sturdy zip-top bag with a corner snipped off will work just fine for a simpler look.
Assembling Your Halloween Masterpieces:
- Ensure Muffins are Fully Cooled: I cannot stress this enough: make absolutely certain your chocolate muffins are completely cool before you begin frosting. If they’re even slightly warm, your carefully prepared cream cheese frosting will melt, slide off, and create a messy situation, ruining your “Muffin Halloween” vision. Patience here truly pays off!
- Frost Your Muffins: Now for the fun part! Take your piping bag filled with the eerie orange frosting. Starting from the outside edge of each cooled muffin, pipe a generous swirl of frosting towards the center. You can create tall, dramatic peaks or a simpler, flatter design – it’s entirely up to your spooky style! If you’re not using a piping bag, simply use an offset spatula or the back of a spoon to spread the frosting evenly over the tops of the muffins. Aim for good coverage to create a perfect canvas for your decorations.
-
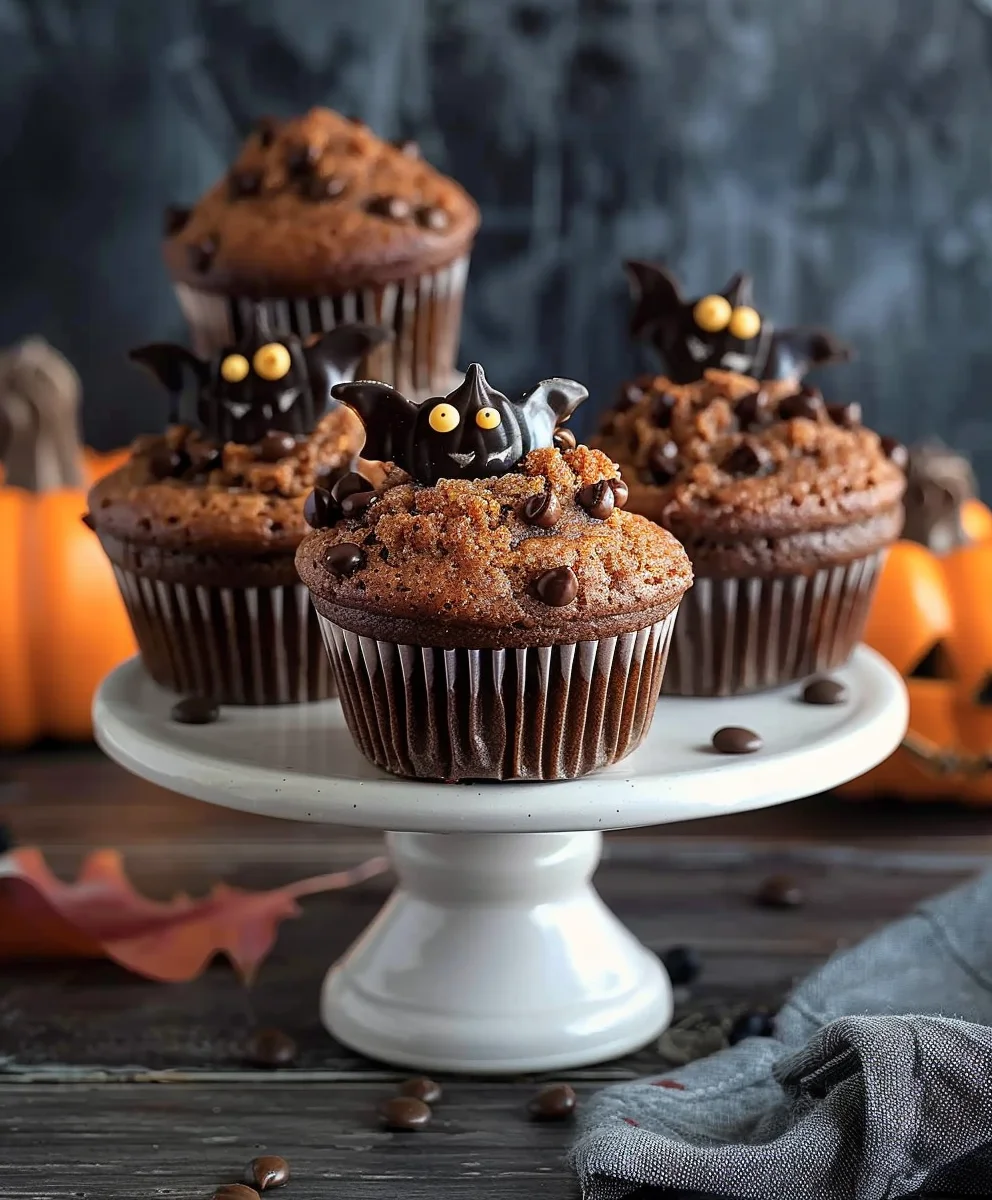
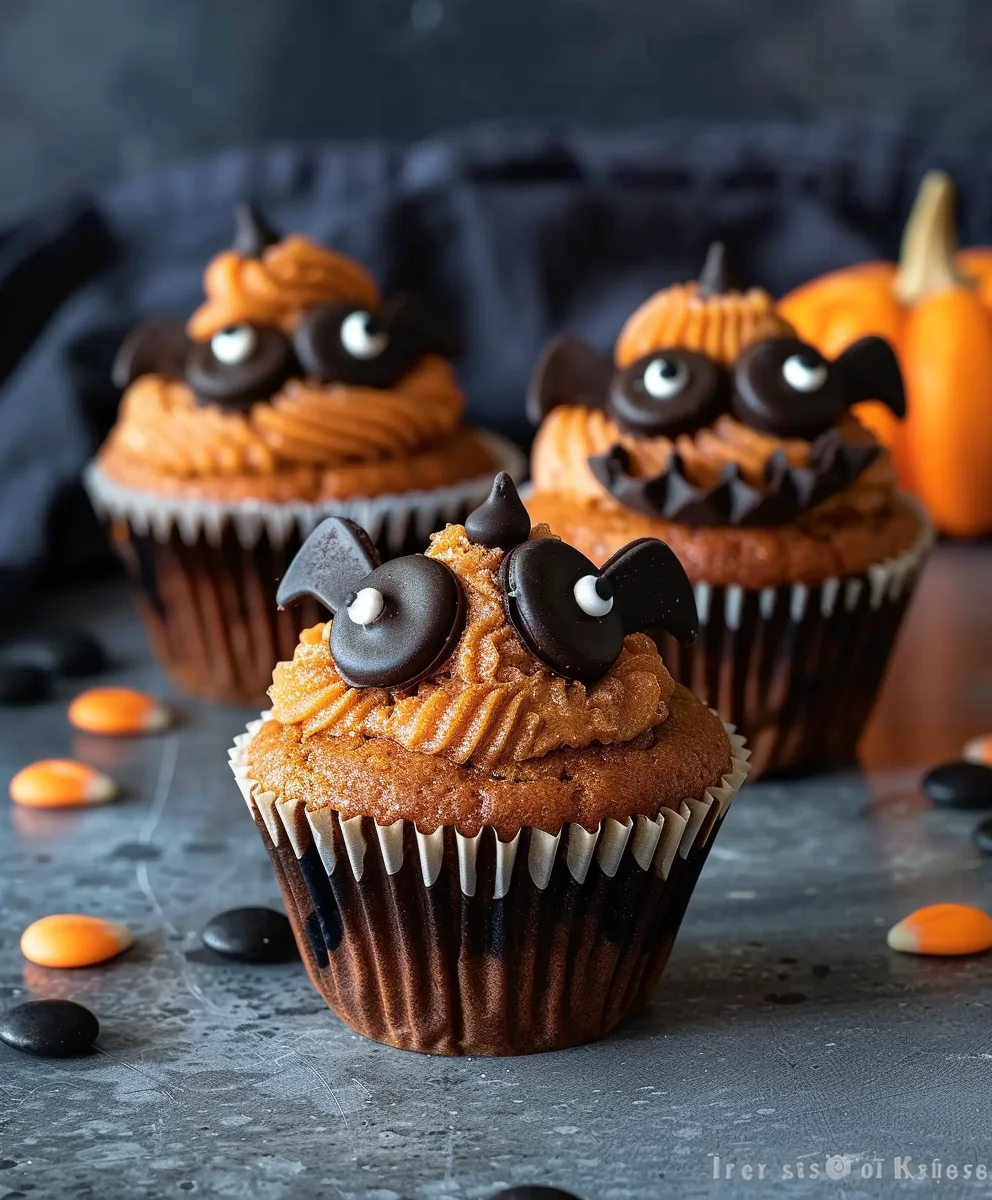
Decorate with Ghoulish Garnishes: This is where your Halloween creativity truly shines! While the frosting is still fresh and soft, immediately start adding your garnishes.
- Candy Eyeballs: These are a must for any “Muffin Halloween” theme. Place two candy eyeballs on each muffin, making them peer out from the orange frosting. You can position them close together for a surprised look, or further apart for a sillier expression.
- Halloween Sprinkles: Scatter an assortment of Halloween-themed sprinkles (ghosts, pumpkins, bats, or classic orange and black jimmies) over the frosted tops. Don’t be shy here; a generous amount of sprinkles adds fantastic color and texture.
- Mini Chocolate Chips for Spiders: For a simple spider design, you can use a mini chocolate chip as the body of a spider. Then, using a toothpick dipped in a tiny bit of melted chocolate or even some black gel food coloring, draw eight thin legs extending from the chocolate chip body. This adds a wonderfully creepy touch!
- Edible Glitter: For a touch of enchantment or a ghostly glow, lightly dust some edible glitter over the finished muffins. Silver, gold, or even an iridescent white glitter can add a magical shimmer that will make your Halloween muffins stand out.
- Arrangement and Presentation: Once all your muffins are frosted and decorated, arrange them on a festive platter or a tiered stand. These “Muffin Halloween” treats are not just delicious; they’re also a fantastic edible decoration for any Halloween gathering. The visual impact of a dozen beautifully decorated muffins is truly impressive.
- Storage: If you happen to have any leftover Halloween Muffins (which is highly unlikely, in my experience!), store them in an airtight container in the refrigerator due to the cream cheese frosting. They are best enjoyed within 3-4 days. Allow them to come closer to room temperature for about 15-20 minutes before serving for the best flavor and texture, as the frosting will soften slightly and the muffin crumb will be at its most tender. These spooky delights are sure to be a hit at any Halloween party or as a special treat for your little ghouls and goblins! Enjoy the process and have a wonderfully delicious and spooky “Muffin Halloween”!
Conclusion:
And there you have it, my friends! We’ve reached the delicious culmination of our baking journey. I truly believe that this recipe isn’t just another item to tick off your culinary list; it’s a delightful experience waiting to unfold in your kitchen. What makes these muffins an absolute must-try, in my humble opinion, is their perfect harmony of flavors and textures. Imagine a tender, moist crumb that practically melts in your mouth, infused with notes that are both comforting and exciting, making every single bite an absolute pleasure. It’s that wonderful balance of being incredibly satisfying without being overly heavy, striking a delightful chord with anyone who tries them. I’ve found that they possess a certain charm, an undeniable appeal that transforms a simple baked good into something quite special. They’re impressive enough to serve guests but simple enough for a casual weekend bake, striking that perfect balance for any occasion you can imagine. The aroma alone, as they bake to golden perfection, is enough to warm any home and lift any spirit, promising a treat that lives up to its fragrant invitation.
Beyond their inherent deliciousness, these muffins are remarkably versatile, making them a fantastic addition to almost any part of your day or any gathering you might host. While they are utterly divine still warm from the oven, perhaps with a simple pat of butter melting into their crevices, don’t hesitate to get creative with your serving choices. For a delightful morning treat, consider pairing them with a strong cup of coffee or a refreshing glass of orange juice – they make for a truly decadent breakfast that feels like a special occasion. For an afternoon pick-me-up, a light dusting of powdered sugar or a dollop of softly whipped cream elevates them into a café-worthy snack.
Elevate Your Muffin Experience
If you’re looking to turn these into a more elaborate dessert, imagine them served warm with a scoop of vanilla bean ice cream and a drizzle of caramel sauce – a combination that is nothing short of heavenly. You could also transform them into an autumnal masterpiece by serving them alongside a warm mug of spiced apple cider or a festive pumpkin spice latte, creating an atmosphere that is both cozy and inviting. The possibilities truly are endless, limited only by your imagination!
Feeling adventurous? These muffins are incredibly forgiving and open to various delightful variations. For an added textural element, try folding in a handful of chopped walnuts, pecans, or even toasted almonds into the batter before baking; the nutty crunch provides a wonderful contrast to the soft muffin. If you have a sweeter tooth, a sprinkling of mini chocolate chips or white chocolate chunks would be an irresistible addition, creating pockets of melty goodness throughout. For a burst of tartness, fresh or frozen berries like cranberries or raspberries can be folded in, adding a vibrant zing that cuts through the richness beautifully. And if you’re baking for a special occasion, perhaps a themed event or a spooky gathering, consider decorating them! A simple cream cheese frosting tinted with food coloring – think vibrant orange or eerie green – can transform these already wonderful treats into truly festive delights. Imagine a batch of these glorious muffins, perhaps artfully decorated with playful sprinkles, becoming the star attraction on your snack table. This flexibility is what makes the base recipe so incredibly powerful; it’s a canvas for your culinary creativity.
Now, I’m genuinely excited for you to dive in and experience the pure joy of making these yourself. There’s something incredibly satisfying about creating something delicious from scratch, and I promise you, this recipe delivers that satisfaction in spades. Don’t let any hesitation hold you back; gather your ingredients, put on your apron, and let the magic happen. I truly believe that once you pull your first batch from the oven and take that glorious first bite, this recipe will quickly become a cherished staple in your kitchen, a go-to whenever you need a reliable crowd-pleaser or a comforting treat for yourself.
Share Your Spooky Creations!
And when you do, please, please, please don’t keep your culinary triumphs to yourselves! I am absolutely eager to hear all about your baking adventures. Did you stick to the original recipe, or did you venture into exciting new variations? What were your favorite parts of the process? Did you come up with a brilliant serving suggestion I haven’t even thought of? Share your stories, your tips, and most importantly, your beautiful photos! Whether you’re whipping up a batch for a quiet morning at home, surprising loved ones with a homemade gift, or preparing for your very own Muffin Halloween party, I want to see and hear all about it. Your creativity and feedback are what truly inspire me and the entire community of home bakers. Let’s connect, celebrate our shared love for delicious food, and make some wonderful, tasty memories together!
Frightfully Fun Halloween Muffins
These frightfully fun Halloween muffins are easy to make and perfect for spooky treats. Featuring a chocolate muffin base topped with a rich chocolate ganache, apricot jam, crushed Oreos, and eerie sugar eyeballs, they are sure to be a hit at any Halloween gathering.
Ingredients
-
190g All-purpose flour
-
125g Warm milk
-
100g Sugar
-
80g Softened butter (for muffins)
-
20g Unsweetened cocoa powder
-
1 Medium egg
-
8g Baking powder
-
1/2 sachet Vanilla
-
1 pinch Salt
-
200g Fresh liquid cream
-
200g Dark chocolate
-
25g Butter (for topping)
-
80g Apricot jam
-
10 Oreo cookies
-
As needed Sugar eyeballs
Instructions
-
Step 1
Preheat your oven to 180°C (350°F). Line a 12-cup muffin tin. In a large bowl, whisk together 190g all-purpose flour, 100g sugar, 20g unsweetened cocoa powder, 8g baking powder, 1/2 sachet vanilla, and 1 pinch of salt. -
Step 2
In a separate bowl, whisk together 125g warm milk, 80g softened butter, and 1 medium egg. Pour wet ingredients into the dry mixture, stirring gently until just combined. Do not overmix. -
Step 3
Divide the batter evenly among the prepared muffin cups. Bake for 20-25 minutes, or until a wooden skewer inserted into the center comes out clean. Let cool in the tin for 5 minutes, then transfer to a wire rack to cool completely. -
Step 4
While muffins cool, prepare the topping. Heat 200g fresh liquid cream in a saucepan until it just begins to simmer. Remove from heat, add 200g dark chocolate and 25g butter. Stir until the chocolate and butter are fully melted and the mixture is smooth and glossy. Let cool slightly at room temperature to thicken to a spreadable consistency. -
Step 5
Once muffins are completely cool, spread 80g apricot jam over the top of each. Then, generously spoon or pipe the chocolate topping over the jam. Crush or place 10 Oreo cookies (whole or broken) on top. Finally, add sugar eyeballs as desired to create spooky faces. -
Step 6
Store leftover Halloween muffins in an airtight container in the refrigerator for up to 3-4 days. Allow to come to room temperature for 15-20 minutes before serving for best texture and flavor.
Important Information
Nutrition Facts (Per Serving)
It is important to consider this information as approximate and not to use it as definitive health advice.
Allergy Information
Please check ingredients for potential allergens and consult a health professional if in doubt.
Leave a Comment