
Spooky Halloween Ghost Cookies are the perfect treat to add a ghoulishly delightful touch to your Halloween celebrations! Forget store-bought candies this year; imagine the delighted screams (of joy, of course!) when you present a platter of these adorable, edible apparitions. These aren’t just cookies; they’re a fun, creative activity that the whole family can enjoy, turning your kitchen into a haunted (but happy) baking laboratory.
While the exact origins of Halloween cookies are shrouded in mystery (perhaps they materialized from the spirit world?), the tradition of baking special treats for this holiday dates back centuries. In many cultures, food offerings were left out to appease wandering spirits. Today, we channel that spirit (pun intended!) into creating delicious and festive goodies like our Spooky Halloween Ghost Cookies.
What makes these cookies so irresistible? It’s a combination of factors. The buttery, melt-in-your-mouth texture is simply divine. The subtle sweetness is perfectly balanced, making them ideal for both kids and adults. And let’s be honest, who can resist a cookie shaped like a ghost? They’re visually appealing, easy to decorate, and incredibly fun to eat. Plus, they’re surprisingly simple to make, requiring minimal ingredients and baking time. So, gather your little goblins and get ready to bake up some spooky fun!

Ingredients:
- For the Sugar Cookies:
- 3 cups all-purpose flour, plus more for dusting
- 1 teaspoon baking powder
- 1/2 teaspoon baking soda
- 1/4 teaspoon salt
- 1 cup (2 sticks) unsalted butter, softened
- 1 1/2 cups granulated sugar
- 1 large egg
- 1 teaspoon vanilla extract
- For the Royal Icing:
- 4 cups powdered sugar, sifted
- 3 tablespoons meringue powder
- 5-7 tablespoons lukewarm water
- Gel food coloring (white and black)
Preparing the Sugar Cookie Dough
Alright, let’s get started with the foundation of our spooky ghosts – the sugar cookie dough! This is a classic recipe, and I promise, it’s easier than it looks. Just follow these steps, and you’ll have perfect cookies every time.
- Combine Dry Ingredients: In a medium bowl, whisk together the flour, baking powder, baking soda, and salt. Whisking ensures everything is evenly distributed, which is crucial for a consistent cookie texture. Set this aside for now.
- Cream Butter and Sugar: In a large bowl (or the bowl of your stand mixer), cream together the softened butter and granulated sugar until light and fluffy. This usually takes about 3-5 minutes on medium speed. You want the mixture to be pale and airy – this is what gives the cookies their tenderness. Scrape down the sides of the bowl occasionally to ensure everything is evenly incorporated.
- Add Egg and Vanilla: Beat in the egg and vanilla extract until well combined. Make sure the egg is fully incorporated before moving on to the next step. Again, scrape down the sides of the bowl as needed.
- Gradually Add Dry Ingredients: Gradually add the dry ingredients to the wet ingredients, mixing on low speed until just combined. Be careful not to overmix! Overmixing develops the gluten in the flour, which can result in tough cookies. Mix until the flour is just incorporated, and then stop.
- Form Dough into Discs: Divide the dough in half and flatten each half into a disc. Wrap each disc tightly in plastic wrap. This helps the dough chill evenly and prevents it from drying out.
- Chill the Dough: Refrigerate the dough for at least 2 hours, or preferably overnight. Chilling the dough is essential! It allows the gluten to relax, which prevents the cookies from spreading too much in the oven. It also makes the dough easier to roll out.
Rolling, Cutting, and Baking the Cookies
Now for the fun part – shaping our ghostly friends! This is where your creativity can really shine. Don’t worry if your first few cookies aren’t perfect; practice makes perfect!
- Preheat Oven and Prepare Baking Sheets: Preheat your oven to 350°F (175°C). Line baking sheets with parchment paper or silicone baking mats. This prevents the cookies from sticking and makes cleanup a breeze.
- Roll Out the Dough: On a lightly floured surface, roll out one disc of dough to about 1/4 inch thickness. Keep the other disc of dough refrigerated while you work. If the dough is sticking, add a little more flour to your rolling pin and the surface.
- Cut Out Cookie Shapes: Use a ghost-shaped cookie cutter (or any Halloween-themed cutter you like!) to cut out cookies. If you don’t have a ghost cutter, you can use a knife to freehand cut ghost shapes. Get creative!
- Place Cookies on Baking Sheets: Carefully transfer the cut-out cookies to the prepared baking sheets, leaving about 1 inch of space between each cookie.
- Bake the Cookies: Bake for 8-10 minutes, or until the edges are lightly golden brown. Keep a close eye on them, as they can burn easily.
- Cool the Cookies: Let the cookies cool on the baking sheets for a few minutes before transferring them to a wire rack to cool completely. Make sure the cookies are completely cool before you start decorating.
- Repeat: Repeat steps 2-6 with the remaining dough. You can re-roll the scraps of dough to get the most out of your batch.
Preparing the Royal Icing
Royal icing is the key to creating those adorable (and slightly spooky) ghost faces. Don’t be intimidated! This recipe is straightforward, and with a little practice, you’ll be a royal icing pro in no time.
- Combine Dry Ingredients: In a large bowl (or the bowl of your stand mixer), whisk together the sifted powdered sugar and meringue powder. Sifting the powdered sugar is important to remove any lumps, which will ensure a smooth icing.
- Add Water: Gradually add the lukewarm water, one tablespoon at a time, mixing on low speed until the icing reaches a stiff peak consistency. You want the icing to be thick enough to hold its shape but still be pipeable. The amount of water you need may vary slightly depending on the humidity.
- Divide and Color the Icing: Divide the icing into two bowls. Leave one bowl of icing white for the base coat of the ghosts. In the other bowl, add a tiny amount of black gel food coloring and mix until you achieve a black icing. Remember, a little goes a long way with gel food coloring!
- Adjust Consistency (if needed): For flooding the cookies (the base coat), you’ll want a slightly thinner consistency. Add a few drops of water to the white icing at a time, mixing well, until it reaches a “15-second flood” consistency. This means that if you lift a spoonful of icing and let it fall back into the bowl, it should take about 15 seconds for the surface to smooth out. For the black icing, you’ll want a thicker consistency for piping the details.
- Prepare Piping Bags: Transfer the white and black icing to separate piping bags fitted with small round tips (or use ziplock bags and snip off a tiny corner).
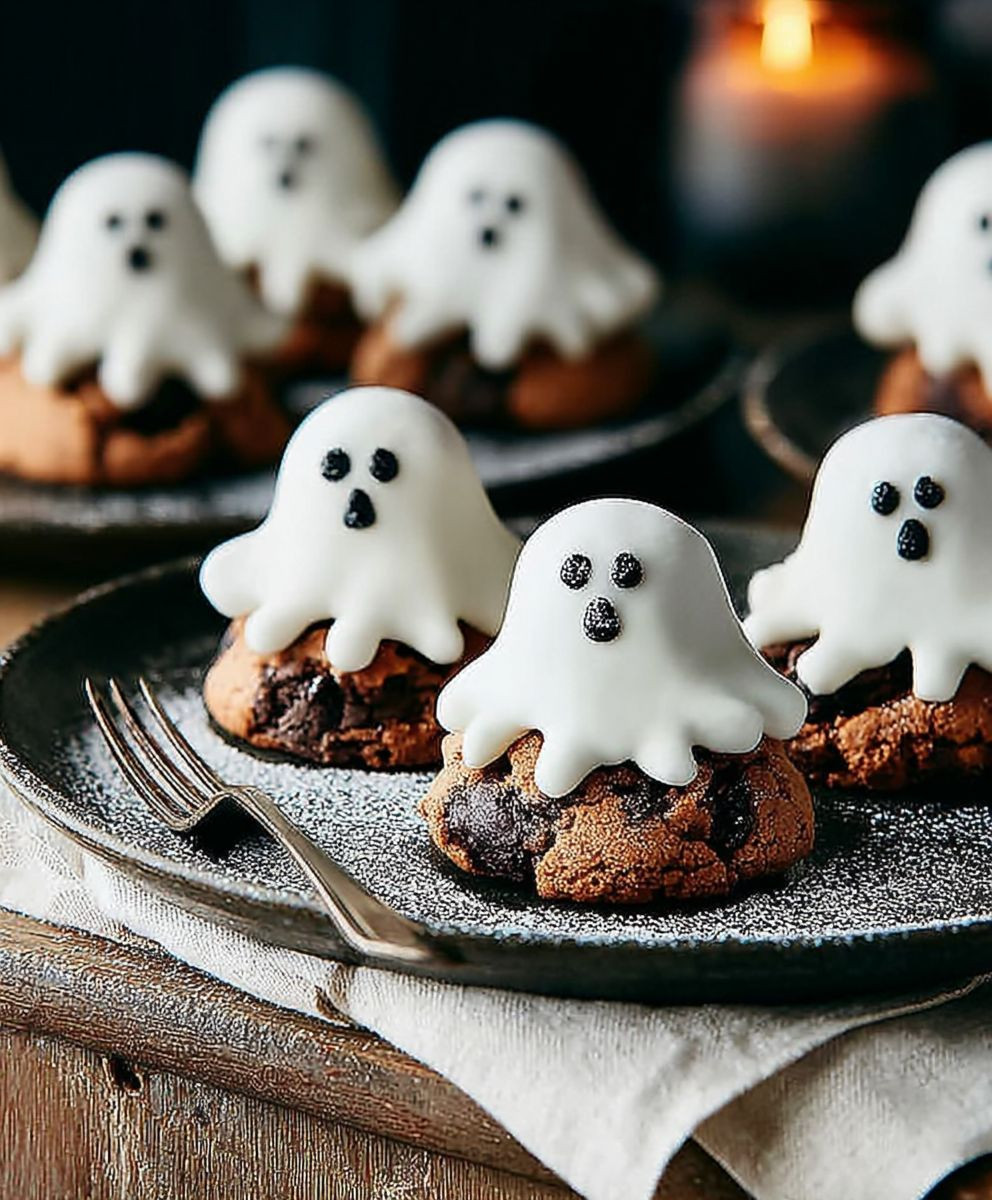
Decorating the Ghost Cookies
Here comes the most creative part! Let your imagination run wild and create some truly unique and spooky ghost cookies. Don’t be afraid to experiment with different designs and expressions.
- Flood the Cookies with White Icing: Using the white icing, outline each cookie with a thin line of icing. Then, flood the inside of the outline with the remaining white icing. Use a toothpick or scribe tool to pop any air bubbles and spread the icing evenly.
- Let the Base Coat Dry: Allow the white icing base coat to dry completely. This usually takes at least 2-3 hours, or preferably overnight. This is crucial! If you try to add details before the base coat is dry, the colors will bleed together.
- Add Black Icing Details: Once the white icing is completely dry, use the black icing to pipe on the ghost’s eyes and mouth. You can create simple round eyes or more elaborate expressions. Get creative with the mouths – some ghosts can be smiling, others can be screaming!
- Optional: Add Other Details: If you want to add even more detail, you can use other colors of icing to create accessories like hats, bows, or even little ghosts holding pumpkins.
- Let the Decorated Cookies Dry: Allow the decorated cookies to dry completely before serving or packaging. This will prevent the icing from smudging.
Tips for Success:
- Use high-quality ingredients: The better the ingredients, the better the cookies will taste.
- Don’t overmix the dough: Overmixing will result in tough cookies.
- Chill the dough thoroughly: Chilling the dough is essential for preventing spreading.
- Use gel food coloring: Gel food coloring is more concentrated than liquid food coloring, so you’ll need less of it.
- Practice your piping skills: Practice piping on a piece of parchment paper before decorating the cookies.
- Be patient: Decorating cookies takes time and patience. Don’t get discouraged if your first few cookies aren’t perfect.
- Have fun! Decorating cookies should be a fun and relaxing activity.
Storage Instructions:
Store the decorated cookies in an airtight container at room temperature for up to a week. You can also freeze the cookies for up to 2 months. To freeze, wrap the cookies individually in plastic wrap and then place them in a freezer-safe container.
Conclusion:
These Spooky Halloween Ghost Cookies are more than just a treat; they’re a delightful experience waiting to happen! From the satisfying crunch of the buttery shortbread to the playfully spooky marshmallow ghosts perched on top, every bite is a celebration of the Halloween spirit. I truly believe this recipe is a must-try this season, not just for its deliciousness, but also for the sheer joy it brings to the baking process. It’s a fantastic activity to do with kids, friends, or even just as a relaxing solo project on a crisp autumn evening.
But the fun doesn’t stop there! Feel free to get creative with your ghost designs. Use different sized marshmallows for varying ghost heights, or experiment with food coloring to give your ghosts a subtle, eerie glow. You could even add a touch of edible glitter for a shimmering, spectral effect. For a richer flavor, consider dipping the finished cookies in melted white chocolate before adding the ghosts. This will create an extra layer of sweetness and a beautiful, glossy finish.
Serving suggestions are endless! These Spooky Halloween Ghost Cookies are perfect for Halloween parties, school bake sales, or simply as a festive snack to enjoy with a warm cup of cocoa. Package them individually in cellophane bags tied with orange and black ribbon for adorable party favors. Or, arrange them on a spooky platter alongside other Halloween treats like candy corn, chocolate spiders, and pumpkin-shaped candies for a truly impressive dessert display. If you’re feeling adventurous, try crumbling the cookies over vanilla ice cream for a hauntingly delicious sundae.
And don’t be afraid to experiment with variations! If you’re not a fan of shortbread, you can easily substitute it with your favorite sugar cookie recipe. For a gluten-free option, use a gluten-free flour blend in the shortbread dough. You can also play around with the flavor of the shortbread by adding a touch of cinnamon, nutmeg, or even a hint of orange zest. Instead of marshmallows, you could use royal icing to create intricate ghost designs. The possibilities are truly endless!
I’m so excited for you to try this recipe and create your own batch of Spooky Halloween Ghost Cookies. I know you’ll have a blast baking them, and even more fun sharing them with your loved ones. Remember, baking is all about having fun and expressing your creativity, so don’t be afraid to put your own spin on things.
Once you’ve made your ghostly creations, I’d absolutely love to hear about your experience! Share your photos and stories on social media using [Your Social Media Hashtag] so I can see all the spooky masterpieces you’ve created. Let me know what variations you tried, what your favorite part of the process was, and how much everyone enjoyed them. Your feedback is invaluable, and it helps me create even better recipes in the future. Happy baking, and Happy Halloween! I hope these cookies bring a little bit of spooky sweetness to your holiday season.
Spooky Halloween Ghost Cookies: A Deliciously Spooky Treat
Spooky and delicious ghost sugar cookies, perfect for Halloween! Classic sugar cookie base topped with royal icing for a fun and festive decorating experience.
Ingredients
Instructions
Recipe Notes
- Use high-quality ingredients for the best flavor.
- Don’t overmix the dough, as this will result in tough cookies.
- Chilling the dough is essential for preventing spreading.
- Use gel food coloring for vibrant colors.
- Practice your piping skills on parchment paper before decorating the cookies.
- Be patient and have fun with the decorating process!
Leave a Comment